

Have you ever looked out your back window and felt like something was missing? We’ve all been there—staring at a patch of grass that feels more like a chore than a destination. For years, my backyard was just a place where the mower lived, but I realized that our outdoor spaces have the potential to be so much more. They are the backdrop for our summer memories, the quiet corner for our morning reflections, and the playground where our children’s imaginations run wild.
Transforming your yard into a bliss-filled oasis doesn’t require a massive renovation budget or a team of contractors. It’s about the small, intentional touches that engage our senses and connect us back to the earth. Whether you’re dreaming of a spa-like retreat or a whimsical haven for your little ones, the magic lies in the DIY details. Let’s dive into ten secrets that will turn your outdoor space into the sanctuary you’ve always deserved.
How to Create a Serene Garden Oasis for Native Birds

Why we love this
The gentle rustle of wings and the melodic morning chorus become your personal soundtrack when you welcome native birds into your sanctuary. Imagine sipping your coffee as a vibrant cardinal flits through the dense foliage of a serviceberry bush, its red feathers popping against the deep green leaves. There is something deeply grounding about watching a hummingbird hover over a tubular flower, its wings a blur of motion while the air smells of fresh earth and blooming nectar. By inviting these feathered friends, you aren’t just gardening; you’re participating in a living, breathing ecosystem that brings a sense of wild, untamed peace right to your back door.
Essential Elements:
- Native berry-producing shrubs (like Elderberry or Serviceberry).
- A tiered birdbath with a solar-powered bubbler for moving water.
- Bird-friendly nesting boxes tailored to local species.
- High-quality seed mixes and suet blocks.
- Native wildflowers (like Coneflower or Milkweed) for nectar.
How to make it
- Research your local USDA hardiness zone to identify exactly which bird species are native to your area and what plants they rely on for food and shelter.
- Design a layered landscape by planting tall canopy trees, followed by mid-sized shrubs, and finally ground-level flowers to provide multiple levels of protection and perching.
- Install a birdbath in a central location, ensuring it is level; add a solar bubbler to the center to create the sound of moving water, which is a magnet for birds from miles away.
- Secure nesting boxes to sturdy posts or trees at least 5 to 10 feet off the ground, ensuring the entrance holes face away from prevailing winds to protect hatchlings.
- Avoid all chemical pesticides; instead, allow the birds to act as your natural pest control, creating a chemical-free haven where the insects feed the birds and the birds nourish the garden.
How to Design Curb Appeal for a Welcoming Home

Why we love this
First impressions are lasting, and your home’s exterior is the handshake it offers to the world. A well-designed entryway whispers a warm welcome before you even turn the key, combining the structured beauty of architecture with the soft, organic textures of curated greenery. We love the way a freshly painted door in a bold, matte finish contrasts with the metallic gleam of new hardware, catching the golden hour light just perfectly. It’s about creating a transition from the busy outside world into your private sanctuary, making every arrival feel like a special occasion for you and your guests alike.
Essential Elements:
- High-quality exterior paint in a signature color.
- Modern or vintage-style house numbers with high visibility.
- Coordinating porch lighting fixtures (sconces or pendants).
- Symmetrical oversized planters with “thriller, filler, and spiller” plants.
- A heavy-duty, stylish doormat.
How to make it
- Begin by deep-cleaning your entryway; power wash the siding and scrub the porch floor to create a pristine canvas for your design elements.
- Choose a front door color that complements your home’s siding—warm sage, deep navy, or classic black are timeless choices—and apply at least two coats of exterior-grade semi-gloss paint using a high-density foam roller for a factory-smooth finish.
- Replace outdated lighting with fixtures that match the scale of your door; ensure you use warm-toned LED bulbs (around 2700K) to create a soft, inviting glow rather than a harsh white light.
- Flank the door with two large planters; use a tall grass or dracaena as the ‘thriller,’ colorful petunias as the ‘filler,’ and ivy or sweet potato vine as the ‘spiller’ to create a professional, lush look.
- Mount new house numbers horizontally or vertically, ensuring they are at eye level and have a high contrast against the house color so they are easily readable from the street.
How to Build Custom Garden Containers for Fresh Homegrown Herbs

Why we love this
There is an unparalleled culinary joy in stepping onto your patio and snipping fresh basil or rosemary just seconds before it hits the pan. These custom herb containers are more than just vessels; they are fragrant pillars of life that perfume the air with notes of citrus, pine, and spice whenever a breeze passes by. We love the tactile experience of the rough cedar wood against the soft, velvet leaves of sage and the bright, feathery sprigs of cilantro. These containers bring the garden to eye level, making the act of nurturing your food a central, beautiful part of your daily outdoor ritual.
Essential Elements:
- Rot-resistant cedar or redwood planks (1×6 or 1×8).
- Exterior-grade wood screws and wood glue.
- Landscape fabric to line the interior.
- High-quality organic potting mix with added perlite for drainage.
- Assorted herb starts (Mint, Thyme, Oregano, Basil).
How to make it
- Cut your cedar planks into four equal sides and a bottom piece; for a standard herb box, aim for 18 inches long by 8 inches wide to allow for adequate root growth.
- Pre-drill holes into the sides to prevent the cedar from splitting, then assemble the box using exterior screws and a bead of waterproof wood glue along the joints for extra durability.
- Drill five to six half-inch drainage holes into the bottom plank to ensure water doesn’t pool and cause root rot, which is the number one killer of container herbs.
- Staple landscape fabric to the inside walls of the box; this allows water to escape while keeping the soil and fine roots from washing out through the drainage holes.
- Fill with organic potting soil, leaving two inches at the top; plant your herbs, placing the tallest ones in the center and the trailing ones like thyme near the edges, then water thoroughly until the runoff is clear.
How to Build a Magical Backyard Haven for Creative Play

Why we love this
A child’s imagination is a wild, beautiful thing, and a dedicated play haven provides the stage for their greatest adventures to unfold. We love this concept because it moves away from plastic, neon-colored toys and embraces natural materials that blend seamlessly into your landscape. Imagine a hidden nook draped in canvas and twinkling lights, where the air smells of pine needles and the only sounds are whispers of make-believe. It’s a space that encourages dirty hands and big dreams, providing a safe, enchanting corner of the world where the rules of reality don’t quite apply.
Essential Elements:
- Natural timber frame or a large, sturdy A-frame structure.
- Weather-resistant outdoor canvas or heavy cotton drop cloths.
- Solar-powered fairy lights or outdoor lanterns.
- Soft floor coverings like outdoor rugs or a thick layer of cedar mulch.
- Natural loose parts (logs, smooth stones, pinecones) for open-ended play.
How to make it
- Select a level, shaded spot in the yard—under a large tree is ideal—to keep the area cool during summer afternoons.
- Construct a simple A-frame using pressure-treated 2x4s, ensuring the base is anchored firmly into the ground using metal stakes for safety and stability.
- Drape the frame with heavy-duty canvas, securing it with galvanized staples or upholstery tacks; leave the front open to allow for easy entry and supervision.
- Line the interior floor with a thick, 3-inch layer of playground-grade cedar mulch or a durable outdoor rug to provide a soft landing spot for active play.
- Weave solar fairy lights through the top of the frame and around the entrance; the lights will charge during the day and automatically illuminate at dusk, extending the magic into the twilight hours.
How to Style a Whimsical Play Station for Little Chefs

Why we love this
The ‘mud kitchen’ is the ultimate sensory experience, where dirt, water, and imagination combine to create the finest ‘mud pies’ in the neighborhood. We love this play station because it celebrates the beautiful messiness of childhood, encouraging kids to explore textures, volumes, and natural scents. There is a nostalgic charm in seeing old stainless steel pots and wooden spoons repurposed for a new generation of little chefs. The sound of water splashing into a metal basin and the sight of flower petals being ‘stirred’ into a concoction creates a rich, developmental environment that feels like pure, unadulterated joy.
Essential Elements:
- An upcycled wooden bench or pallet-based table.
- A removable plastic or stainless steel basin for the ‘sink.’
- Hooks for hanging old pots, pans, and ladles.
- A ‘stove top’ created with painted wood circles or slate tiles.
- Natural ‘ingredients’ like sand, pebbles, and dried flower petals.
How to make it
- Build or repurpose a wooden table to child-height (usually 20-24 inches); if using a pallet, ensure it is sanded thoroughly to remove any splinters and finished with a non-toxic outdoor sealant.
- Cut a circular or rectangular hole into the tabletop slightly smaller than the lip of your basin, then drop the basin in so it sits flush with the surface.
- Screw four circular wood discs or slate coasters onto the table surface next to the sink; paint them black to mimic the burners of a stove, giving the kids a dedicated space to ‘cook.’
- Install a row of stainless steel hooks along the backboard of the station to organize utensils; this teaches children to ‘clean up’ their kitchen after their culinary masterpieces are complete.
- Set up a nearby ‘pantry’—a small shelf filled with jars of pinecones, acorns, and pebbles—to provide the raw materials for their imaginative recipes.
How to Craft a Backyard Spa Retreat for Ultimate Relaxation
Why we love this
There is nothing quite like the feeling of stepping into a steaming outdoor cedar tub as the cool night air kisses your shoulders, creating a delicate dance of temperature and sensation. The scent of damp wood and essential oils like eucalyptus or lavender wafts through the air, instantly melting away the stresses of the modern world. Surrounded by flickering lanterns and the soft hum of the evening breeze, your backyard transforms into a high-end sanctuary where time seems to slow down and every breath feels deeper. It is a sensory escape that grounds you, turning a simple soak into a ritual of restoration and profound mental clarity.
Essential Elements:
- A cedar-cladded stock tank or a specialized cedar soaking tub.
- A water heating system (submersible wood stove or electric heater).
- Privacy screening (bamboo fencing or tall lattice panels).
- Water-safe LED mood lighting.
- A small side table for towels, tea, or candles.
How to make it
- Identify a perfectly level spot on your patio or deck that can support the significant weight of a filled tub (approximately 8 lbs per gallon plus the weight of the tub and occupants).
- If using a stock tank, clean it thoroughly and apply a waterproofing sealant to the interior seams to prevent leaks over time.
- Install your heating element; for a rustic feel, a Chofu-style wood-burning water heater is incredibly effective and adds the aroma of woodsmoke to the experience.
- Surround the tub with cedar slat panels to provide both aesthetic beauty and privacy from neighbors; ensure the wood is treated with a UV-resistant oil to maintain its rich color.
- Set the ambiance by placing weather-proof lanterns at varying heights around the retreat and adding a floating thermometer to monitor water temperature, aiming for a relaxing 102-104 degrees Fahrenheit.
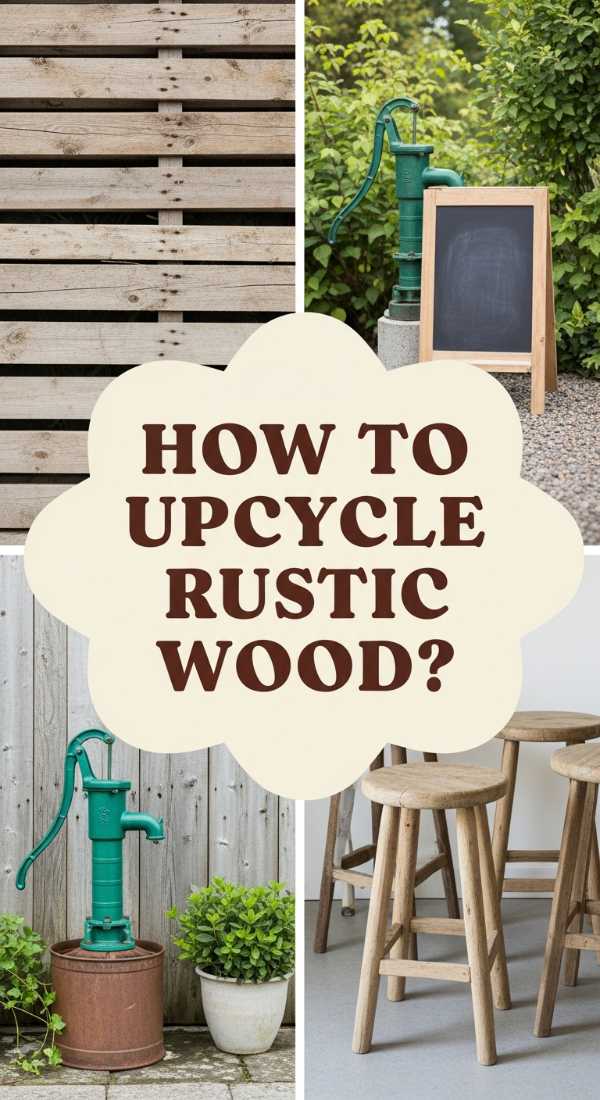
How to Upcycle Rustic Wood for Endless Summer Fun

Why we love this
Upcycling old wood into backyard games brings a soulful, vintage vibe to your outdoor gatherings that store-bought plastic simply cannot match. We love the weight of a hand-sanded wooden block in the palm of your hand and the satisfying ‘clack’ it makes when it connects with another piece of timber. These DIY projects carry the history of the wood—the knots, the grain, and the weathered patina—into your fun, making every game of Giant Jenga or Cornhole feel like a piece of functional art. It’s about slowing down and enjoying the tactile, analog side of life with friends and family under the summer sun.
Essential Elements:
- Reclaimed 2x4s or 4x4s (cleaned and dried).
- Electric sander with various grits (80, 120, 220).
- Exterior wood stain or vibrant outdoor paint.
- Heavy-duty canvas for bean bags (if making Cornhole).
- A sturdy storage crate for the finished pieces.
How to make it
- For a Giant Tumble Tower, cut 54 pieces of 2×4 wood into exactly 10.5-inch lengths; consistency is key to ensuring the tower stands straight and tall.
- Spend ample time sanding every single edge and face of the blocks; start with 80-grit to remove splinters and finish with 220-grit for a buttery-smooth feel that won’t catch during gameplay.
- If you want a themed look, paint the ends of the blocks in alternating colors or stain them in a warm walnut finish to highlight the natural wood grain.
- Apply a coat of paste wax to the surfaces of the blocks; this reduces friction and makes the sliding action much smoother as the tower gets precariously tall.
- Construct a simple storage crate from the leftover scraps, adding rope handles for easy transport from the garage to the lawn during your next BBQ.
How to Construct a Refreshing Splash Zone for Sensory Discovery
Why we love this
The sound of splashing water is the universal language of summer, and a dedicated splash zone provides a cool, sensory escape for both kids and pets. We love the way the sunlight catches the mist, creating tiny rainbows that dance across the yard while the cool water provides instant relief from the humidity. It’s a dynamic space where the textures of wet stones and the spray of a gentle fountain invite curious hands to explore and play. This isn’t just a way to stay cool; it’s a refreshing focal point that adds movement and a sense of lively energy to your outdoor oasis.
Essential Elements:
- A shallow, heavy-duty pond liner or a recessed plastic basin.
- A submersible water pump with adjustable flow.
- Polished river stones and large decorative boulders.
- Non-slip paving stones or cedar decking for the perimeter.
- Solar-powered fountain heads for various spray patterns.
How to make it
- Dig a shallow pit (about 6-8 inches deep) in a sunny area of the yard, ensuring the bottom is level and free of sharp rocks that could puncture the liner.
- Lay down the pond liner, smoothing out any large wrinkles, and secure the edges with heavy decorative boulders to create a natural, ‘creek-bed’ look.
- Place the submersible pump in the center of the basin; run the waterproof power cord through a protective PVC pipe buried just under the surface to reach your exterior outlet.
- Fill the basin with polished river stones, covering the pump and liner entirely; the stones will filter the water and provide a safe, non-slippery surface for walking and splashing.
- Fill with water and attach a ‘tulip’ or ‘bell’ fountain head to the pump; adjust the flow so the water cascades gently over the stones, creating a continuous cycle of refreshing mist and sound.
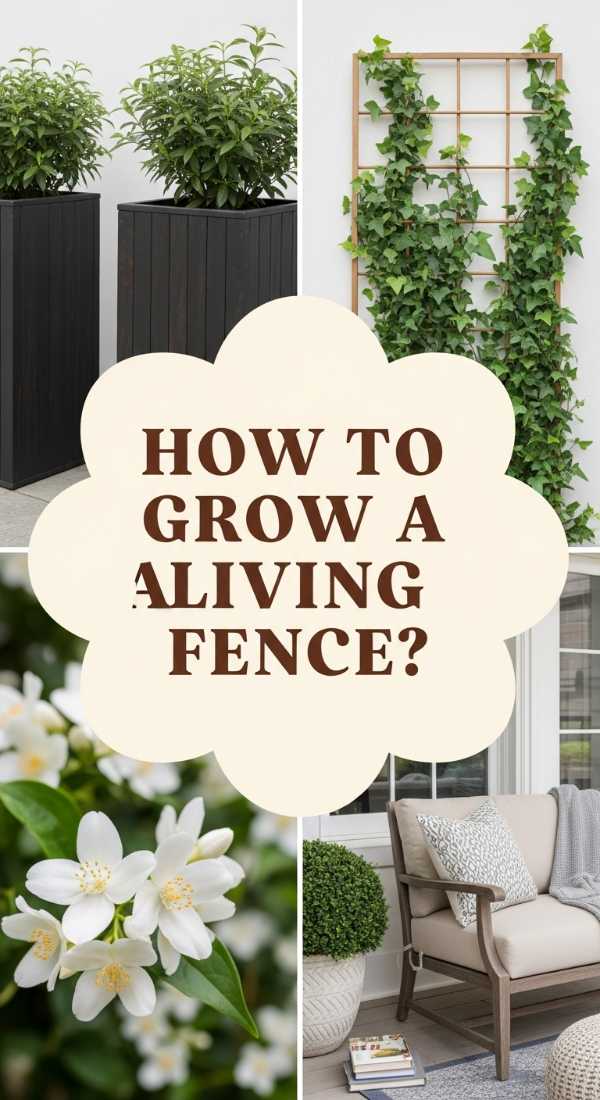
How to Grow a Living Fence for Natural Patio Seclusion

Why we love this
Traditional fences create boundaries, but a living fence creates a sanctuary that breathes and changes with the seasons. We love the way a wall of lush greenery softens the hard lines of a patio, turning a suburban backyard into a private, emerald-walled room. Imagine the scent of jasmine or honeysuckle filling the air as you lounge on your sofa, the leaves providing a soft rustle that masks distant traffic sounds. It’s a way to reclaim your privacy without feeling boxed in, replacing cold wood or metal with vibrant life that attracts butterflies and provides a cooling microclimate for your outdoor living area.
Essential Elements:
- Sturdy cedar posts and heavy-duty galvanized wire or trellis panels.
- Fast-growing evergreen climbers (like Star Jasmine) or tall shrubs (like Privet).
- Rich organic compost and slow-release fertilizer.
- Drip irrigation tubing for consistent moisture.
- Mulch to retain soil moisture and suppress weeds.
How to make it
- Install your support structure first; set 4×4 cedar posts 8 feet apart and string 12-gauge galvanized wire horizontally every 12 inches to create a sturdy climbing frame.
- Dig a trench along the base of the trellis, mixing in plenty of organic compost to provide a nutrient-rich foundation for your plants to thrive.
- Space your plants according to their mature width—usually every 2 to 3 feet for hedging shrubs—to ensure they fill in quickly without overcrowding each other.
- As the vines grow, gently ‘train’ them by weaving the new shoots through the wire or using soft garden ties to encourage upward and outward growth.
- Install a simple drip irrigation system at the base of the living fence; consistent watering is crucial during the first two years to ensure the roots grow deep enough to provide a dense, lush screen.
How to Illuminate Garden Paths for Dreamy Evening Walks
[IMAGE_10]
Why we love this
When the sun goes down, the garden takes on a completely different, almost ethereal personality, and proper lighting is the key to unlocking that nighttime magic. We love the way path lighting creates a sense of mystery and depth, guiding your footsteps through the shadows with a soft, warm radiance. The glow from low-profile lamps highlights the texture of stone paths and the delicate shapes of overhanging leaves, making the space feel expansive and intimate all at once. It’s about safety, yes, but more importantly, it’s about creating an atmosphere where you can linger longer and enjoy the cool evening air in a landscape that feels like a dreamscape.
Essential Elements:
- Low-voltage LED path lights (brass or matte black finishes).
- Outdoor transformer with a built-in timer or light sensor.
- Low-voltage burial wire (12 or 14 gauge).
- Small shovel or edger for wire trenching.
- Accent spotlights for highlighting architectural plants or trees.
How to make it
- Sketch out your path and place the light fixtures temporarily to see the spacing; aim for a ‘staggered’ look on both sides of the path rather than a straight runway to create a more natural feel.
- Use a flat-head shovel to create a shallow 3-inch deep trench along the edge of the path for the burial wire, ensuring it is tucked away from where lawnmowers or edgers might strike it.
- Connect the wire to your transformer, which should be mounted near an outdoor GFCI outlet, and use waterproof wire connectors to attach each individual light fixture to the main line.
- Push the stakes of the path lights into the ground, ensuring they are vertical; angle the heads slightly downward to minimize glare and keep the light focused on the walking surface.
- Set the transformer’s timer to turn on at dusk and off at midnight, ensuring your garden is always illuminated when you need it most while conserving energy during the late-night hours.
Creating Your Forever Oasis
The journey from a plain backyard to a blissful oasis is one of the most rewarding DIY projects you can undertake. By focusing on sensory details—the sound of birds, the scent of fresh herbs, the warmth of evening lights—you create a space that nourishes your soul every time you step outside. Remember, your garden is a living thing, and it will evolve alongside you. Don’t feel pressured to do everything at once; choose one project that speaks to you today and let the magic grow from there. Your ultimate outdoor retreat is just a few DIY steps away!