
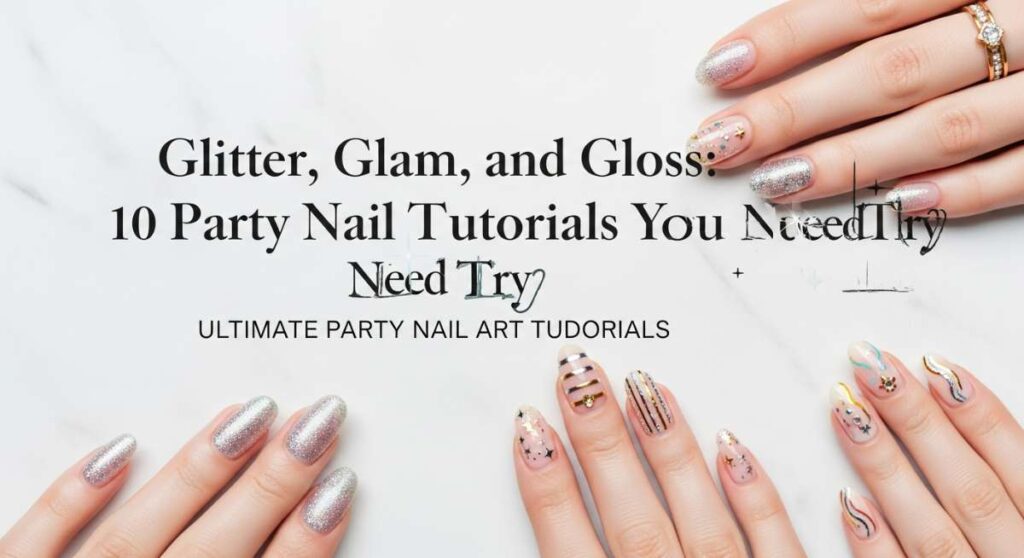
Glitter, Glam, and Gloss: 10 Party Nail Tutorials You Need to Try
Hello my beautiful loves! There is something so incredibly magical about that moment when you look down at your hands and see a tiny masterpiece reflecting exactly how you feel. Whether you’re getting ready for a night of dancing or a cozy tea party with your best friends, your nails are like the finishing touch on a love letter to yourself. I truly believe that self-care starts at our fingertips, and taking the time to paint something beautiful is such a sweet, meditative way to embrace your inner glow.
I’ve gathered my absolute favorite party looks that I’ve been wearing on repeat lately. From soft, romantic florals to high-shine celestial vibes, these tutorials are designed to be a cloud-soft embrace for your creative soul. Grab a cup of lavender tea, put on your favorite playlist, and let’s dive into these dreamy designs together. You deserve to sparkle from head to toe, my darlings!
Floral Tea Party Nails

Why to love these Nails:
These nails are like a soft spring morning captured on your fingertips. They bring a touch of vintage charm and feminine grace to any outfit, making you feel like you’re walking through a sun-drenched garden even if you’re just sipping tea in your kitchen.
Essential Items:
- Pastel pink base polish
- White and yellow acrylic paint or polish
- Fine dotting tool
- Glossy top coat
How to Prepare:
- Apply two thin coats of pastel pink polish and let dry completely.
- Using a dotting tool, place five small white dots in a circle to create petals.
- Add a tiny yellow dot in the center of each flower.
- Repeat across the nail in a scattered pattern.
- Seal with a glossy top coat for that porcelain finish.
Budget Range
- Essie ‘S’il Vous Play’ – $10
- Dotting Tool Set – $5
- Sally Hansen Top Coat – $7
Glam Bachelorette Nails
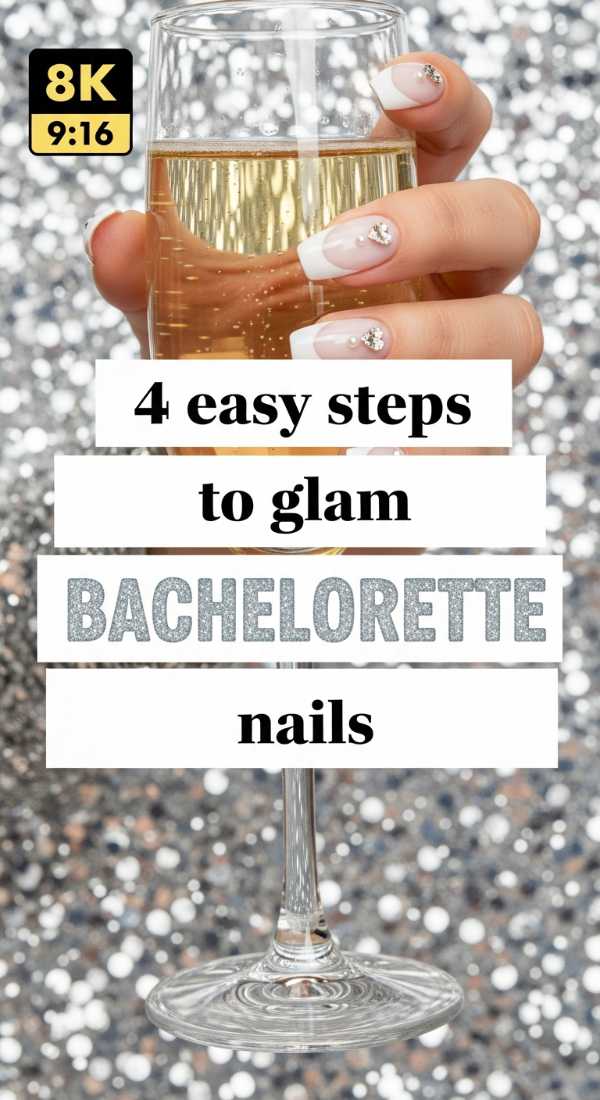
Why to love these Nails:
When it’s time to celebrate a bride-to-be, you need nails that shout joy! This look combines high-octane glitter with a sophisticated pink that says you’re ready to dance the night away and make memories that last a lifetime.
Essential Items:
- Hot pink or champagne polish
- Chunky silver glitter polish
- Nail sponges
- Fast-dry top coat
How to Prepare:
- Paint all nails with your chosen base color.
- Apply silver glitter to the edge of a makeup sponge.
- Dab the sponge onto the tips of your nails for a gradient effect.
- Finish with a thick layer of top coat to smooth out the glitter.
Budget Range
- OPI ‘Big Apple Red’ – $11
- Holo Taco Glitter Polish – $13
- Makeup Sponges – $3
Matte Party Nails
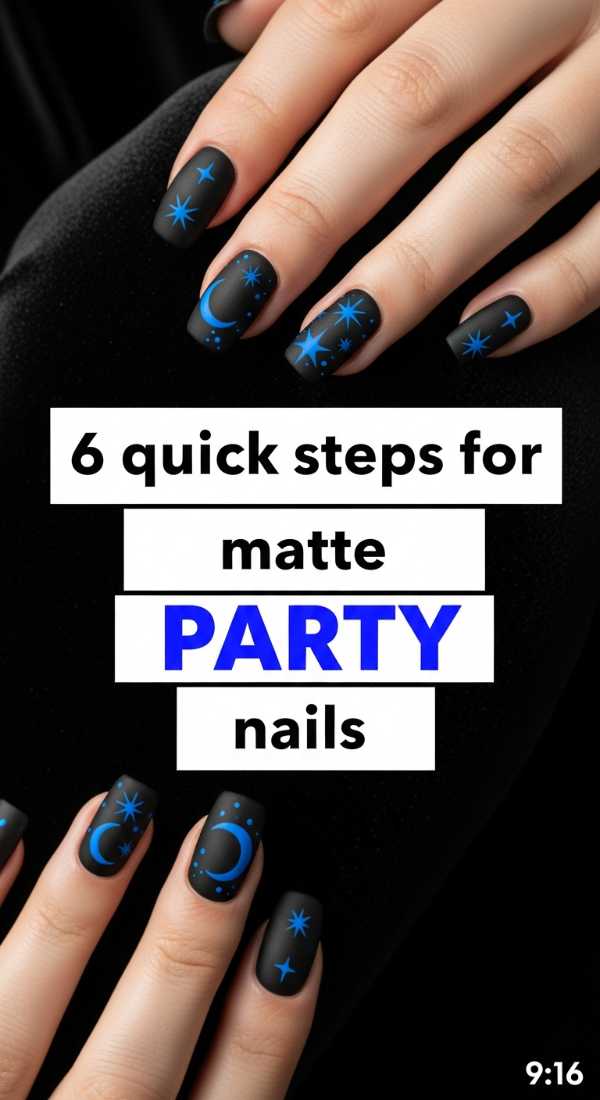
Why to love these Nails:
There is something so modern and chic about a matte finish. It transforms any standard color into a velvet-soft statement piece that looks incredibly expensive and sophisticated, perfect for an upscale gallery opening or a dinner party.
Essential Items:
- Deep plum or navy polish
- Matte top coat
- Nail file
How to Prepare:
- Shape your nails into a clean almond or square shape.
- Apply two coats of your deep plum polish.
- Wait for the color to be about 80% dry.
- Apply an even layer of matte top coat.
- Avoid touching them for 10 minutes to ensure the velvet texture sets perfectly.
- Massage cuticle oil around the edges for a professional look.
Budget Range
- Zoya Professional Lacquer – $12
- Revlon Matte Top Coat – $6
- Cuccio Cuticle Oil – $9
Pearl Accent Nails

Why to love these Nails:
Pearls are the ultimate symbol of timeless elegance. Adding these delicate accents to your manicure creates a 3D effect that is both tactile and stunningly beautiful, giving off a ‘mermaid-core’ or ‘coquette’ vibe that is so on-trend right now.
Essential Items:
- Sheer ‘milky’ white polish
- Flat-back nail pearls
- Nail glue or clear gel
How to Prepare:
- Apply two coats of milky white polish for a translucent base.
- Place a small dot of nail glue where you want the pearl to sit.
- Using a wax pencil or tweezers, gently press the pearl into the glue and hold for 5 seconds.
Budget Range
- Funny Bunny by OPI – $11
- Mixed Size Nail Pearls – $4
- Nailene Quick Dry Glue – $5
3D Bow Nails
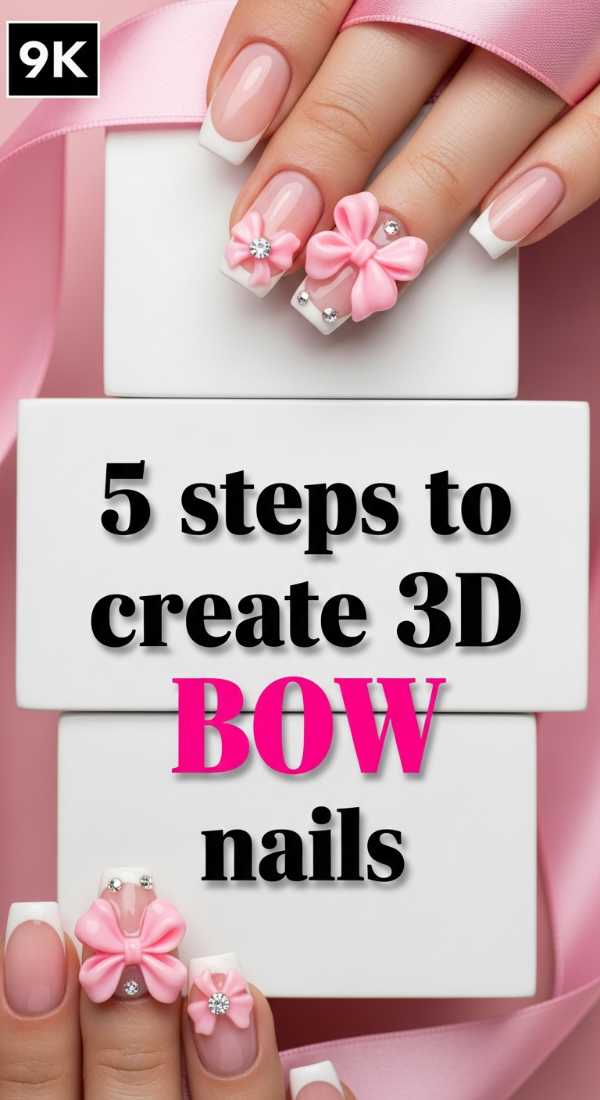
Why to love these Nails:
Bows are the sweetheart of the fashion world right now. These 3D accents add a playful, doll-like charm to your look that is impossible not to smile at every time you check your phone or grab your purse.
Essential Items:
- Nude base polish
- Pre-made 3D resin bows
- Strong nail adhesive
How to Prepare:
- Start with a clean, nude manicure as your canvas.
- Select a bow that fits the width of your ring finger.
- Apply a generous bead of adhesive to the back of the bow.
- Position it near the cuticle or right in the center of the nail.
- Cure under a lamp or hold firmly until set.
Budget Range
- Essie ‘Ballet Slippers’ – $10
- Resin Bow Charms (50pc) – $6
- Makartt Nail Glue – $8
Cherry Party Nails
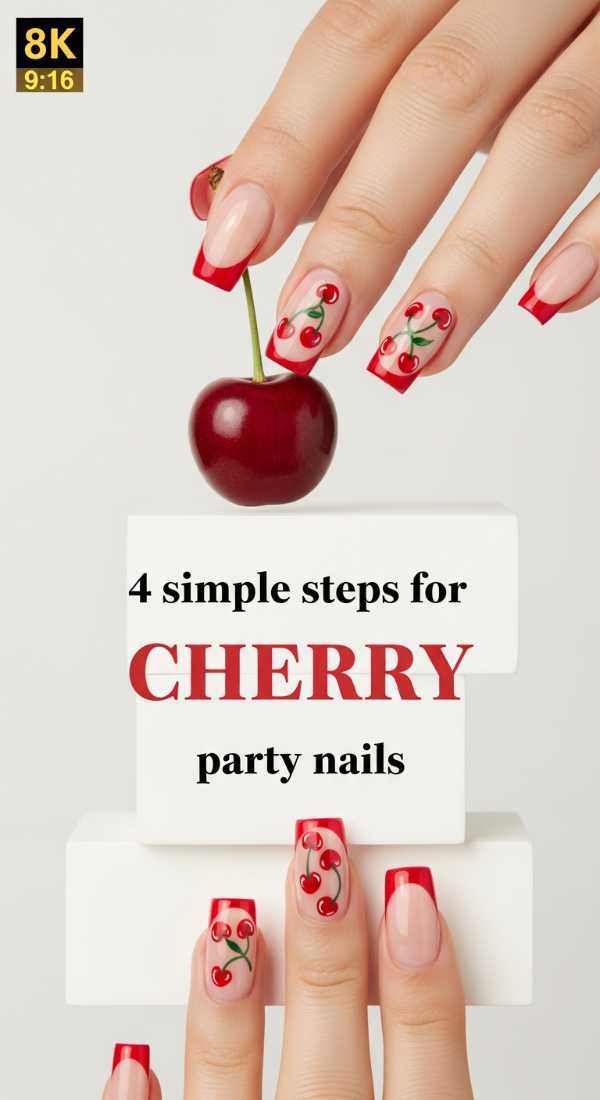
Why to love these Nails:
Cherry nails are the epitome of retro-cool fun! They add a pop of juicy color and a bit of a rockabilly edge to your party style. It’s a design that feels youthful, energetic, and oh-so-sweet.
Essential Items:
- Cherry red polish
- Forest green polish
- Dotting tool
How to Prepare:
- Paint your base in a light cream or clear.
- Dot two red circles close together to form the cherries.
- Use a very thin brush to draw a tiny ‘V’ shape in green for the stems.
- Add a tiny white ‘highlight’ dot on each cherry for a 3D effect.
Budget Range
- China Glaze ‘Red-y & Willing’ – $8
- Fine Detail Brush – $4
- Orly Bonder Base – $10
Vintage Rose Nails
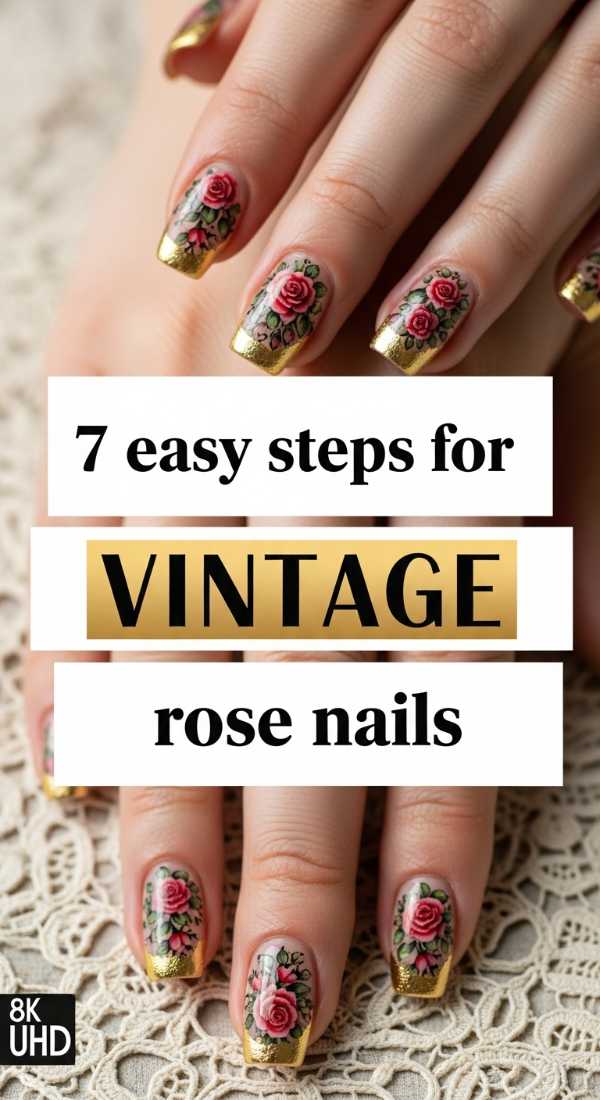
Why to love these Nails:
These nails feel like a page out of a Victorian diary. The layered colors create a depth that looks like a hand-painted oil painting, offering a romantic and moody aesthetic for your next evening soirée.
Essential Items:
- Dusty rose polish
- Muted green polish
- Cream polish
How to Prepare:
- Apply the dusty rose as your base.
- Dab a bit of cream polish in a messy circle.
- Swirl a darker pink into the cream while wet to create petal depth.
- Add two small green leaves using a toothpick.
- Repeat on two accent nails.
- Let dry for at least 15 minutes.
- Finish with a high-shine top coat.
Budget Range
- ILNP Boutique Polish – $12
- Toothpick/Detail set – $2
- Seche Vite Top Coat – $9
Bridal Glow Nails
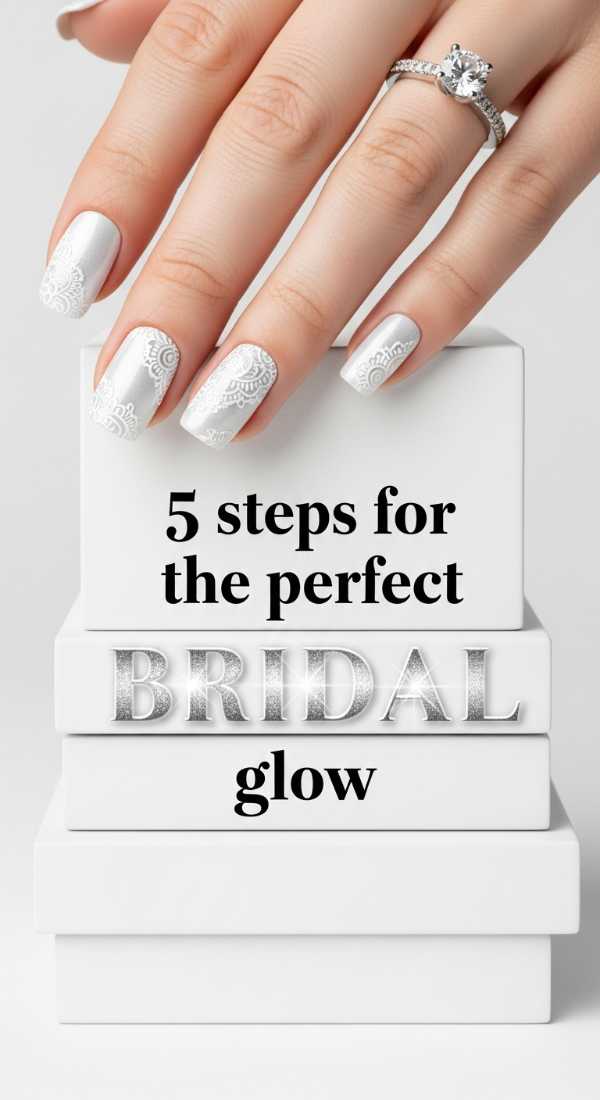
Why to love these Nails:
Even if you aren’t the bride, this ‘glow from within’ look is perfect for any formal occasion. It emphasizes healthy, clean nails with a hint of ethereal shimmer that catches the light beautifully when you move.
Essential Items:
- Iridescent topper
- Sheer peach polish
- Buffing block
How to Prepare:
- Buff the nail surface until it is perfectly smooth.
- Apply one coat of sheer peach polish.
- Layer one coat of iridescent shimmer over the top.
- Clean up the edges with a brush dipped in acetone.
- Apply cuticle cream for a hydrated, healthy glow.
Budget Range
- Cirque Colors Shimmer – $14
- Buffer Block – $2
- Lush Lemony Flutter – $12
Celestial Velvet Nails
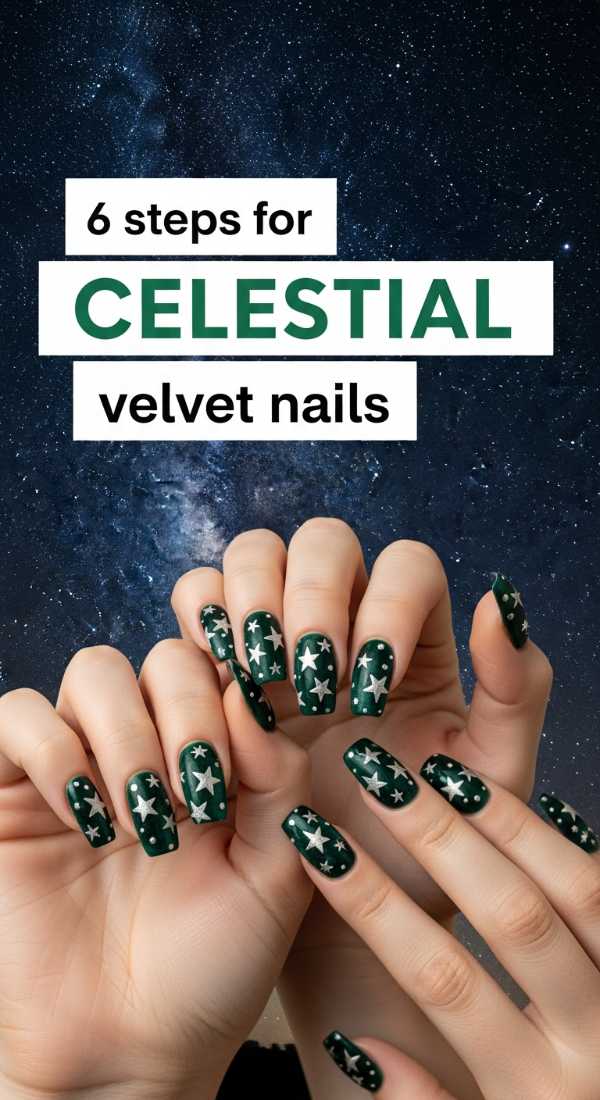
Why to love these Nails:
Channel the mystery of the night sky with these velvet-effect nails. Using magnetic polish creates a shifting, 3D movement that looks like a nebula trapped on your fingertips—truly out of this world!
Essential Items:
- Magnetic ‘cat eye’ polish
- Strong nail magnet
- Black base polish
How to Prepare:
- Apply a black base coat to make the colors pop.
- Apply one thick coat of magnetic polish.
- Immediately hold the magnet 1/4 inch away from the nail for 10 seconds.
- Watch the ‘velvet’ line form.
- Repeat for every finger individually.
- Seal with a glossy top coat.
Budget Range
- KBShimmer Magnetic Polish – $12
- Nail Magnet – $3
- Black Onyx by OPI – $11
Butterfly Party Nails
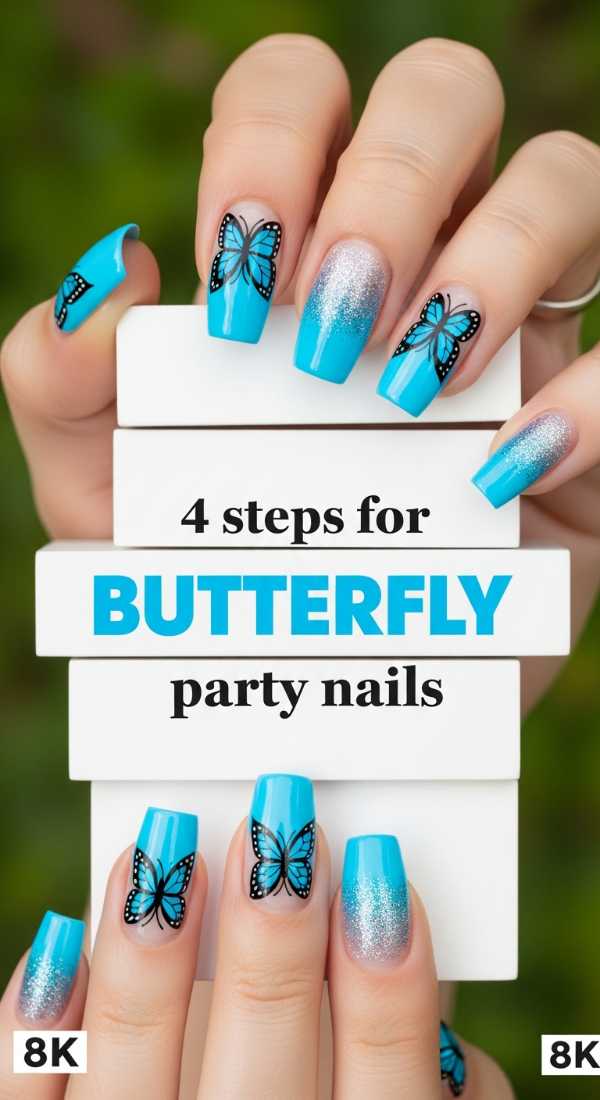
Why to love these Nails:
Butterflies represent transformation and beauty, making them the perfect symbol for a celebratory night out. This whimsical look adds a touch of magic and flight to your hands, keeping the vibe light and airy.
Essential Items:
- Butterfly nail decals or stickers
- Lavender polish
- Tweezers
How to Prepare:
- Paint nails with a soft lavender shade.
- Peel the butterfly decal carefully with tweezers.
- Press firmly onto the center of the nail.
- Seal with two coats of top coat to ensure the edges don’t lift.
Budget Range
- Essie ‘Play Date’ – $10
- Butterfly Decal Pack – $5
- Precision Tweezers – $6
Sparkle Bright, My Loves!
I hope these tutorials inspire you to take a little time for yourself this week. There is so much beauty in the small details, and your nails are a wonderful way to express the light you carry inside. Whether you choose the vintage roses or the celestial velvet, remember that you are the artist of your own life. Don’t be afraid to experiment, get a little messy, and most importantly, have fun! I can’t wait to see which look you choose for your next big event. Tag me in your photos—I’ll be sending you so much love and sparkle!