
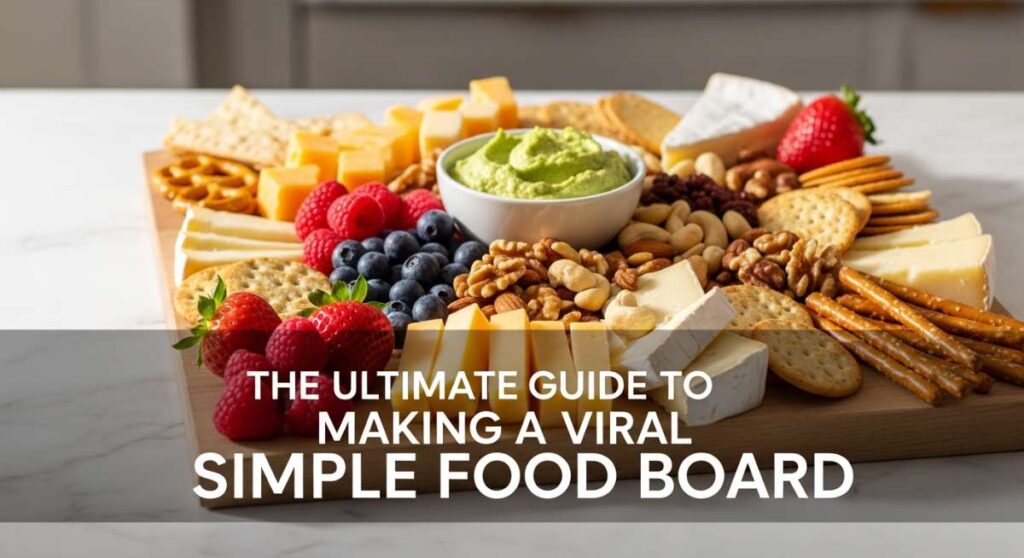
The Ultimate Guide to Making a Viral Simple Food Board
There is something undeniably magical about a gathering where the food isn’t just a meal, but a centerpiece of connection. We’ve all seen those stunning food boards scrolling through our feeds—the ones that look almost too beautiful to eat, yet you can’t help but reach for a bite. My journey into the world of food boards started on a rainy Sunday afternoon when I realized that the best memories aren’t made over stiff three-course dinners, but over shared platters that invite everyone to linger, talk, and snack at their own pace.
Creating a viral-worthy food board isn’t about being a professional chef; it’s about the harmony of textures, the pop of colors, and that ‘wow’ factor that makes your guests reach for their phones before their forks. It’s about the sizzle of garlic shrimp, the golden glow of turmeric cauliflower, and the irresistible pull of a cheesy potato bomb. Today, I’m sharing the ultimate secrets to building a board that will have your friends tagging you in every post. Let’s dive into the recipes that turn a simple board into a viral sensation.
How to get that signature crunch on crispy chicken wings?

Why we love this
There is a primitive joy in biting into a perfectly rendered chicken wing where the skin shatters like glass, revealing the succulent, steaming meat beneath. The aroma of toasted spices and rendered fat fills the kitchen, promising a savory experience that is both comforting and exhilarating. These wings are the backbone of any great food board because they provide that essential protein hit with a textural contrast that keeps everyone coming back for more. When you hit that perfect level of crispiness, the sauce clings to every nook and cranny without making the wing soggy, creating a symphony of flavor in every single bite.
Ingredients
- 2 lbs chicken wings (flats and drumettes)
- 1 tbsp baking powder (aluminum-free)
- 1 tsp kosher salt
- 1/2 tsp black pepper
- 1/2 tsp garlic powder
- Optional: Buffalo or BBQ sauce for dipping
How to make it
- Pat the chicken wings extremely dry with paper towels. Any moisture left on the skin will create steam, which prevents the skin from crisping up in the oven.
- In a large bowl, toss the wings with baking powder, salt, pepper, and garlic powder. The baking powder raises the pH level of the skin, allowing the proteins to break down and the skin to blister and crisp more effectively.
- Arrange the wings on a wire rack set over a rimmed baking sheet. This allows hot air to circulate around the entire wing, ensuring the bottom is just as crunchy as the top.
- Preheat your oven to 250°F (120°C) and bake for 30 minutes. This low-temperature phase renders out the fat slowly without burning the skin.
- Increase the oven temperature to 425°F (220°C) and bake for an additional 40-50 minutes. You are looking for a deep golden-brown color and a skin that feels firm and hollow when tapped with a fork.
- Remove from the oven and let them rest for 5 minutes before serving to allow the juices to redistribute, ensuring every bite is moist.
How to make cauliflower look like edible gold with turmeric?

Why we love this
Turmeric cauliflower is the hidden gem of a viral food board, bringing an earthy warmth and a stunning visual pop that mimics the glow of a summer sunset. The cauliflower florets transform from humble white vegetables into tender, caramelized nuggets with charred, smoky edges that provide a delightful bitterness to balance the spice. As you roast them, the scent of turmeric and cumin wafts through the air, creating an inviting, aromatic atmosphere that draws people to the table. It’s a light, healthy addition that feels decadent thanks to its velvety interior and the complex depth of flavor provided by the golden spice rub.
Ingredients
- 1 head of cauliflower, cut into bite-sized florets
- 3 tbsp olive oil
- 1 tsp ground turmeric
- 1/2 tsp ground cumin
- 1/2 tsp smoked paprika
- Salt and pepper to taste
- Fresh parsley for garnish
How to make it
- Preheat your oven to 400°F (200°C) and line a large baking sheet with parchment paper to prevent sticking and staining from the turmeric.
- In a large mixing bowl, whisk together the olive oil, turmeric, cumin, smoked paprika, salt, and pepper until it forms a vibrant orange paste.
- Add the cauliflower florets to the bowl and use your hands or a spatula to toss them thoroughly. Ensure every crevice of the floret is coated in the golden oil mixture for even coloring.
- Spread the florets in a single layer on the baking sheet. Do not overcrowd the pan; if the florets are too close, they will steam instead of roasting and browning.
- Roast for 25-30 minutes, tossing the cauliflower halfway through the cooking time. Look for the edges to turn a dark brown or black—this charring is where the best flavor lives.
- Test for doneness by piercing a stem with a knife; it should slide in with zero resistance while the tops remain slightly crisp.
How to get the ultimate cheese pull with potato bombs?
Why we love this
The cheesy potato bomb is the ultimate crowd-pleaser, offering a theatrical moment of stretchy, melted goodness that is practically made for social media. Imagine a golden-brown, crispy exterior that gives way to a cloud-like mash of seasoned potatoes, only to reveal a molten core of mozzarella that stretches endlessly. The contrast between the salty, crunchy crust and the mild, gooey center is addictive, while the aroma of fried potato and melted cheese is universally irresistible. It’s a warm, heavy-hitter on the board that provides a sense of indulgence and playful fun, making every guest want to grab one and see who can get the longest cheese pull.
Ingredients
- 2 cups cold mashed potatoes (stiff consistency)
- 1/2 cup shredded cheddar cheese
- 10 small cubes of mozzarella cheese
- 1/2 cup all-purpose flour
- 2 eggs, beaten
- 1 cup Panko breadcrumbs
- Oil for frying
How to make it
- Start with cold, seasoned mashed potatoes. If the potatoes are warm, they will fall apart during the frying process. Mix the shredded cheddar into the cold mash.
- Take a small handful of the potato mixture and flatten it in your palm. Place a mozzarella cube in the center and fold the potato around it, rolling it into a smooth ball about the size of a golf ball. Ensure there are no cracks where the cheese could leak out.
- Set up a dredging station: one bowl with flour, one with beaten eggs, and one with Panko breadcrumbs.
- Roll each potato ball in flour, then dip in the egg wash, and finally coat thoroughly in Panko, pressing the crumbs gently so they adhere well.
- Heat about 2 inches of oil in a heavy skillet to 350°F (175°C). Use a thermometer to ensure the oil is hot enough; if it’s too cool, the balls will absorb grease and become heavy.
- Fry the balls in batches for 3-4 minutes, turning frequently, until they are an even deep golden brown. Drain on a wire rack to keep the bottom from getting soggy.
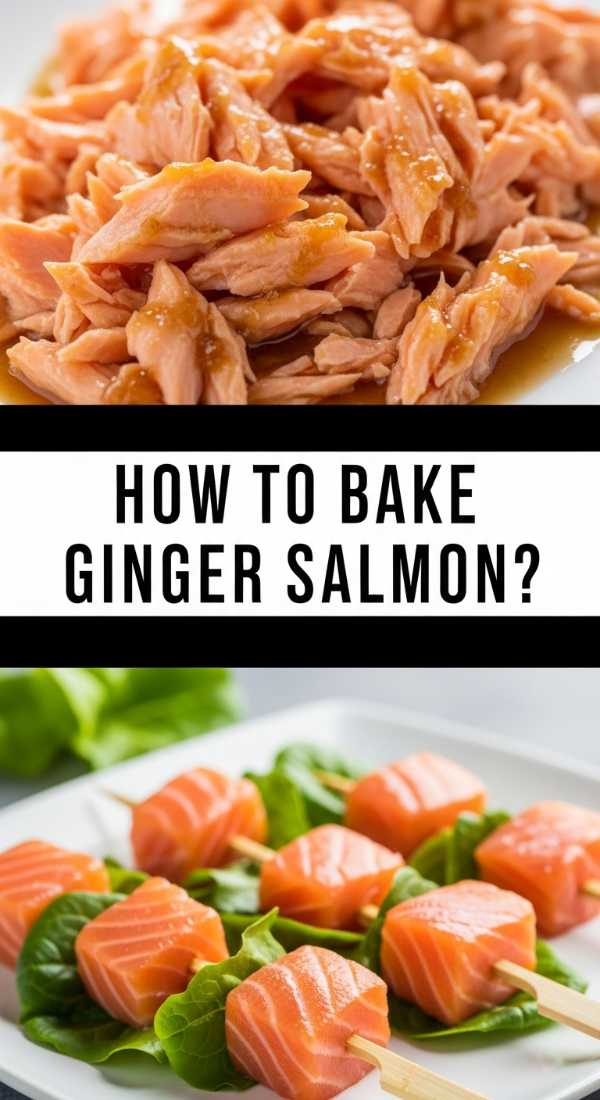
How to glaze ginger salmon skewers for a sticky, sweet finish?

Why we love this
Salmon skewers bring an element of elegance and brightness to the board, offering a fresh, flaky texture that breaks up the heavier fried elements. The glaze is a masterpiece of balance—the sharp, zesty bite of fresh ginger meets the salty depth of soy sauce and the caramelized sweetness of honey. As the salmon chars on the grill or pan, the sugars in the glaze thicken into a sticky, lacquered coating that glistens beautifully under the light. Every bite offers a burst of umami followed by the clean, buttery melt of high-quality fish, making these skewers a sophisticated favorite for any food enthusiast.
Ingredients
- 1 lb salmon fillet, cut into 1-inch cubes
- 2 tbsp soy sauce
- 1 tbsp honey
- 1 tsp freshly grated ginger
- 1 clove garlic, minced
- 1 tsp sesame oil
- Wooden skewers (soaked in water for 30 minutes)
How to make it
- In a small bowl, whisk together the soy sauce, honey, grated ginger, minced garlic, and sesame oil to create the marinade and glaze.
- Thread the salmon cubes onto the soaked skewers, leaving a little space between each piece to ensure the heat can reach all sides of the fish.
- Brush the skewers generously with about half of the glaze. Let them sit for 10 minutes at room temperature to absorb the flavors.
- Heat a non-stick grill pan or skillet over medium-high heat. Lightly oil the surface to prevent the delicate fish skin/flesh from tearing.
- Place the skewers on the hot pan. Sear for 2-3 minutes per side. As you flip them, brush more of the remaining glaze onto the cooked sides.
- The salmon is done when it is opaque on the outside but still slightly translucent in the very center, and the glaze has bubbled into a dark, sticky coating. Be careful not to overcook, as salmon can become dry quickly.
How to ensure your potato wedges stay crunchy and not soggy?
Why we love this
Potato wedges are the rugged, rustic cousins of the French fry, offering a substantial bite that is intensely satisfying. We love them for their thick, fluffy interiors that contrast perfectly against a heavily seasoned, rugged crust that holds its shape even when dipped into thick sauces. There’s a distinct earthy aroma of roasted potato and dried herbs like rosemary and thyme that makes these wedges feel like a true gourmet treat. They are the perfect vessel for various dips, providing a hearty, starchy base that anchors the more delicate flavors on your food board with a comforting, salt-of-the-earth presence.
Ingredients
- 3 large Russet potatoes
- 3 tbsp vegetable oil
- 1 tsp garlic powder
- 1 tsp onion powder
- 1 tsp dried oregano
- 1/2 tsp paprika
- Salt and pepper to taste
How to make it
- Scrub the potatoes clean but leave the skins on; the skin provides essential structural integrity and extra crunch. Cut each potato into 8 equal-sized wedges.
- Place the wedges in a bowl of ice-cold water for at least 30 minutes. This step is crucial as it removes excess starch from the surface, which is the primary cause of limp, soggy fries.
- Drain the wedges and pat them thoroughly dry with a clean kitchen towel. Even a tiny bit of water will create steam in the oven.
- Toss the dry wedges with oil and all the spices in a large bowl until every surface is coated.
- Place the wedges on a baking sheet, ensuring they are standing up on their skin side or lying flat without touching each other.
- Bake at 425°F (220°C) for 35-45 minutes. Halfway through, flip the wedges to a different side to ensure even browning. The wedges are ready when the edges are dark brown and the centers feel light and airy.
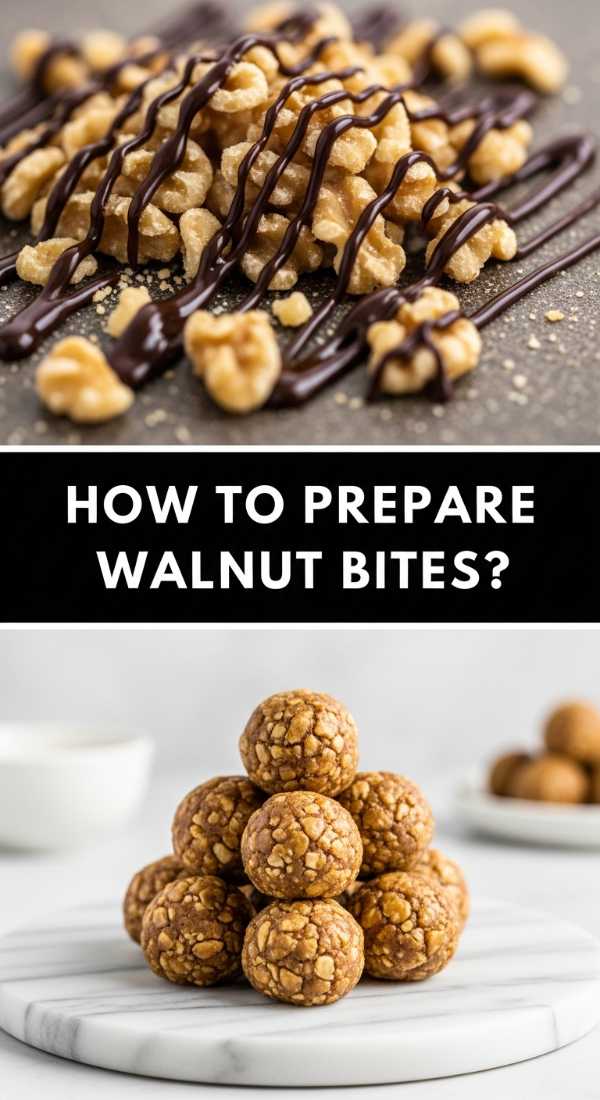
How to roll the perfect walnut energy bites for a sweet finish?
Why we love this
Walnut energy bites are the perfect “palate cleanser” for a savory food board, offering a natural sweetness and a dense, chewy texture that satisfies the sweet tooth without being overwhelming. The rich, buttery flavor of toasted walnuts pairs beautifully with the caramel notes of Medjool dates, creating a fudge-like consistency that feels like a treat. These little gems are packed with healthy fats and fiber, providing a lingering nutty aroma and a satisfying bite that rounds out the board’s flavor profile. They look like artisanal truffles, adding a touch of sophistication and a different shape to the overall presentation.
Ingredients
- 1 cup raw walnuts
- 1 cup Medjool dates, pitted
- 2 tbsp cocoa powder
- 1/4 tsp sea salt
- 1/2 tsp vanilla extract
- Optional: Shredded coconut or extra crushed walnuts for rolling
How to make it
- Place the walnuts in a food processor and pulse until they are finely ground into a coarse meal. Be careful not to over-process, or you will end up with walnut butter.
- Add the pitted Medjool dates, cocoa powder, sea salt, and vanilla extract. If your dates are a bit dry, soak them in warm water for 10 minutes and then drain them before adding.
- Process the mixture on high until it forms a sticky dough that clumps together into a ball around the blade. This usually takes about 1-2 minutes.
- Scoop out a tablespoon of the mixture and roll it between your palms to form a smooth, tight ball. The heat from your hands will help the natural oils bind the bite together.
- If using toppings, immediately roll the ball in shredded coconut or crushed walnuts while the surface is still slightly tacky so they stick well.
- Refrigerate the bites for at least 30 minutes before serving. This firms up the texture and makes them much easier to handle on the board.
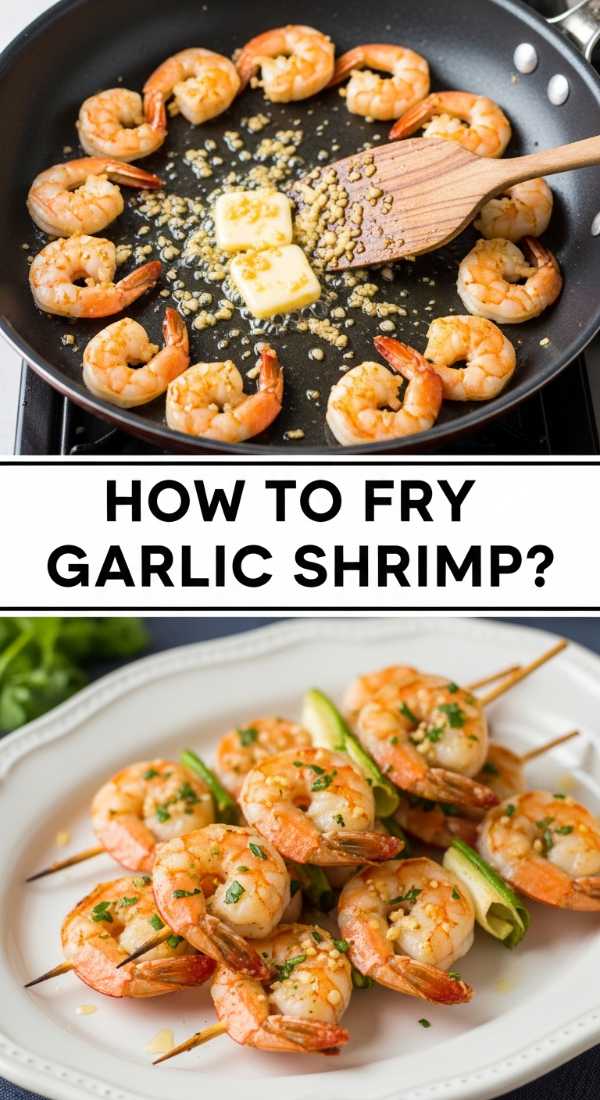
How to sear garlic butter shrimp without overcooking them?

Why we love this
Garlic butter shrimp are the ultimate luxury addition to any board, offering a succulent, snappy texture and a rich, decadent flavor that commands attention. The aroma of sizzling butter infused with pungent garlic and a splash of lemon is enough to make anyone’s mouth water instantly. These shrimp provide a beautiful pink hue to the board and a delicate sweetness that is perfectly complemented by the savory, silken sauce. They are light enough to snack on but feel incredibly indulgent, making them the first thing people reach for when the board is set down.
Ingredients
- 1 lb large shrimp, peeled and deveined
- 3 tbsp unsalted butter
- 4 cloves garlic, minced
- 1/2 tsp red pepper flakes
- 2 tbsp fresh lemon juice
- Fresh parsley, chopped
- Salt to taste
How to make it
- Pat the shrimp dry with paper towels. Dry shrimp sear beautifully, while wet shrimp will simply boil in the pan and turn rubbery.
- Heat a large skillet over medium-high heat. Add the butter and wait until it stops foaming and starts to turn a very light brown.
- Add the shrimp in a single, even layer. Do not crowd the pan; if necessary, cook in two batches. Let them sear undisturbed for 2 minutes until the bottom side turns pink and opaque.
- Flip the shrimp and immediately add the minced garlic and red pepper flakes. Garlic burns quickly, so adding it halfway through ensures it flavors the butter without becoming bitter.
- Cook for another 1-2 minutes. As soon as the shrimp curl into a ‘C’ shape (not a tight ‘O’), they are done. Add the lemon juice and toss to coat.
- Remove from heat immediately. The residual heat of the pan will continue to cook them, so getting them out of the pan and onto the board quickly is key to maintaining that perfect ‘snap’.
How to caramelize roasted sweet potato edges perfectly?
Why we love this
Roasted sweet potatoes bring a vibrant orange color and a soft, velvety texture that feels like a warm hug in food form. When roasted correctly, the natural sugars in the potato migrate to the edges and caramelize, creating sweet, sticky, and slightly charred corners that are reminiscent of candy. The interior remains creamy and mild, providing a wonderful base for salty toppings or spicy dips. They add a wholesome, rustic charm to the board and offer a different kind of sweetness that bridges the gap between the savory meats and the fresh vegetables.
Ingredients
- 2 large sweet potatoes, peeled and cubed
- 2 tbsp olive oil
- 1 tsp ground cinnamon
- 1/2 tsp smoked paprika
- 1 tbsp maple syrup (optional)
- Salt to taste
How to make it
- Cut the sweet potatoes into uniform 1-inch cubes. Uniformity is the secret to ensuring that every piece finishes cooking at the exact same time.
- In a bowl, toss the cubes with olive oil, salt, cinnamon, and paprika. The cinnamon enhances the natural sweetness, while the paprika adds a subtle smoky depth.
- Spread the cubes on a parchment-lined baking sheet. Space them out so that the hot air can circulate around each cube to create those coveted caramelized edges.
- Roast at 400°F (200°C) for 25-30 minutes. Every 10 minutes, use a spatula to flip and move the cubes around the pan.
- For an extra viral “glaze,” drizzle the maple syrup over the potatoes in the last 5 minutes of roasting. This will bubble up and create a shiny, sticky coating.
- The sweet potatoes are done when they are tender to a fork’s touch and the edges look dark orange and slightly shriveled.
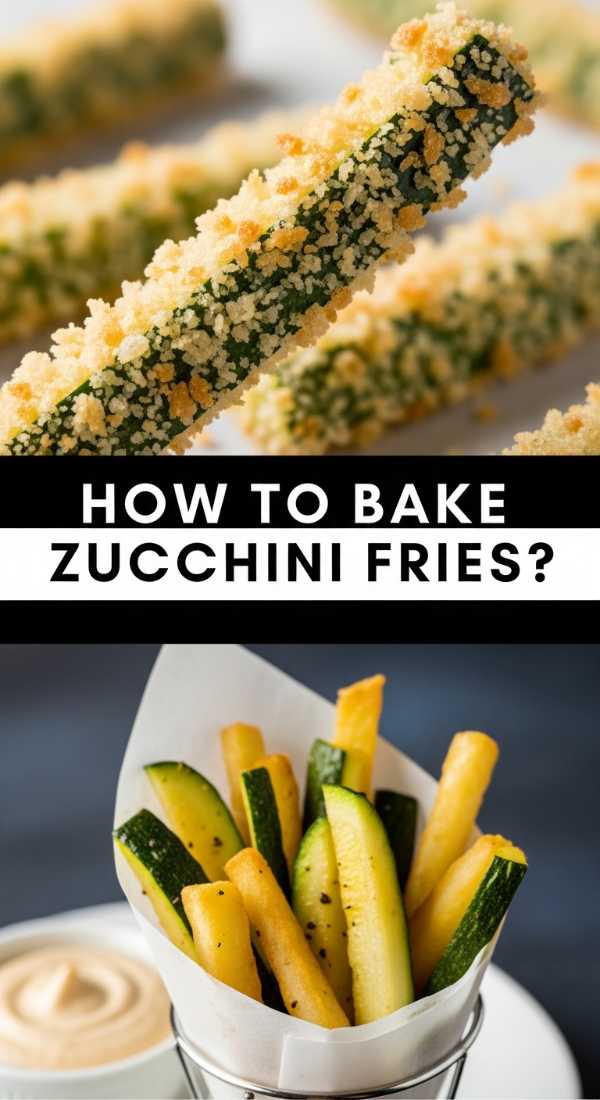
How to bread zucchini fries so they stay crispy?
Why we love this
Zucchini fries are the lighter, brighter alternative to traditional fries, offering a refreshing burst of moisture encased in a salty, parmesan-crusted shell. We love the way the mild flavor of the zucchini allows the herbs and cheese in the breading to shine, creating a snack that feels virtuous but tastes like a total treat. The texture is a delightful surprise—a crunch that gives way to a soft, almost buttery center. They add a lovely green element to the board and are a fantastic way to incorporate more vegetables in a way that feels celebratory rather than obligatory.
Ingredients
- 2 medium zucchinis, cut into sticks
- 1/2 cup all-purpose flour
- 2 eggs, beaten
- 1 cup Panko breadcrumbs
- 1/2 cup grated Parmesan cheese
- 1 tsp dried Italian seasoning
How to make it
- Slice the zucchini into uniform sticks, about 3 inches long and 1/2 inch thick. Sprinkle them with a little salt and let them sit for 10 minutes to draw out excess moisture, then pat them dry.
- Prepare your three-step dredging station: flour in one, beaten eggs in the second, and a mixture of Panko, Parmesan, and Italian seasoning in the third.
- Dip each zucchini stick in flour, shaking off the excess, then into the egg, and finally press firmly into the Panko-Parmesan mix. Ensure the coating is thick and even.
- Place the sticks on a wire rack over a baking sheet. Using a wire rack is essential for zucchini because they contain so much water; the rack prevents them from sitting in their own steam.
- Bake at 425°F (220°C) for 15-20 minutes until the breading is a deep golden brown and feels hard to the touch.
- Serve immediately with a side of marinara or ranch. Zucchini fries are best eaten fresh while the contrast between the hot center and crispy shell is at its peak.
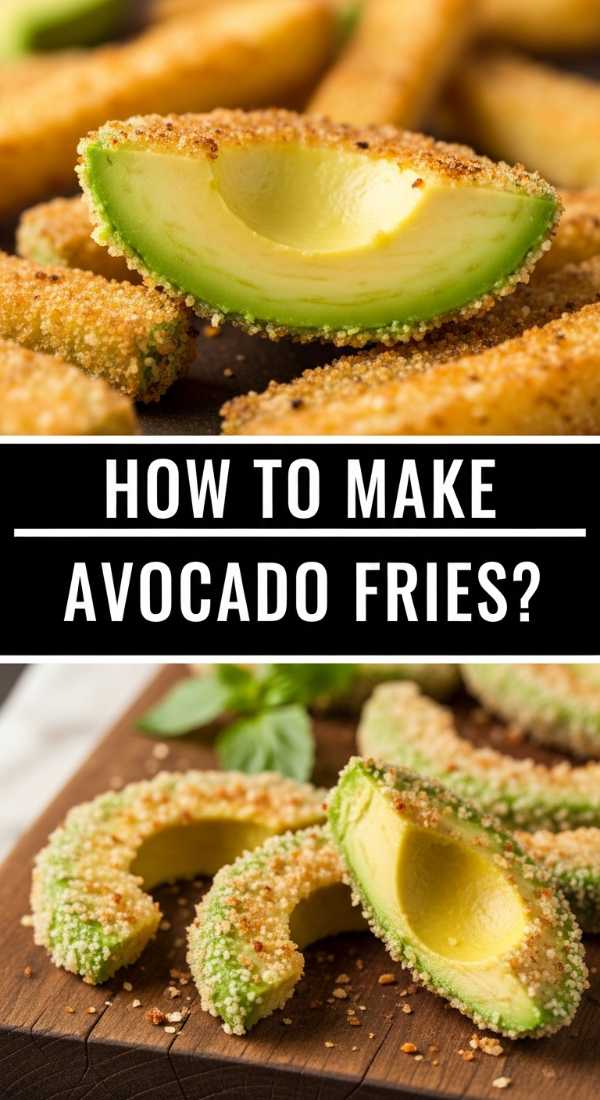
How to fry avocado without it getting mushy?
[IMAGE_10]
Why we love this
Avocado fries are a true revelation and a guaranteed conversation starter on any viral food board. The contrast is mind-blowing: a hot, crispy, seasoned exterior that shatters to reveal a cool, creamy, and buttery avocado center. It’s like eating warm guacamole in a crunchy shell. The richness of the avocado is elevated by the heat, making it feel incredibly luxurious and satisfying. They add a unique, sophisticated flare to the board and pair perfectly with spicy lime or cilantro-based dips, offering a refreshing yet decadent bite that guests will be talking about long after the board is empty.
Ingredients
- 2 firm-ripe avocados
- 1/2 cup flour
- 2 eggs, beaten
- 1 cup Panko breadcrumbs
- 1 tsp lime zest
- 1/2 tsp chili powder
- Oil for frying
How to make it
- Select avocados that are “firm-ripe.” If they are too soft, they will turn into mush the moment they hit the heat. They should give slightly to gentle pressure but still feel solid.
- Slice the avocados in half, remove the pit, and cut each half into 4-5 thick wedges. Gently peel the skin away from the wedges.
- Dredge each wedge in flour, then egg, and finally in the Panko mixed with lime zest and chili powder. Be very gentle to avoid breaking the avocado slices.
- Heat 1 inch of oil in a skillet to 375°F (190°C). High heat is necessary because you want to brown the crust quickly without cooking the avocado for too long.
- Fry the wedges in small batches for only 30-60 seconds per side. You are only looking to brown the breading; the avocado inside should remain firm.
- Drain on paper towels and sprinkle with a touch of flaky sea salt immediately. Serve these last, as they are best enjoyed while the crust is piping hot.
Putting It All Together
The secret to a viral food board isn’t just the individual recipes—it’s the assembly. Start by placing your larger items like the chicken wings and potato wedges in the corners. Use small bowls for your dips and sauces to create structure. Fill in the gaps with the colorful turmeric cauliflower and salmon skewers, and use the smaller items like energy bites and shrimp to tuck into the remaining spaces. The goal is a lush, overflowing look that celebrates abundance and variety. Once you lay it out, step back, take that perfect top-down photo, and enjoy the feast with the people you love!
Frequently Asked Questions
What is the best board to use for a large crowd?
A large wooden butcher block or a dedicated marble pastry board works best. If you don’t have one, you can even line your clean countertop with parchment paper for an ‘infinite’ board look!
How do I keep the fried items warm while I assemble the rest?
Keep your oven on its lowest setting (around 170°F) and place finished items on a wire rack inside the oven. This keeps them warm and prevents them from getting soggy while you finish the other components.
Can I make any of these items ahead of time?
The Walnut Energy Bites and the spice mixes for the vegetables can be prepared a day in advance. However, for the best texture, anything fried or roasted should be made just before serving.