

There is something inherently magical about the way sunlight dances across a crystal-clear pool, casting ripples of gold against the tile and inviting you into a world of pure, unadulterated relaxation. For me, the ultimate luxury isn’t just about the water itself, but the atmosphere that surrounds it—the scent of blooming jasmine drifting on the breeze, the soft touch of a plush towel, and the profound peace that comes from a perfectly curated outdoor sanctuary. When our surroundings are in harmony, our minds quickly follow, allowing us to sink into those golden afternoon hours with a sense of total serenity.
Building a high-end poolside lifestyle is an art form that blends functionality with aesthetic bliss. It is about transforming a simple backyard into a five-star retreat where every element, from the way your towels are folded to how your floats are stored, feels intentional and indulgent. In this guide, I’m sharing my favorite secrets for elevated poolside living, focusing on the small details that create a big impact, ensuring your summer is defined by style, ease, and that elusive feeling of total Zen.
How to Organize Pool Floats for a Peaceful Backyard Retreat
Why we love this
There is a profound sense of visual relief when a sea of neon plastic is replaced by a curated collection of sophisticated, sculptural floats that complement your outdoor decor. Imagine stepping onto your deck and seeing soft champagne golds, crisp whites, or muted sage greens neatly arranged, rather than a chaotic pile of deflated rubber. The texture of high-quality, fabric-covered floats feels cool and smooth against sun-warmed skin, lacking that sticky, artificial aroma of cheaper alternatives. It creates a vista that feels more like a boutique hotel in Ibiza and less like a cluttered toy box, allowing your eyes to rest on the shimmering water without distraction.
Essential Elements:
- UV-resistant fabric-covered luxury floats
- A vertical float rack or wall-mounted bungee system
- Microfiber cleaning cloths
- Mild, biodegradable soap
- Aerated storage bin for smaller rings
How to make it
- Begin by auditing your collection; discard any faded or damaged items and select a cohesive color palette that mirrors the tones of your patio furniture to ensure visual flow.
- Wash each float using a mixture of warm water and mild soap, applying gentle pressure with a microfiber cloth to remove salt, chlorine, and sunscreen residue that can dull the finish over time.
- Dry completely in a shaded area; never store floats while damp, as this leads to a sour, mildewed scent that ruins the poolside aroma.
- Install a vertical storage rack in a discreet corner of the deck, ensuring it is anchored securely into the substrate using masonry screws for stability against wind.
- Arrange the floats by size and color, placing the largest loungers at the back and smaller rings at the front, creating a tiered effect that looks like a curated display rather than mere storage.
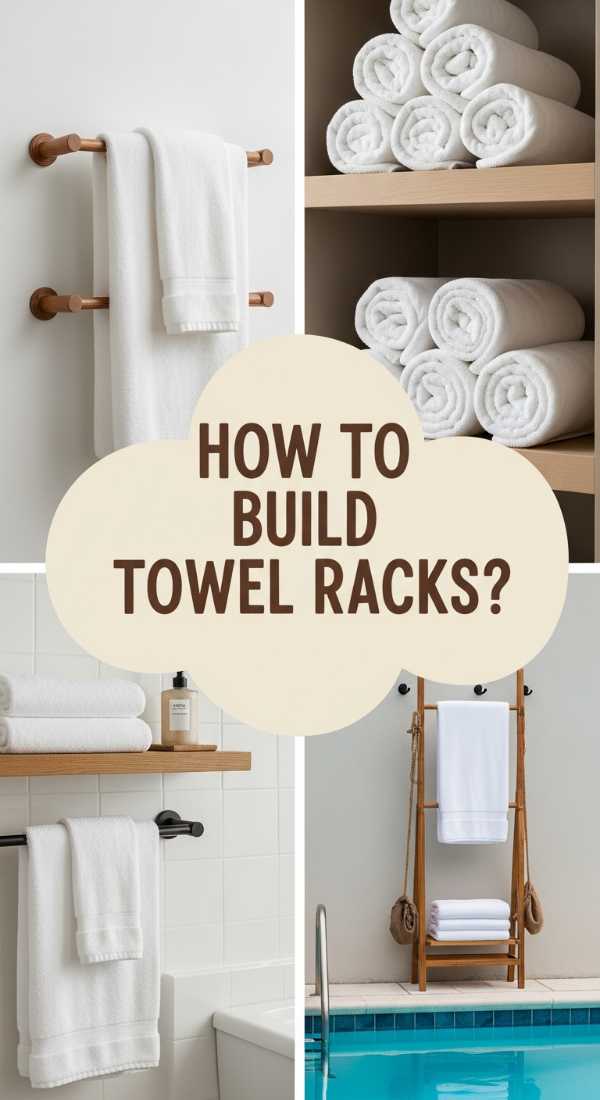
How to Build a Custom Towel Rack for a High End Resort Vibe
Why we love this
Nothing says ‘luxury resort’ quite like a dedicated station for thick, thirsty towels that smell faintly of lavender and sunshine. Building your own rack allows you to use rich, aromatic woods like cedar or teak, which release a grounding, earthy scent when kissed by the afternoon heat. The tactile experience of reaching for a warm, dry towel hanging at just the right height—its fibers soft and inviting—is a sensory delight that bridges the gap between the cool water and the dry warmth of the lounge. It’s a functional piece of furniture that doubles as a design statement, grounding your poolside space with organic textures and clean, architectural lines.
Essential Elements:
- Weather-resistant cedar or teak 2×4 boards
- Stainless steel outdoor-grade screws
- Fine-grit sandpaper (120 and 220 grit)
- Outdoor wood sealer with UV protection
- Sturdy, oversized matte black hooks
How to make it
- Measure and cut your vertical posts to a height of 5 feet, ensuring a tall enough clearance so that oversized beach towels do not touch the ground and collect debris.
- Sand the wood surfaces meticulously, starting with 120-grit and finishing with 220-grit until the grain feels like velvet to the touch; this prevents snags on delicate linen fibers.
- Apply the wood sealer in long, even strokes with a high-quality natural bristle brush, watching for the wood to ‘drink’ the liquid; wait for the surface to lose its tackiness before applying a second coat.
- Position your matte black hooks approximately 12 inches apart to allow for maximum airflow between towels, which is the secret to keeping them smelling fresh and drying quickly.
- Secure the rack to a heavy weighted base or bolt it directly into your decking, checking with a spirit level to ensure the structure is perfectly vertical for a professional, high-end finish.
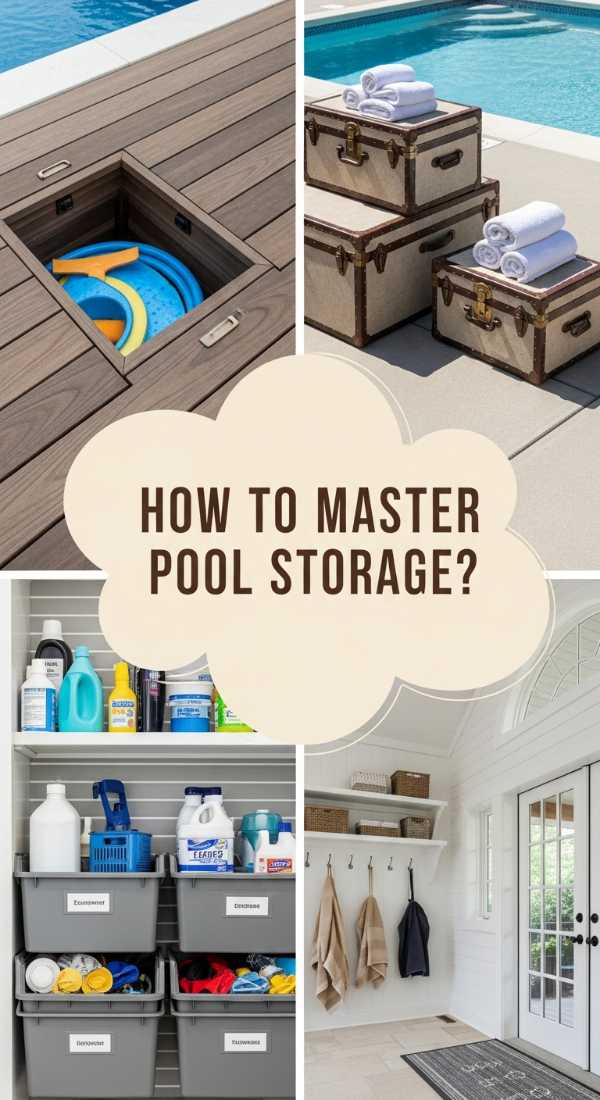
How to Master Poolside Storage for a Seamless Summer Lifestyle

Why we love this
Mastering storage is about the luxury of invisibility—the ability to have everything you need within arm’s reach while seeing nothing but beauty. When goggles, fins, and sunscreen bottles are tucked away into elegant, breathable wicker trunks or sleek, hidden cabinetry, the deck feels expansive and calm. There is a specific satisfaction in the smooth glide of a well-oiled drawer or the soft ‘thud’ of a heavy lid closing over the day’s gear. This organization eliminates the ‘clutter-anxiety’ that often plagues outdoor spaces, leaving only the aroma of sea salt and the gentle sound of water to occupy your senses.
Essential Elements:
- Weatherproof resin wicker trunks or teak storage benches
- Internal dividers or clear acrylic bins
- Label maker with waterproof tape
- Silica gel packets for moisture control
- Scented drawer liners (cedar or eucalyptus)
How to make it
- Select storage vessels that match the height and scale of your existing lounge furniture to create a cohesive, ‘built-in’ appearance.
- Categorize all items into ‘Action’ (goggles, toys) and ‘Care’ (sunscreen, first aid), placing ‘Action’ items in top-level bins for immediate access during active swimming hours.
- Wipe down every item with a damp cloth to remove grit before it enters the storage unit; any sand brought into the box will act as an abrasive, damaging the interior over time.
- Incorporate silica gel packets at the bottom of the trunk to absorb ambient humidity, ensuring that the interior remains bone-dry and free of the ‘musty’ smell associated with damp outdoor storage.
- Audit the storage weekly, removing any stray wet items that may have been tossed in by guests, and refresh the eucalyptus liners to maintain a crisp, invigorating scent every time the lid is opened.
How to Arrange Outdoor Linens for a Luxurious Swimming Experience
Why we love this
The arrangement of outdoor linens is where comfort meets high-fashion styling. Picture a row of perfectly aligned lounge chairs draped in crisp, white Turkish cotton towels, their long tassels swaying in the breeze. The contrast of the brilliant white against the deep blue of the pool creates a visual crispness that is incredibly restorative. These linens provide a soft, absorbent barrier against the heat of the sun-drenched furniture, offering a tactile sensation of pure indulgence. When towels are folded with precision—edges aligned and stripes matching—it signals a level of care and hospitality that transforms a casual swim into a sophisticated event.
Essential Elements:
- Over-sized Turkish or Egyptian cotton towels
- Outdoor throw pillows with sun-resistant covers
- Fabric stiffening spray (optional)
- Rolling cart for fresh linen presentation
- Decorative weights or clips
How to make it
- Launder your towels using a vinegar rinse instead of traditional softener to ensure they remain maximumly absorbent and free of waxy buildup that can trap odors.
- Use the ‘hotel roll’ technique: fold the towel in half lengthwise, then roll tightly from one end to the other, ensuring the edges are tucked in for a clean, cylindrical look.
- Place towels on the head of each lounger, or stack them in a pyramid formation on a dedicated side table, ensuring the folds face away from the main entrance for a seamless visual line.
- Coordinate throw pillows by layering a larger neutral base pillow with a smaller, textured accent pillow, ensuring the ‘karate chop’ indentation is applied to the top for that designer-finished look.
- Check the alignment of your linens every hour; the visual cue for ‘doneness’ in this setup is a perfectly straight line of fabric that hasn’t been disturbed by the wind or casual use.
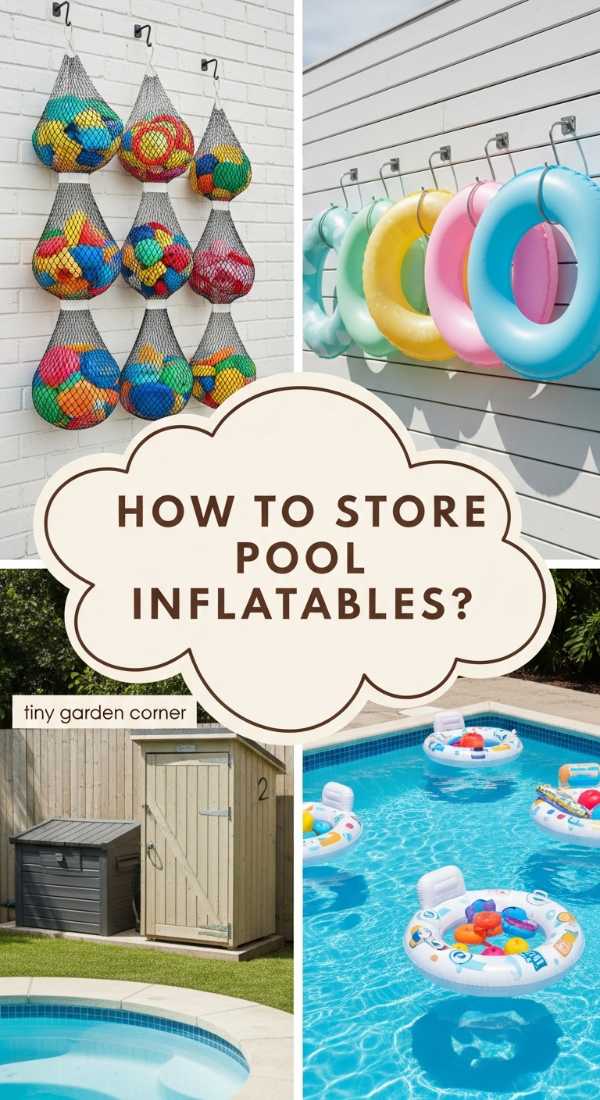
How to Store Inflatables for a Serene Garden Atmosphere
Why we love this
When the sun sets and the swimming ends, the garden should return to a state of natural grace. Properly storing inflatables ensures that your evening landscape is defined by the silhouettes of trees and the glow of lanterns, rather than the silhouette of a giant inflatable flamingo. The process of deflating and folding these items is almost meditative; the gentle hiss of escaping air signifies the transition from the high energy of the day to the quietude of the night. It preserves the integrity of the materials, preventing the ‘rubbery’ smell from permeating the air and keeping the PVC from becoming brittle and unsightly under the harsh UV rays.
Essential Elements:
- Electric air pump with a deflation setting
- Flat, clean folding surface
- Talcum powder or cornstarch
- Breathable cotton storage bags
- Cool, dry storage location
How to make it
- Connect the electric pump to the ‘deflate’ port of the inflatable to remove every last cubic inch of air; a perfectly flat inflatable is much easier to fold into a tight, professional-looking package.
- Lay the deflated item on a clean, dry surface and sprinkle a very light dusting of talcum powder over the surface; this prevents the plastic from sticking to itself, which can cause tearing when unfolding next season.
- Fold the item into thirds, pressing out any remaining air pockets as you go, until it fits the dimensions of your storage bag.
- Place the folded inflatable into a breathable cotton bag rather than a plastic bin; this allows the material to ‘breathe’ and prevents the buildup of chemical odors.
- Store the bags on a raised shelf in a climate-controlled area, away from direct sunlight and extreme temperature fluctuations, to ensure the material remains supple and ready for use.
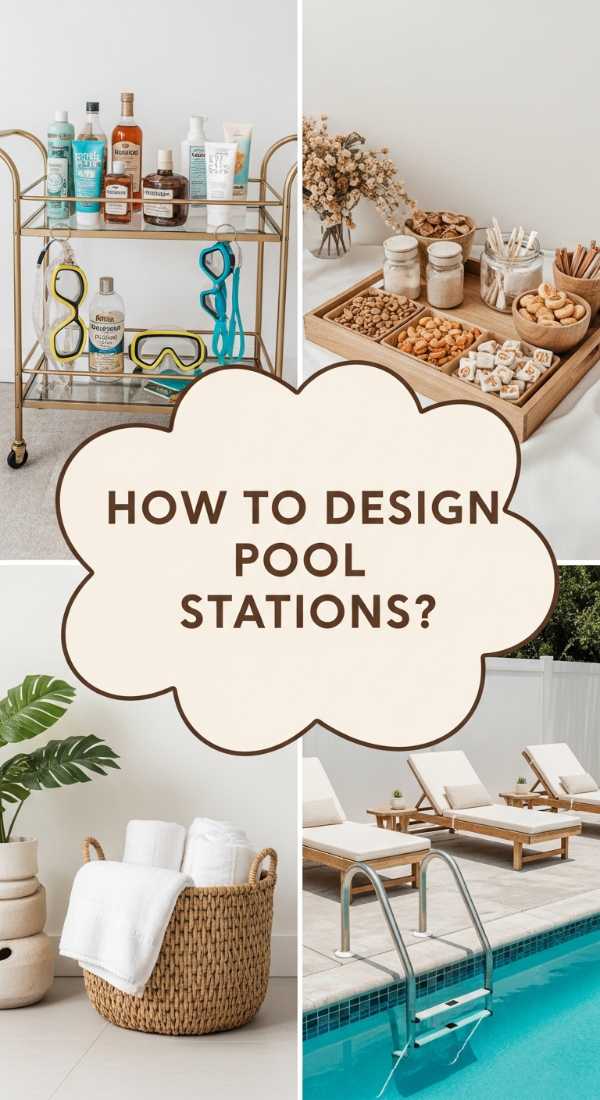
How to Design a Poolside Station for Effortless Outdoor Entertaining
Why we love this
A poolside station is the heart of summer hospitality, a place where the refreshing aroma of sliced limes and mint mingles with the cool mist of an ice bucket. It’s about creating a ‘self-serve’ luxury experience where guests feel pampered without you ever having to leave your lounge chair. The visual appeal of tiered trays filled with chilled glass bottles, artisanal sunscreens, and rolled face towels is undeniable. It creates a focal point that is both beautiful and highly functional, turning the simple act of grabbing a drink into a curated experience of flavor, scent, and style.
Essential Elements:
- Weatherproof bar cart or console table
- Double-walled insulated ice bucket
- Unbreakable high-end acrylic glassware
- Aromatic garnish station (mint, rosemary, citrus)
- Sun protection basket (SPF, lip balm, cooling mist)
How to make it
- Position the station in a shaded area to prevent ice from melting too rapidly and to protect sunscreens from heat-induced degradation.
- Layer the bottom of your ice bucket with a handful of rock salt before adding ice; this lowers the freezing point and keeps your bottles ‘frosty’ for significantly longer.
- Arrange glassware in neat rows, stems up, to prevent dust or insects from entering the bowls, and place a small weighted napkin holder nearby for easy access.
- Create a ‘sensory tray’ with a bowl of citrus and a small vase of fresh herbs; the heat will naturally release these oils, creating a spa-like aroma around the station.
- Monitor the station every 30 minutes to replenish ice and wipe away any condensation rings, ensuring the surface remains pristine and inviting for your next guest.
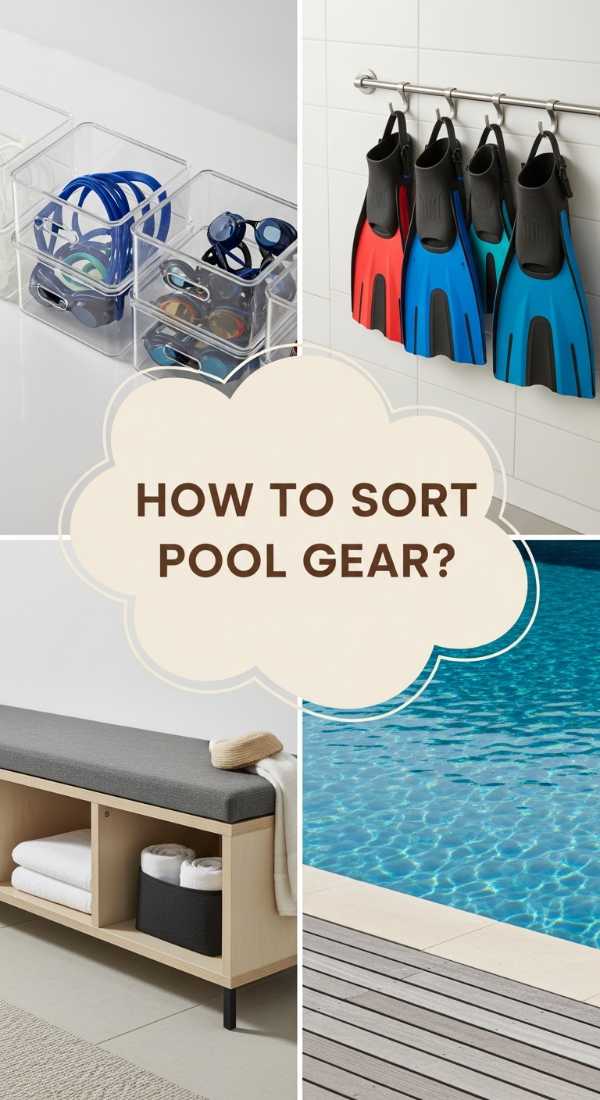
How to Sort Swimming Gear for a Calm Morning Routine
Why we love this
There is a unique stillness to a morning swim—the water is like glass, and the air is crisp. Having your gear sorted and ready turns this routine into a moving meditation rather than a frantic search for a missing fin. Imagine reaching into a perfectly organized mesh basket and finding your goggles clear, your cap dry, and your weights exactly where they belong. The tactical efficiency of a sorted gear station allows you to stay in that ‘flow state,’ maintaining the quiet hum of a calm morning. It’s about respecting the ritual of the swim and honoring the equipment that makes it possible.
Essential Elements:
- Wall-mounted mesh drying bags
- Individual cubbies for family members
- Anti-fog spray for goggles
- Rinse bucket with fresh water
- Hook system for swim fins
How to make it
- Designate a ‘rinse station’ where gear is dipped in fresh water immediately after use to neutralize the corrosive effects of chlorine or salt.
- Hang mesh bags at eye level; these allow for 360-degree airflow, which is the critical visual cue for ‘doneness’—gear is only ready to be moved to permanent storage when the mesh shows no signs of condensation.
- Assign a specific cubby or hook to each person to eliminate morning confusion; use waterproof vinyl decals for a clean, high-end labeling solution.
- Apply a small drop of anti-fog solution to goggle lenses before storing; the thin film will set overnight, providing crystal-clear vision for your early morning laps.
- Conduct a ‘clip-check’ once a week, ensuring all straps and buckles are supple and functional, replacing any that show signs of UV wear before they fail during a swim.
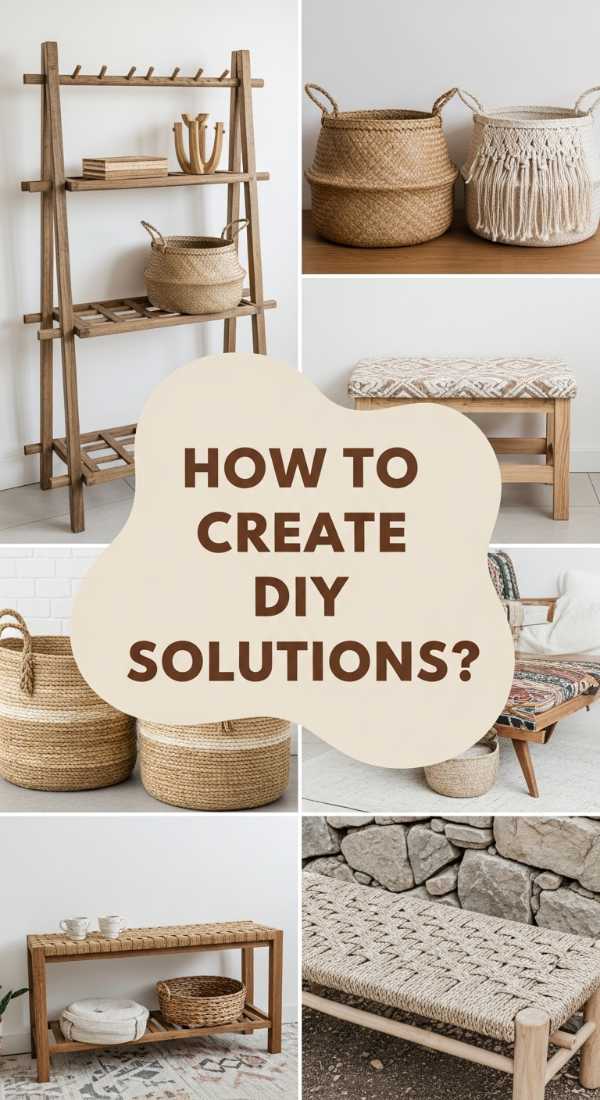
How to Create a DIY Storage Solution for a Beautifully Orderly Deck
Why we love this
A custom DIY storage solution allows you to tailor your organization to the specific architecture of your home, creating a sense of ‘oneness’ between the pool and the deck. Whether it’s a hidden compartment under a bench or a sleek box clad in the same wood as your siding, this approach elevates the entire environment. The touch of handmade wood, the sturdy feel of custom joinery, and the way it fits perfectly into an otherwise wasted corner provides a deep sense of satisfaction. It’s an investment in the ‘bones’ of your outdoor living room, ensuring that every square inch is dedicated to beauty and order.
Essential Elements:
- Pressure-treated lumber for the frame
- Ipe or composite decking for the exterior skin
- Heavy-duty hydraulic lid stays
- Rubber gasket seals for waterproofing
- Power drill and impact driver
How to make it
- Construct a sturdy internal frame using 2×4 pressure-treated lumber, ensuring all corners are perfectly square to prevent the lid from sticking or sagging over time.
- Skin the frame with Ipe or high-end composite boards, leaving a 1/8-inch gap between planks to allow for the natural expansion and contraction of the wood in the sun.
- Install a rubber gasket around the top rim of the box; when the lid closes, this creates a weather-tight seal that keeps the interior as dry as a desert, even during summer storms.
- Attach hydraulic lid stays to the interior; these provide a luxurious, ‘soft-close’ feel and prevent the lid from slamming, which protects the wood and the serenity of the environment.
- Finish the exterior with a high-performance UV oil, applying it until the wood grain glows with a deep, rich luster that reflects the sunlight beautifully.
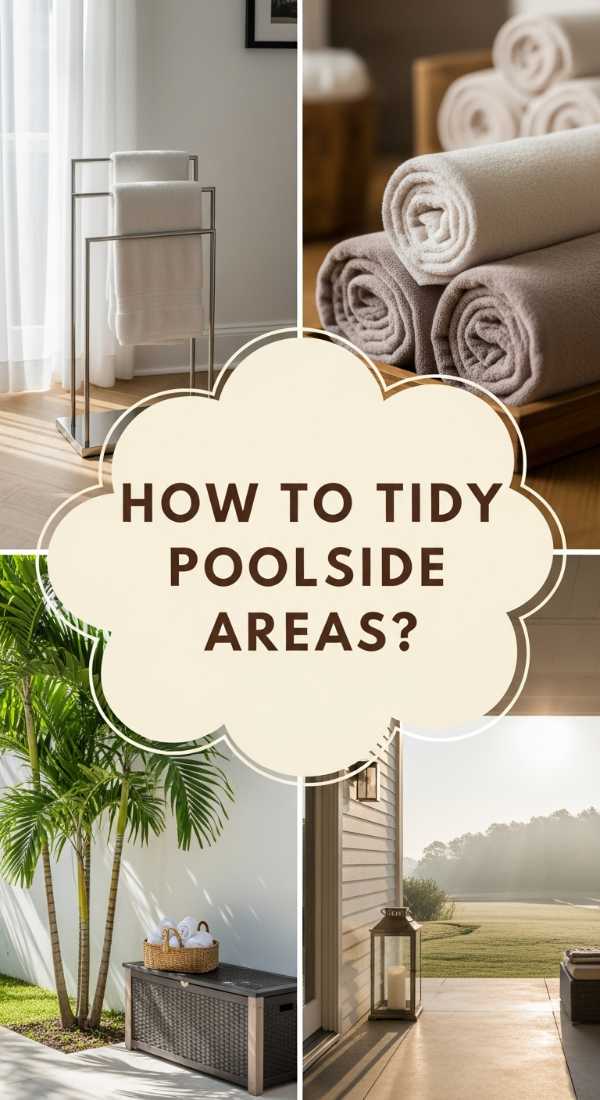
How to Tidy Your Pool Area for a Restorative Sunny Weekend

Why we love this
The act of tidying the pool area is the final ‘cleansing’ before the weekend begins, a ritual that clears the path for relaxation. Sweeping away the stray leaves, skimming the surface until the water is a mirror, and plumping the cushions creates an environment that feels brand new every Friday afternoon. The scent of freshly blown stone and the sight of an empty, clean deck invite you to exhale deeply. This restorative practice ensures that when you finally sit down with your book and a cold drink, there is nothing left to ‘do’—only a beautiful, orderly world to inhabit and enjoy.
Essential Elements:
- High-quality leaf skimmer with a fine mesh net
- Outdoor-rated leaf blower or soft-bristled broom
- Upholstery brush for cushions
- Surface cleaner for glass and metal
- Decorative lanterns or candles
- Fresh botanicals for table arrangements
How to make it
- Start from the perimeter and work your way in; use a leaf blower on its lowest setting to gently direct debris away from the water and into a collection point for removal.
- Skim the water surface using slow, rhythmic strokes; the goal is to create as little wake as possible so that debris doesn’t sink before you can capture it.
- Use a soft upholstery brush to whisk away pollen or dust from lounge cushions, then stand them upright on their sides for 10 minutes to allow any trapped moisture to evaporate.
- Wipe down all hard surfaces—tables, armrests, and railings—with a solution of water and a drop of lemon oil to leave a streak-free shine and a faint, clean citrus aroma.
- Finish the tidy-up by lighting a few citronella-scented candles in elegant glass hurricanes, signaling to your brain (and your guests) that the work is done and the relaxation has officially begun.
How to Perfect Your Pool House Organization for Total Zen Living
[IMAGE_10]
Why we love this
The pool house should be a sanctuary within a sanctuary—a cool, shaded retreat where order reigns supreme. Walking into a well-organized pool house feels like stepping into a private spa; there is a place for everything, and the air is still and cool. The tactile pleasure of smooth stone floors, the visual rhythm of neatly stacked shelves, and the aroma of clean linen and cedar create an atmosphere of total Zen. It’s the ultimate expression of the high-end poolside lifestyle, where every detail is managed so that you can lose yourself in the present moment, surrounded by quiet luxury.
Essential Elements:
- Floating shelves for a modern, airy feel
- Uniform glass jars for snacks and amenities
- Wall-mounted racks for hats and bags
- Small refrigerator for chilled refreshments
- Diffuser with essential oils (eucalyptus or sandalwood)
How to make it
- Clear all surfaces and group items by function: ‘Refreshment,’ ‘Changing,’ and ‘Utility,’ ensuring that the most frequently used items are stored at chest height for effortless access.
- Install floating shelves using heavy-duty hidden brackets, ensuring they are perfectly level; a slanted shelf is a subtle visual stressor that breaks the Zen atmosphere.
- Transfer bulk amenities like cotton swabs, snacks, or sunscreen packets into uniform glass jars; this removes ‘visual noise’ from branded packaging and creates a high-end boutique look.
- Set up a cooling station with a small fridge stocked with sparkling water and chilled face towels infused with a drop of peppermint oil for an instant temperature drop on hot days.
- Activate a diffuser 20 minutes before you plan to use the space; the visual cue of the gentle mist and the immediate aroma of sandalwood will anchor the ‘Zen’ feel of the room, making it the perfect end-of-day retreat.
Conclusion
Creating an elevated poolside lifestyle is about more than just aesthetics; it is about crafting an environment that nurtures your soul and simplifies your days. When we take the time to organize our floats, curate our linens, and build thoughtful storage, we aren’t just ‘cleaning’—we are designing a life of greater ease and beauty. I hope these tips inspire you to look at your outdoor space with fresh eyes and a creative heart. May your summer be filled with sparkling water, sun-drenched memories, and the absolute peace of a perfectly ordered retreat.