
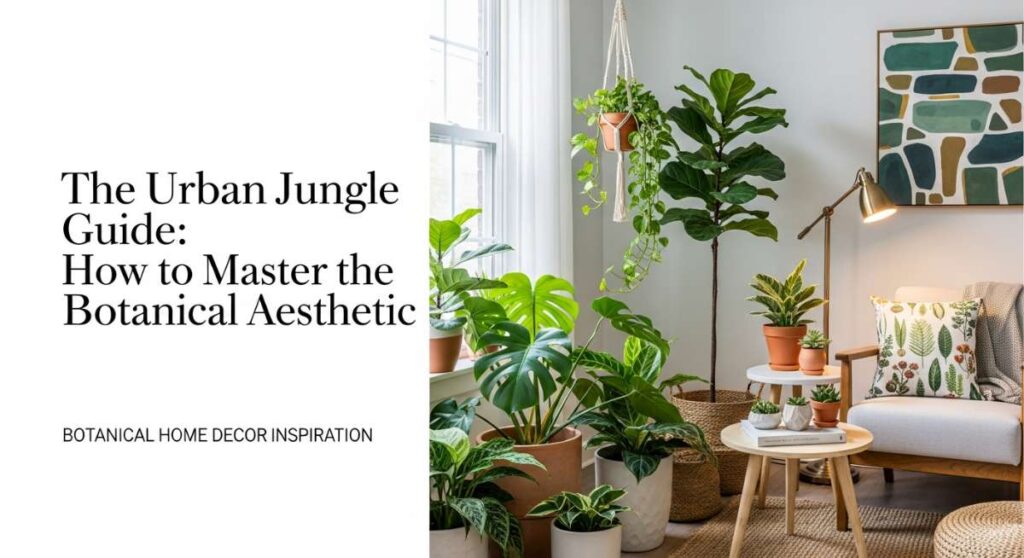
The Urban Jungle Guide: How to Master the Botanical Aesthetic
There is something inherently soul-soothing about walking into a room that breathes. After a long day of screen glare and city concrete, returning to a home filled with the soft rustle of leaves and the vibrant, grounding energy of greenery feels like a literal exhale. I remember the first time I brought a simple Monstera home; it didn’t just fill a corner, it changed the entire vibration of my living room, turning a sterile space into a living, pulsing sanctuary that felt like a hug from Mother Nature herself.
The ‘Urban Jungle’ isn’t just about hoarding plants; it’s about intentional design that bridges the gap between our modern lives and our primal need for the outdoors. Whether you are working with a sun-drenched loft or a cozy, dim-lit studio, the botanical aesthetic allows you to curate a personal oasis that nurtures your creativity and calms your nervous system. Let’s dive into how you can transform your walls into living canvases and your shelves into verdant masterpieces that celebrate the wild beauty of the botanical world.
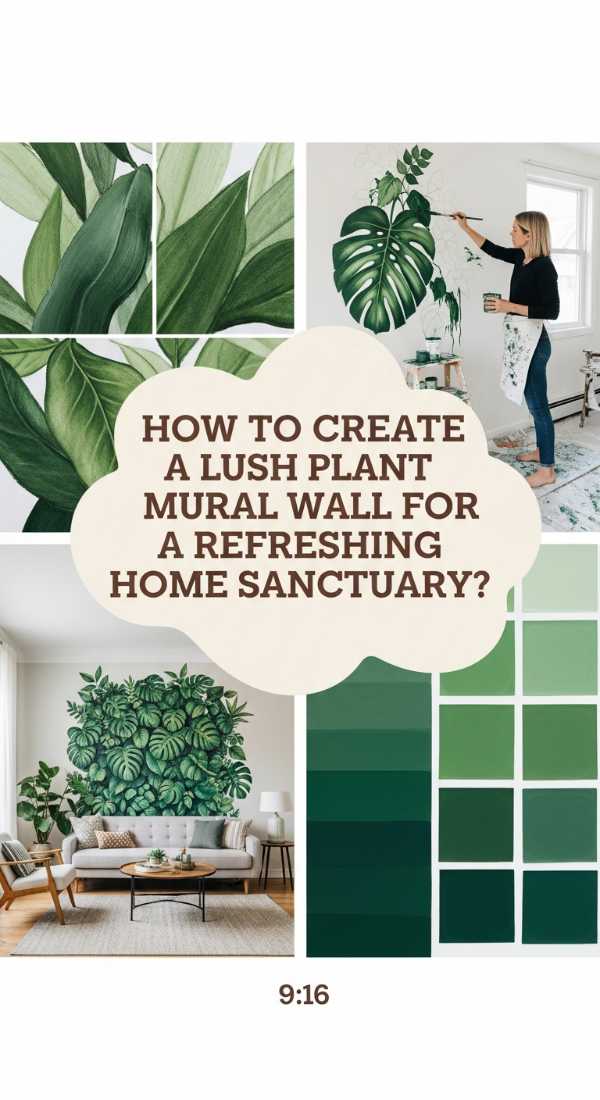
How to Create a Lush Plant Mural Wall for a Refreshing Home Sanctuary
Why we love this
This approach transforms a static wall into a three-dimensional tapestry of life that feels like stepping into a hidden conservatory. The sensory experience is unparalleled; you can smell the faint, clean scent of oxygenated air and feel the slight humidity that large clusters of foliage provide. The visual depth created by layering different leaf textures—from the waxy sheen of a Pothos to the delicate lace of a Fern—creates a focal point that is both energizing and deeply peaceful, acting as a natural air purifier for your soul.
Essential Elements:
- Varying sizes of wall-mounted planters or ‘living wall’ pockets.
- A mix of trailing plants (Ivy, Philodendron) and upright plants (Calathea).
- Automated drip irrigation or a high-quality long-neck watering can.
- Full-spectrum grow lights if natural light is insufficient.
- Moisture-resistant wall backing or sealant.
How to make it
- Assess your wall’s weight capacity and light levels to ensure your chosen structure can support the soil and water weight.
- Install a moisture barrier, such as a thin sheet of PVC or waterproof paint, to protect your drywall from humidity and potential leaks.
- Mount your planter system, starting from the top and working down, ensuring all anchors are securely fastened into studs or using heavy-duty toggles.
- Fill the pockets or pots with a high-quality, lightweight potting mix enriched with perlite for optimal drainage and aeration.
- Plant your selections, placing trailing varieties at the top to create a waterfall effect and larger-leaved varieties at the bottom for a grounded look.
- Prune any dead leaves immediately and mist the foliage to help the plants settle into their new vertical environment.
How to Style a Gallery Wall with Plants for an Organic Living Room Aesthetic

Why we love this
There is a rhythmic beauty in mixing man-made art with the unpredictable growth of living organisms. This style brings a sophisticated, curated feel to any living room, where the crisp lines of a picture frame meet the wild, wandering tendrils of a Heartleaf Philodendron. It creates a narrative of growth and time; as the plants grow, the gallery wall evolves, making your decor feel like a living, breathing entity that changes with the seasons and adds a rich, organic texture to your daily life.
Essential Elements:
- A collection of mismatched frames (wood, brass, and black).
- Wall-mounted propagation stations or glass test tubes.
- Small floating shelves for potted succulents.
- Botanical sketches or pressed flower art.
- Command hooks or discreet wall nails.
How to make it
- Lay all your frames and plant shelves on the floor first to map out the composition, ensuring a balanced mix of ‘static’ art and ‘living’ elements.
- Install your floating shelves at varying heights, leaving enough vertical space for the plants to grow upward or drape downward without hitting the frames.
- Secure your propagation tubes using small brass clips, filling them with fresh water and cuttings of easy-rooting plants like Tradescantia.
- Place your potted plants on the shelves, opting for species with unique silhouettes like the ‘String of Pearls’ for dramatic vertical movement.
- Hang your framed art around the plants, maintaining a 2-3 inch gap to allow for air circulation and easy access for watering.
- Regularly rotate the pots on the shelves to ensure all sides of the plant receive equal light exposure, preventing lopsided growth.
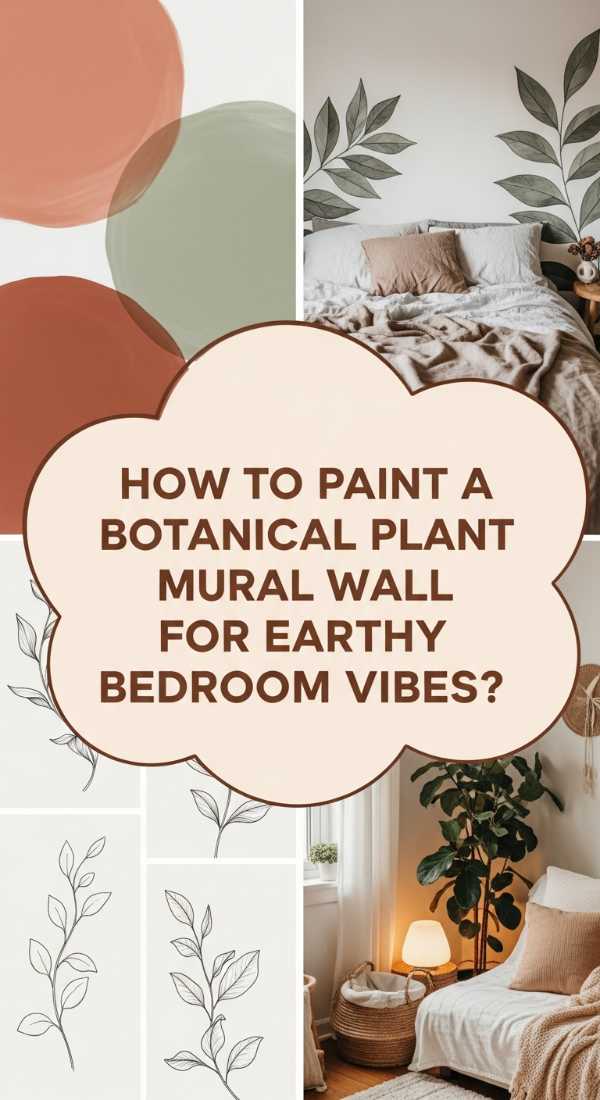
How to Paint a Botanical Plant Mural Wall for Earthy Bedroom Vibes
Why we love this
Painting a mural allows you to bring the botanical aesthetic into spaces where light might be too low for actual plants to thrive. The soft, hand-painted strokes of sage, olive, and deep forest greens create a serene backdrop that mimics a woodland clearing, promoting deep relaxation and restorative sleep. It is an artistic expression of nature that doesn’t require watering, offering a permanent sense of springtime bloom and earthy tranquility that makes your bedroom feel like a secluded forest retreat.
Essential Elements:
- High-quality interior latex paint in 3-4 shades of green and one earthy terracotta.
- Detail brushes and a sea sponge for texture.
- Pencil for sketching and a large eraser.
- Painter’s tape and drop cloths.
- Matte sealer for a velvety finish.
How to make it
- Clean the wall surface thoroughly with a damp cloth to remove dust, then apply a base coat in a soft, neutral cream or pale grey.
- Lightly sketch large, overlapping leaf shapes (like Banana leaves or Eucalyptus stems) using a pencil, focusing on a flow that leads the eye toward the bed.
- Block in the darkest green shades first for the leaves in the background to create a sense of depth and shadow.
- Layer on mid-tone greens for the main foliage, using a sea sponge to dab on paint for a natural, slightly mottled leaf texture.
- Use your finest detail brush to add highlights in a pale mint color and delicate veins in a deep charcoal or brown for realism.
- Once dry, apply a matte clear coat to protect the mural from scuffs while maintaining the soft, non-reflective earthy aesthetic.
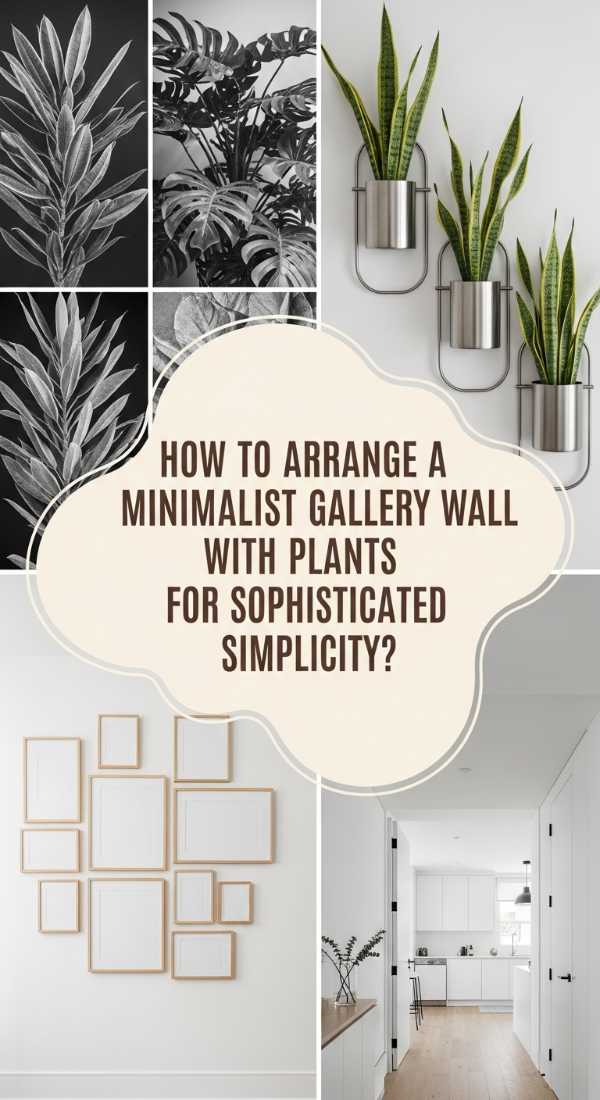
How to Arrange a Minimalist Gallery Wall with Plants for Sophisticated Simplicity
Why we love this
Minimalism meets nature in this clean, high-contrast arrangement that emphasizes form over clutter. By using a limited color palette and sleek silhouettes, you allow the individual beauty of a single leaf or a sculptural stem to shine. It feels intentional, modern, and incredibly calming, stripping away the noise of the outside world and focusing on the quiet, sophisticated elegance of a few well-placed botanical elements that provide a breath of fresh air without overwhelming the senses.
Essential Elements:
- Uniform white or black thin-profile frames.
- Single-stem vases or minimalist wall hoops.
- Architectural plants like Snake Plants or Air Plants.
- White-matted botanical photography.
- Level and measuring tape for precision.
How to make it
- Select a grid or a linear layout to maintain a sense of order and architectural cleanliness.
- Use a level to ensure all frames and plant holders are perfectly aligned, as symmetry is key to the minimalist aesthetic.
- Choose plants with ‘clean’ lines, such as the vertical spikes of a Sansevieria or the geometric perfection of a Xerographica air plant.
- Mount minimalist wire hoops or ‘circle’ planters that frame the air plants like living sculptures against the wall.
- Space the elements generously, allowing the ‘negative space’ of the wall to act as a frame that highlights the green of the plants.
- Keep the maintenance simple by choosing low-water plants that don’t drop leaves, preserving the pristine look of the minimalist gallery.
How to Design a Tropical Plant Mural Wall for Exotic Vacation Feelings
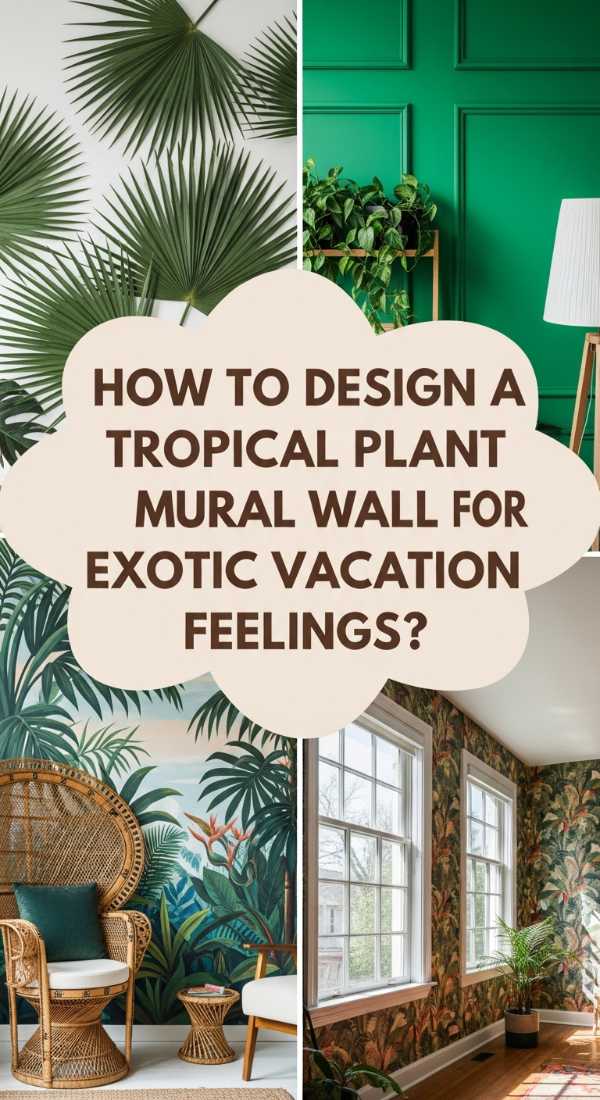
Why we love this
This design is a bold, maximalist celebration of the tropics that instantly elevates the mood of any room. The vibrant, oversized leaf patterns and saturated greens evoke the feeling of a sun-drenched getaway, bringing the warmth and energy of the equator into your home. The sight of giant Monstera leaves and Palm fronds creates a sense of adventure and abundance, making even the smallest corner feel like a lush, exotic paradise where the stress of the day simply melts away under the canopy.
Essential Elements:
- Vibrant paint colors: Emerald, Lime, and Deep Teal.
- Stencils of tropical leaves (Monstera, Fan Palm, Bird of Paradise).
- Gold leaf accents for a touch of luxury.
- Potted floor plants (Kentia Palm, Fiddle Leaf Fig) to layer in front.
- High-gloss finish for a ‘wet’ jungle look.
How to make it
- Start with a bold background color, such as a deep navy or a bright white, to make the tropical greens pop with intensity.
- Secure your leaf stencils with low-tack tape and use a stippling brush to apply paint, ensuring the edges are crisp and defined.
- Vary the angles of the stencils to create a natural, ‘overgrown’ look that mimics the chaos of a real tropical jungle.
- Apply a thin layer of gold leaf to the veins of a few key leaves to catch the light and add a sophisticated, high-end vacation vibe.
- Position large, real floor plants in front of the mural to blur the lines between the painted art and the living greenery.
- Add a high-gloss topcoat to the painted leaves only, giving them a waxy, humid appearance that enhances the tropical theme.
How to Curate a Vintage Gallery Wall with Plants for Timeless Charm
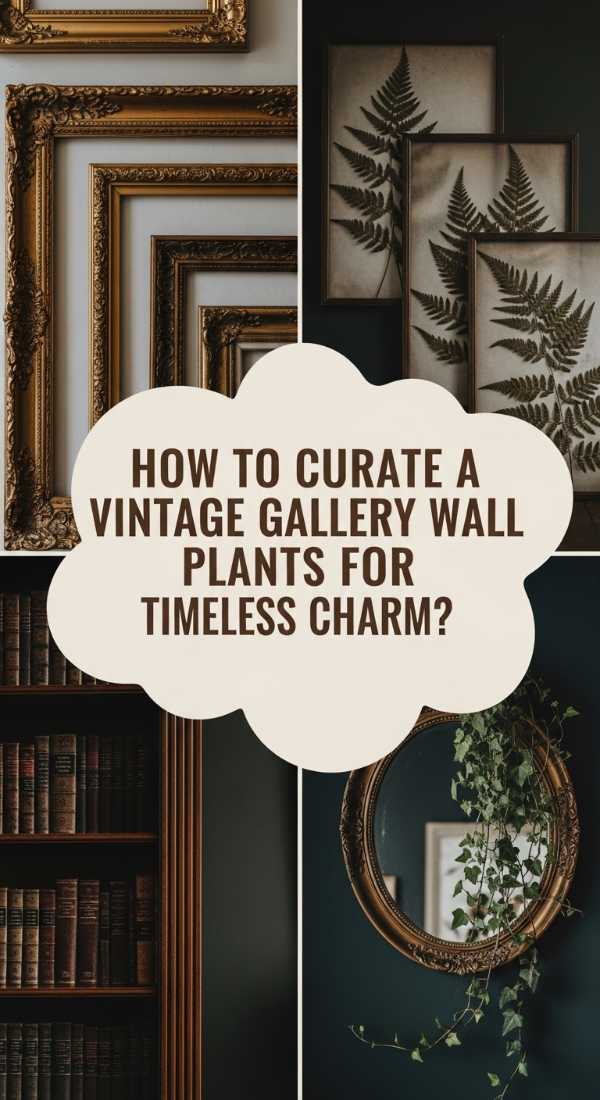
Why we love this
There is a nostalgic, academic charm to this style that feels like walking into an old explorer’s study. The combination of weathered wood, aged paper, and thriving plants suggests a deep history and a love for botanical discovery. It smells faintly of old books and dried herbs, providing a cozy, intellectual atmosphere where the plants feel like specimens collected from a 19th-century expedition, grounding your home in a sense of timelessness and wonder.
Essential Elements:
- Ornate vintage gold frames and weathered wooden crates.
- Antique botanical prints or pages from old herbariums.
- Terrariums with moss and ferns.
- Aged terracotta pots with a natural patina.
- Brass misting bottles.
How to make it
- Source vintage frames from thrift stores and replace the glass with pressed dried flowers or antique-style botanical illustrations.
- Mount a weathered wooden crate horizontally on the wall to serve as a rustic shadow box for a small, glass-enclosed terrarium.
- Place Ferns—the quintessential vintage plant—in aged terracotta pots that have been treated with a lime wash to simulate years of moss growth.
- Intersperse the plants with non-living vintage items like an old magnifying glass or a brass compass to lean into the ‘explorer’ theme.
- Use small brass ‘S’ hooks to hang dried bundles of lavender or eucalyptus from the bottom of the frames for an extra sensory layer.
- Arrange the elements in a ‘random but balanced’ cluster to mimic the eclectic feel of a historical collector’s cabinet.
How to Master a Watercolor Plant Mural Wall for Artistic Interior Bliss

Why we love this
A watercolor mural offers a soft, ethereal quality that makes a room feel light and airy. The translucent layers of green wash over the wall like a gentle mist, creating a dreamlike botanical landscape that is incredibly soothing to the eyes. It feels fluid and movement-filled, capturing the delicate essence of plants rather than their literal form, resulting in a space that feels like living inside a piece of fine art where the boundaries of the room seem to expand into a soft, green garden.
Essential Elements:
- Watercolor-style wall paint or specialized mural glazes.
- Wide, soft-bristle brushes and spray bottles filled with water.
- A palette of diluted greens, soft blues, and dusty pinks.
- Rags for blending and lifting color.
- Patience for building layers of transparency.
How to make it
- Prime the wall with a high-quality white base to ensure the translucent colors remain bright and don’t look muddy.
- Mist the wall with a spray bottle before applying paint to encourage the ‘bleeding’ and ‘blooming’ effects characteristic of watercolor.
- Apply very diluted paint in broad, sweeping motions, allowing the paint to drip and run naturally in some areas for an organic feel.
- While the paint is wet, use a damp rag to lift color from the center of leaves to create highlights and a sense of three-dimensional glow.
- Layer different shades once the previous layer is slightly tacky, creating ‘glazes’ that give the mural a complex, professional depth.
- Keep the edges soft and undefined, letting the botanical shapes fade out into the white of the wall for that signature ethereal watercolor look.
How to Fit a Dense Gallery Wall with Plants for Maximalist Apartment Living

Why we love this
For those who believe ‘more is more,’ the dense gallery wall is the ultimate expression of botanical passion. It creates a lush, cocoon-like feeling that envelops the room in life, making even the smallest apartment feel like a grand, verdant estate. Every inch of wall space is utilized, creating a visual feast of textures, colors, and growth habits that completely transforms the energy of the home into a high-vibration, oxygen-rich sanctuary where nature takes center stage.
Essential Elements:
- Wall-mounted grid panels or shelving units.
- High-density plant hangers (macramé or metal).
- A diverse ‘zoo’ of plants: trailing, upright, bushy, and spiked.
- Small mirrors to reflect the greenery and double the visual density.
- Clip-on grow lights to ensure the lower layers get light.
How to make it
- Install a floor-to-ceiling shelving unit or a sturdy metal grid across the entire wall to maximize vertical ‘real estate’ for plants.
- Start by placing the largest, ‘anchor’ plants on the floor and top shelves to define the boundaries of your living wall.
- Fill the middle sections with a variety of potted plants, using ‘S’ hooks to hang macramé planters from the shelves themselves for extra layering.
- Intersperse small mirrors between the pots; these will reflect the leaves and make the ‘jungle’ look twice as deep and vibrant.
- Ensure you have a sturdy step ladder and a long-reach watering wand, as maintaining a dense wall requires being able to reach every corner easily.
- Monitor the airflow; with so many plants, you may need a small, stylish fan to keep air moving and prevent pests from settling in the dense foliage.
How to Paint a Moody Plant Mural Wall for Dramatic Evening Relaxation

Why we love this
There is something profoundly cozy and dramatic about deep, dark botanical art. Against a backdrop of charcoal or midnight blue, the green of the leaves takes on a jewel-like quality that glows in the evening lamplight. This style is perfect for creating an intimate, ‘night garden’ atmosphere that feels luxurious and slightly mysterious, providing a perfect backdrop for a glass of wine and a quiet book as the shadows of the real plants dance against the painted ones.
Essential Elements:
- Base color: Charcoal, Deep Navy, or Forest Green.
- Metallic paint (copper or bronze) for leaf outlines.
- Large-scale leaf stencils.
- Warm, dimmable lighting (sconces or fairy lights).
- Satin finish paint for a subtle, high-end sheen.
How to make it
- Apply two coats of your dark base color, ensuring full coverage for a rich, ‘endless’ depth that will make the botanical elements pop.
- Sketch large, dramatic leaves like Fiddle Leaf Fig or Swiss Cheese Plant, focusing on a few large-scale shapes rather than many small ones.
- Fill in the leaves with a slightly lighter shade of the base color (e.g., forest green over charcoal) to create a subtle, sophisticated tone-on-tone effect.
- Use a fine brush to outline the leaves with metallic copper or bronze paint, which will catch the warm evening light and create a ‘glow.’
- Install warm-toned wall sconces that cast light upwards, highlighting the texture and the metallic accents of the mural.
- Finish with a satin sealer; the slight sheen will help bounce light around the room, preventing the dark colors from feeling too heavy or closed-in.
How to Build a Rustic Gallery Wall with Plants for Cozy Country Comfort
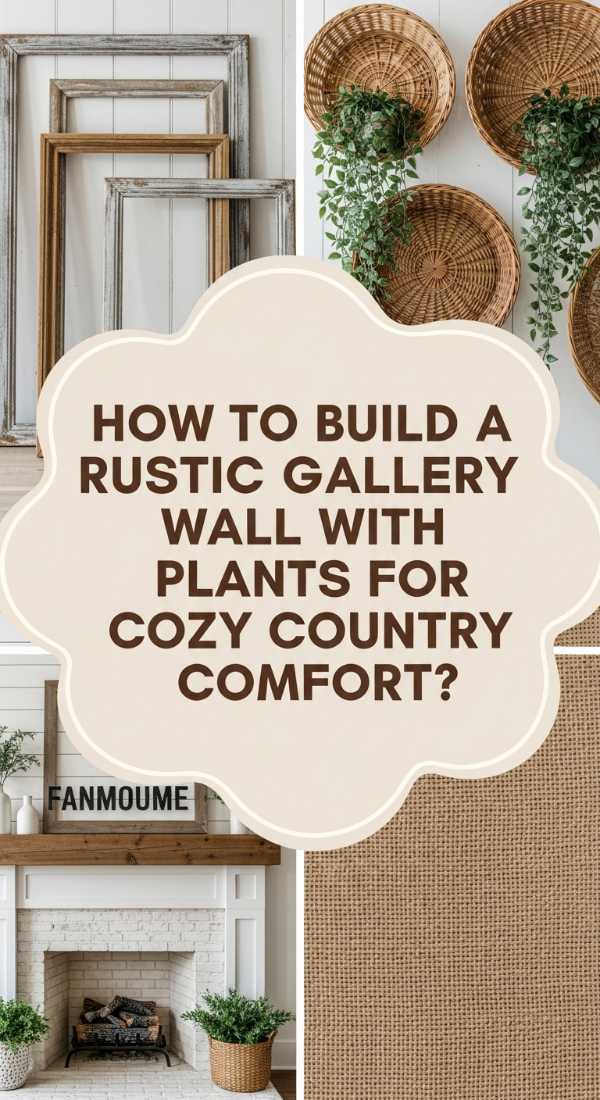
Why we love this
This style is all about warmth, texture, and the simple beauty of rural life. The use of natural materials like reclaimed wood, burlap, and twine creates a tactile experience that feels grounded and unpretentious. It brings the ‘farmhouse’ vibe into the city, where the scent of dried herbs and the sight of trailing vines against rough-hewn timber evoke a sense of home-cooked meals and slow Sunday mornings, wrapping your living space in a layer of cozy, country-inspired comfort.
Essential Elements:
- Reclaimed wood planks or old shutters.
- Mason jars with wire hangers.
- Burlap-wrapped pots.
- Hardy, ‘rustic’ plants like Spider Plants, Pothos, and Herbs.
- Twine and wooden clothespins for hanging dried botanicals.
How to make it
- Mount several reclaimed wood planks horizontally on the wall to act as a rustic backdrop for your botanical elements.
- Attach pipe clamps to the wood planks, which will securely hold Mason jars filled with water for fresh-cut herbs or water-propagated plants.
- Wrap standard plastic nursery pots in burlap and tie them with twine for an instant, budget-friendly rustic makeover.
- Incorporate ‘living’ elements by hanging small bundles of dried lavender or rosemary from the wood using wooden clothespins.
- Use ‘rustic’ plant varieties that can handle a bit of neglect, as the country aesthetic is all about ease and natural, un-fussy growth.
- Add a few vintage-inspired wooden signs or a small chalkboard with plant names to complete the charming farmhouse look.
Conclusion: Embracing Your Inner Botanist
Transforming your home into an urban jungle is more than just a decor trend; it’s a commitment to a lifestyle of growth and wellness. Whether you choose the dramatic flair of a moody mural or the refined order of a minimalist gallery, you are creating a space that honors the natural world. Remember, your botanical sanctuary doesn’t have to be perfect—nature certainly isn’t! Let it grow, let it change, and most importantly, let it bring you peace. Happy planting!