
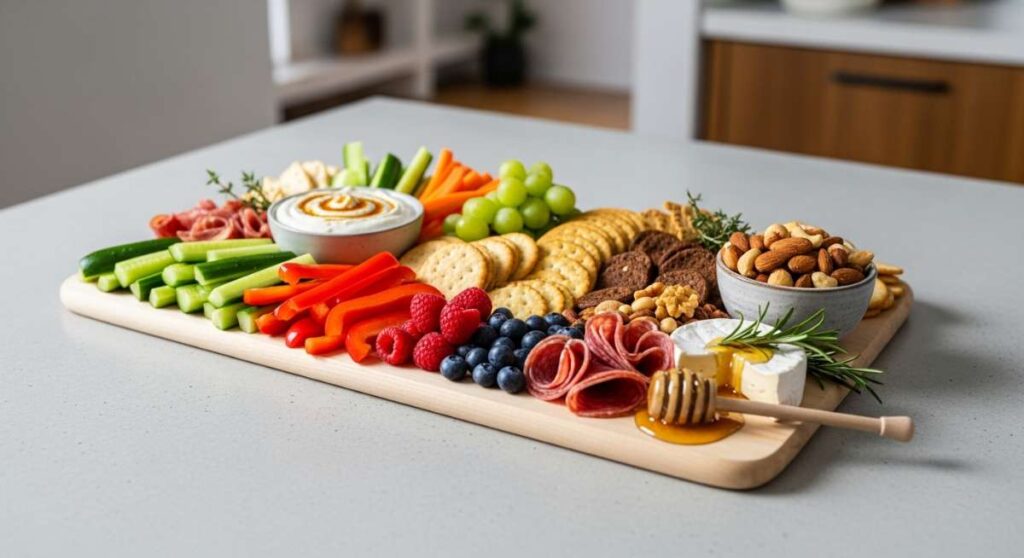
The Easiest Food Board Hacks for Your Next Party
There is something truly magical about the way a gathering transforms when a beautiful food board is placed in the center of the table. I remember the first time I hosted a dinner party; I was a nervous wreck, worrying if the food would be hot or if everyone would have enough to eat. But then I discovered the power of the ‘viral food board’—a communal, vibrant way of eating that invites people to lean in, share stories, and pick at their favorite morsels while the laughter flows as freely as the wine. It’s not just about the food; it’s about the connection that happens when we break bread together in such an effortless, approachable way.
The secret to a viral-worthy board isn’t hours of stress in the kitchen; it’s about mastering a few key, high-impact dishes that look as good as they taste. In this guide, I’m sharing my absolute favorite hacks to turn your next get-together into an unforgettable feast. Whether you are craving the salty-sweet sizzle of teriyaki or the crispy, golden crunch of a perfect katsu, these recipes are designed to be the stars of your spread. Let’s dive into how you can create a board that will have your guests reaching for their phones to snap a photo before they even take their first bite.
How to make authentic Teriyaki Chicken

Why we love this
There is nothing quite like the gloss of a perfectly reduced teriyaki glaze clinging to tender, charred pieces of chicken. The aroma of ginger and garlic hitting a hot pan instantly makes your mouth water, promising a balance of salty soy and deep, brown sugar sweetness. When you bite into a piece, you get that slightly smoky exterior from the sear followed by an explosion of umami-rich juice that makes it impossible to stop at just one. It brings a sophisticated yet comforting vibe to any food board, looking like it came straight from a high-end bistro.
Ingredients
- 2 lbs boneless skinless chicken thighs, cut into bite-sized pieces
- 1/2 cup soy sauce (low sodium preferred)
- 1/4 cup mirin
- 1/4 cup brown sugar
- 1 tablespoon grated fresh ginger
- 2 cloves garlic, minced
- 1 tablespoon cornstarch mixed with 1 tablespoon water
- Toasted sesame seeds and sliced green onions for garnish
How to make it
- Begin by preparing your marinade and glaze base by whisking together the soy sauce, mirin, brown sugar, ginger, and garlic in a small bowl until the sugar is mostly dissolved.
- Heat a large heavy-bottomed skillet or wok over medium-high heat with a splash of neutral oil; once the oil is shimmering and just starting to smoke, add the chicken in a single layer to ensure a proper sear.
- Let the chicken cook undisturbed for 3-4 minutes to develop a deep golden-brown crust before flipping; continue cooking until the internal temperature reaches 165°F.
- Pour the sauce mixture into the pan with the chicken, allowing it to bubble and foam vigorously for about 2 minutes while you scrape up any flavorful browned bits from the bottom.
- Slowly whisk in your cornstarch slurry and continue to simmer, stirring constantly, until the sauce thickens into a rich, dark syrup that coats the back of a spoon.
- Remove from heat immediately and transfer to your board, finishing with a generous sprinkle of sesame seeds and green onions for that professional, vibrant look.
How to cook creamy garlic pasta

Why we love this
This pasta is the ultimate soul-soother, wrapping every single strand in a velvet-like embrace of infused cream and nutty, roasted garlic. As the steam rises from the bowl, the scent of sizzling garlic and melted parmesan fills the room, creating an atmosphere of pure indulgence and warmth. The texture is incredibly silky, providing a luxurious mouthfeel that acts as the perfect neutral yet decadent base for a variety of proteins on your food board. It’s the kind of dish that makes guests close their eyes in appreciation after the very first forkful.
Ingredients
- 1 lb fettuccine or linguine
- 4 tablespoons unsalted butter
- 5 cloves garlic, thinly sliced
- 2 cups heavy cream
- 1 cup freshly grated Parmesan cheese
- Salt and cracked black pepper to taste
- Fresh parsley, finely chopped
How to make it
- Bring a large pot of heavily salted water to a rolling boil and cook your pasta for one minute less than the package directions for ‘al dente’ texture, as it will finish cooking in the sauce.
- While the water boils, melt the butter in a large skillet over medium-low heat; add the sliced garlic and sauté gently for 2-3 minutes until it is fragrant and translucent, being careful not to let it brown or turn bitter.
- Slowly pour in the heavy cream and bring the mixture to a gentle simmer, allowing it to reduce slightly for about 5 minutes until it begins to thicken.
- Reserve 1/2 cup of the starchy pasta water before draining the noodles, then toss the pasta directly into the cream mixture.
- Gradually add the Parmesan cheese, tossing constantly with tongs over low heat until the cheese is melted and the sauce is emulsified and glossy.
- If the sauce becomes too thick, add a splash of the reserved pasta water to loosen it up, then season generously with black pepper and parsley before serving.
How to make hot honey chicken

Why we love this
Hot honey chicken is a masterclass in the ‘swicy’—sweet and spicy—trend that has taken the culinary world by storm for a reason. The chicken is fried to a shattering crispness, creating a textured landscape that traps pools of sticky, spicy honey in every crevice. Each bite offers a playful dance between the initial heat of the chili and the soothing, floral notes of the honey, followed by the satisfying crunch of the golden breading. It is a bold, exciting addition to a board that keeps people coming back for that addictive flavor profile that hits every single taste bud.
Ingredients
- 1.5 lbs chicken breast or thighs, cut into strips
- 2 cups buttermilk
- 2 cups flour seasoned with salt, pepper, and paprika
- 1/2 cup honey
- 2 tablespoons hot sauce (like Frank’s or Sriracha)
- 1 teaspoon red pepper flakes
- Neutral oil for frying
How to make it
- Submerge your chicken pieces in buttermilk and let them marinate for at least 30 minutes in the fridge to tenderize the meat and help the flour adhere.
- In a small saucepan over low heat, combine the honey, hot sauce, and red pepper flakes; stir until the honey is liquid and infused with the spice, then set aside to keep warm.
- Dredge the buttermilk-soaked chicken in the seasoned flour mixture, pressing down firmly to ensure a thick, craggy coating that will become extra crispy when fried.
- Heat about 2 inches of oil in a heavy pot to 350°F; use a thermometer to maintain this temperature, as too low will make the chicken greasy and too high will burn the crust.
- Fry the chicken in small batches for 5-7 minutes, turning once, until they are a deep mahogany brown and register 165°F internally.
- Immediately after removing the chicken from the oil, place it on a wire rack to drain, then drizzle or brush generously with the warm hot honey while the crust is still hot and porous.
How to roast sweet balsamic beets

Why we love this
Roasted beets are nature’s candy, and when paired with a balsamic glaze, their earthy depth is transformed into something truly sophisticated and bright. The roasting process concentrates their natural sugars, giving them a tender, almost buttery texture that melts in your mouth with a subtle resistance. The dark, syrupy balsamic adds a necessary acidic punch that cuts through the earthiness, making the beets shimmer like jewels on your board. They provide a beautiful pop of deep ruby color and a refreshing yet hearty vegetable element that balances out richer, meatier dishes.
Ingredients
- 4 large beets, scrubbed and trimmed
- 2 tablespoons olive oil
- 1/4 cup balsamic vinegar
- 1 tablespoon honey or maple syrup
- Salt and pepper to taste
- Fresh thyme sprigs
How to make it
- Preheat your oven to 400°F and prepare a large sheet of heavy-duty aluminum foil.
- Place the cleaned beets on the foil, drizzle with a tablespoon of olive oil and a pinch of salt, then fold the foil into a tight pouch to steam the beets while they roast.
- Roast for 45-60 minutes, or until a sharp knife can easily slide into the center of the largest beet; let them cool slightly before rubbing the skins off with a paper towel.
- While the beets roast, combine the balsamic vinegar and honey in a small pan and simmer over medium heat until reduced by half into a thick glaze.
- Cut the peeled beets into wedges or rounds and toss them in a bowl with the remaining olive oil and half of the balsamic reduction.
- Arrange the beets on your board and drizzle with the remaining reduction and fresh thyme for a fragrant, elegant finish.
How to bake a spicy sushi bake

Why we love this
A sushi bake is the ultimate party hack, offering all the complex, umami-rich flavors of a specialty roll in a warm, sharable casserole format. It’s a creamy, decadent experience where the rice becomes slightly crispy on the bottom while the top is a bubbling layer of spicy mayo, succulent seafood, and savory furikake. Every scoop feels like a celebration of textures—soft, crunchy, creamy, and spicy—making it a huge crowd-pleaser that is as fun to assemble as it is to eat. It’s a modern classic that brings a playful, interactive element to your food board when served with small sheets of roasted seaweed.
Ingredients
- 3 cups cooked sushi rice (seasoned with rice vinegar and sugar)
- 1 lb imitation crab or cooked shrimp, shredded
- 1/2 cup Japanese mayo (Kewpie)
- 2 tablespoons Sriracha
- 2 tablespoons Furikake seasoning
- Dried seaweed (nori) snacks for serving
- Slices of cucumber and avocado for garnish
How to make it
- Press the seasoned sushi rice firmly into the bottom of a 9×13 inch baking dish, creating an even layer about an inch thick.
- In a medium bowl, mix the shredded crab or shrimp with the Kewpie mayo and Sriracha until the seafood is fully coated in the spicy, creamy dressing.
- Spread the seafood mixture evenly over the rice layer, then sprinkle a heavy coating of furikake over the top to provide saltiness and crunch.
- Bake in a preheated oven at 400°F for about 15-20 minutes, or until the top begins to bubble and brown slightly around the edges.
- For an extra viral touch, drizzle additional Sriracha and mayo in a zigzag pattern across the top once it comes out of the oven.
- Serve the bake warm, allowing guests to scoop small portions onto nori sheets and top them with fresh cucumber or avocado slices for a hit of coolness.
How to make one pot beef

Why we love this
There is nothing more comforting than a one-pot beef dish where the meat has been simmered until it practically falls apart at the touch of a fork. The rich, savory gravy that forms in the pot is a concentrate of slow-cooked vegetables, red wine, and beef drippings, coating every morsel in a blanket of pure flavor. The aroma that fills your home while this simmers is the definition of ‘cozy,’ signaling to your guests that a hearty, soul-warming meal is on the way. It’s a rustic, impressive centerpiece for a board that feels grounded and deeply satisfying.
Ingredients
- 2 lbs beef chuck roast, cut into 1-inch cubes
- 2 tablespoons flour
- 1 large onion, chopped
- 3 carrots, sliced
- 3 cloves garlic, smashed
- 1 cup dry red wine
- 2 cups beef broth
- 2 tablespoons tomato paste
- Fresh rosemary and thyme
How to make it
- Pat the beef cubes dry with paper towels—this is crucial for a good sear—and toss them in a bowl with the flour, salt, and pepper until lightly coated.
- In a large Dutch oven, heat oil over medium-high heat and brown the beef in batches, ensuring each side gets a dark, caramelized crust; remove the beef and set aside.
- In the same pot, add the onions and carrots, sautéing for 5 minutes until the onions are softened and have picked up the browned bits from the beef.
- Stir in the tomato paste and garlic, cooking for another minute until fragrant, then deglaze the pan with the red wine, scraping the bottom vigorously.
- Return the beef and its juices to the pot, add the beef broth and herbs, and bring to a boil; then reduce heat to low and cover with a tight-fitting lid.
- Simmer gently for 1.5 to 2 hours until the beef is meltingly tender and the liquid has reduced into a thick, glossy gravy.
How to glaze hot honey salmon
Why we love this
This salmon recipe is a absolute game-changer, combining the healthy, flaky lightness of the fish with a bold, sticky glaze that caramelizes under the heat. The salmon develops a gorgeous, lacquered finish that catches the light, while the interior remains moist and tender, flaking away in large, succulent shards. The hot honey provides a sweet heat that perfectly complements the natural richness of the salmon, creating a dish that feels both light and incredibly indulgent at the same time. It’s a show-stopping protein that looks incredibly sophisticated on a mixed food board.
Ingredients
- 4 salmon fillets (6 oz each)
- 1/4 cup honey
- 1 tablespoon Sriracha or chili flakes
- 1 tablespoon soy sauce
- 1 tablespoon lemon juice
- 2 cloves garlic, minced
- Olive oil for searing
How to make it
- Whisk together the honey, Sriracha, soy sauce, lemon juice, and minced garlic in a small bowl to create your glaze.
- Season the salmon fillets with salt and pepper, then heat olive oil in a large non-stick skillet over medium-high heat until it shimmers.
- Place the salmon skin-side up in the pan and sear for 4-5 minutes without moving them to develop a crisp, golden exterior.
- Flip the fillets carefully and immediately pour the glaze into the pan; it will begin to bubble and thicken almost instantly.
- Use a spoon to continuously baste the salmon with the thickening glaze for another 3-4 minutes until the salmon is cooked through and the glaze is sticky and dark.
- Remove from the heat and let the salmon rest for 2 minutes before serving, allowing the juices to redistribute for maximum tenderness.
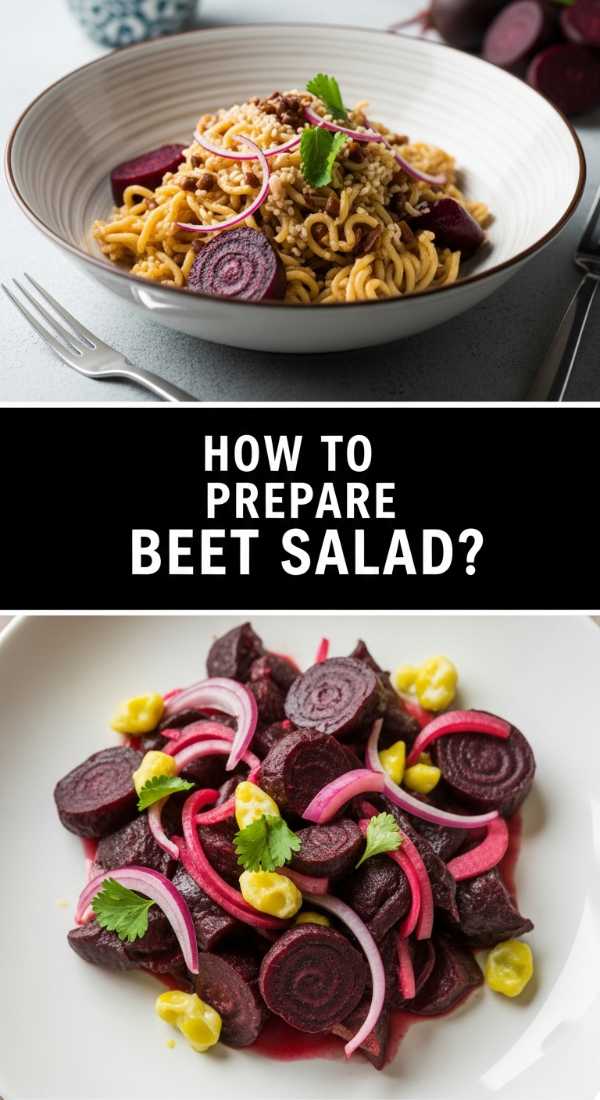
How to prepare a beet salad

Why we love this
A fresh beet salad is a vibrant, refreshing counterpoint to the heavier, savory items on a food board, offering a crisp texture and a bright, zesty finish. The combination of sweet beets, tangy goat cheese, and crunchy nuts creates a symphony of flavors and textures that cleanse the palate and keep you reaching for more. The colors alone—deep purples, bright greens, and snowy whites—make this salad a visual anchor for your board, looking as though it were plated by a professional chef. It’s light, healthy, and provides a sophisticated garden-fresh element that everyone appreciates.
Ingredients
- 3 cups roasted beets, chilled and sliced
- 4 cups baby arugula or mixed greens
- 1/2 cup crumbled goat cheese or feta
- 1/4 cup toasted walnuts or pecans
- 1/2 red onion, thinly sliced
- Dressing: 3 tbsp olive oil, 1 tbsp balsamic vinegar, 1 tsp Dijon mustard, 1 tsp honey
How to make it
- Ensure your roasted beets are completely chilled before starting; slicing them while cold ensures clean edges and prevents them from bleeding too much into the greens.
- In a small jar, combine the olive oil, balsamic vinegar, mustard, and honey; shake vigorously until the dressing is emulsified and creamy.
- In a large mixing bowl, toss the arugula and red onion with just enough dressing to lightly coat the leaves—don’t over-dress or the greens will wilt.
- Layer the dressed greens on a platter and then artfully arrange the sliced beets over the top, rather than tossing them in, to keep the colors distinct and beautiful.
- Sprinkle the crumbled goat cheese and toasted nuts over the top, providing a beautiful contrast of white and brown against the purple beets.
- Finish with a final, light drizzle of the dressing and a crack of fresh black pepper just before placing it on your food board.
How to sear garlic butter steak

Why we love this
There is nothing quite as primal or satisfying as the smell of steak searing in a hot pan with a mountain of garlic and butter. The crust—or ‘Maillard reaction’—provides a deep, savory crunch that gives way to a tender, pink center that is bursting with beefy flavor. As you baste the steak with the foaming garlic butter and fresh herbs, the meat absorbs those aromatic oils, creating a finish that is rich, herbaceous, and incredibly luxurious. Sliced thin and fanned out on a board, it becomes the ultimate centerpiece that screams celebration and high-quality cooking.
Ingredients
- 1.5 lb Ribeye or New York Strip steak (at least 1.5 inches thick)
- 3 tablespoons unsalted butter
- 4 cloves garlic, smashed
- 3 sprigs fresh rosemary or thyme
- Kosher salt and coarse black pepper
- High-smoke point oil (like grapeseed or canola)
How to make it
- Remove the steak from the fridge at least 30-45 minutes before cooking to bring it to room temperature; this ensures even cooking from edge to center.
- Pat the steak completely dry with paper towels and season very generously with kosher salt and pepper on all sides, including the edges.
- Heat a heavy cast-iron skillet over high heat until it is smoking hot, then add a tablespoon of oil and place the steak in the pan.
- Sear for 3-4 minutes per side without moving it to develop a thick, dark crust; use tongs to sear the fat cap on the side as well.
- Reduce the heat to medium and add the butter, smashed garlic, and herbs to the pan; once the butter foams, tilt the pan and use a large spoon to continuously pour the hot butter over the steak for 2-3 minutes.
- Remove the steak when it reaches 130°F for medium-rare, and let it rest on a cutting board for at least 10 minutes before slicing against the grain to ensure the juices stay inside the meat.
How to fry crispy katsu
[IMAGE_10]
Why we love this
Crispy katsu is the ultimate comfort food, offering a light, airy crunch that is completely different from traditional American fried chicken. The use of Panko breadcrumbs creates a jagged, golden exterior that stays crispy for a long time, making it perfect for a board that guests will be grazing on. Inside, the meat remains incredibly juicy and tender, providing a satisfying contrast to the loud, clean crunch of the crust. When drizzled with a tangy, savory katsu sauce, it becomes an addictive snack that is both filling and incredibly fun to eat with your hands or chopsticks.
Ingredients
- 4 boneless pork chops or chicken cutlets, pounded thin
- 1 cup all-purpose flour
- 2 large eggs, beaten
- 2 cups Panko breadcrumbs
- Salt and pepper
- Neutral oil for frying
- Katsu sauce (store-bought or mix ketchup, Worcestershire, and soy sauce)
How to make it
- Pound your meat to an even 1/2 inch thickness using a meat mallet; this ensures that the meat cooks through at the exact same time the breading becomes golden.
- Set up a standard breading station with three shallow bowls: one with seasoned flour, one with the beaten eggs, and one with the Panko.
- Dredge each piece in flour (shaking off excess), dip into the egg wash, and then press firmly into the Panko, ensuring every square inch is covered in crumbs.
- Heat about 1/2 inch of oil in a skillet to 350°F; you can test this by dropping a single Panko crumb in—if it sizzles immediately, you’re ready.
- Fry the cutlets for 3-4 minutes per side, being careful not to crowd the pan which would drop the oil temperature and lead to soggy breading.
- Transfer the golden-brown katsu to a wire rack to maintain air circulation and keep the bottom crispy, then slice into thick strips and serve with a side of tangy sauce.
Conclusion: The Art of the Board
Building a food board is more than just a culinary task; it’s a creative expression of hospitality. By combining these viral-worthy techniques—from the perfect sear on a steak to the delicate balance of a beet salad—you create a tapestry of flavors that invites your guests to explore and enjoy. Remember, the best boards are messy, vibrant, and full of variety. Don’t be afraid to mix these dishes, add some fresh fruits, nuts, and crackers, and let the conversation flow. Your next party isn’t just about the food; it’s about the memories made around the board. Happy hosting!
Frequently Asked Questions
How do I keep the food warm on a food board?
The best way to keep food board items warm is to use warmed serving platters or small slate boards that hold heat. You can also stagger the arrival of your ‘hot’ items, bringing out the steak and katsu last so they are enjoyed at their peak temperature.
Can I prepare these dishes in advance?
Absolutely! Items like the balsamic beets and the sauces for the teriyaki and hot honey can be made 1-2 days ahead. The sushi bake can be assembled and kept in the fridge until you are ready to pop it in the oven. For the fried items like katsu, it’s best to fry them just before serving for maximum crunch.
What is the best way to arrange a board for a crowd?
Start with your largest items (the ‘anchors’) like the steak or the sushi bake in the center or corners. Fill in the gaps with your salads and smaller proteins, then use garnishes like herbs, nuts, and sliced fruit to fill any remaining ‘white space’ to give it that lush, viral look.