

Why Everyone is Obsessed with This 10-Minute Simple Food Board
There is a certain magic that happens when you stop trying to make dinner a formal affair and start treating it like a celebration of flavors. We’ve all had those evenings where the clock is ticking, the house is loud, and the thought of a three-course meal feels more like a chore than a joy. That’s exactly why the ‘Simple Food Board’ has taken over my kitchen and my social media feed—it’s about bringing people together around a spread that looks like a masterpiece but takes mere minutes to assemble.
The secret isn’t in fancy gadgets or rare ingredients; it’s in the art of the assembly. By combining fresh proteins, vibrant vegetables, and zesty dressings on one large wooden board, you create an interactive dining experience that feels intimate and relaxed. It invites your guests to reach in, mix and match, and savor every bite at their own pace. Trust me, once you try this effortless way of eating, you’ll never want to go back to individual plating again.
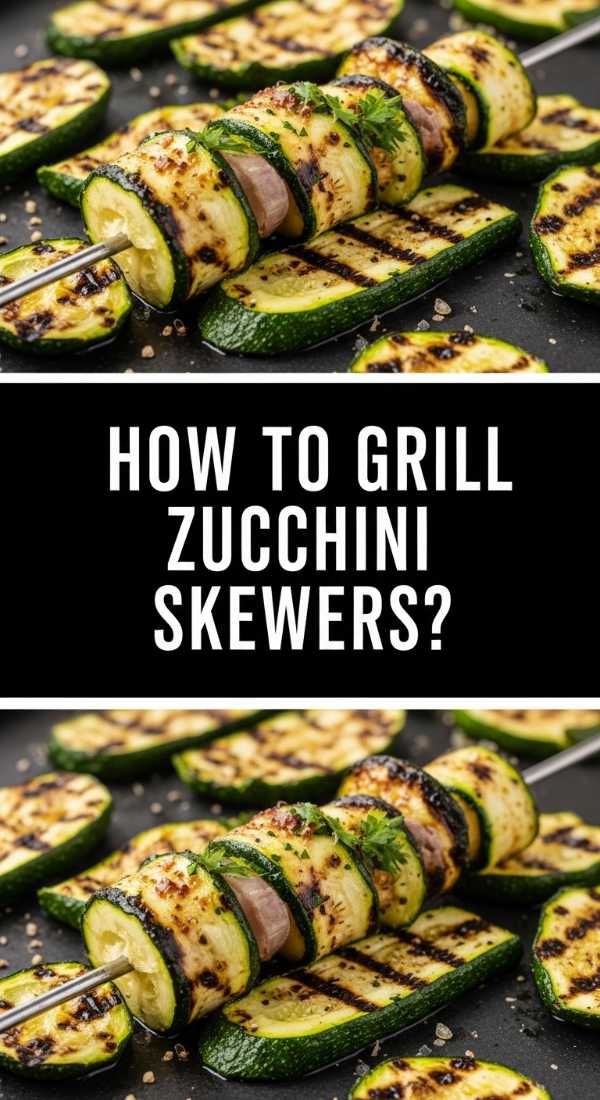
How to grill zucchini skewers
Why we love this
There is something incredibly nostalgic about the scent of zucchini hitting a hot grill, evoking memories of sun-drenched backyard barbecues and warm summer breezes. When grilled correctly, zucchini transforms from a humble vegetable into a smoky, tender delicacy with beautifully charred edges that provide a satisfying crunch. The contrast between the soft, buttery interior and the zesty, salt-kissed exterior makes these skewers an absolute must-have for any board that needs a refreshing yet savory element.
Ingredients
- 3 medium zucchinis, sliced into 1/2-inch rounds
- 2 tablespoons extra virgin olive oil
- 1 teaspoon dried oregano
- 1/2 teaspoon garlic powder
- Sea salt and cracked black pepper to taste
- Lemon wedges for serving
How to make it
- Begin by prepping your skewers; if using wooden ones, soak them in water for at least 20 minutes to prevent burning. Slice the zucchini into uniform rounds to ensure even cooking across all pieces.
- In a large mixing bowl, toss the zucchini rounds with olive oil, oregano, garlic powder, salt, and pepper until each piece is thoroughly and evenly coated.
- Thread the zucchini rounds onto the skewers, leaving a small amount of space between each piece to allow the heat to circulate and create those coveted grill marks.
- Preheat your grill or grill pan to medium-high heat (approximately 400°F). Lightly oil the grates to prevent sticking.
- Place the skewers on the grill and cook for 3 to 4 minutes per side. You are looking for deep brown grill marks and a slight translucency in the flesh, indicating they are tender but not mushy. Finish with a fresh squeeze of lemon juice immediately after removing from heat.
How to make berry salads

Why we love this
A berry salad is like a burst of pure sunshine on your plate, offering a vibrant explosion of sweetness that balances out the savory notes of a food board. The aroma of freshly torn mint leaves mixed with the floral scent of ripe strawberries and blueberries is enough to make anyone’s mouth water instantly. Every spoonful provides a delightful texture play between the pop of the blueberries, the juiciness of the blackberries, and the velvet-soft crunch of the poppy seeds.
Ingredients
- 2 cups fresh strawberries, hulled and quartered
- 1 cup fresh blueberries
- 1 cup fresh raspberries
- 1 tablespoon honey or agave nectar
- 1 tablespoon fresh lime juice
- 1/4 cup fresh mint leaves, chiffonade
How to make it
- Start by gently washing all your berries in cold water and patting them completely dry with a paper towel; excess moisture will make the salad soggy and dilute the flavors.
- In a small glass jar or bowl, whisk together the honey and lime juice until the honey is completely dissolved, creating a light, glossy glaze.
- Place the strawberries, blueberries, and raspberries in a wide, shallow bowl. This prevents the heavier berries from crushing the delicate raspberries at the bottom.
- Drizzle the honey-lime dressing over the fruit and use a large silicone spatula to gently fold the mixture together, being careful not to break the skins of the fruit.
- Just before serving, sprinkle the freshly sliced mint over the top. This timing is crucial because mint oxidizes and turns brown quickly; adding it last ensures the most vibrant green color and pungent aroma.
How to sear fresh salmon

Why we love this
The sound of a cold salmon fillet hitting a screaming-hot cast iron skillet is the ultimate kitchen symphony, signaling a meal that is both healthy and indulgent. When you achieve that perfect sear, the skin becomes a salty, potato-chip-crisp layer that protects the succulent, fatty flakes of pink meat underneath. The richness of the fish paired with a hint of lemon and herbs creates a sophisticated profile that elevates the entire food board to a gourmet level.
Ingredients
- 2 center-cut salmon fillets (6 oz each), skin-on
- 1 tablespoon neutral oil (like avocado or grapeseed)
- 1 tablespoon unsalted butter
- Kosher salt and coarse black pepper
- Fresh dill for garnish
How to make it
- Remove the salmon from the refrigerator 15 minutes before cooking to take the chill off, which ensures even cooking. Use a paper towel to pat the skin side extremely dry—this is the secret to a truly crispy skin.
- Season both sides generously with salt and pepper. Heat your skillet over medium-high heat until the oil begins to shimmer and show faint wisps of smoke.
- Place the salmon fillets skin-side down in the pan. Use a flexible spatula to press down firmly on the fish for the first 30 seconds to prevent the skin from curling up.
- Let the salmon cook undisturbed for about 4 to 5 minutes. You will see the color of the meat change from translucent pink to opaque beige moving up the side of the fillet.
- Once the skin releases easily from the pan, flip the fish. Add the butter to the pan and let it foam, then spoon the melted butter over the salmon for 1 more minute. Remove from heat when the internal temperature reaches 125-130°F for a perfect medium-rare.
How to bake lemon chicken

Why we love this
Lemon chicken is the ultimate comfort food that manages to feel light and bright at the same time, filling your kitchen with a heavenly citrusy aroma that lingers beautifully. The golden-brown edges of the chicken breast, lacquered in a reduction of lemon juice and pan drippings, offer a savory-tart punch that is deeply satisfying. It’s the kind of dish that feels like a warm hug, providing a reliable, juicy protein base that pairs effortlessly with every other item on your board.
Ingredients
- 1 lb boneless, skinless chicken breasts, pounded to even thickness
- 3 tablespoons olive oil
- 1 large lemon, sliced into rounds
- 3 cloves garlic, smashed
- 1 teaspoon dried thyme
- Salt and pepper to taste
How to make it
- Preheat your oven to 400°F (200°C). Pounding the chicken breasts to an even 3/4-inch thickness is a critical step; it ensures the entire piece of meat finishes cooking at the same time without drying out the edges.
- In a small bowl, whisk together the olive oil, thyme, salt, pepper, and smashed garlic. Rub this mixture thoroughly over both sides of the chicken breasts.
- Place the chicken in a ceramic baking dish and arrange the lemon slices on top of and around the meat. The lemon slices will caramelize in the oven, releasing sweet, concentrated juices.
- Bake for 20 to 25 minutes. To ensure maximum juiciness, use a meat thermometer to check for an internal temperature of exactly 165°F.
- Once removed from the oven, cover the dish loosely with foil and let the chicken rest for at least 5 to 7 minutes. This allows the juices to redistribute back into the fibers of the meat, ensuring every bite is moist.
How to roast sweet corn

Why we love this
There is no flavor quite like the concentrated sweetness of roasted corn, where each kernel becomes a tiny explosion of summer flavor. As the corn roasts, the natural sugars caramelize, turning the bright yellow kernels into shades of deep gold and toasted brown that look stunning on a rustic board. The smell of roasting husks and melting butter is intoxicating, reminding us of late-night festivals and family gatherings under the stars.
Ingredients
- 4 ears of fresh corn, husked
- 2 tablespoons melted butter
- 1/2 teaspoon smoked paprika
- 1/4 cup crumbled cotija cheese
- Fresh cilantro, chopped
How to make it
- Preheat your oven to 425°F (220°C). While the oven heats, remove all silk from the corn ears—this is easiest done by rubbing the corn with a dry paper towel after husking.
- Brush each ear of corn generously with the melted butter and sprinkle with a pinch of salt. For a deeper flavor profile, you can mix the smoked paprika directly into the butter before brushing.
- Place the corn directly on a baking sheet. Roast for 20 to 25 minutes, turning the ears every 5 to 7 minutes using tongs to ensure they get even color and charring on all sides.
- Look for the kernels to begin to shrivel slightly and take on a deep golden hue with occasional charred spots. This indicates the sugars have fully caramelized.
- Remove from the oven and immediately sprinkle with crumbled cotija cheese and fresh cilantro while the butter is still tacky, allowing the toppings to adhere to the warm kernels.
How to prepare shrimp tacos

Why we love this
Shrimp tacos are the quintessential ‘fun’ food, bringing a playful, coastal vibe to your board with their bright colors and bold, spicy aromas. The snap of the perfectly cooked shrimp, coated in a zesty rub, provides a wonderful contrast to the soft, warm tortillas and the cool, creamy crunch of a cabbage slaw. It’s an interactive component that allows everyone to customize their perfect bite, making the meal feel like a mini-vacation in the middle of a busy week.
Ingredients
- 1 lb large shrimp, peeled and deveined
- 1 tablespoon taco seasoning (chili powder, cumin, garlic powder)
- 1 tablespoon lime juice
- Small corn or flour tortillas
- Sliced radishes and jalapeños for garnish
How to make it
- Pat the shrimp dry with paper towels to ensure they sear rather than steam in the pan. In a bowl, toss the shrimp with the taco seasoning and a drizzle of oil until they are vibrant and red.
- Heat a large skillet over medium-high heat. Add the shrimp in a single layer, ensuring they aren’t crowded. Cook for only 2 minutes per side; the shrimp are done when they turn opaque and form a ‘C’ shape. Be careful not to overcook them into an ‘O’ shape, which makes them rubbery.
- While the shrimp are cooking, warm your tortillas. This is best done directly over a low gas flame for 10 seconds per side until slightly charred, or in a dry pan until soft and pliable.
- Assemble the tacos by placing 3 to 4 shrimp in each tortilla. The heat from the shrimp will slightly warm the base, making it easier to fold.
- Top with a squeeze of fresh lime juice, sliced radishes for crunch, and jalapeños for a kick of heat. Serve them nested together on the board to keep them upright and warm.
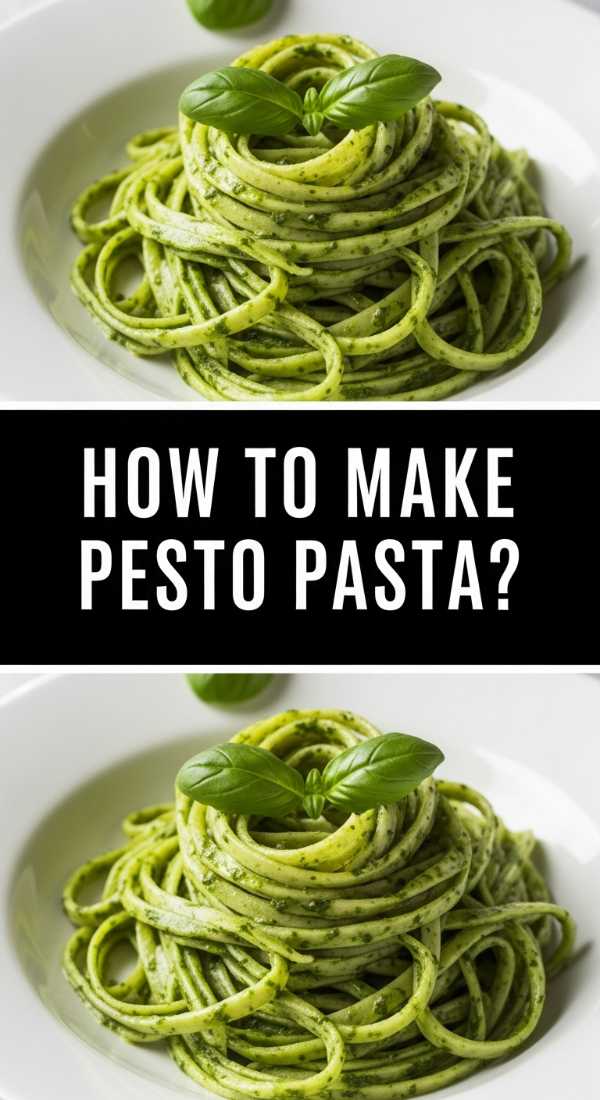
How to make pesto pasta
Why we love this
Pesto pasta is a classic for a reason; it’s an herbal, garlicky masterpiece that feels incredibly luxurious despite its simplicity. The vibrant green sauce coats every strand of pasta in a silky, nutty embrace that smells like a fresh Mediterranean garden. There is something deeply comforting about the combination of aged parmesan and sweet basil, providing a rich, savory backbone to the food board that satisfies the soul as much as the appetite.
Ingredients
- 12 oz spaghetti or fusilli pasta
- 2 cups fresh basil leaves, packed
- 1/3 cup pine nuts, lightly toasted
- 1/2 cup freshly grated Parmesan cheese
- 1/2 cup extra virgin olive oil
- 2 cloves garlic
How to make it
- Bring a large pot of heavily salted water to a rolling boil. Add your pasta and cook until it is ‘al dente’—usually 1 to 2 minutes less than the package instructions. Before draining, reserve 1/2 cup of the starchy pasta water; this is the ‘liquid gold’ that creates a creamy sauce.
- While the pasta cooks, make the pesto. In a food processor, pulse the garlic and toasted pine nuts until coarsely chopped. Add the basil leaves and pulse again until a thick paste forms.
- With the processor running on low, slowly drizzle in the olive oil in a steady stream to emulsify the sauce. Stir in the Parmesan cheese by hand at the end to maintain some texture.
- In a large warm bowl, combine the hot pasta with the pesto. Gradually add the reserved pasta water, one tablespoon at a time, tossing vigorously until the sauce transforms from a thick paste into a glossy, silk-like coating.
- Serve immediately, finished with an extra sprinkle of cheese and a few whole basil leaves for a professional, fresh-from-the-kitchen look.
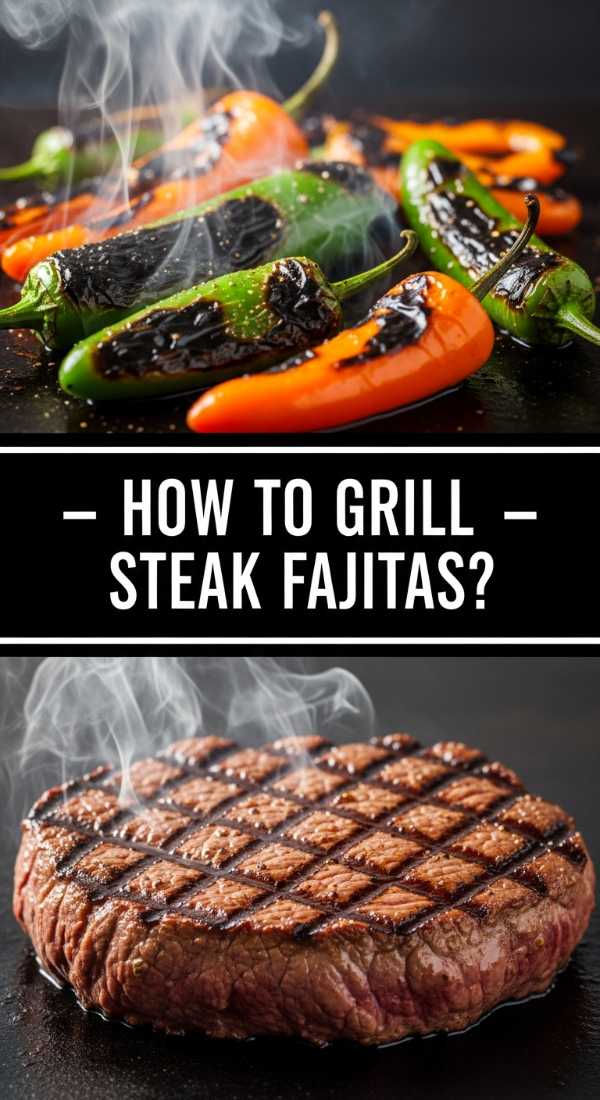
How to grill steak fajitas
Why we love this
Grilling steak fajitas brings a sense of theater to the table, with the sizzle of the meat and the sweet, charred aroma of bell peppers filling the air. The steak itself, marinated to perfection and sliced thin, offers a melt-in-your-mouth tenderness that is perfectly complemented by the smoky, softened onions. It’s a hearty, protein-rich addition to any board that provides a deep, umami-filled satisfaction that keeps everyone coming back for more.
Ingredients
- 1 lb flank steak or skirt steak
- 1 large onion, sliced into strips
- 2 bell peppers (any color), sliced into strips
- 1/4 cup lime juice
- 2 tablespoons soy sauce
- 2 cloves garlic, minced
How to make it
- Whisk together the lime juice, soy sauce, garlic, and a splash of oil in a gallon-sized bag. Add the steak and marinate for at least 30 minutes, or up to 4 hours. The acidity in the lime juice breaks down the tough fibers in these specific cuts of meat.
- Prepare your grill for high-heat direct cooking. Clean and oil the grates thoroughly.
- Place the steak on the grill and sear for 5 to 6 minutes per side for medium-rare. You are looking for a dark, flavorful crust on the outside.
- While the steak cooks, use a grill basket or a cast iron skillet on the grill to sauté the peppers and onions with a little salt until they are softened and have blackened ‘blisters’ on the skin.
- Crucially, let the steak rest on a cutting board for 10 minutes before slicing. Always slice against the grain (perpendicular to the muscle fibers) to ensure the steak is tender and easy to chew.
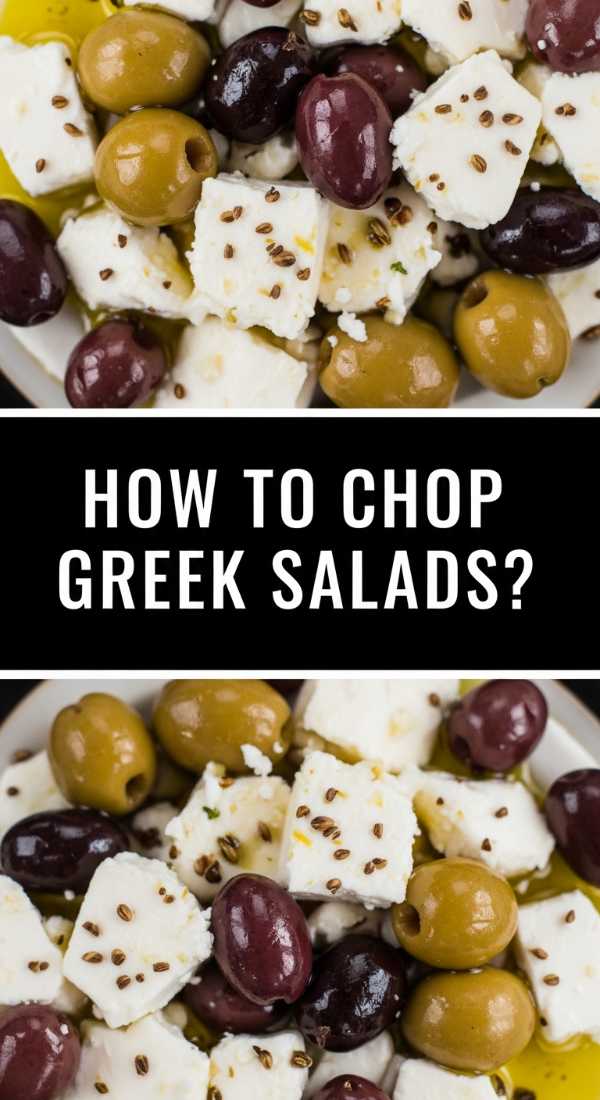
How to chop greek salads
Why we love this
A Greek salad is the ultimate palate cleanser on a food board, offering a sharp, vinegary bite and a cooling crunch that offsets richer meats. The combination of salty olives, creamy feta, and the crisp bite of cucumbers creates a textural playground that feels incredibly fresh. The smell of dried oregano and high-quality olive oil instantly transports you to a seaside tavern in the Mediterranean, making it a timeless favorite for any gathering.
Ingredients
- 1 English cucumber, diced into 1-inch cubes
- 2 large tomatoes, cut into wedges
- 1/2 red onion, thinly sliced
- 1/2 cup Kalamata olives, pitted
- 4 oz feta cheese, cut into large cubes
- 3 tablespoons olive oil and 1 tablespoon red wine vinegar
How to make it
- Uniformity is key to a great Greek salad. Start by dicing your cucumbers and tomatoes into similarly sized chunks so that every forkful contains a bit of everything.
- Slice the red onion as thinly as possible; if you find raw onions too sharp, soak the slices in ice water for 10 minutes before adding them to the salad to mellow the bite.
- In a large bowl, whisk together the olive oil, red wine vinegar, and a generous pinch of dried oregano. Add the vegetables and olives to the bowl and toss gently to coat.
- The most important step is adding the feta last. Traditionally, Greek salads feature large slabs or cubes of feta rather than crumbles; this prevents the cheese from breaking down and making the dressing cloudy.
- Let the salad sit for 10 minutes before serving. This allows the juices from the tomatoes to mingle with the vinegar and oil, creating a natural, flavorful ‘broth’ at the bottom of the bowl.
How to stuff bell peppers

Why we love this
Stuffed bell peppers are like little edible gift boxes, packed with savory surprises and topped with bubbling, golden cheese. The sweetness of the roasted pepper ‘vessel’ becomes soft and pliable in the oven, acting as the perfect container for a hearty mixture of grains and spices. The aroma of baking peppers and melting cheese is deeply inviting, providing a beautiful pop of color and a complete, self-contained portion that anchors the food board.
Ingredients
- 4 large bell peppers, tops removed and seeded
- 2 cups cooked quinoa or rice
- 1 cup black beans, rinsed
- 1 cup salsa
- 1 cup shredded Monterey Jack cheese
- 1/2 teaspoon cumin
How to make it
- Preheat your oven to 375°F (190°C). To ensure the peppers are tender, place the empty, seeded peppers in a baking dish with a splash of water at the bottom, cover with foil, and pre-bake for 10 minutes before filling.
- In a medium bowl, combine your cooked grain (rice or quinoa), black beans, salsa, cumin, and half of the cheese. Stir until the mixture is well-incorporated and moist.
- Pack the filling tightly into each pre-baked pepper using a spoon, pressing down to ensure there are no air pockets.
- Top each pepper with the remaining cheese. Place the peppers back in the oven, uncovered, and bake for another 15 to 20 minutes.
- You’ll know they are ready when the cheese is golden-brown and bubbling, and the pepper skins are slightly wrinkled and soft to the touch. Let them stand for 5 minutes before transferring to the food board.
Conclusion
The beauty of the Simple Food Board is that it evolves with you. Whether you’re hosting a sophisticated dinner party or just trying to survive a Tuesday night, these ten components offer a roadmap to a meal that is as beautiful as it is delicious. By focusing on high-quality ingredients and simple techniques, you take the stress out of the kitchen and put the joy back into the eating. So, grab your favorite wooden board, pick a few of these recipes, and watch how quickly your table becomes the heart of the home.