
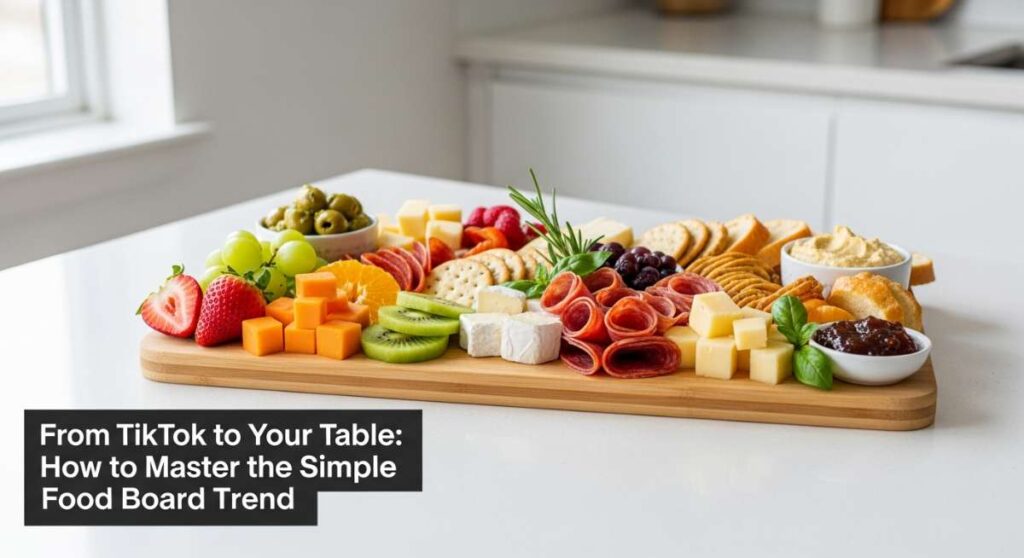
From TikTok to Your Table: How to Master the Simple Food Board Trend
There is something undeniably magical about the way food brings us together, especially when it is presented as a vibrant, edible canvas. We’ve all spent those late nights scrolling through TikTok, mesmerized by the rhythmic spreading of whipped butter or the artistic layering of artisanal cheeses. It’s not just about the food; it’s about the aesthetic of abundance and the effortless joy of sharing a meal that looks like a work of art. My kitchen has become a laboratory for these viral trends, and I’ve discovered that the secret isn’t in the price of the ingredients, but in the love and intention behind the arrangement.
Bringing these boards into your home is like inviting a little bit of internet sunshine to your dinner table. Whether you are hosting a boisterous backyard bash or a quiet Sunday brunch, these boards transform simple ingredients into a focal point of conversation. They encourage guests to linger, to pick, and to savor every bite. Today, I’m sharing my favorite ways to elevate the ‘food board’ concept across every season and craving, ensuring your next gathering is as delicious as it is Instagram-worthy.
How to build the ultimate chilled Caprese pasta board?
Why we love this
This dish captures the very essence of a Mediterranean summer, blending the cool, refreshing bite of heirloom tomatoes with the creamy, indulgent pull of fresh buffalo mozzarella. As you draw a forkful from the board, the aroma of torn basil leaves hits you first—peppery and bright—followed by the silky richness of high-quality olive oil. The pasta offers a satisfyingly firm, al dente texture that contrasts beautifully with the soft, bursting juices of the fruit. It’s a sensory celebration that feels like a warm breeze on a coastal terrace, making it the perfect centerpiece for a sun-drenched lunch.
Ingredients
- 1 lb Farfalle or Fusilli pasta
- 2 cups multi-colored heirloom cherry tomatoes, halved
- 8 oz fresh buffalo mozzarella pearls
- 1 cup fresh basil leaves, torn by hand
- 1/4 cup extra virgin olive oil
- 2 tbsp balsamic glaze
- Flaky sea salt and cracked black pepper
- 1 lemon, zested
How to make it
- Begin by bringing a large pot of heavily salted water to a rolling boil. Add your pasta and cook it for exactly one minute less than the package directions for ‘al dente’ to ensure it maintains a firm structure even after cooling.
- Immediately drain the pasta and spread it out on a large baking sheet. Drizzle lightly with olive oil and toss to prevent sticking. Allow it to air-cool to room temperature rather than rinsing it, which preserves the starches that help the dressing cling.
- Once cooled, transfer the pasta to a large wooden board, creating a slightly mounded base.
- Artfully nestle the halved heirloom tomatoes and mozzarella pearls into the folds of the pasta, ensuring an even distribution of color and shape across the entire board.
- Scatter the torn basil leaves generously over the top. The jagged edges of hand-torn basil release more essential oils than knife-cut leaves, enhancing the fragrance.
- Whisk your extra virgin olive oil with lemon zest and a pinch of salt, then drizzle it evenly over the board. Finish with a dramatic swirl of thick balsamic glaze and a final sprinkle of flaky sea salt for a crunchy, savory pop.
How to serve a deconstructed elote street corn board?

Why we love this
There is an addictive quality to street corn that hits every taste bud: the charred sweetness of the kernels, the tangy zip of lime, and the smoky heat of chili powder. When spread across a board, this dish becomes an interactive experience where guests can scoop up the creamy, salty goodness with crisp tortilla chips. The aroma of toasted corn mingling with fresh cilantro is intoxicating, and the vibrant yellow of the corn contrasted against the snowy white cotija cheese makes it a visual masterpiece. It’s messy, it’s bold, and it’s the ultimate crowd-pleaser for any outdoor celebration.
Ingredients
- 6 ears of fresh sweet corn, husked
- 1/2 cup Mexican crema or sour cream
- 1/2 cup mayonnaise
- 1 cup crumbled cotija cheese
- 1/2 cup chopped fresh cilantro
- 2 tsp smoked paprika or Tajin seasoning
- 3 limes, cut into wedges
- Large bag of blue corn or sea salt tortilla chips
How to make it
- Preheat your grill to medium-high heat (about 400°F). Place the husked corn directly onto the grates and grill for 10-12 minutes, turning every 2-3 minutes until the kernels are tender and charred in beautiful dark spots all over.
- Once charred, remove the corn and let it cool slightly. Using a sharp knife, stand the corn upright and slice the kernels off the cob into long, thick planks or loose kernels.
- In a small bowl, whisk together the crema and mayonnaise until smooth. Spread this mixture in a thin, even layer across the center of a long serving board, leaving a 2-inch border.
- Layer the charred corn kernels directly on top of the cream base. The warmth of the corn will slightly soften the cream, creating a luscious texture.
- Sprinkle the crumbled cotija cheese and smoked paprika over the corn, then garnish with a heavy handful of fresh cilantro.
- Arrange lime wedges and a perimeter of sturdy tortilla chips around the corn mixture. Advise guests to use the chips to scoop the corn and cream together for the perfect bite.
How to create a vibrant stone fruit and honeycomb platter?

Why we love this
This board is a love letter to the peak of summer, showcasing the fuzzy velvet of peaches and the deep, wine-red sweetness of plums. The addition of raw honeycomb adds a luxury that is both visual and tactile; the way the golden liquid slowly oozes over the fruit is sheer poetry. The flavors range from tart and tangy to deep, floral sweetness, balanced by the crunch of toasted nuts. It’s a sophisticated, light dessert that allows the natural beauty of the harvest to shine, leaving a lingering taste of sun-ripened nectar on your palate.
Ingredients
- 4 ripe peaches, sliced into wedges
- 4 plums, sliced
- 1 cup fresh cherries, stems on
- 1 large piece of fresh honeycomb
- 1/2 cup Marcona almonds
- Fresh mint sprigs for garnish
- 8 oz whipped ricotta or mascarpone
How to make it
- Select a large slate or marble board, which helps keep the fruit slightly cooler. Begin by placing a small bowl of whipped ricotta in the corner and the honeycomb block in the center.
- Arrange the peach and plum wedges in a sweeping fan motion around the honeycomb, alternating colors to create a gradient effect.
- Tuck the whole cherries into any gaps to add height and a pop of deep crimson.
- Scatter the Marcona almonds across the board to provide a salty, buttery crunch that cuts through the intense sweetness of the fruit.
- Use a small spoon to slightly break the surface of the honeycomb, encouraging the honey to flow out and glisten against the fruit.
- Finish by tucking fresh mint sprigs between the slices for a pop of green and a refreshing aroma. Serve with small dessert forks or allow guests to use their hands for a rustic feel.
How to master the viral herb-whipped butter board?

Why we love this
The butter board trend took the world by storm for a reason: it’s pure, unadulterated comfort served with a side of elegance. Imagine the silkiest, high-fat butter whipped until it’s as light as a cloud, then topped with the earthy fragrance of rosemary and the bright, citrusy notes of lemon zest. As you swipe a piece of warm, crusty bread through the spread, you get a perfect harmony of fat, salt, and herb. It’s a decadent, communal way to start a meal that feels far more special than a simple butter dish, inviting everyone to dive into the creamy goodness together.
Ingredients
- 2 sticks high-quality unsalted butter (room temperature)
- 1 tbsp flaky sea salt
- 1 tbsp fresh rosemary, finely minced
- 1 tbsp fresh thyme leaves
- Zest of one organic lemon
- 1 tbsp honey or hot honey
- Edible flowers (optional)
- 1 warm baguette or sourdough loaf, sliced
How to make it
- Ensure your butter is truly at room temperature—it should yield easily when pressed but not be oily. Place it in a stand mixer with a whisk attachment and whip on high speed for 3-5 minutes until it doubles in volume and becomes pale and fluffy.
- Using a small offset spatula or the back of a spoon, spread the whipped butter onto a clean wooden board in decorative, swirling swoops and peaks.
- Evenly sprinkle the flaky sea salt over the butter. Salt is crucial here as it enhances the creamy dairy notes.
- Layer on your finely minced rosemary, thyme, and lemon zest. The herbs should be distributed so that every ‘swipe’ gets a bit of green.
- Drizzle the honey in a thin stream over the entire board to add a subtle sweetness that balances the savory herbs.
- If using, garnish with edible flowers for a stunning presentation. Serve immediately while the butter is soft and pliable, alongside a basket of warm, toasted bread.
How to make crispy sourdough discard flatbread boards?

Why we love this
There’s a rustic, soulful quality to sourdough that never goes out of style, and using the ‘discard’ creates a flatbread with a complex, tangy depth that you just can’t get from commercial yeast. These flatbreads are incredibly crispy on the outside while remaining slightly chewy in the center, carrying the char of a hot skillet. Served on a board with roasted garlic and creamy dips, they represent the ultimate ‘low-waste’ luxury. The scent of fermenting dough hitting a hot pan is enough to draw anyone into the kitchen, promising a snack that is both hearty and sophisticated.
Ingredients
- 1 cup sourdough discard (unfed)
- 1 cup all-purpose flour
- 1/2 tsp fine sea salt
- 2 tbsp olive oil (plus more for the pan)
- 1 tsp dried oregano
- 1 head of roasted garlic
- Side of hummus or tzatziki
How to make it
- In a medium bowl, mix the sourdough discard, flour, salt, olive oil, and oregano until a shaggy dough forms. Knead gently for 1-2 minutes on a floured surface until it becomes smooth.
- Divide the dough into 4 equal portions. Use a rolling pin to flatten each piece into an irregular, thin oval shape, about 1/8 inch thick.
- Heat a cast-iron skillet over medium-high heat. Drizzle a teaspoon of olive oil in the pan. Once the oil shimmers, lay one flatbread in the skillet.
- Cook for 2-3 minutes until large bubbles form on the surface and the bottom is deeply browned and crispy. Flip and cook for another 2 minutes.
- Transfer the hot flatbreads to a board and immediately rub them with a clove of roasted garlic while they are still steaming.
- Slice the flatbreads into triangles and arrange them on the board around a bowl of creamy dip. Garnish with a final sprinkle of herbs and a drizzle of olive oil.
How to assemble a lox and bagel garden board?

Why we love this
This is the ultimate spring brunch centerpiece, a vibrant garden of colors that feels both light and incredibly satisfying. The silky, salty smoked salmon pairs perfectly with the cool tang of cream cheese, while the snap of fresh radishes and cucumbers adds a much-needed crunch. It’s a visual feast that reminds you of a blooming meadow, with the pink of the fish, the green of the dill, and the bright purple of pickled onions. Eating from this board is a slow, leisurely process of building the ‘perfect bite,’ making your Sunday morning feel like a special occasion.
Ingredients
- 8 oz smoked salmon (lox)
- 4 mini bagels, halved and toasted
- 1 cup whipped plain cream cheese
- 1/2 red onion, thinly sliced (or pickled)
- 1 cucumber, sliced into ribbons
- 3-4 radishes, thinly shaved
- 2 tbsp capers, drained
- Fresh dill sprigs and lemon slices
How to make it
- Start by placing a bowl of whipped cream cheese in the center of the board and use a spoon to create a well in the middle, filling it with a few capers.
- Arrange the toasted bagel halves in a circular pattern around the cream cheese, slightly overlapping them to save space.
- Fold the smoked salmon slices into ‘ribbons’ or ‘roses’ and nestle them into the gaps between the bagels. This adds height and makes the salmon easier to pick up.
- Interweave cucumber ribbons and radish shavings throughout the salmon and bagels, creating a lush, ‘overgrown’ garden look.
- Scatter the red onions and remaining capers over the entire board. The acidity of the onions is vital for cutting through the richness of the salmon.
- Garnish heavily with fresh dill and tuck lemon slices into the edges so guests can add a fresh squeeze of citrus to their creations.
How to design a floral shortbread cookie grazing board?

Why we love this
There is a whimsical, fairytale charm to a board covered in buttery shortbread and delicate edible blooms. The cookies themselves are crumbly and rich, with a hint of vanilla that melts on the tongue. When you bite into one, the subtle floral notes of pansies or lavender provide a sophisticated finish that elevates a simple sweet into an artisanal experience. This board is perfect for tea parties or bridal showers, where the visual impact of the colorful petals against the golden cookies creates a moment of pure, aesthetic delight that guests will be talking about long after the last crumb is gone.
Ingredients
- 24 vanilla shortbread cookies (homemade or high-quality store-bought)
- 1/2 cup white chocolate, melted
- A variety of edible flowers (pansies, violas, or lavender)
- 1/2 cup pistachios, finely crushed
- 1/2 cup dried rose petals
- Small bowls of lemon curd and raspberry jam
How to make it
- If your cookies are plain, start by lightly dipping one half of each shortbread cookie into the melted white chocolate, shaking off any excess.
- While the chocolate is still wet, carefully press a fresh edible flower onto the center of the cookie. Sprinkle a few crushed pistachios around the edges of the flower for texture.
- Place the decorated cookies on parchment paper for 15 minutes until the chocolate has completely set.
- On a clean white or light wood board, place small bowls of lemon curd and raspberry jam to provide tangy dipping options.
- Arrange the cookies in a cascading waterfall pattern across the board, starting from one corner and flowing toward the other.
- Fill the empty spaces with a handful of dried rose petals and any leftover fresh flowers to give the impression of a floral meadow.
How to serve gazpacho shots on a chilled vegetable board?

Why we love this
When the heat of summer hits, there is nothing more revitalizing than a chilled vegetable board featuring vibrant gazpacho shots. The soup is a cold, refreshing explosion of garden-fresh tomatoes, peppers, and garlic, offering a savory zing that wakes up the senses. Served in small glasses, it’s a neat and stylish way to enjoy a classic dish without the formality of a bowl. The accompanying raw vegetables provide a satisfying crunch, making this a healthy yet indulgent-feeling snack that looks like a professional catering display. It’s the ultimate ‘cool-down’ appetizer for a backyard cocktail hour.
Ingredients
- 3 cups tomato gazpacho (blended and chilled)
- 1 red bell pepper, sliced into strips
- 1 yellow bell pepper, sliced into strips
- 1 bunch baby carrots, tops on
- 1 cup snap peas
- Small glass votives or shot glasses
- Celery stalks for garnish
How to make it
- Prepare your gazpacho at least 4 hours in advance, ensuring it is ice-cold. A longer chill time allows the flavors of the raw garlic and vinegar to mellow and meld beautifully.
- Place your serving board (preferably stone or marble) in the refrigerator for 30 minutes before assembly to help keep the food cool.
- Fill 6-8 shot glasses with the gazpacho. Place a tiny celery leaf or a thin sliver of cucumber on the rim of each glass for a professional touch.
- Arrange the shot glasses in a cluster on one side of the chilled board.
- Fan out the bell pepper strips, baby carrots, and snap peas in organized rows next to the soup. The contrast between the bright red liquid and the colorful vegetables is striking.
- Serve with a small bowl of sea salt on the side for guests to season their raw veggies as they sip their gazpacho.
How to plate a Mediterranean grilled skewer board?

Why we love this
This board brings the smoky, charred flavors of the grill directly to the table in a way that feels communal and generous. Each skewer offers a perfect combination of succulent protein and caramelized vegetables, infused with the scent of oregano and lemon. The warmth of the meat against the cold, creamy tzatziki and the sharp bite of feta cheese creates a dynamic eating experience. It’s a hearty, protein-packed platter that satisfies the soul, making it the king of cookout boards. There’s something primal and wonderful about sliding a piece of perfectly grilled chicken off a stick and into a warm piece of pita bread.
Ingredients
- 1 lb chicken breast or lamb, cubed and grilled on skewers
- 2 cups grilled zucchini and red onion chunks
- 1 cup kalamata olives
- 1/2 cup crumbled feta cheese
- 1 cup tzatziki sauce
- 4 warm pita breads, quartered
- Lemon halves, grilled
How to make it
- Marinate your meat in olive oil, lemon juice, garlic, and dried oregano for at least 1 hour. Thread onto skewers, alternating with zucchini and onion.
- Grill the skewers over high heat for 4-5 minutes per side until the meat reaches an internal temperature of 165°F (for chicken) and the vegetables have clear grill marks.
- Place a large bowl of tzatziki in the center of a rustic wooden board.
- Lay the hot skewers around the bowl, piling them high to create a sense of abundance. The steam from the meat will keep the pita warm if you place it nearby.
- Scatter the kalamata olives and crumbled feta over the gaps. The feta will slightly soften from the heat of the skewers, becoming even creamier.
- Place the grilled lemon halves on the board; squeezing grilled lemon over the meat adds a smoky acidity that is far superior to fresh juice. Serve immediately while the char is fresh.
How to arrange a mini lemon-lavender cake board?
[IMAGE_10]
Why we love this
A cake board is the ultimate ‘choose your own adventure’ for dessert lovers, and the lemon-lavender combination is a spring dream come true. These mini cakes are light, airy, and bursting with sunshine, while the lavender adds a sophisticated floral undertone that feels like an afternoon in Provence. The sight of tiny, perfectly glazed cakes nestled among fresh berries and sprigs of lavender is incredibly charming. It’s a delicate, feminine board that turns a simple cake into a curated experience, where guests can sample different textures from the moist crumb of the cake to the juicy snap of a fresh blackberry.
Ingredients
- 12 mini lemon pound cakes (or a larger cake cut into cubes)
- 1/2 cup lemon glaze (powdered sugar + lemon juice)
- 1 tsp dried culinary lavender
- 1 cup fresh blackberries
- 1/2 cup honey-roasted pecans
- Small jar of clotted cream or thick whipped cream
How to make it
- Prepare your mini cakes and let them cool completely. Whisk together the lemon glaze until it is thick but pourable.
- Drizzle the glaze over each mini cake, allowing it to drip down the sides for a rustic, ‘homemade’ look. While the glaze is still wet, sprinkle a tiny pinch of culinary lavender onto the center of each cake.
- On a circular board, place the jar of clotted cream in the middle. This acts as the anchor for your arrangement.
- Circle the mini cakes around the cream, leaving enough space for guests to easily pick them up without touching the neighbors.
- Fill the remaining spaces with clusters of fresh blackberries and handfuls of honey-roasted pecans for a contrast in texture and color.
- Garnish with a few stems of fresh lavender to reinforce the scent of the cakes. Provide small plates and napkins, as the glaze can be delightfully sticky.
Conclusion
Mastering the food board trend is less about following a strict recipe and more about embracing the art of the assembly. Whether you are building a savory Mediterranean feast or a delicate floral dessert board, the key is to prioritize color, texture, and the joy of sharing. These boards are a testament to the fact that we eat with our eyes first, and by taking a few extra minutes to arrange your ingredients with care, you turn a standard meal into a memorable event. So, grab your favorite board, gather your friends, and let the flavors of the season take center stage.
Frequently Asked Questions
Can I make these boards in advance? Most boards are best assembled shortly before serving to maintain the texture of the food (like crispy crackers or fresh fruit). However, you can prep the individual components—slicing cheese, washing fruit, or cooking meats—several hours ahead of time and store them in airtight containers.
How do I choose the right board? Wooden boards are classic for meats and cheeses, while marble or slate is better for chilled items like gazpacho shots or fruit. Ensure your board is food-safe and large enough to hold your ingredients without them falling off the edges.
What is the best way to keep the food fresh? If your board will be sitting out for more than an hour, keep it in a cool, shaded area. For seafood or dairy-heavy boards, consider placing the board on a bed of ice or refreshing the items periodically from the fridge.