
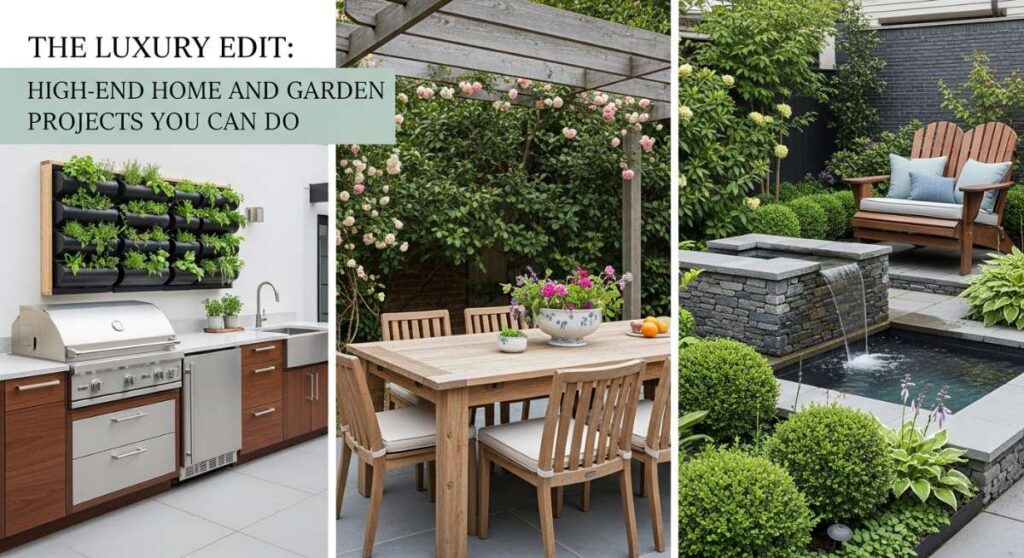
There is a specific kind of magic that happens when your home begins to reflect the most refined version of your soul. We’ve all scrolled through those high-end architectural digests, sighing at the perfectly manicured gardens and the seamless, airy interiors that seem to whisper of a life lived with intention and grace. For a long time, I thought those levels of ‘luxury’ were reserved for those with a permanent construction crew on speed dial, but I’ve recently discovered a beautiful truth: luxury isn’t about the price tag, it’s about the curation and the craftsmanship you pour into your own sanctuary.
In this ‘Luxury Edit,’ I’m sharing my favorite elevated home and garden DIYs that bridge the gap between ‘standard’ and ‘spectacular.’ These projects are designed to evoke that boutique hotel feeling—think crisp lines, sensory-rich textures, and a profound sense of peace. Whether you’re looking to transform a neglected concrete slab into a Mediterranean retreat or turn a chaotic pantry into a vision of glass and grain, these projects are your roadmap to a more beautiful life.
Grab a cup of something sparkling, put on your favorite playlist, and let’s dive into how we can elevate our everyday spaces. From the architectural structure of your backyard to the tiny, magical details of a sidewalk mural, every inch of your home is a canvas waiting for a high-end touch. It’s time to stop waiting for your ‘dream home’ and start building it, one sophisticated project at a time.
How to Design a Rectangular Backyard for Maximum Outdoor Comfort
Why we love this
A well-designed rectangular backyard feels like an outdoor gallery where every ‘room’ has a specific purpose and a distinct vibe. We love the way the geometric precision allows for a seamless flow between a sun-drenched dining area and a cozy, shadowed lounge nook. Imagine the scent of night-blooming jasmine wafting through the air as the sun sets, the crisp feel of outdoor linen pillows against your skin, and the visual rhythm of perfectly aligned pavers that lead your eye toward a focal point. It turns a simple patch of grass into a multi-sensory retreat that feels expansive yet intimate.
Essential Elements:
- Hardscape pavers or flagstones
- Pressure-treated lumber for distinct zones
- String lights or architectural spotlights
- Curated outdoor furniture (sofa, dining set)
- Tall privacy greenery (Thuja Green Giant or Bamboo)
- Decorative gravel or river rock for borders
How to make it
- Begin by sketching your yard into three distinct ‘zones’: a dining area near the house, a central green space, and a lounge or fire pit area at the far end. Use marking spray to visualize these rectangles on the ground.
- Level the ground for your hardscape areas. Excavate about 4-6 inches of soil, lay down a weed barrier, and add a 2-inch layer of leveled paver sand. This ensures your ‘luxury’ patio doesn’t shift or crack over time.
- Lay your pavers in a sophisticated pattern, such as herringbone or a clean stack bond. Use a rubber mallet to set them firmly, and fill the gaps with polymeric sand to prevent weeds and create a seamless, professional finish.
- Define the transitions between zones using vertical elements. Install a low wooden screen or a row of tall planters to create ‘walls’ without closing off the space. This architectural layering is what gives high-end gardens their depth.
- Install your lighting. Run professional-grade low-voltage wire along the perimeter to feed up-lights for your trees and warm-toned string lights across the dining area. The glow at dusk should be soft and golden, never harsh.
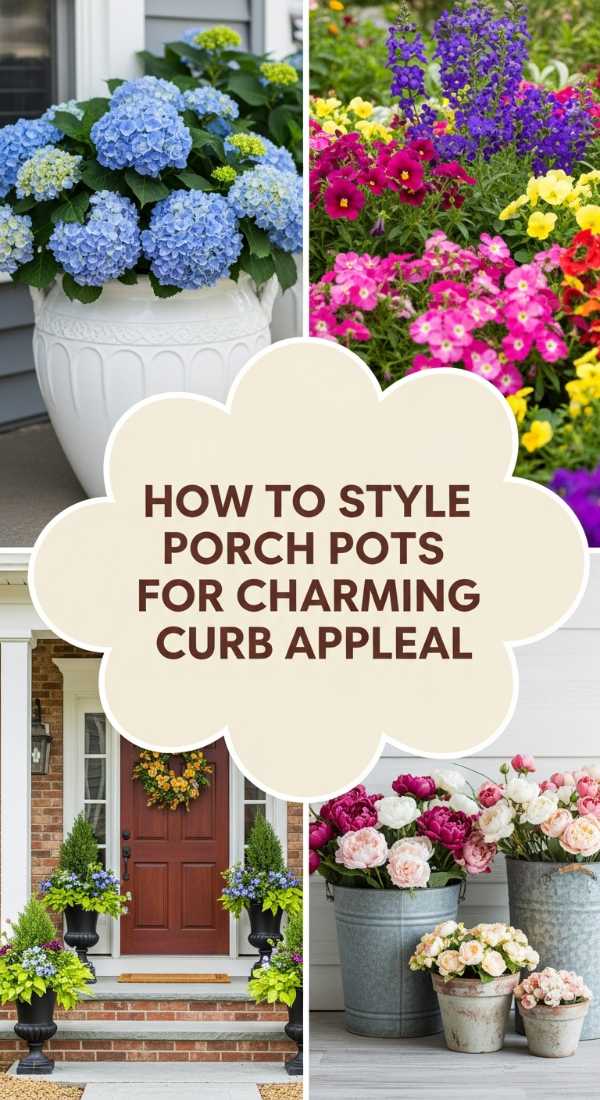
How to Style Front Porch Flower Pots for a Welcoming Entryway
Why we love this
The front porch is your home’s first impression, and high-end styling is all about volume, texture, and a cohesive color palette. We love the way oversized planters create a sense of grandeur, making even a modest entryway feel like the entrance to a manor. Picture the velvety touch of silver dichondra spilling over the edges, the sweet, heady aroma of white petunias in the breeze, and the architectural height of a centerpiece grass catching the golden hour light. It’s a botanical welcome that feels lush, expensive, and deeply curated.
Essential Elements:
- Two large, matching heavy-duty planters (stone, ceramic, or high-quality resin)
- High-quality potting mix with perlite
- ‘Thriller’ plants (Dracaena, Canna Lily, or Grasses)
- ‘Filler’ plants (Geraniums, Lantana, or Coleus)
- ‘Spiller’ plants (Sweet Potato Vine, Creeping Jenny, or Lobelia)
- Slow-release fertilizer
How to make it
- Select planters that are at least 20-24 inches in diameter; scale is the secret to a luxury look. Ensure they have drainage holes, and fill the bottom third with empty plastic water bottles or packing peanuts to reduce weight and save on soil.
- Fill the remaining space with a premium, well-draining potting mix, leaving about 2 inches of space from the top rim. Mix in a handful of slow-release fertilizer granules to keep the blooms vibrant all season.
- Place your ‘Thriller’—the tallest, most dramatic plant—exactly in the center (or slightly toward the back if the pot faces one way). Firm the soil around its base to keep it upright and majestic.
- Surround the thriller with ‘Fillers.’ These should be mounding plants with dense foliage or flowers. Pack them in tightly; a luxury pot should look ‘finished’ from day one, not like it’s waiting to grow in.
- Incorporate your ‘Spillers’ around the very edge of the pot. Tilt them slightly outward so they are encouraged to cascade down the sides, softening the hard edges of the planter and creating that professional, overflowing aesthetic.
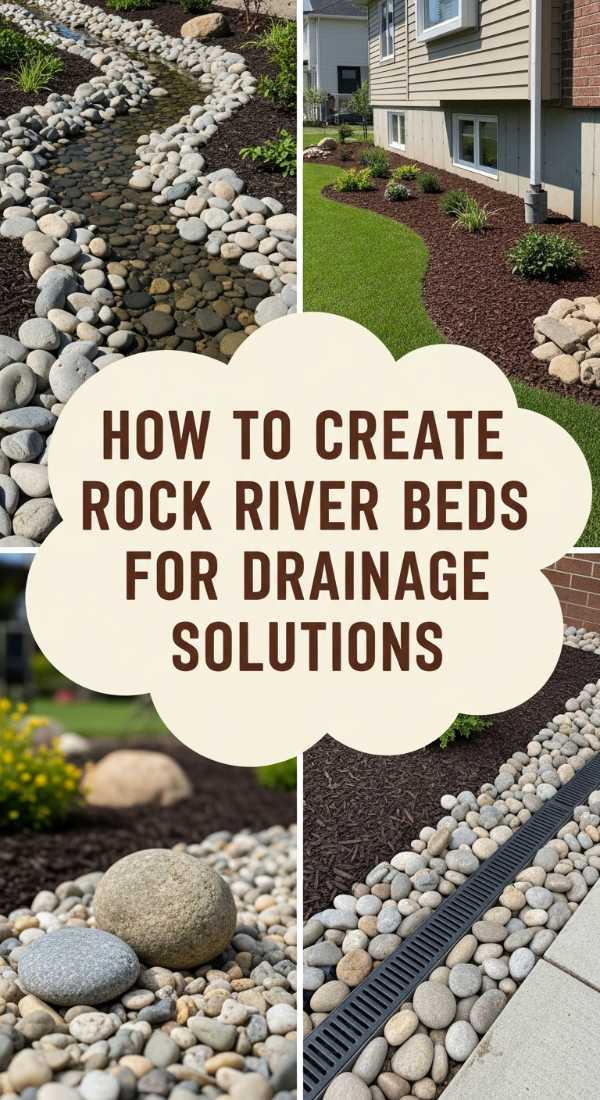
How to Create a Rock River Bed for Better House Drainage
Why we love this
A rock river bed is the perfect marriage of high-end Japanese-inspired landscape design and practical utility. Instead of a muddy trench or an ugly plastic pipe, you have a winding, naturalistic feature that mimics the beauty of a mountain stream. We love the tactile contrast between the smooth, cool river stones and the soft textures of surrounding ferns. When it rains, the sight and sound of water dancing over the rocks turn a drainage necessity into a serene, meditative experience that elevates the entire side of your home.
Essential Elements:
- Heavy-duty landscape fabric
- Galvanized landscape staples
- River rocks (varying sizes from 1-inch to 6-inch)
- Large ‘anchor’ boulders
- PVC drainage pipe (if diverting from a downspout)
- Edging material (optional)
How to make it
- Identify the natural path of water runoff and dig a shallow, meandering trench approximately 12-18 inches wide and 6 inches deep. Avoid straight lines; a slight ‘S’ curve looks much more organic and high-end.
- Line the entire trench with heavy-duty landscape fabric, extending it slightly over the sides. Secure it firmly with landscape staples every 12 inches to prevent any soil from mixing with your clean stones later.
- If you are connecting a downspout, bury the PVC pipe at the head of the trench and cover the exit point with larger stones to break the water’s force and prevent erosion.
- Layer your rocks. Start by placing your largest ‘anchor’ boulders at the curves of the ‘river’ to ground the design. Then, fill the bottom with medium-sized river rocks, and use the smallest pebbles to fill the gaps and create a natural-looking bed.
- Finish the edges by tucking the landscape fabric under the rocks and planting moisture-loving plants like Hostas or Japanese Forest Grass along the banks. This hides the edges and makes the river bed look like it has been there for decades.
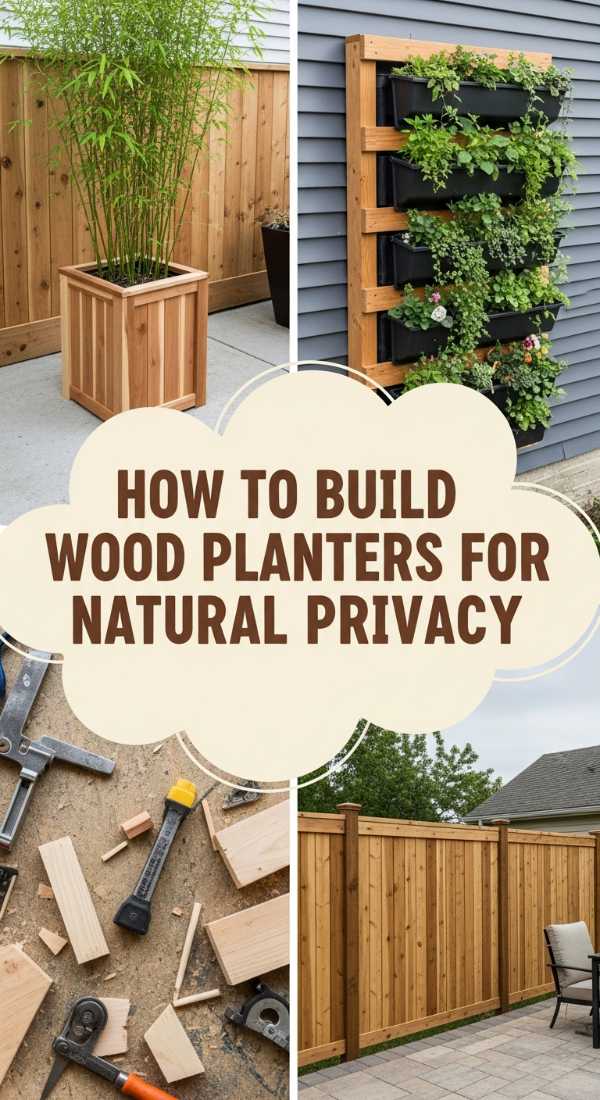
How to Build a Wood Planter Box for a Lush Privacy Wall
Why we love this
There is something incredibly sophisticated about the warm, organic grain of cedar contrasted against vibrant green foliage. These tall planter boxes act as living architecture, providing a sense of seclusion and ‘hygge’ that a cold plastic fence never could. We love the scent of fresh-cut wood mingling with the earthy aroma of damp soil. Running your hand along the smooth, stained surface while watching the leaves of your privacy hedge rustle in the wind creates an atmosphere of an exclusive rooftop lounge right in your backyard.
Essential Elements:
- Cedar or Redwood 2x4s and 1x6s (naturally rot-resistant)
- Exterior-grade wood screws (stainless steel or coated)
- Waterproof pond liner or heavy-duty plastic
- Wood stain or sealer (translucent or dark oak looks best)
- Castor wheels (optional, for mobility)
- Tall plants (Bamboo, Sky Pencil Holly, or Privet)
How to make it
- Cut your 2x4s to create a rectangular frame for the base and the top. For a privacy wall, a height of 24 inches and a length of 48 inches is a standard luxury scale. Screw the frames together using pilot holes to prevent the wood from splitting.
- Attach 2×4 vertical supports at each corner and at the midpoint of the long sides. Then, wrap the frame with your 1×6 cedar planks, ensuring the edges are flush. Use a spacer (like a nail) to leave a tiny, consistent gap between planks for a modern ‘slat’ look.
- Sand the entire exterior with 120-grit sandpaper until it’s silky to the touch. Apply a high-quality UV-resistant stain. A dark, rich espresso or a clear cedar sealer will provide that high-end, custom-built appearance.
- Line the interior with a waterproof plastic liner, stapling it just below the top rim. Poke several drainage holes through the bottom of the liner and the wooden base to ensure your plants don’t get ‘wet feet.’
- Fill with a high-quality potting mix and your chosen tall greenery. Position the boxes in a row to create an instant, upscale ‘green wall’ that blocks out the world and encloses your private sanctuary.
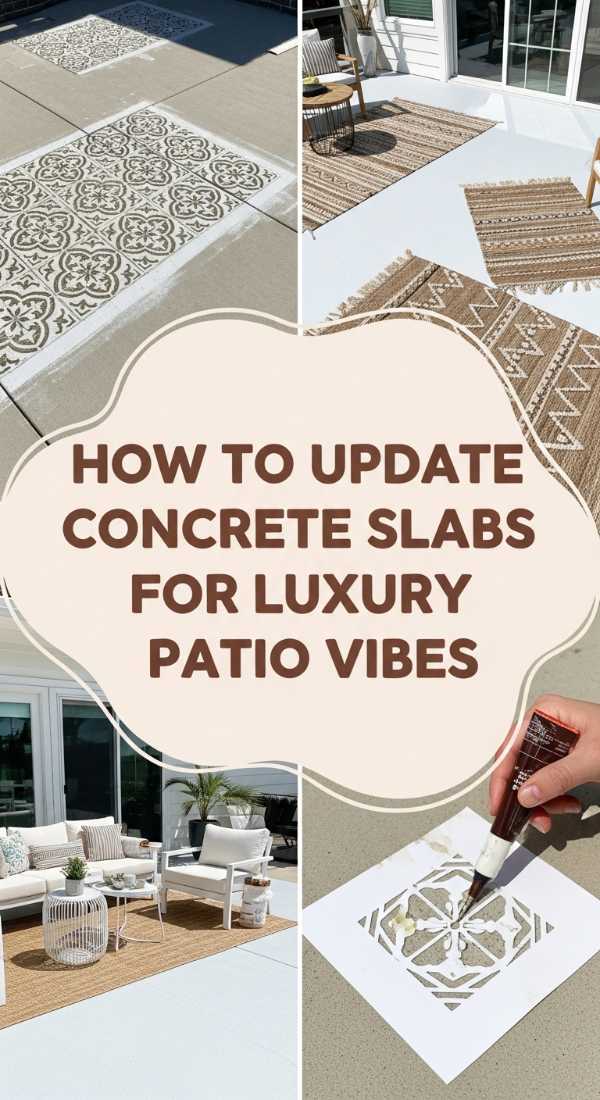
How to Update a Concrete Slab Patio for an Expensive Look
Why we love this
A standard grey concrete slab is the ‘blank wall’ of the outdoors, and transforming it is one of the most rewarding DIYs you can tackle. By adding a high-end finish, you change the entire thermal and visual feel of the space. We love the transformation from ‘industrial cold’ to ‘European courtyard.’ Imagine the cool, smooth feel of a faux-stone finish under your bare feet on a warm afternoon, the way the light bounces off a soft greige or slate-colored pattern, and the instant upgrade it gives to your outdoor furniture.
Essential Elements:
- Pressure washer and heavy-duty concrete cleaner
- Concrete patch compound (for cracks)
- Concrete primer and high-quality porch/patio paint
- Large-scale stencil (Moroccan or Tile patterns)
- Small foam rollers and painter’s tape
- Concrete sealer (matte or satin finish)
How to make it
- The secret to a luxury finish is 90% preparation. Pressure wash the concrete thoroughly to remove all dirt and oils. Use a concrete cleaner/degreaser, scrub it in, and rinse. Let it dry for at least 48 hours.
- Patch any cracks or divots with a concrete filler, smoothing it flush with a putty knife. Once dry, apply a specialized concrete primer; this ensures your expensive look doesn’t peel away after one season.
- Apply two coats of your base color using a long-handle roller. For a high-end look, choose sophisticated neutrals like ‘Greige,’ ‘Charcoal,’ or ‘Sand.’ Allow each coat to dry completely.
- Secure your large-scale stencil with painter’s tape. Using a ‘dry’ foam roller (dip in paint, then roll most of it off onto a paper towel), lightly apply your accent color over the stencil. This prevents bleeding and keeps the lines crisp and professional.
- Once the pattern is dry, apply two coats of a high-grade clear concrete sealer. This adds a subtle, expensive-looking sheen and protects your hard work from UV rays and foot traffic, making the slab look like real stone or custom tile.
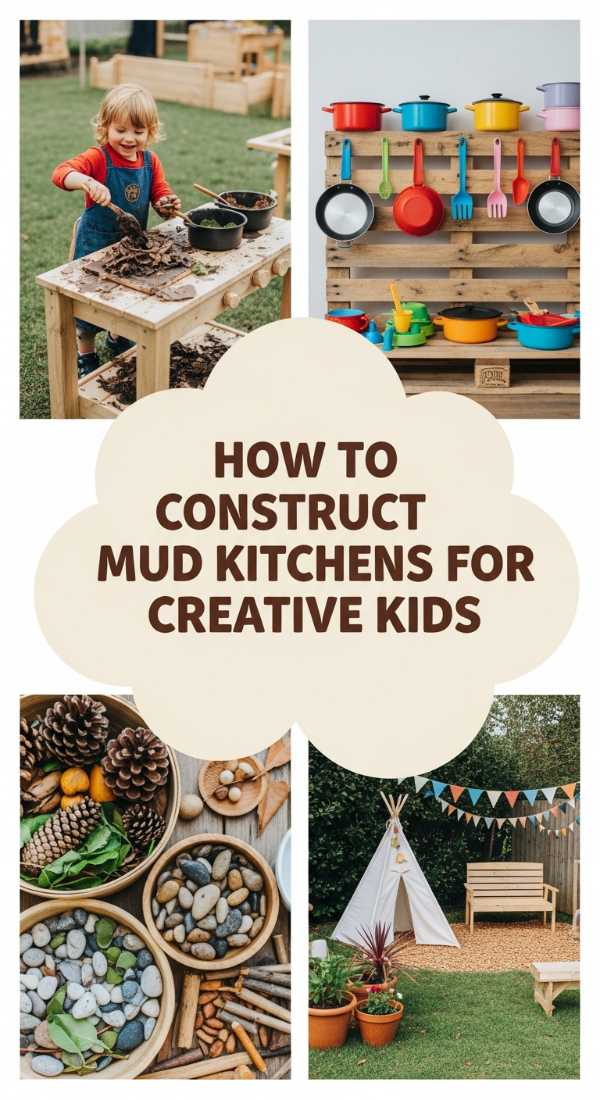
How to Construct a Pallet Mud Kitchen for Creative Outdoor Play
Why we love this
Who says children’s play areas can’t be aesthetically pleasing? A mud kitchen made from reclaimed wood brings a rustic, Waldorf-inspired luxury to your garden that plastic play-sets simply lack. We love the tactile joy of smooth wooden spoons, the clink of stainless steel bowls, and the smell of rosemary and mint being ‘cooked’ into imaginary soups. It’s a space that encourages slow, sensory play, looking like a charming potting bench that just happens to be a portal for a child’s imagination.
Essential Elements:
- Two heat-treated pallets (labeled ‘HT’)
- Stainless steel mixing bowls (for sinks)
- Old kitchen faucet (purely decorative)
- Hooks, knobs, and a small chalkboard
- Outdoor-safe wood glue and screws
- Sandpaper (various grits)
How to make it
- Dismantle your pallets carefully using a crowbar. Select the cleanest, straightest boards. Sand every single inch of the wood, starting with 60-grit and finishing with 120-grit, to ensure there are zero splinters—a must for a high-end feel.
- Build a sturdy table frame using the pallet 2x4s. The height should be comfortable for your child (usually 20-24 inches). Use the flatter slats to create the tabletop, leaving a gap exactly the size of your stainless steel bowls.
- Drop the bowls into the gaps—these are your ‘sinks.’ Attach an old faucet between the sinks using a drill and screws. This adds an authentic, high-end ‘chef’s kitchen’ touch that kids absolutely adore.
- Construct a vertical backboard using more pallet slats. Attach small hooks for wooden utensils and a shelf for ‘ingredients’ like pinecones, stones, and dried lavender. A small chalkboard can be mounted here for the ‘Daily Menu.’
- Finish the wood with a food-safe outdoor oil or a whimsical coat of sage green or navy blue exterior paint. The result is a beautiful, durable piece of garden furniture that facilitates hours of creative, screen-free play.
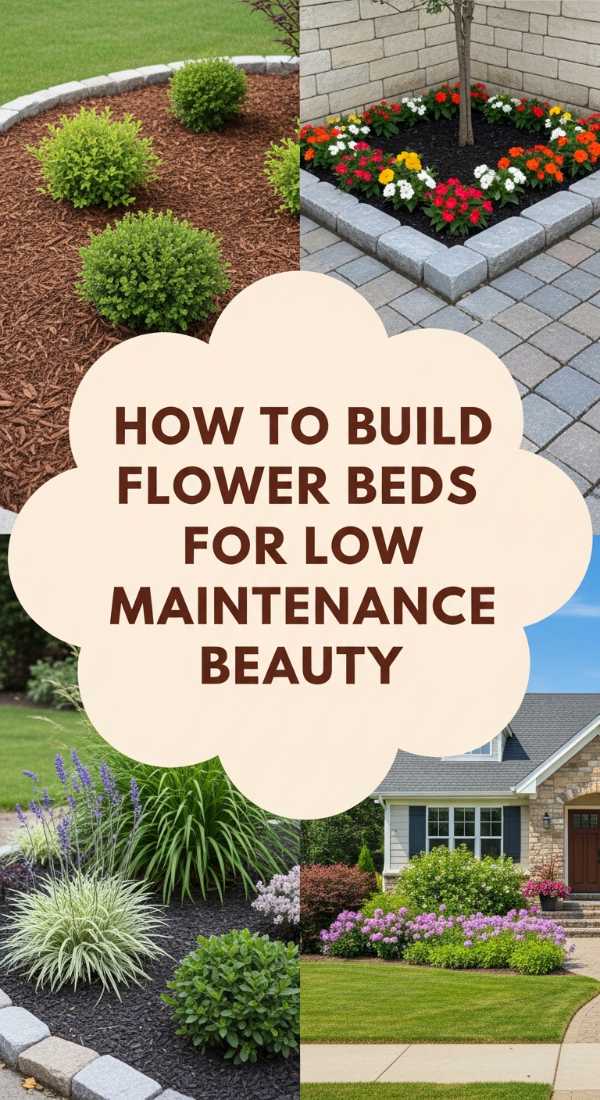
How to Build Low Maintenance Flower Beds for Effortless Beauty
Why we love this
True luxury is the gift of time, and a low-maintenance flower bed offers a high-end ‘English Garden’ look without the daily toil. We love the layered textures of evergreen shrubs against the wispy movement of ornamental grasses. Imagine walking through your garden and seeing a consistent, lush landscape that thrives on its own—the scent of lavender filling the air, the soft hum of bees, and the deep, rich color of fresh mulch that makes the greens of your plants pop with professional intensity.
Essential Elements:
- Dwarf Boxwoods or Hollies (for structure)
- Perennial flowers (Lavender, Coneflower, or Salvia)
- Ornamental Grasses (Carex or Maiden Grass)
- Preen or weed-preventer granules
- Professional-grade landscape fabric
- Premium dark wood mulch or pine bark nuggets
How to make it
- Define your bed with a clean, deep edge. Use an edging shovel to cut a 3-inch deep ‘V’ notch between your lawn and the bed; this crisp line is the hallmark of a professionally maintained estate.
- Lay down your plants while they are still in their pots to check the spacing. Place larger ‘structural’ evergreens in the back, mounded perennials in the middle, and shorter grasses or groundcovers at the front.
- Install a drip irrigation soaker hose throughout the bed. This is a hidden luxury that ensures your plants get deep, consistent watering at the roots, which is far better for plant health than overhead spraying.
- Apply a layer of professional landscape fabric around the plants (cutting ‘X’ shapes to fit over them), then sprinkle weed-preventer granules. This dual-layered defense is what keeps the bed ‘low maintenance.’
- Spread a 3-inch thick layer of premium mulch. Avoid dyed ‘cherry red’ mulch; instead, opt for natural dark brown or black. This keeps the soil moist, prevents weeds, and provides that high-contrast, expensive look that makes a garden feel finished.
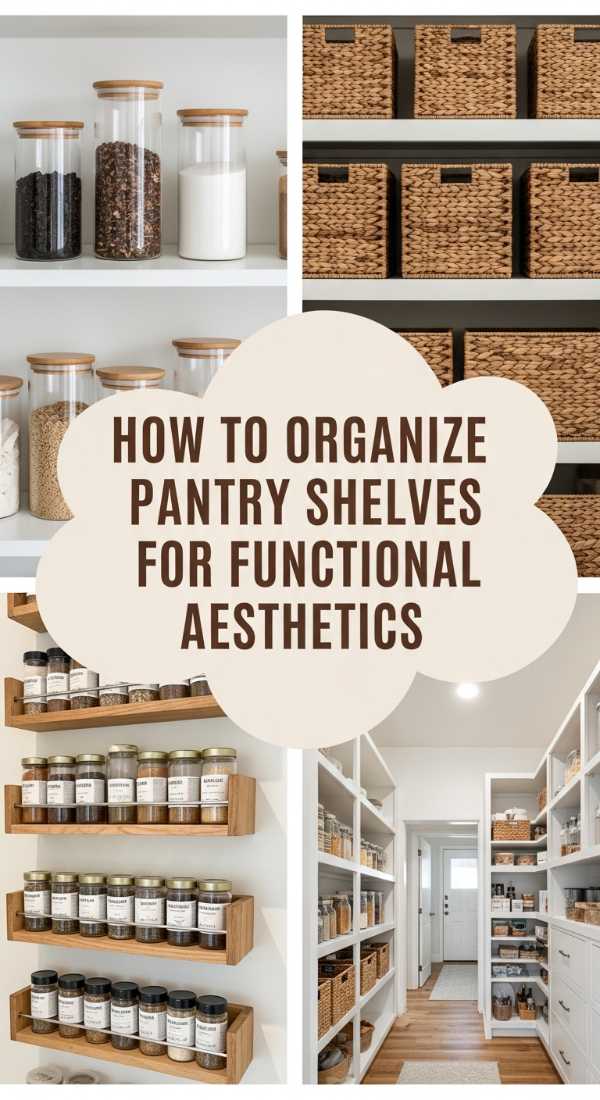
How to Organize a Realistic Pantry for an Aesthetic Kitchen

Why we love this
A perfectly organized pantry is the ultimate daily luxury—it’s the visual exhale you need every time you start to cook. We love the satisfying ‘clink’ of glass jars, the uniform rows of custom labels, and the earthy aroma of spices and dried grains stored properly. It’s about more than just looking good; it’s the tactile pleasure of a smooth-spinning lazy Susan and the clarity of knowing exactly what you have. It turns the chore of meal prep into a high-end, boutique shopping experience in your own home.
Essential Elements:
- Airtight glass canisters (varying sizes)
- Uniform wicker or seagrass baskets
- Tiered spice racks or risers
- Minimalist custom labels
- Lazy Susans for corners or oils
- Uniform scoopers (wooden or stainless steel)
How to make it
- Empty the entire pantry and wipe down the shelves. Group your items into categories: ‘Baking,’ ‘Breakfast,’ ‘Grains,’ ‘Snacks,’ and ‘Backstock.’ This categorization is the foundation of a high-end organizational system.
- Decant your dry goods (flour, sugar, pasta, nuts) into your glass canisters. Removing ‘loud’ commercial packaging instantly reduces visual noise and creates a high-end, cohesive look. Ensure the seals are airtight to keep everything fresh.
- Place smaller, oddly shaped items (like snack bags or baking mixes) into your uniform baskets. Use the ‘one in, one out’ rule here to prevent clutter. Grouping like-with-like in baskets makes the shelves look clean and curated.
- Use risers for canned goods and a Lazy Susan for oils, vinegars, or tall jars. This ensures nothing gets ‘lost’ in the back, maintaining that effortless, high-functioning luxury feel.
- Apply your minimalist labels. Ensure they are all placed at the exact same height on every jar. This tiny attention to detail is what separates a ‘tidy’ pantry from an ‘aesthetic’ masterpiece you’d see in a luxury home tour.
How to Build an Above Ground Pool Bar for Tropical Vibes
Why we love this
Transforming an above-ground pool with a custom bar area is the ultimate way to bring five-star resort vibes to your own backyard. We love the feeling of leaning against a cool wooden ledge with a cold drink in hand while the water sparkles beside you. Picture the sun on your shoulders, the sound of water splashing, and the tropical aesthetic of a bar that serves as the social heart of your summer. It’s a clever, high-end upgrade that makes an affordable pool feel like a custom-built architectural feature.
Essential Elements:
- Pressure-treated 2x4s for the frame
- Cedar or composite decking for the bar top
- Heavy-duty L-brackets
- Exterior wood stain or waterproof paint
- Outdoor bar stools
- Solar-powered LED strip lights
How to make it
- Build a sturdy ‘U’ shaped frame using 2x4s that sits flush against the exterior top rail of your pool. It should be independent of the pool structure to ensure it doesn’t put stress on the liner or walls.
- Mount the frame into the ground using 4×4 posts set in concrete for maximum stability, or use heavy-duty brackets if you are attaching it to an existing deck. The bar should be at a standard height of 42 inches.
- Install your bar top. Cedar is the gold standard for a luxury look, but high-quality composite decking is great for low maintenance. Ensure the top has a slight overhang on the ‘seating’ side so guests can pull up stools comfortably.
- Sand the edges to a rounded, smooth finish and apply a marine-grade sealer. This protects the wood from constant splashing and UV exposure, keeping it looking ‘new’ and expensive for years.
- Mount a solar-powered LED strip under the lip of the bar top. At night, the glow will reflect off the pool water, creating a stunning, high-end ‘Miami hotel’ atmosphere that is perfect for evening entertaining.
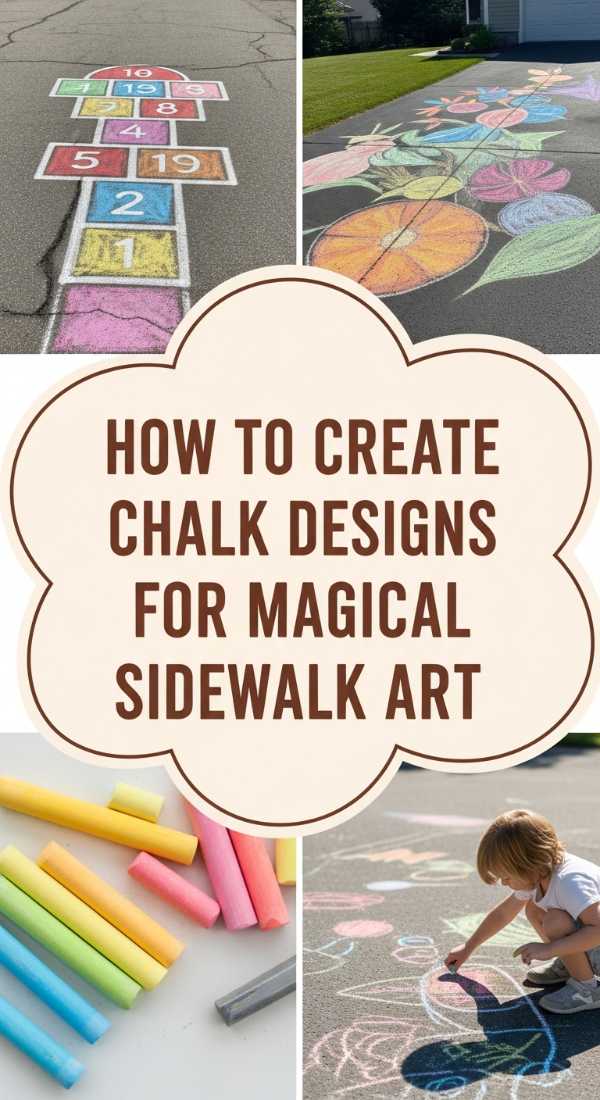
How to Create Chalk Designs for Magical Sidewalk Play
[IMAGE_10]
Why we love this
There is a profound, ephemeral luxury in creating something beautiful just for the sake of it. Chalk art turns a mundane concrete walkway into a vibrant, imaginative gallery. We love the dusty, soft texture of the chalk in your hands, the way the colors blend into smooth gradients, and the sheer joy of seeing a neighborhood transformed by art. It’s a way to infuse your daily environment with a touch of whimsy and high-end creativity that delights both children and adults alike.
Essential Elements:
- Professional-grade ‘soft’ pastels or high-pigment sidewalk chalk
- Buckets of water and old rags
- Blending sponges or large paintbrushes
- Painter’s tape (for crisp geometric edges)
- Knee pads for comfort
How to make it
- Sweep the sidewalk area thoroughly. Any grit or dirt will prevent the chalk from adhering smoothly. If you want a ‘stained glass’ look, use painter’s tape to create a geometric grid on the concrete first.
- Start with your lightest colors in the center of your design. For a high-end look, don’t just ‘color in’—use a wet paintbrush to turn the chalk dust into a ‘paint’ that fills the pores of the concrete for a much more saturated, professional finish.
- Layer your colors to create depth. Use a darker shade around the edges of a shape and blend it inward using a sponge or your hand. This creates a 3D effect that looks significantly more ‘luxe’ than standard flat coloring.
- If you used tape, peel it back slowly while the chalk is still slightly damp to reveal crisp, clean concrete lines. This ‘negative space’ is what makes the design look intentional and artistic.
- For a final touch of magic, sprinkle a tiny bit of eco-friendly biodegradable glitter over the damp chalk. It will catch the sunlight, making your sidewalk mural shimmer like a high-end installation until the next rain washes it away.
The Final Touch: Living the Elevated Life
As we wrap up this ‘Luxury Edit,’ remember that the most beautiful homes are those that tell the story of the people living inside them. Luxury isn’t a destination; it’s the care you take in selecting the right stones for your river bed, the patience you have while the stain dries on your privacy wall, and the laughter shared over a mud-kitchen ‘feast.’ By investing your time and creativity into these projects, you aren’t just improving your property value—you are enriching your daily experience of ‘home.’ Go ahead, start that project you’ve been dreaming of, and watch how your space begins to rise to meet your new, elevated standard of living.