

We’ve all been there—scrolling through a sea of perfectly curated Pinterest feeds, feeling that familiar pang of envy at the sight of a gorgeous, overflowing charcuterie spread that looks more like a Renaissance painting than a snack. There is something deeply soothing about the ‘Lazy Girl’ aesthetic; it’s about achieving that high-end, effortless beauty without spending eight hours in the kitchen or breaking a sweat. It’s the art of living well, simply, and with a touch of curated magic that makes every day feel like a slow Sunday morning.
Today, I’m taking you beyond the crackers and cheese. To truly master the vibe of a viral food board, you have to cultivate the world around it. We are talking about the entire ecosystem of your home—from the digital spaces you curate while you snack, to the lush garden views outside your window where you’ll eventually host your next gathering. This guide is your ultimate roadmap to elevating your lifestyle, one aesthetic choice at a time, ensuring your surroundings are as delicious as the food you serve.
How to Curate a Dreamy Digital Profile for Aesthetic Vibes

Why we love this
There is a profound sense of digital serenity that comes from opening an app and seeing a cohesive, soft-hued world that reflects your inner calm. It’s about the tactile smoothness of your screen under your thumb as you scroll through a palette of creams, sages, and dusty roses that feel like a visual deep breath. When your digital presence matches your physical aesthetic, it creates a seamless transition from your curated home to your online life, making every notification feel a little more like a love letter and less like a chore.
Essential Elements:
- A consistent color palette (3-4 primary tones).
- High-quality, grainy film-style profile pictures.
- A minimalist bio with intentional keywords and elegant emojis.
- Highlight covers that use custom icons or textured swatches.
- A curated feed layout (checkerboard or tonal transitions).
How to make it
- Identify your core aesthetic ‘vibe’ by gathering ten images that represent your dream life and finding the common color threads among them.
- Audit your current grid or profile; archive any posts that clash with your new palette to create a clean slate without losing your memories.
- Use a photo editing app to create a custom preset—adjust the ‘warmth’ up by 5% and the ‘grain’ by 10% to achieve that soft, lived-in film look consistently across all photos.
- Draft a minimalist bio using a ‘pipe’ separator (|) to keep information clean and legible, focusing on your passions rather than just your job title.
- Create highlight covers using a design tool like Canva, selecting a textured background like linen or handmade paper to add depth to your profile header.
How to Master Garden Drainage for a Flourishing Backyard Oasis

Why we love this
Imagine stepping out onto your patio after a light spring rain, the air thick with the sweet, heavy scent of damp earth and blooming jasmine, without a single muddy puddle in sight. Proper drainage is the invisible hero of a beautiful garden, ensuring your plants stay hydrated but never drowned, and your soil remains rich and loamy rather than swampy. It’s the feeling of total peace knowing that your backyard sanctuary is working in harmony with nature, allowing life to flourish in even the wettest seasons.
Essential Elements:
- Perforated PVC or flexible drainage piping.
- Landscaping fabric (non-woven).
- Clean, washed river gravel or crushed stone.
- A catch basin or French drain grate.
- A slight natural slope (1-2% grade).
How to make it
- Identify the ‘low spots’ in your garden by observing where water naturally pools after a heavy rain or a long hose session; mark these areas with stakes.
- Dig a trench that is at least 12 inches deep and 6 inches wide, ensuring it leads away from your home’s foundation toward a safe runoff area or rain garden.
- Line the trench with landscaping fabric, leaving enough excess on the sides to fold over the top later; this prevents silt from clogging your system over time.
- Pour a 2-inch layer of gravel into the bottom of the trench, then lay your perforated pipe on top with the holes facing downward to allow water to rise into the pipe.
- Fill the rest of the trench with gravel until it is 2 inches below the surface, fold the fabric over, and top with decorative river stones or sod for a seamless look.
How to Style a Two Tone Deck for Ultimate Outdoor Luxury

Why we love this
The visual contrast of a two-tone deck creates a sophisticated architectural depth that makes even a small outdoor space feel like a high-end resort. Picture the warmth of a honey-toned wood main floor framed by a crisp, charcoal perimeter that anchors the space and draws the eye outward toward the horizon. It’s about the sensory experience of walking barefoot over sun-warmed planks, feeling the subtle change in texture at the border, and seeing how the dual colors catch the golden hour light in different, beautiful ways.
Essential Elements:
- Primary decking boards (lighter wood or composite).
- Border ‘picture frame’ boards (darker contrasting shade).
- Hidden fasteners for a clean, seamless look.
- Coordinated outdoor furniture with neutral cushions.
- Solar-powered rim lighting for evening ambiance.
How to make it
- Select your two colors by testing samples against your home’s siding; the primary color should complement your walls, while the accent color should provide a bold contrast.
- Install the main deck joists as usual, but add extra blocking around the perimeter where the ‘picture frame’ boards will sit to provide a sturdy nailing surface.
- Lay the primary boards in your chosen pattern (diagonal or horizontal), trimming them precisely so they sit flush within the planned border area.
- Measure and cut the darker accent boards at 45-degree angles for the corners, ensuring a perfect mitered fit that looks like professional carpentry.
- Secure the boards using hidden fasteners rather than top-screws to maintain that high-end, smooth-to-the-touch aesthetic that defines luxury decking.
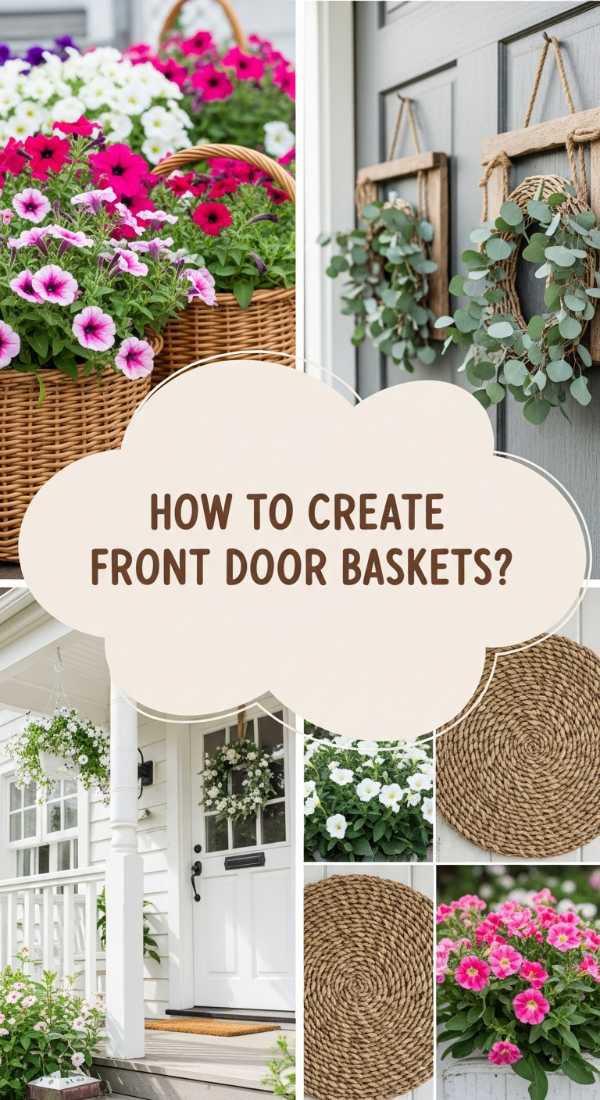
How to Create Front Door Baskets for a Welcoming Home Entrance
Why we love this
A front door basket is like a warm hug for your home’s exterior, offering a burst of texture and life before you even step through the threshold. There is something so charming about the sight of woven seagrass or sturdy rattan overflowing with soft moss, cascading ivy, and seasonal blooms that sway gently in the breeze. It softens the hard lines of a doorway and infuses the air with the faint, clean scent of fresh greens, making every arrival feel like a special occasion.
Essential Elements:
- A flat-backed hanging basket (wicker or metal wire).
- Coco coir liner for moisture retention.
- High-quality potting mix with perlite.
- ‘Thriller’ (tall focal plant), ‘Filler’ (mounded flowers), and ‘Spiller’ (trailing vines).
- Over-the-door wreath hanger or a heavy-duty Command hook.
How to make it
- Choose a basket that contrasts with your door color; for example, a dark grey door looks stunning with a light, natural-toned wicker basket.
- Insert the coco coir liner and fill the basket halfway with potting soil, pressing down lightly to remove large air pockets but keeping it fluffy for root growth.
- Place your ‘Thriller’ (like a miniature fern or dracaena) in the center-back of the basket to create height and drama.
- Surround the center plant with ‘Fillers’ like pansies or petunias, packing them tightly enough so that no soil is visible from the front view.
- Tuck ‘Spillers’ like English ivy or Creeping Jenny into the front edge, angling them slightly outward so they begin to drape elegantly over the basket’s rim immediately.
How to Design a Creative Dye Table for Artistic Fabric Projects

Why we love this
There is a raw, tactile joy in the process of hand-dyeing fabrics—the sight of white linen swirling in a bath of indigo or terrcotta, the earthy smell of damp cloth, and the anticipation of the final reveal. Having a dedicated dye table means you can embrace the mess and the magic without fear; it becomes a sanctuary of color and experimentation. It’s a place where the sun hits the drying racks just right, and you can feel the transformation of simple materials into something uniquely yours.
Essential Elements:
- A sturdy, waterproof table (plastic or treated wood).
- Deep plastic bins or stainless steel vats.
- Drying racks or a retractable clothesline.
- Natural dyes (avocado pits, turmeric, or commercial dyes).
- A high-quality thermometer for temperature-sensitive pigments.
How to make it
- Set up your table in a well-ventilated area, preferably near a water source like an outdoor spigot or a utility sink to make cleanup effortless.
- Level the table perfectly; if the table is slanted, your dye baths will settle unevenly, potentially causing inconsistent color saturation in your fabrics.
- Prepare your dye bath by heating water to the specific temperature required for your pigment—usually around 140°F (60°C) for synthetic dyes or simmering for natural extracts.
- Add a fixative (like salt for cotton or vinegar for silk) to the water, stirring thoroughly until completely dissolved to ensure the color bonds deeply with the fibers.
- Submerge your pre-washed, damp fabric into the bath, using long tongs to move it constantly for the first ten minutes to prevent spotting and ensure a flawless, even tone.
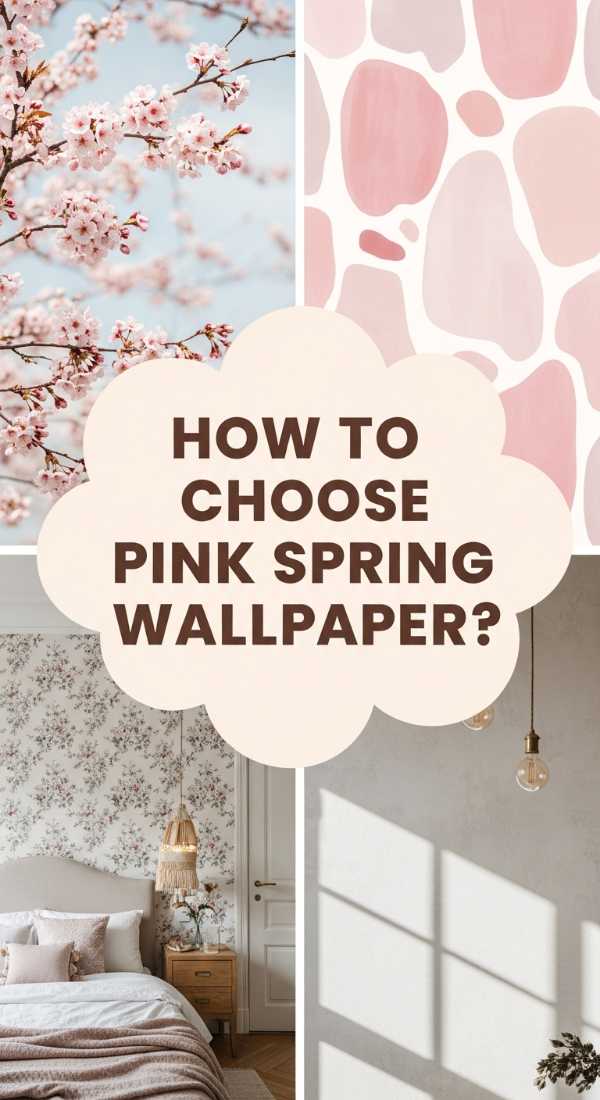
How to Choose Pink Spring Wallpaper for a Refreshing Room Makeover
Why we love this
The right shade of pink wallpaper can transform a room from a cold space into a glowing, sunset-drenched sanctuary that feels perpetually bathed in soft light. It’s not just about the color; it’s about the subtle texture of the paper under your fingertips and the way a delicate floral or geometric pattern adds rhythm to your walls. Walking into a pink-toned room feels like a gentle embrace, lifting your mood instantly and providing a dreamy backdrop for your morning coffee and aesthetic food boards.
Essential Elements:
- Samples of various pinks (blush, dusty rose, peach-undertones).
- A pattern scale that matches your room size (small prints for cozy spots).
- Peel-and-stick or traditional paste-the-wall paper.
- A wallpaper smoothing tool and a sharp precision blade.
- Complementary trim paint (creamy white or soft gold).
How to make it
- Tape your wallpaper samples to different walls in the room and observe them throughout the day; pinks change drastically from the cool morning light to the warm evening glow.
- Prep your walls by cleaning them with a damp cloth and filling any small holes; a perfectly smooth surface is the secret to a professional-looking finish.
- Measure the height of your wall and cut your first strip of wallpaper, adding 2 inches of ‘bleed’ at the top and bottom to allow for minor adjustments.
- Apply the paper starting from the top corner of the most visible wall, using a smoothing tool to push air bubbles from the center outward toward the edges.
- Use a metal straight-edge and a fresh blade to trim the excess at the ceiling and baseboard, changing the blade every three strips to ensure crisp, snag-free cuts.
How to Organize Chic Digital Spaces for Minimalist Productivity

Why we love this
A cluttered desktop is a cluttered mind, but a chic, organized digital space feels like a fresh start every time you open your laptop. There is a quiet luxury in seeing a desktop background that features a calming landscape or a textured abstract, with folders neatly categorized and labeled in a clean, sans-serif font. It’s the digital equivalent of a clean kitchen counter—it provides the mental space you need to be creative, productive, and focused on the things that truly matter.
Essential Elements:
- A high-resolution, minimalist desktop wallpaper.
- Custom folder icons in a neutral color palette.
- A cloud-based filing system (Notion, Google Drive).
- A ‘Today’ folder for temporary files to prevent clutter.
- Digital widgets for clocks or minimalist calendars.
How to make it
- Clear everything off your desktop and move it into one ‘To Sort’ folder; this immediately lowers your visual stress levels while you work on the system.
- Create four main ‘Life’ folders: Work, Personal, Finances, and Inspiration, using a consistent naming convention like lowercase letters for a modern look.
- Change your folder icons by downloading a ‘minimalist icon pack’ and using the ‘Get Info’ (Mac) or ‘Properties’ (Windows) shortcut to paste the new image over the old icon.
- Set up a browser start page that only displays the time and a beautiful image, preventing you from being sucked into news or social media the moment you go online.
- Schedule a ‘digital sunset’ every Friday at 4:00 PM to spend ten minutes clearing your downloads folder and trash, ensuring a fresh start for the following Monday.
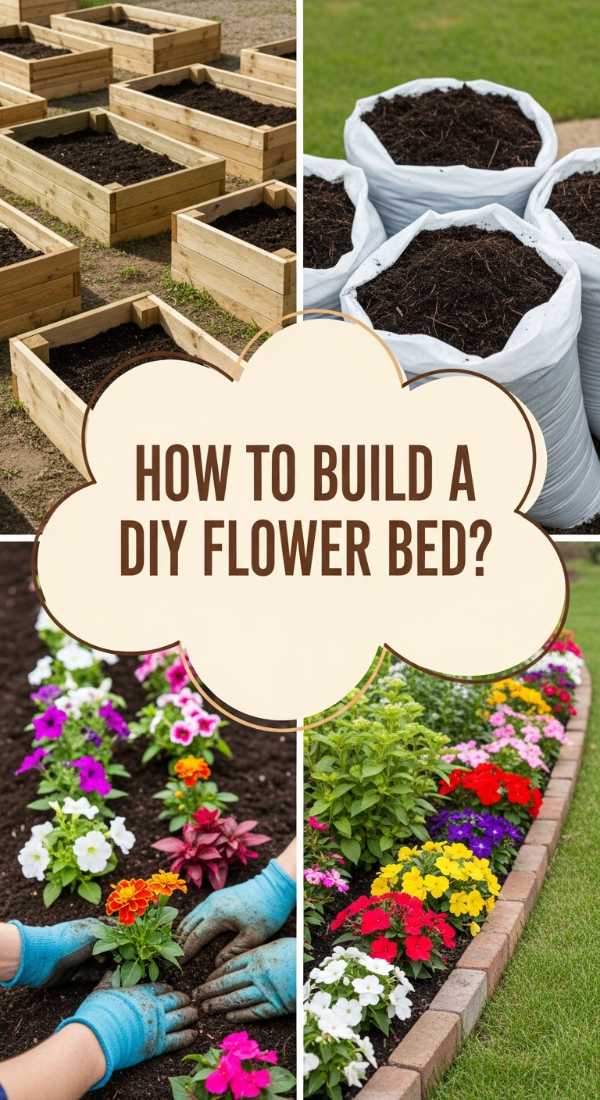
How to Build a DIY Flower Bed for Your Dream Garden
Why we love this
Building your own flower bed is an act of hope and creativity, a way to literally plant the seeds of your future aesthetic. The feeling of the cool, dark soil between your fingers and the sight of vibrant petals beginning to unfurl is deeply rewarding. A well-designed bed brings structure to your yard, creating a focal point where butterflies congregate and the fragrance of lilies and roses drifts through your windows on warm afternoons. It’s a living piece of art that grows more beautiful with every passing season.
Essential Elements:
- Cedar or redwood planks (naturally rot-resistant).
- Galvanized wood screws.
- Organic garden soil and compost mix.
- Cardboard for a ‘no-dig’ weed barrier.
- A selection of native perennial and annual flowers.
How to make it
- Select a location that receives at least 6-8 hours of sunlight daily; use a garden hose to mock up the shape of the bed until you find a curve or line that looks balanced.
- Build the frame using 2×6 cedar planks, pre-drilling holes at the corners to prevent the wood from splitting, and securing them with 3-inch galvanized screws.
- Lay a thick layer of plain brown cardboard over the grass inside the frame; this will smother the weeds and eventually decompose into rich organic matter.
- Fill the bed with a 70/30 mix of high-quality topsoil and mushroom compost, raking it until the surface is level and sits about an inch below the top of the wood.
- Plant your flowers starting with the largest specimens in the back and smaller, trailing varieties in the front, then water deeply until the soil is saturated but not muddy.
How to Use Blue Aesthetic Accents for a Calm Home Atmosphere

Why we love this
Blue is the color of the endless sky and the deep, quiet ocean; it has an inherent ability to lower the heart rate and bring a sense of sophisticated calm to any room. Incorporating blue accents—like a velvet navy pillow, a crackled cerulean vase, or a soft slate throw—creates a layered, thoughtfully designed atmosphere. It feels cool to the eyes and soothing to the soul, acting as a neutral that adds personality without the noise of brighter, more frantic colors.
Essential Elements:
- Textured blue textiles (linen, velvet, or wool).
- Blue glass or ceramic decorative objects.
- Art prints featuring water or abstract blue tones.
- A signature ‘blue’ scent, like sea salt or eucalyptus.
- Natural wood elements to balance the cool tones.
How to make it
- Start with a ‘base’ of three blue items in different textures—for example, a smooth ceramic bowl, a chunky knit blanket, and a matte-finish candle.
- Place these items in a ‘triangle’ formation across the room to draw the eye around the space and create a sense of intentional, balanced design.
- Choose your specific ‘blue’ carefully; ‘warm’ blues have a hint of green and feel inviting, while ‘cool’ blues have a hint of grey and feel more formal and serene.
- Layer your blue accents against a neutral backdrop of white, cream, or light oak to let the color pop without overwhelming the room’s architecture.
- Swap out lightbulbs for ‘warm white’ (2700K) to ensure that your blue accents don’t look too stark or clinical under artificial evening light.
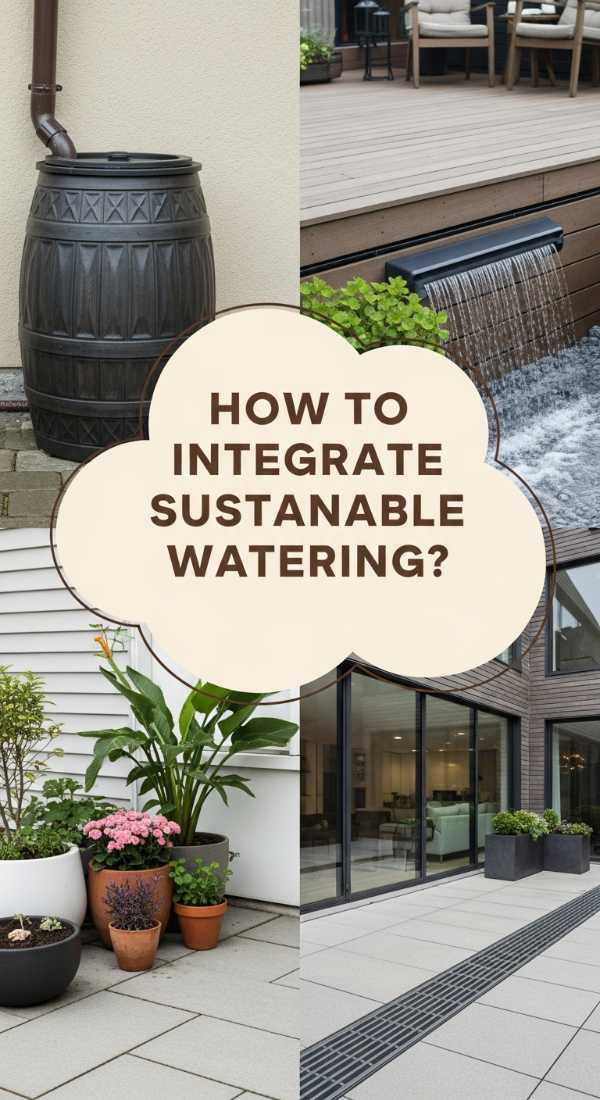
How to Integrate Sustainable Watering Solutions for a Greener Patio
Why we love this
Sustainability is the ultimate flex in the modern aesthetic home. There is a deep satisfaction in knowing that your lush, green patio is nourished by the sky rather than the tap. Using rain barrels and drip irrigation systems doesn’t just save water; it creates a rhythmic, automated care system for your plants that feels both high-tech and grounded. The sound of a gentle drip system at dawn and the sight of thriving, hydrated plants create a sanctuary that is as ethical as it is beautiful.
Essential Elements:
- A rain barrel with a brass spigot and debris screen.
- A solar-powered irrigation timer.
- Drip tubing and emitters.
- Mulch (cedar or straw) to prevent evaporation.
- A downspout diverter kit.
How to make it
- Install a downspout diverter at eye level on your gutter system, which will funnel rainwater into your barrel while allowing overflow to continue down the pipe once the barrel is full.
- Elevate your rain barrel on sturdy cinder blocks or a wooden stand; gravity is what will push the water through your irrigation lines, so height is crucial for pressure.
- Connect a solar-powered timer to the spigot and run a main line of drip tubing along the base of your patio containers or flower beds.
- Punch small holes in the main line and insert ’emitters’ directly at the base of each plant, ensuring that water goes directly to the roots where it is needed most.
- Cover the soil surface with a 2-inch layer of organic mulch to lock in the moisture and keep the root zones cool, reducing the frequency of watering even in the heat of summer.
Creating the Life You Deserve
Living an aesthetic life isn’t about perfection—it’s about the intentional choices you make to surround yourself with things that bring you peace, joy, and a sense of ‘lazy girl’ ease. Whether you’re curating your digital feed or building a flower bed, remember that the most viral-worthy moments are the ones where you feel completely at home in your own space. Now, go grab that food board and enjoy the beautiful world you’ve built!