

Have you ever found yourself scrolling through Pinterest at 2 AM, heart racing over a perfectly lit patio or a kitchen that looks like it belongs in a high-end boutique? We’ve all been there—that magnetic pull toward a space that feels curated, intentional, and vibrantly alive. Your home isn’t just a building; it’s the backdrop of your life, the place where you sip your morning coffee and unwind after a long day. Transforming that space into a ‘Pinterest Paradise’ isn’t about having a million-dollar budget; it’s about capturing a specific feeling of harmony and style.
This year, the trends are shifting away from the sterile and moving toward ‘Lived-in Luxury.’ We are seeing a gorgeous blend of rustic textures, bold architectural statements, and botanical sanctuaries that bring the outdoors in. Whether you have a sprawling backyard or a tiny balcony, these viral aesthetics are designed to make your home feel like a destination. Let’s dive into the most sought-after home and garden trends of 2024 that will have your followers—and your neighbors—begging for your secrets.
How to Create Low Maintenance Flower Beds for Effortless Curb Appeal
Why we love this
There is something deeply satisfying about a garden that looks lush and expensive without demanding every second of your weekend. Imagine walking up to a bed of velvet-soft lamb’s ear and sturdy, aromatic lavender that releases a calming scent every time the breeze brushes past. These beds offer a visual feast of silvery greens and deep purples, creating a textured tapestry that feels grounded and permanent. The beauty of a low-maintenance bed lies in the ‘slow burn’ of its growth, providing a rich, earthy aroma of fresh mulch and damp soil that makes coming home feel like a retreat into nature.
Essential Elements:
- Drought-tolerant perennials (Lavender, Sedum, Coneflower)
- High-quality cedar or hemlock mulch
- Professional-grade landscape fabric
- Steel or stone edging for clean lines
- Slow-release organic fertilizer granules
How to make it
- Start by mapping out your bed using a garden hose to create organic, flowing curves; avoid stiff straight lines for a more natural Pinterest look.
- Remove all grass and weeds from the area, digging down at least 3-4 inches to ensure you have a clean slate for your soil.
- Amend your soil with organic compost; you want the texture to be crumbly and rich—if it feels like wet clay, add perlite or sand to improve drainage.
- Lay down your plants while they are still in their pots to test the arrangement. Place taller varieties in the back and shorter, spreading groundcovers at the front edge.
- Once satisfied, dig holes twice as wide as the root ball. Gently tease the roots out if they are pot-bound and set them so the crown of the plant is level with the soil line.
- Apply a 3-inch layer of mulch across the entire bed. This is the secret to low maintenance; it suppresses weeds and retains moisture so you won’t have to water nearly as often.
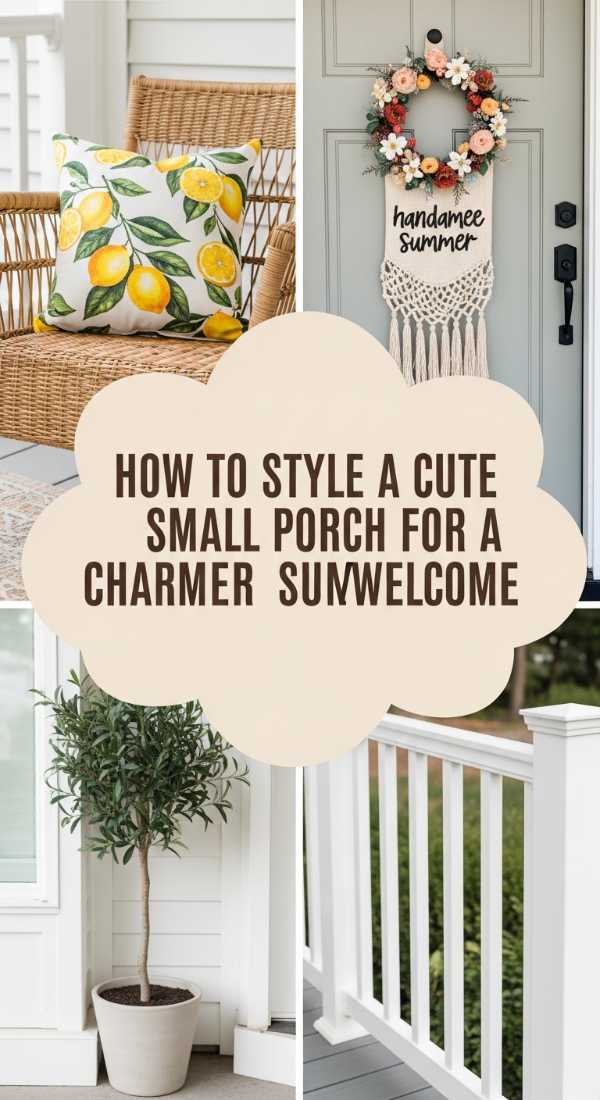
How to Style a Cute Small Porch for a Charming Summer Welcome

Why we love this
A small porch is like a warm hug for your guests before they even step through the front door. We love the layered textures of a woven jute rug topped with a cheeky welcome mat, creating a tactile experience underfoot that feels intentional and cozy. The air here should smell like blooming jasmine and fresh lemonade, with the soft glow of battery-operated lanterns flickering as the sun goes down. It’s a tiny, curated ‘dish’ of home decor where every element—from the weight of a ceramic planter to the soft fringe of a throw blanket—contributes to a sense of ultimate hospitality.
Essential Elements:
- Layered rugs (one oversized jute, one patterned coir)
- Symmetrical oversized planters
- Wicker or rattan seating (even a single chair works!)
- Outdoor-rated lanterns with LED candles
- A seasonal wreath with eucalyptus or dried florals
How to make it
- Deep clean the area first by power washing the floor and dusting the ceiling corners; a sparkling clean base is essential for the ‘viral’ look.
- Place your large base rug (6×9 or 5×7) down first, then center your smaller coir mat on top to create that signature designer depth.
- Select two identical, tall planters and place them on either side of the door. Use the ‘Thriller, Filler, Spiller’ method: a tall grass in the middle, colorful flowers around it, and ivy trailing over the sides.
- Add a single statement chair or a small bench if space permits. Drape an outdoor-safe throw blanket over the arm to soften the hard lines of the porch.
- Hang your wreath at eye level. If you have a glass door, use a magnetic hook for a seamless, floating appearance.
- Set your lanterns on a timer to turn on at dusk, providing a warm, 2700K color temperature glow that looks magical from the street.
How to Build a DIY Grill Station for Affordable Outdoor Entertaining
Why we love this
The DIY grill station is the ultimate functional centerpiece, transforming a basic barbecue into a high-end outdoor kitchen. The sensory experience here is unmatched: the sizzle of searing protein on a hot grate, the aromatic smoke of hickory wood, and the cool touch of a stone countertop. It feels like a professional culinary stage where the textures of reclaimed wood meet the industrial sheen of stainless steel. There is a deep satisfaction in serving a meal from a station you built yourself, where every tool is in its place and the vibe is effortlessly communal.
Essential Elements:
- Pressure-treated 4×4 posts for the frame
- Concrete pavers or granite remnants for the countertop
- Magnetic tool strips for spatulas and tongs
- Built-in bottle opener
- Hidden trash bin compartment
How to make it
- Design your frame based on the height of your grill; the countertop should ideally sit at 36 inches high for ergonomic cooking.
- Construct the base using pressure-treated lumber and heavy-duty deck screws. Ensure the structure is perfectly level by using a 4-foot level across the top rails.
- Clad the exterior with cedar slats or faux stone siding. If using wood, sand it down to a 120-grit finish and apply a UV-resistant outdoor stain.
- For the countertop, lay down a substrate of 3/4-inch exterior grade plywood, then secure your stone or concrete pavers using a high-strength construction adhesive.
- Leave a specific ‘drop-in’ zone for your grill. Ensure there is at least a 2-inch clearance on all sides for heat dissipation to prevent the wood frame from scorching.
- Install a bottle opener and heavy-duty hooks on the sides. Professional tip: Add a solar-powered LED strip under the counter lip for nighttime visibility.
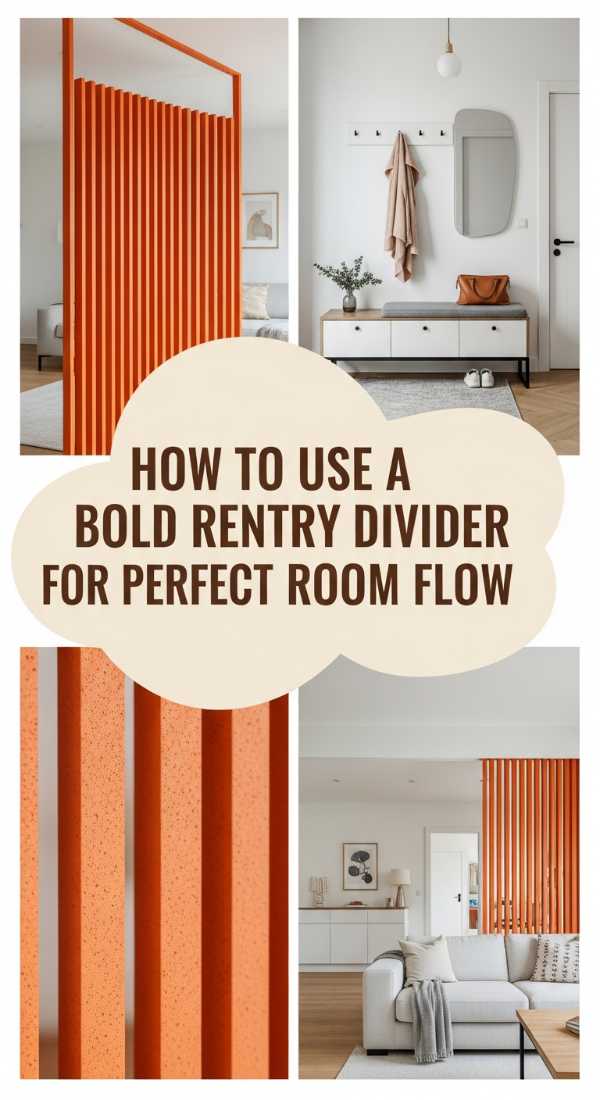
How to Use a Bold Entry Divider for Perfect Room Flow

Why we love this
A bold entry divider is the master of illusion, providing structure without the claustrophobia of a solid wall. We adore the way light filters through vertical oak slats, creating a rhythmic pattern of shadows that dance across the floor as the day progresses. It smells of fresh wood polish and high-end design, offering a tactile boundary that feels sturdy yet airy. It’s the architectural equivalent of a deep breath, signaling a transition from the chaotic outside world into the sanctuary of your living space with sophistication and grace.
Essential Elements:
- Floor-to-ceiling wooden slats (Oak, Walnut, or Pine)
- Sturdy header and footer mounting boards
- Precision spacers for consistent gaps
- Matte black hardware or hidden fasteners
- Satin-finish wood sealer
How to make it
- Measure your floor-to-ceiling height in three different spots to account for any sagging; use the shortest measurement for your slats.
- Cut your vertical slats to size. For a modern viral look, use 1×2 or 2×2 boards. Sand every edge until it feels buttery smooth to the touch.
- Install a 1×4 mounting plate to the ceiling and the floor. Use a stud finder to ensure the top plate is secured directly into the joists for maximum stability.
- Use a plumb bob or a laser level to ensure every slat is perfectly vertical. Even a 1/8-inch tilt will be visible to the naked eye.
- Pre-drill your holes to prevent the wood from splitting. Attach the slats to the mounting plates using trim screws or a finish nailer.
- Apply a clear coat or a light stain. A satin finish is best as it hides fingerprints while still giving the wood a healthy, hydrated glow.
How to Install Hog Wire Fence for a Modern Rustic Garden Perimeter
Why we love this
Hog wire fencing is the darling of the modern farmhouse movement, offering a rugged durability that doesn’t block your view of the sunset. We love the industrial ‘snap’ of the heavy-gauge wire paired with the warmth of chunky cedar posts. It feels incredibly sturdy underhand, a reliable barrier that still allows the scent of honeysuckle and freshly cut grass to waft through the yard. The visual transparency makes your garden feel twice as large, creating a seamless connection between your manicured beds and the wild horizon beyond.
Essential Elements:
- 4-gauge galvanized hog wire panels
- Rough-sawn cedar 4×4 posts
- 2×4 cedar rails for the ‘sandwich’ frame
- Heavy-duty staples or fencing clips
- Concrete mix for post setting
How to make it
- Mark your post holes every 6 to 8 feet. Dig holes 24 inches deep (or below the frost line) and set your 4×4 posts in quick-setting concrete.
- Once the concrete has cured for 24 hours, install your bottom 2×4 rail between the posts, about 2 inches off the ground to prevent rot.
- Cut the hog wire panels to size using a heavy-duty bolt cutter. Wear protective gloves, as the cut ends can be extremely sharp.
- Attach the wire panel to the back of the bottom rail and the posts using galvanized staples. Ensure the wire is pulled taut and level.
- Install the top 2×4 rail and ‘sandwich’ the wire by adding a second set of 2x4s on the opposite side, hiding the wire edges completely for a professional finish.
- Cap the posts with a flat 2×6 board to create a ‘cocktail rail’ where you can set drinks while chatting over the fence.
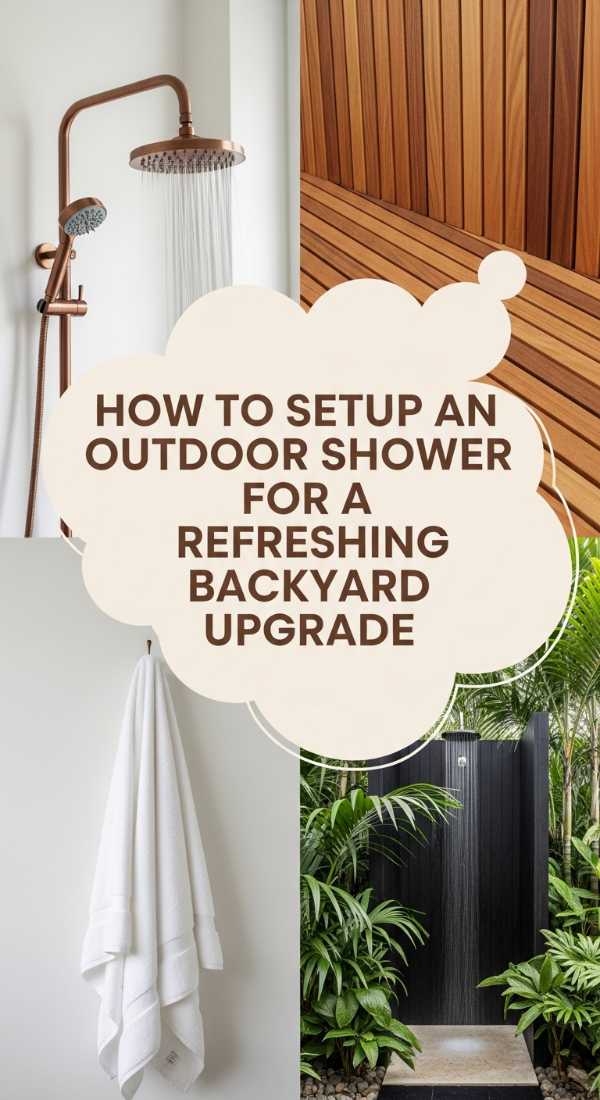
How to Setup an Outdoor Shower for a Refreshing Backyard Upgrade

Why we love this
There is no luxury quite like rinsing off under the open sky, surrounded by the rustle of leaves and the chirp of birds. An outdoor shower is a sensory masterpiece: the stinging-cold or steaming-hot water hitting your skin, the earthy smell of cedar planks becoming wet, and the feel of smooth river stones beneath your bare feet. It’s a primal yet sophisticated experience that turns a simple backyard into a high-end spa. It’s the ultimate ‘cool girl’ summer upgrade that makes every day feel like a vacation in the Hamptons or Bali.
Essential Elements:
- Wall-mounted rainfall showerhead
- Cedar or teak privacy screen
- French drain system with river rocks
- Outdoor-rated plumbing (PEX or Copper)
- Brass or matte black fixtures
How to make it
- Choose a location with easy access to your home’s hot and cold water lines—exterior walls near the kitchen or laundry room are usually easiest.
- Excavate a 3×3 foot area for drainage. Fill it with 6 inches of gravel, topped with a layer of smooth river stones to provide a comfortable, non-slip surface for your feet.
- Build a three-sided privacy enclosure using rot-resistant cedar. Leave 1/2-inch gaps between slats to allow for airflow and quick drying.
- Mount your plumbing. If you live in a cold climate, ensure you install a shut-off valve inside the house and a way to drain the exterior lines to prevent freezing.
- Install a large rainfall showerhead at least 7 feet high to accommodate taller users and provide that luxurious ‘waterfall’ sensation.
- Add a small teak bench and a few heavy-duty hooks for towels and robes to complete the functional spa aesthetic.
How to Select Pool Stone and Tile for a Luxurious Oasis
Why we love this
The right pool stone and tile can transform a basic chlorine tank into a shimmering Mediterranean cove. We are obsessed with the tactile contrast between the cool, matte surface of travertine coping and the iridescent glass tiles that catch the midday sun. When the water laps against the tile, it creates a melodic, rhythmic sound that is the hallmark of a luxury resort. It’s a feast for the eyes, where deep teals and soft sands meet, smelling faintly of salt air and sunscreen, promising a refreshing escape from the summer heat.
Essential Elements:
- Travertine or Limestone coping (natural stone stays cool)
- Glass mosaic waterline tiles
- Non-slip porcelain pavers for the deck
- Submersible LED lighting
- High-bond thin-set and waterproof grout
How to make it
- Select stone that has a high ‘solar reflectance index’ (SRI) so it doesn’t burn your feet during July heatwaves; light grays and tans are perfect.
- For the waterline tile, choose a 1×1 glass mosaic. The smaller the tile, the better it can handle the curves of the pool and the more it will shimmer.
- Ensure the pool beam (the top edge of the pool wall) is perfectly level before applying mortar. Any slight dip will cause uneven water levels against your tiles.
- Apply a waterproof membrane over the concrete before tiling to prevent efflorescence (that white chalky buildup) from ruining your aesthetic later.
- Grout with an epoxy-based product. While harder to work with than cement grout, it is virtually stain-proof and will hold its color against pool chemicals for years.
- Seal the natural stone coping with a penetrating, breathable sealer that protects against salt and chlorine without making the stone slippery.
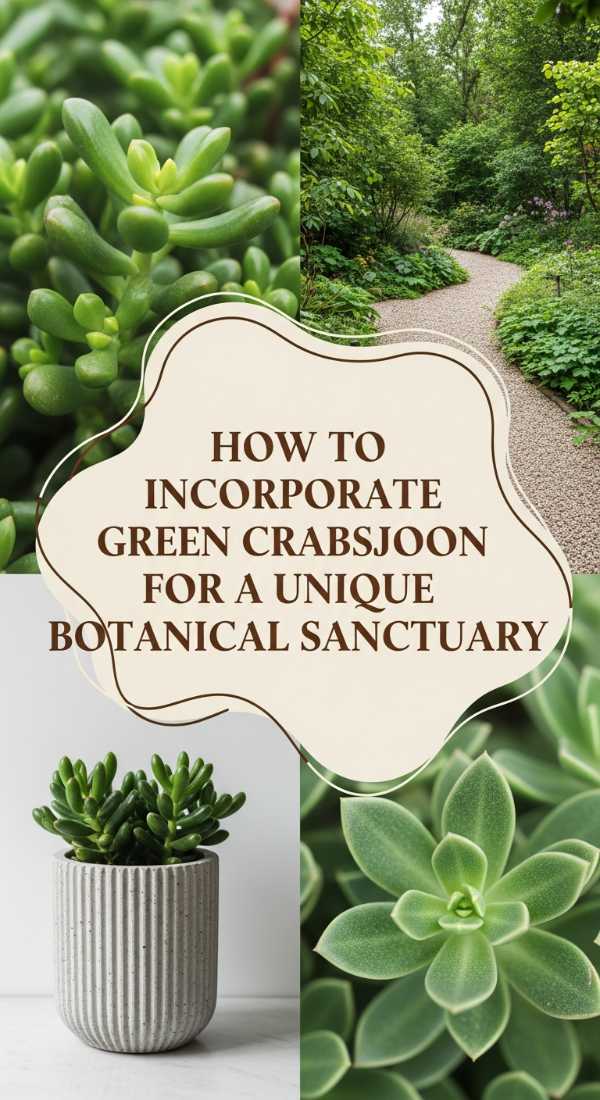
How to Incorporate Green Crabsjoon for a Unique Botanical Sanctuary

Why we love this
The ‘Green Crabsjoon’ aesthetic is all about creating a dense, multi-layered botanical sanctuary that feels like a hidden jungle discovery. This trend leans into deep, moody forest greens and the thick, waxy textures of exotic foliage. Imagine the damp, oxygen-rich air of a greenhouse, filled with the scent of wet moss and fern spores. It’s a visual ‘dish’ served with varying heights and shadows, where the velvet leaves of an Alocasia brush against the delicate fronds of a Boston fern, making you feel completely cocooned in life and vitality.
Essential Elements:
- Large-leaf tropicals (Monstera, Alocasia, Birds of Paradise)
- Trailing ‘string’ varieties (String of Hearts, Pothos)
- Terracotta and moss-covered pots
- High-output humidifiers for that ‘misty forest’ feel
- Pebble trays for localized humidity
How to make it
- Identify your ‘hero’ plant—a large, floor-standing specimen that anchors the space. Place it near a bright, indirect light source.
- Layer your heights. Use plant stands, shelving, and hanging macramé baskets to ensure that green reaches from the floor all the way to the ceiling.
- Group plants with similar humidity needs together. This creates a ‘microclimate’ where the plants help keep each other hydrated through transpiration.
- Incorporate ‘Crabsjoon’ textures—look for plants with unusual leaf shapes or deep ridges. The more variety in texture, the more ‘viral’ and curated the look.
- Use a moisture meter to check the soil. For this look, you want the soil to stay consistently moist like a forest floor, never bone-dry or swampy.
- Finish the look by covering the soil in your pots with live sheet moss or dark river stones to hide the dirt and enhance the ‘sanctuary’ vibe.
How to Plan Front House Flower Beds for Instant Curb Appeal

Why we love this
The front flower bed is your home’s first impression, a curated ‘welcome mat’ made of blooms and greenery. We love the structured beauty of boxwood globes paired with the wild, romantic reach of climbing roses. The air should be thick with the sweet perfume of star jasmine, and the textures should range from the crinkle of hydrangea petals to the stiff, architectural spears of ornamental grasses. It’s a balanced, sophisticated display that signals a home cared for with love, providing a visual high that starts the moment you pull into the driveway.
Essential Elements:
- Evergreen structural plants (Boxwood, Yew, Holly)
- Seasonal color ‘fillers’ (Hydrangeas, Peonies, Zinnias)
- A clean, spade-cut edge
- Uniform dark brown or black mulch
- Strategic accent lighting (uplights for trees)
How to make it
- Stand at the street and take a photo of your house. Use this perspective to plan your bed; small plants look tiny from the road, so think bigger than you think you need.
- Design in layers: Group three or five of the same plant together for a ‘mass planting’ effect that looks professional and high-end.
- Create a sharp edge. Use a half-moon edger to cut a 3-inch deep trench between the grass and the bed. This ‘shadow line’ is what makes the bed pop.
- Plant for year-round interest. Ensure at least 40% of your bed is evergreen so it doesn’t look like a dirt patch in the middle of January.
- Incorporate a ‘focal point’ like a large ceramic urn, a specimen Japanese Maple, or a decorative birdbath to give the eye a place to rest.
- Install low-voltage LED uplights at the base of your focal points. Aim the light into the canopy of the tree or the face of the urn for a dramatic, expensive nighttime look.
How to Develop a Cohesive Color Palette for Sophisticated Living
[IMAGE_10]
Why we love this
A cohesive color palette is the ‘secret sauce’ that makes a home feel like a professional interior designer just left. We love the flow of ‘greige’ walls transitioning into soft terracotta accents and deep navy textiles. It feels like a symphony for the eyes, where no single color screams for attention, but rather, they all hum together in perfect harmony. The atmosphere feels expensive and intentional, smelling of expensive soy candles and clean linen. It’s a sophisticated ‘dish’ of neutrals and textures that provides a calm, steady backdrop for your busy life.
Essential Elements:
- The 60-30-10 Rule (Primary, Secondary, Accent)
- Large-scale paint swatches
- Textile samples (velvet, linen, wool)
- Consistent hardware finishes (e.g., all brass or all black)
- Natural wood tones for warmth
How to make it
- Select your ‘anchor’ color—this is usually a neutral like ‘Swiss Coffee’ or ‘Agreeable Gray’ that will cover 60% of your home’s surfaces.
- Choose a secondary color for larger furniture pieces, rugs, and accent walls. This should be a complementary shade that shares the same ‘undertone’ (cool vs. warm) as your anchor.
- Pick one or two bold accent colors for 10% of the space—think throw pillows, art, and vases. This is where you can follow trends without a permanent commitment.
- Use the ‘Red Thread’ technique: carry one specific color or material through every single room in the house to create a sense of continuity.
- Test your colors in all lighting. Paint a 2×2 square on every wall and watch how it changes from the bright morning sun to the warm glow of evening lamps.
- Don’t forget the ‘wood’ palette. Ensure your flooring, coffee tables, and shelving all have similar wood undertones (don’t mix cherry red wood with yellow oak) for a polished finish.
Final Thoughts: Your Home, Your Masterpiece
Creating a Pinterest-worthy home isn’t about perfection; it’s about the joy of the process. Each of these trends offers a way to inject personality and luxury into your everyday life. Whether you’re getting your hands dirty building a grill station or carefully selecting the perfect tile for your pool, you’re crafting a space that tells your story. So, grab that mood board, start small, and watch as your home transforms into the sanctuary you’ve always dreamed of. Happy decorating!