
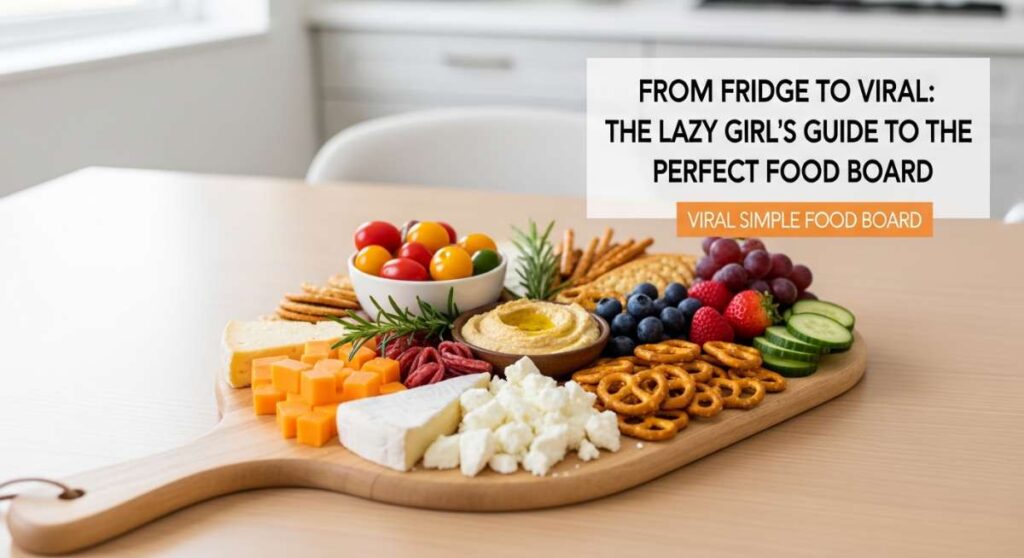
From Fridge to Viral: The Lazy Girl’s Guide to the Perfect Food Board
We’ve all been there: scrolling through social media at 11 PM, eyes glazed over as we watch effortless creators assemble the most stunning food boards that look like they belong in a high-end gallery rather than a kitchen. It feels unattainable, doesn’t it? Like you need a degree in culinary arts and a personal gardener just to put together a snack. But here is a secret from one lazy girl to another—the magic isn’t in the effort; it’s in the aesthetic arrangement and the bold flavors that do the heavy lifting for you.
The ‘Lazy Girl’ philosophy is all about maximum impact with minimum stress. We aren’t slaving over a hot stove for hours; we are curated, we are clever, and we are definitely using what we already have in the fridge to create something viral-worthy. Whether you’re hosting a last-minute brunch or just want to treat yourself to a solo ‘girl dinner’ that feels luxurious, these boards are your new best friend. Let’s dive into the ultimate guide to making your food look as good as it tastes without breaking a sweat.
How to Style the Dreamiest Pressed Flower Cake?

Why we love this
There is something inherently magical about a cake that looks like it was plucked straight from a sun-drenched wildflower meadow. The sponge itself is incredibly light and airy, carrying the faint, sweet aroma of vanilla bean and a hint of lemon zest that lingers on the palate. As you glide your fork through the silky, cloud-like Swiss meringue buttercream, the texture is smooth as velvet, providing the perfect canvas for the delicate, papery petals of edible pansies and violas. It’s a sensory experience that feels both sophisticated and whimsical, capturing the very essence of a fresh spring morning in every bite.
Ingredients
- 2 1/2 cups cake flour
- 1 1/2 cups granulated sugar
- 1 tbsp baking powder
- 1/2 tsp salt
- 3/4 cup unsalted butter, softened
- 1 cup whole milk
- 4 large egg whites
- 2 tsp vanilla bean paste
- Swiss meringue buttercream
- Assorted edible flowers (pansies, violas, chamomile)
How to make it
- Preheat your oven to 350°F (175°C) and grease two 8-inch round cake pans. Line the bottoms with parchment paper to ensure a clean release, which is crucial for the aesthetic.
- Sift the cake flour and baking powder together in a large bowl. In a separate stand mixer, cream the softened butter and sugar on medium-high speed for about 5 minutes until the mixture is pale and doubled in volume; this aeration creates that signature ‘viral’ fluffy crumb.
- Slowly incorporate the egg whites one by one, ensuring each is fully emulsified before adding the next. Then, alternate adding the dry ingredients and the milk, starting and ending with the flour mixture. Mix only until just combined to avoid overworking the gluten.
- Divide the batter evenly between the pans and bake for 25-30 minutes. Use a toothpick to check for doneness; it should come out clean with a few moist crumbs. Cool the cakes completely on a wire rack.
- Apply a thin ‘crumb coat’ of buttercream to the chilled cakes, then refrigerate for 20 minutes. Apply a final, thick layer of buttercream, smoothing it with an offset spatula for a professional finish.
- Gently press your washed and dried edible flowers into the sides and top of the cake. Use a pair of tweezers for precision, layering the different colors and sizes to create a natural, organic flow that looks like a growing garden.
How to Prep the Ultimate 20-Minute Healthy Spring Dinner?

Why we love this
This dish is the epitome of rejuvenation, combining the crisp, snappy textures of seasonal greens with a protein that melts like butter in your mouth. The aroma of roasted asparagus mingled with garlic and lemon zest fills the kitchen, signaling a shift away from the heavy comfort foods of winter toward something vibrant and life-affirming. Each forkful offers a balance of earthy notes and bright acidity, leaving you feeling nourished and energized rather than weighed down. It’s the kind of meal that looks incredibly expensive on a wooden serving board but takes less time to prepare than ordering takeout.
Ingredients
- 1 lb fresh asparagus, woody ends trimmed
- 2 salmon fillets (6 oz each)
- 2 cups baby arugula
- 1/2 cup cooked quinoa
- 1 lemon, sliced into rounds
- 3 tbsp olive oil
- 3 cloves garlic, minced
- Red pepper flakes and sea salt
How to make it
- Preheat your oven to 400°F (200°C) and line a large sheet pan with parchment paper. This is the ‘lazy girl’ secret for zero cleanup later.
- Pat the salmon fillets completely dry with a paper towel. This step is non-negotiable if you want a crispy skin and a tender interior. Place them in the center of the pan.
- Arrange the trimmed asparagus around the salmon. Drizzle everything generously with olive oil, then sprinkle the minced garlic, salt, and red pepper flakes over the top. Massage the seasonings into the vegetables and fish to ensure every inch is coated.
- Lay the lemon slices directly on top of the salmon. Bake for 12-15 minutes depending on the thickness of your fillets. The salmon is done when it flakes easily with a fork and reaches an internal temperature of 145°F.
- While the sheet pan is in the oven, toss your baby arugula with a splash of lemon juice. Once the salmon is done, serve it directly on the board over the bed of arugula and quinoa, pouring the warm pan juices over the top as a natural dressing.
How to Make the Most Viral Loaded Rotel Dip?

Why we love this
There is nothing quite as nostalgic or satisfying as the sight of a bubbling, golden-orange cheese dip surrounded by a sea of colorful chips. The texture is thick, velvety, and incredibly gooey, with pockets of zesty tomatoes and spicy green chilies providing a refreshing pop against the richness of the cheese. As you dip a crunchy tortilla chip into the warm center, the aroma of cumin and savory ground meat hits you, creating an irresistible craving for just one more bite. It is the ultimate comfort food that brings people together, making it the undeniable star of any gathering board.
Ingredients
- 1 lb ground beef or spicy sausage
- 1 block (32 oz) Velveeta cheese, cubed
- 2 cans (10 oz each) Rotel Diced Tomatoes & Green Chilies
- 1/2 cup heavy cream (for extra silkiness)
- 1 tsp taco seasoning
- Fresh cilantro and jalapeños for garnish
How to make it
- In a large skillet over medium-high heat, brown the ground beef or sausage until it is fully cooked through and no longer pink. Drain the excess fat thoroughly; this prevents the dip from becoming oily.
- Turn the heat down to low and add the cubed Velveeta cheese. It is important to cut the cheese into even 1-inch cubes so that it melts uniformly without scorching.
- Pour in both cans of Rotel. Do not drain the cans! The liquid from the tomatoes is essential for the flavor profile and the consistency of the dip.
- Slowly stir in the heavy cream and taco seasoning. Keep the heat low and stir constantly with a silicone spatula until the mixture is completely smooth and glossy. If it feels too thick, add another splash of milk or cream.
- Transfer the dip to a warm ceramic bowl and place it in the center of your food board. Garnish with chopped cilantro and sliced jalapeños to give it that ‘viral’ pop of green color.
How to Master the Art of Messy Dirty Spaghetti?

Why we love this
Dirty spaghetti is the rebellious, flavor-packed cousin of the traditional pasta dish, offering a deep, savory complexity that is absolutely addictive. The sauce is thick and rustic, clinging to every strand of al dente pasta with a smoky, slightly spicy richness that comes from browning the meat until it’s nearly caramelized. You’ll notice the earthy aroma of bell peppers and onions cooked down until they are jammy and sweet, contrasting perfectly with the salty bite of parmesan cheese. It’s a messy, beautiful pile of comfort that looks stunning when served on a massive platter for everyone to dig into with their own forks.
Ingredients
- 1 lb spaghetti noodles
- 1 lb ground pork or beef
- 1 large green bell pepper, finely diced
- 1 yellow onion, minced
- 3 cloves garlic, smashed
- 2 tbsp tomato paste
- 1 tsp smoked paprika and 1/2 tsp cayenne
- Fresh parsley and grated parmesan
How to make it
- Bring a large pot of heavily salted water to a rolling boil. Cook the spaghetti for 2 minutes less than the package directions suggest; it will finish cooking in the sauce, which allows the noodles to absorb the maximum amount of flavor.
- In a large wide pan, sear the ground meat over high heat. Don’t stir it too often at first—you want to develop a dark, crispy crust on the meat, which provides the ‘dirty’ color and deep flavor.
- Add the diced peppers and onions to the pan with the meat. Sauté until the vegetables are soft and translucent, about 8 minutes. Stir in the garlic and tomato paste, cooking for another 2 minutes until the paste turns a deep brick red.
- Deglaze the pan with a half cup of starchy pasta water, scraping up all the brown bits (sucs) from the bottom of the pan. This is where all the concentrated flavor lives!
- Toss the undercooked spaghetti into the pan. Add the smoked paprika and cayenne. Toss vigorously with tongs over medium heat, adding more pasta water as needed until a glossy, thick sauce coats every noodle.
- Transfer to a large platter on your board and top with a mountain of fresh parsley and parmesan for that high-contrast, ‘instagrammable’ look.
How to Create a Refreshing Summer Burrata Salad?
Why we love this
This salad is like a cool breeze on a humid July afternoon, offering a stunning interplay of temperatures and textures. The center of the board is dominated by a plump ball of burrata cheese which, when broken open, spills its creamy, buttery interior across a bed of sun-ripened fruit and crisp greens. The aroma is a intoxicating blend of fresh basil and aged balsamic glaze, while the taste is a perfect symphony of sweet, salty, and tangy. Each bite feels like a luxury, with the softness of the cheese contrasting against the crunch of toasted pine nuts, making it the ultimate centerpiece for a summer food board.
Ingredients
- 2 balls of fresh Burrata cheese
- 3 ripe peaches or nectarines, sliced
- 1 pint heirloom cherry tomatoes, halved
- Fresh basil leaves
- 2 tbsp pine nuts, toasted
- Aged balsamic glaze and extra virgin olive oil
- Flaky sea salt
How to make it
- Start by prepping your fruit and vegetables. Ensure the peaches are at room temperature to maximize their sweetness and floral aroma. Slice them into thick wedges.
- On a large circular wooden board, create a ‘nest’ of fresh basil leaves and halved cherry tomatoes. This provides a vibrant green and red base for the cheese.
- Place the burrata balls in the center of the board. Using a very sharp knife, carefully score the top of the cheese in an ‘X’ shape, but don’t pull it apart just yet—save that for the table-side reveal.
- Arrange the peach slices in a fan pattern around the cheese. The orange hues of the fruit against the white cheese and green basil create a striking visual hierarchy.
- In a small dry pan, toast the pine nuts over low heat for 3-4 minutes until they are golden brown and fragrant. Sprinkle these over the entire board for an essential crunch.
- Just before serving, drizzle the entire board with high-quality olive oil and thick balsamic glaze. Finish with a generous pinch of flaky sea salt directly on the cheese to enhance the creaminess.
How to Bake the Perfect Chewy Spring Lemon Cookies?

Why we love this
These cookies are like biting into a sunbeam, offering a bright, zesty punch that instantly wakes up your taste buds. The edges are perfectly crisp and golden, while the centers remain soft, chewy, and almost fudge-like in their richness. As they bake, your kitchen will be filled with the clean, uplifting scent of fresh lemon oil and sweet sugar, creating an atmosphere of pure joy. Drizzled with a tart lemon glaze that hardens into a delicate crackle, these cookies are a beautiful addition to any dessert board, providing a pop of yellow that screams springtime happiness.
Ingredients
- 1/2 cup unsalted butter, melted and cooled
- 1 cup granulated sugar
- 1 large egg + 1 egg yolk
- 2 tbsp fresh lemon zest
- 1 tbsp lemon juice
- 1 1/2 cups all-purpose flour
- 1/2 tsp baking soda and 1/4 tsp salt
- Yellow food coloring (optional)
- Glaze: 1 cup powdered sugar + 2 tbsp lemon juice
How to make it
- In a large bowl, whisk together the melted butter and granulated sugar until well combined. The melted butter is the secret to that chewy, dense texture we all crave in a ‘viral’ cookie.
- Add the egg, egg yolk, lemon zest, and lemon juice. Whisk vigorously for 2 minutes. The lemon zest contains essential oils that are released during whisking, providing a more intense flavor than juice alone.
- Fold in the flour, baking soda, and salt using a rubber spatula. Mix until just combined. If you want that bright ‘social media yellow,’ add a single drop of gel food coloring now.
- Chill the dough in the refrigerator for at least 30 minutes. This prevents the cookies from spreading too thin and ensures a thick, soft center.
- Scoop rounded tablespoons of dough onto a parchment-lined sheet. Bake at 350°F (175°C) for 10-12 minutes. The cookies should look slightly underbaked in the middle; they will firm up as they cool on the pan.
- Once cool, whisk the glaze ingredients until smooth and drizzle over the cookies in a zig-zag pattern. Let them set for 15 minutes before arranging them on your board.
How to Simmer a Vibrant Lemon Chicken Spring Soup?

Why we love this
Forget the heavy, brown stews of winter; this soup is a celebration of clarity, brightness, and fresh herbs. The broth is a shimmering gold, infused with the essence of lemon and garlic, and filled with tender shreds of chicken and vibrant green vegetables like peas and leeks. The aroma is incredibly restorative, smelling of fresh dill and citrus, while the flavor is light yet deeply satisfying. It’s a ‘hug in a bowl’ that manages to feel elegant and clean, making it the perfect transition meal as the weather begins to warm up and the garden starts to bloom.
Ingredients
- 1 tbsp olive oil
- 2 large leeks, white parts only, sliced
- 2 carrots, diced
- 6 cups high-quality chicken bone broth
- 1 lb shredded rotisserie chicken (the ultimate lazy girl hack!)
- 1/2 cup orzo pasta
- 1/4 cup fresh dill, chopped
- Juice and zest of 2 lemons
- 1 cup frozen sweet peas
How to make it
- In a large Dutch oven, heat the olive oil over medium heat. Sauté the sliced leeks and carrots for 5-7 minutes until they are soft and fragrant. Leeks offer a much subtler, sweeter flavor than onions, which is perfect for a spring palate.
- Pour in the chicken bone broth and bring the mixture to a gentle boil. High-quality broth is the backbone of this recipe, so don’t skimp here.
- Add the orzo pasta to the boiling broth. Cook for about 8 minutes, or until the pasta is al dente. Keep an eye on it—orzo loves to soak up liquid, so you may need to add an extra splash of broth later.
- Stir in the shredded rotisserie chicken and the frozen peas. The peas only need about 2 minutes to cook, and they will retain their bright green color if added at the very end.
- Turn off the heat. This is the most important step: stir in the lemon juice, lemon zest, and fresh dill *after* the heat is off. This preserves the bright, volatile flavors of the herbs and citrus.
- Serve in small bowls on a board surrounded by crusty sourdough bread and extra lemon wedges for a beautiful, cohesive look.
How to Build the Ultimate Summer Pasta Salad Board?

Why we love this
This isn’t your grandma’s mayo-heavy deli salad; this is a vibrant, Mediterranean-inspired masterpiece that looks like a mosaic on a platter. The texture is a playful mix of chewy pasta, creamy mozzarella pearls, and the snap of fresh cucumbers and peppers. The aroma of basil pesto and toasted pine nuts wafts from the board, instantly transporting you to a seaside terrace in Italy. It’s the perfect ‘make-ahead’ dish because the flavors only deepen as they sit, making it a stress-free addition to any summer gathering that still manages to look absolutely stunning.
Ingredients
- 1 lb fusilli or farfalle pasta
- 1/2 cup basil pesto (homemade or high-quality store-bought)
- 1 cup mozzarella pearls
- 1 cup cherry tomatoes, halved
- 1/2 cup kalamata olives, sliced
- 1 bell pepper, finely diced
- 1/2 red onion, thinly shaved
- Fresh basil for garnish
How to make it
- Cook the pasta in salted water until just past al dente. For a cold pasta salad, you want the noodle to have a bit of ‘give’ so it doesn’t feel hard when chilled. Drain and rinse under cold water immediately to stop the cooking process and remove excess starch.
- While the pasta is still slightly damp, toss it in a large bowl with the basil pesto. The moisture helps the pesto emulsify and coat every spiral of the pasta evenly.
- Add the mozzarella pearls, cherry tomatoes, olives, peppers, and red onion. Fold these in gently so you don’t break the cheese or bruise the vegetables.
- Spread the pasta salad out across a large, flat board rather than keeping it in a bowl. This ‘viral’ plating technique allows every ingredient to be visible and accessible.
- Tuck fresh basil leaves into the crevices of the pasta and sprinkle with a bit of extra black pepper and a drizzle of olive oil.
- Keep the board chilled until the moment you serve. This keeps the vegetables crisp and the cheese firm, ensuring the best possible texture for your guests.
How to Host a Five-Star Spring Brunch Board?

Why we love this
Brunch is the ultimate ‘lazy girl’ meal, and a brunch board is the peak of that aesthetic. Imagine a sprawling landscape of golden-brown mini waffles, soft-boiled eggs with vibrant orange yolks, and piles of glistening fresh berries. The aroma is a heavenly mix of roasted coffee and maple syrup, creating an atmosphere of relaxed luxury. It’s the variety that makes this so special—each person can customize their own plate, mixing sweet and savory elements in a way that feels indulgent and curated. It turns a simple breakfast into an event that everyone will be talking about (and photographing) for weeks.
Ingredients
- Mini frozen waffles (toasted until golden)
- Soft-boiled eggs (6 minutes for the perfect jammy yolk)
- Crispy bacon or prosciutto roses
- Smoked salmon and cream cheese
- Fresh strawberries, blueberries, and raspberries
- Maple syrup and honey for drizzling
- Everything bagel seasoning
How to make it
- Start by preparing your ‘anchors.’ These are the items that take up the most space. Place two small bowls on the board—one for maple syrup and one for cream cheese.
- Arrange the toasted mini waffles in a cascading line from one corner of the board to the other. This creates a visual path for the eye to follow.
- Add the protein. Fold pieces of prosciutto into ‘rose’ shapes by rolling them tightly, and slice your jammy eggs in half, exposing the bright yolks. Sprinkle the eggs with everything bagel seasoning for flavor and texture.
- Fill the gaps with fruit. Use the berries to create clusters of color, filling in any ‘dead space’ on the board. This makes the board look lush and abundant.
- Place the smoked salmon near the cream cheese, and perhaps add a few sprigs of fresh dill or some capers for a professional touch.
- Serve with a carafe of mimosas or hot coffee. The beauty of this board is that it requires almost no actual cooking—just thoughtful assembly!
How to Serve an Easy No-Bake Summer Dessert Platter?
Why we love this
When the sun is blazing, the last thing anyone wants to do is turn on the oven. This no-bake platter is the perfect solution, offering a decadent variety of treats that are as cold and refreshing as they are sweet. The textures range from the snap of dark chocolate to the creamy richness of cheesecake-stuffed strawberries. The aroma of fresh mint and cocoa creates an inviting, dessert-parlor vibe right in your living room. It’s a visual feast of deep reds, dark browns, and snowy whites that looks incredibly high-effort but can be assembled in under fifteen minutes using high-quality store-bought components.
Ingredients
- 12 large strawberries, hollowed out
- 1 pipeable bag of sweetened cream cheese frosting
- 1 bar of high-quality dark chocolate, broken into shards
- Mini macarons (assorted flavors)
- Fresh mint sprigs
- Pretzel rods dipped in white chocolate
- Fresh whipped cream for dipping
How to make it
- Prepare the ‘star’ of the show: the cheesecake strawberries. Cut the tops off the berries and use a small spoon or melon baller to remove the center. Pipe the cream cheese frosting into each berry until it peaks over the top.
- Place a large bowl of fresh whipped cream in the center of a slate or dark wood board. Dust the cream with a little cocoa powder or cinnamon for a finished look.
- Arrange the macarons in small groups according to color. This creates ‘color blocking,’ which is a major trend in viral food photography.
- Scatter the dark chocolate shards and white-chocolate-dipped pretzels around the board. The mix of sweet and salty is essential for a balanced dessert experience.
- Garnish the entire board with fresh mint sprigs. The green pops against the red berries and brown chocolate, making the whole platter look fresh and intentional.
- Keep the board in the fridge until the very last second to ensure the frosting stays firm and the chocolate doesn’t melt, providing that satisfying snap with every bite.
Elevating Your Everyday with Minimal Effort
Becoming the queen of viral food boards isn’t about spending your entire paycheck at a specialty grocer or sweating over a complicated recipe. It’s about the joy of assembly, the play of colors, and the celebration of simple, high-quality ingredients. By following these ‘lazy girl’ tips, you can transform your kitchen counter into a destination for flavor and style. Remember, the best part of a food board is that there are no rules—if it looks good to you and tastes even better, you’ve already won. So, grab a board, raid your fridge, and start creating your own viral masterpiece today!