
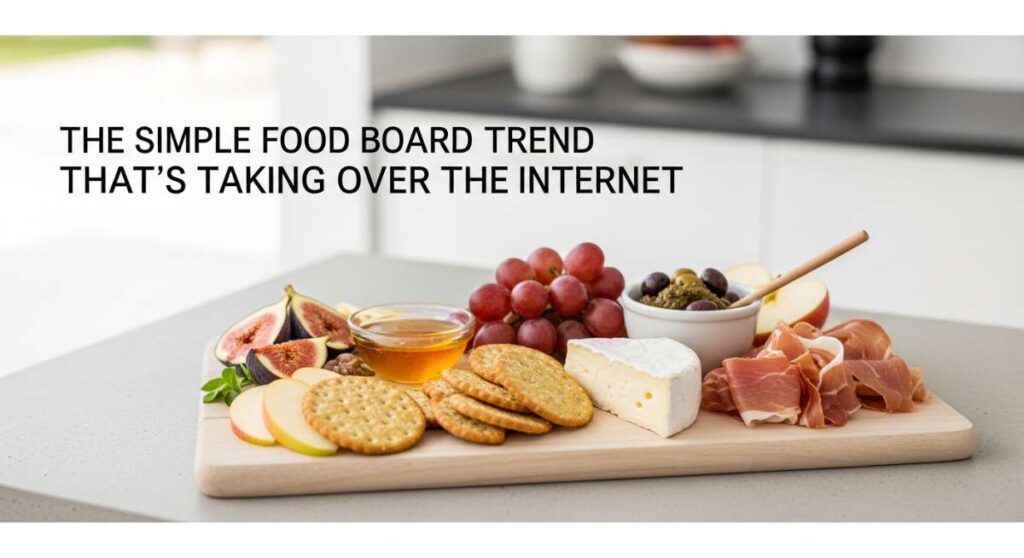
The Simple Food Board Trend That’s Taking Over the Internet
There is something inherently magical about a gathering where the food isn’t just served, but presented as a shared experience. Lately, my social media feeds have been flooded with the most incredible ‘Food Boards’ that go way beyond your standard cheese and crackers. It’s about taking one simple theme—like a favorite dessert or a savory snack—and turning it into a visual and culinary masterpiece that brings people together around the table. It’s the ultimate way to host without the stress of a formal sit-down meal.
Whenever I set out one of these boards, I see my friends’ eyes light up. It’s the tactile joy of picking exactly what you want, the vibrant colors of fresh ingredients, and the way a single board tells a story of the season or the occasion. Whether you are celebrating a milestone or just a Tuesday afternoon tea, these curated boards are the heartbeat of modern entertaining. Let’s dive into some of my favorite ways to build a cake-focused board that will leave your guests speechless.
How to Bake Strawberry Cakes?
Why we love this
There is nothing quite like the aroma of fresh strawberries roasting in the oven, filling the kitchen with a scent that is both sweet and nostalgic. These strawberry cakes offer a moist, tender crumb that is punctuated by the bright, jammy bursts of real fruit. When you take a bite, the contrast between the slightly golden exterior and the soft, blush-pink interior feels like a warm summer hug. It’s the kind of treat that tastes even better when enjoyed outdoors under the sun, paired with a dollop of whipped cream.
Ingredients
- 2 cups all-purpose flour
- 1 1/2 teaspoons baking powder
- 1/2 teaspoon salt
- 1/2 cup unsalted butter, softened
- 1 cup granulated sugar
- 1 large egg
- 1/2 cup whole milk
- 1 teaspoon vanilla extract
- 1 1/2 cups fresh strawberries, hulled and halved
How to make it
- Preheat your oven to 350°F (175°C) and grease a round cake pan or muffin tin. Ensuring the oven is fully preheated is crucial for the initial lift of the batter.
- In a medium bowl, whisk together the flour, baking powder, and salt until well-combined. This ensures even distribution of the leavening agents so your cake rises uniformly.
- In a large bowl, cream the softened butter and sugar together using a hand mixer on medium-high speed for about 3-5 minutes. Look for a pale, fluffy texture which indicates enough air has been incorporated.
- Add the egg and vanilla extract, beating until smooth and fully incorporated. Scrape down the sides of the bowl to ensure no streaks of butter remain.
- Gradually add the dry ingredients and the milk, alternating between the two, starting and ending with the dry. Mix on low speed just until combined; overmixing at this stage will result in a tough cake.
- Gently fold in half of the strawberries. Pour the batter into the prepared pan and arrange the remaining strawberries on top, cut-side down. This creates a beautiful, rustic visual once baked.
- Bake for 35-40 minutes. You’ll know it’s done when the top is golden brown and a toothpick inserted into the center comes out clean or with just a few moist crumbs.
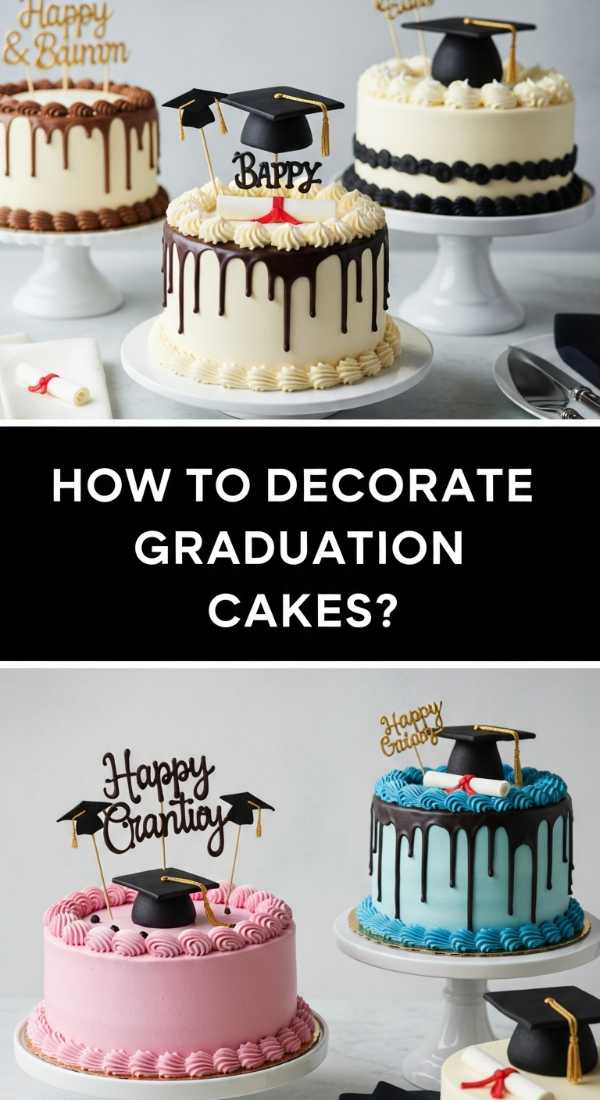
How to Decorate Graduation Cakes?
Why we love this
Graduation cakes are more than just dessert; they are a celebration of hard work and new beginnings. We love the way these cakes can be customized to show off school colors, bringing a sense of pride and accomplishment to the dessert table. The texture of smooth buttercream combined with the sharp lines of a fondant cap creates a sophisticated look that is both modern and timeless. It’s a focal point that captures the joy of the graduate and provides a sweet finale to a momentous day.
Ingredients
- One pre-baked 8-inch layer cake
- 4 cups vanilla buttercream frosting
- Black fondant
- Gold luster dust
- Food coloring in school colors
- Cardstock for a mini tassel
How to make it
- Begin by crumb-coating your chilled cake layers. Apply a thin layer of buttercream to lock in crumbs, then refrigerate for 20 minutes until firm. This creates a stable foundation for the final design.
- Apply the final layer of buttercream, using an offset spatula to achieve a smooth, professional finish. If using school colors, tint your frosting before applying. For sharp edges, hold a bench scraper at a 45-degree angle against the side of the cake while rotating the turntable.
- Roll out the black fondant to a 1/4-inch thickness. Cut a perfect square for the top of the mortarboard and a small circle for the base. Let these dry for several hours or overnight so they hold their shape.
- Assemble the graduation cap by placing the fondant circle in the center of the cake and securing the square on top with a bit of royal icing.
- Mix gold luster dust with a drop of clear vanilla extract to create a ‘paint.’ Use a fine-tip brush to paint ‘Class of [Year]’ on the side of the cake or to highlight the edges of the cap.
- Attach a handmade tassel to the center of the fondant square. Ensure the tassel hangs off the side for an authentic look.
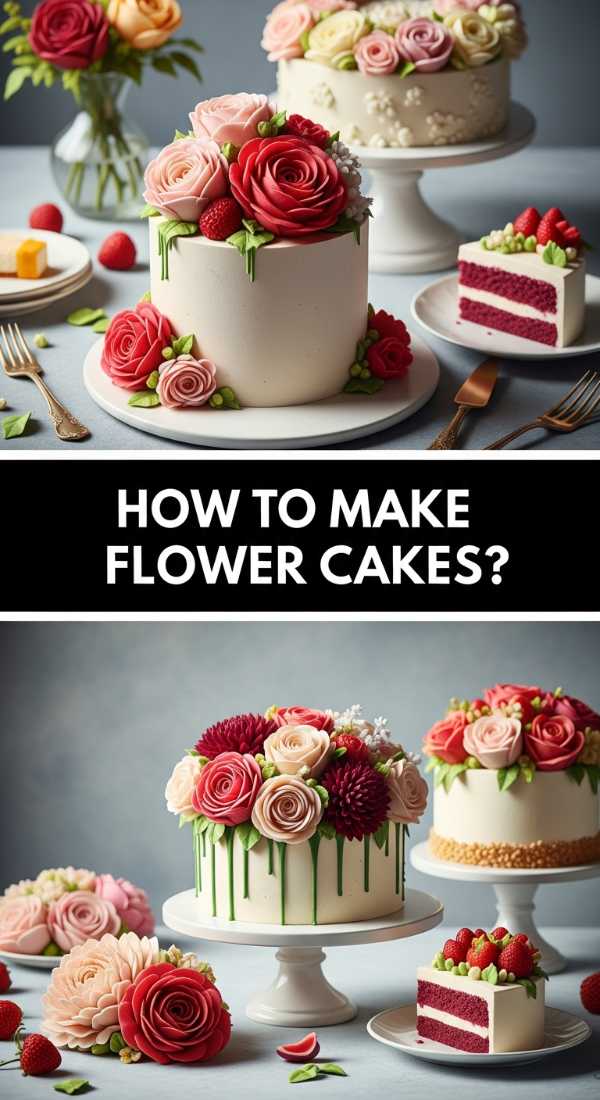
How to Make Flower Cakes?
Why we love this
Flower cakes bring the delicate beauty of a botanical garden right to your plate, turning a simple sponge into a work of art. The sensation of biting through intricate, velvety petals made of buttercream is pure luxury, especially when paired with floral notes like lavender or rosewater. These cakes are visually stunning, with vibrant colors that pop against a neutral background, making them the star of any spring-themed food board. They evoke a sense of elegance and whimsy that is perfect for garden parties.
Ingredients
- 1 dozen cupcakes or a small round cake
- Swiss meringue buttercream
- Gel food colors (pink, yellow, green)
- Piping bags
- Petal tips (No. 104) and leaf tips (No. 352)
- Flower nail
How to make it
- Prepare your Swiss meringue buttercream, ensuring it is silky smooth. Divide the frosting into bowls and tint them with your desired floral shades using gel colors for intensity without thinning the frosting.
- Fit a piping bag with a petal tip (No. 104). Position the wide end of the tip against the flower nail. Using a rotating motion with your fingers, pipe a small mound in the center to act as the bud.
- Pipe individual petals around the center by moving the tip in an up-and-down arch motion. Overlap the petals slightly to create a full, realistic bloom. Repeat until the flower reaches your desired size.
- Freeze the piped flowers on a tray for 15 minutes. This makes them firm enough to handle and place onto the cake without smudging the delicate edges.
- Using a leaf tip (No. 352) and green frosting, pipe small leaves directly onto the cake around the flowers. The pressure-release technique will create pointed, lifelike leaf ends.
- Arrange the chilled flowers in a cluster or a wreath pattern on your cake, filling in any gaps with smaller buttercream buds or edible pearls.
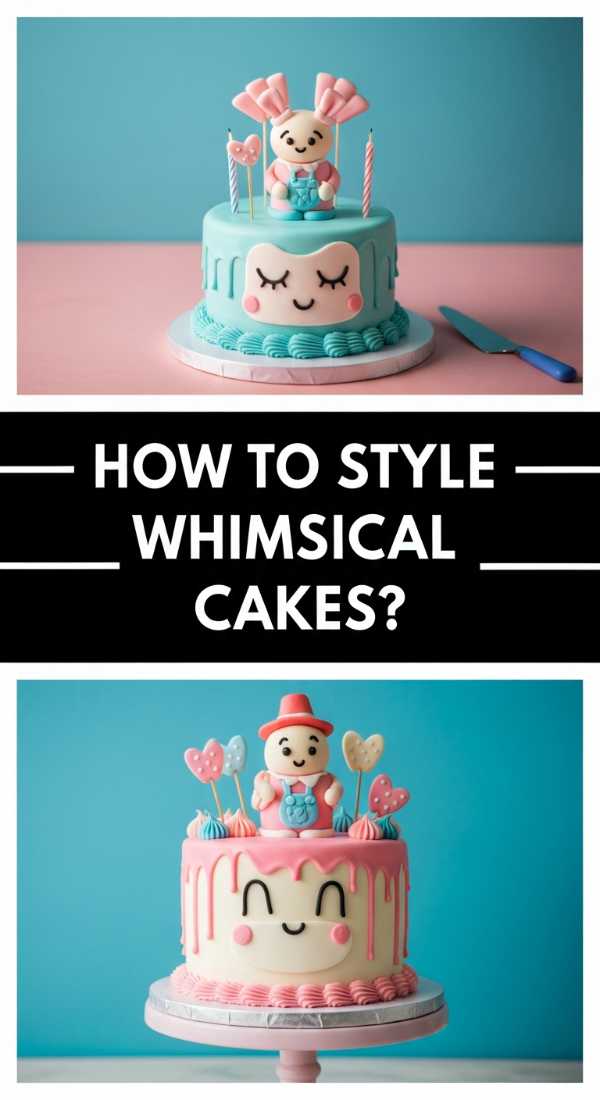
How to Style Whimsical Cakes?
Why we love this
Whimsical cakes are all about embracing your inner child and letting creativity run wild with colors, drips, and textures. We love how these cakes defy traditional rules, featuring gravity-dropping ganache and piles of colorful sweets that look like something out of a fairy tale. The aroma of sugary sprinkles and white chocolate is intoxicating, and the playful aesthetic makes every guest feel like they’re part of a magical celebration. It’s a joyful, messy, and absolutely delicious way to express personality through baking.
Ingredients
- Layered cake (any flavor)
- Brightly colored buttercream
- White chocolate ganache (colored with gel)
- Assorted sprinkles and macarons
- Lollipops and cotton candy
How to make it
- Frost your cake with a vibrant base color. Don’t worry about making it perfectly smooth; a slightly textured ‘watercolor’ effect using two or three shades of frosting adds to the whimsical vibe.
- Prepare your ganache by melting white chocolate with heavy cream in a 3:1 ratio. Tint it with a contrasting gel color. Ensure the ganache has cooled to a lukewarm temperature; it should be thick enough to drip slowly but not run all the way to the bottom.
- Using a squeeze bottle, carefully apply the ganache to the edges of the cake, allowing drips of varying lengths to fall down the sides. Fill in the center of the top of the cake with the remaining ganache.
- While the ganache is still slightly tacky, press a mix of oversized sprinkles and pearls into the base of the cake and along the top edge.
- Anchor larger elements like macarons, lollipops, or even a cloud of cotton candy into the top of the cake. Use wooden skewers if necessary to support heavier items.
- Finish with a dusting of edible glitter to give the entire creation a magical, sparkling glow.
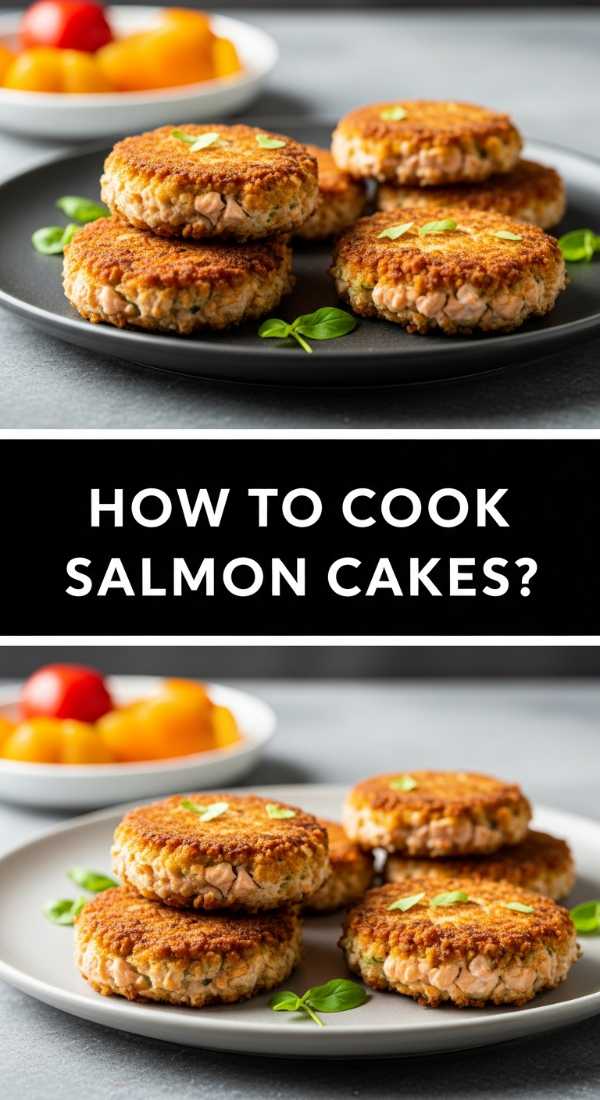
How to Cook Salmon Cakes?
Why we love this
Salmon cakes are the perfect savory addition to a food board, offering a sophisticated flavor profile and a satisfyingly crunchy texture. The contrast between the crisp, golden-brown crust and the tender, flaky pink salmon inside is a culinary delight. Infused with fresh herbs and a hint of lemon zest, they carry a bright, oceanic aroma that pairs beautifully with a creamy dipping sauce. They feel upscale yet comforting, providing a hearty element to an otherwise light spread.
Ingredients
- 1 lb cooked salmon, flaked
- 1/2 cup panko breadcrumbs
- 2 tablespoons fresh parsley, chopped
- 1 tablespoon Dijon mustard
- 1 egg, lightly beaten
- 1 lemon (zested and juiced)
- 2 tablespoons olive oil for frying
How to make it
- In a large mixing bowl, combine the flaked salmon, panko breadcrumbs, parsley, lemon zest, and mustard. Use a fork to mix gently so you don’t over-process the fish; you want chunks of salmon for texture.
- Add the beaten egg and lemon juice, stirring until the mixture just holds together. If it feels too wet, add another tablespoon of breadcrumbs.
- Form the mixture into small, uniform patties (about 2 inches wide for a board). Place them on a parchment-lined tray and refrigerate for 30 minutes. Chilling is essential to prevent them from falling apart in the pan.
- Heat olive oil in a non-stick skillet over medium-high heat. You want the oil to shimmer but not smoke.
- Carefully place the patties in the hot oil. Sear for 3-4 minutes per side. Resist the urge to flip them early; a deep golden crust is what gives them that signature crunch.
- Drain the cakes on a paper towel-lined plate to remove excess oil. Serve warm on your board alongside a lemon-dill aioli.
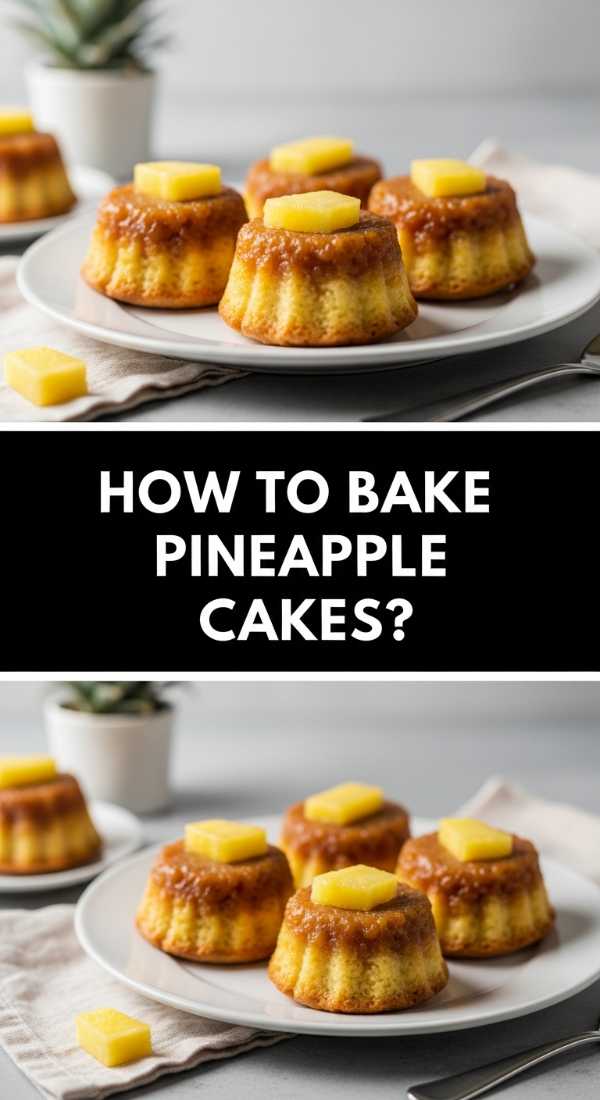
How to Bake Pineapple Cakes?
Why we love this
Pineapple cakes bring a taste of the tropics to your table with their caramelized fruit topping and moist, buttery crumb. The scent of warm pineapple and brown sugar caramelizing together is absolutely irresistible, creating a sweet and tangy profile that lingers on the tongue. We love the retro-chic look of the rings and cherries, which adds a pop of vibrant color to any food board. It’s a dense, satisfying cake that feels both rustic and indulgent.
Ingredients
- 1/4 cup unsalted butter, melted (for topping)
- 1/2 cup light brown sugar
- 1 can pineapple slices in juice
- Maraschino cherries
- 1 1/2 cups flour, 1 cup sugar, 1/2 cup butter (for cake batter)
- 1 teaspoon baking powder
- 2 large eggs
How to make it
- Pour the melted butter into the bottom of a 9-inch round cake pan and sprinkle the brown sugar evenly over it. This will create the sticky caramel glaze.
- Arrange the pineapple slices on top of the sugar. Place a maraschino cherry in the center of each ring and in the gaps between the slices for a classic visual pattern.
- In a separate bowl, cream together the 1/2 cup of softened butter and granulated sugar until light and fluffy. Add the eggs one at a time, beating well after each addition.
- Sift together the flour and baking powder. Gradually add the dry ingredients to the butter mixture, alternating with a few tablespoons of the reserved pineapple juice to keep the batter moist.
- Spread the batter carefully over the pineapple slices, being careful not to disturb your fruit arrangement. Smooth the top with a spatula.
- Bake at 350°F (175°C) for 40-45 minutes. The cake is done when a tester comes out clean and the edges have begun to pull away from the pan.
- Let the cake cool in the pan for only 5-10 minutes, then invert it onto a serving plate while still warm. This ensures the fruit and caramel release perfectly from the bottom.
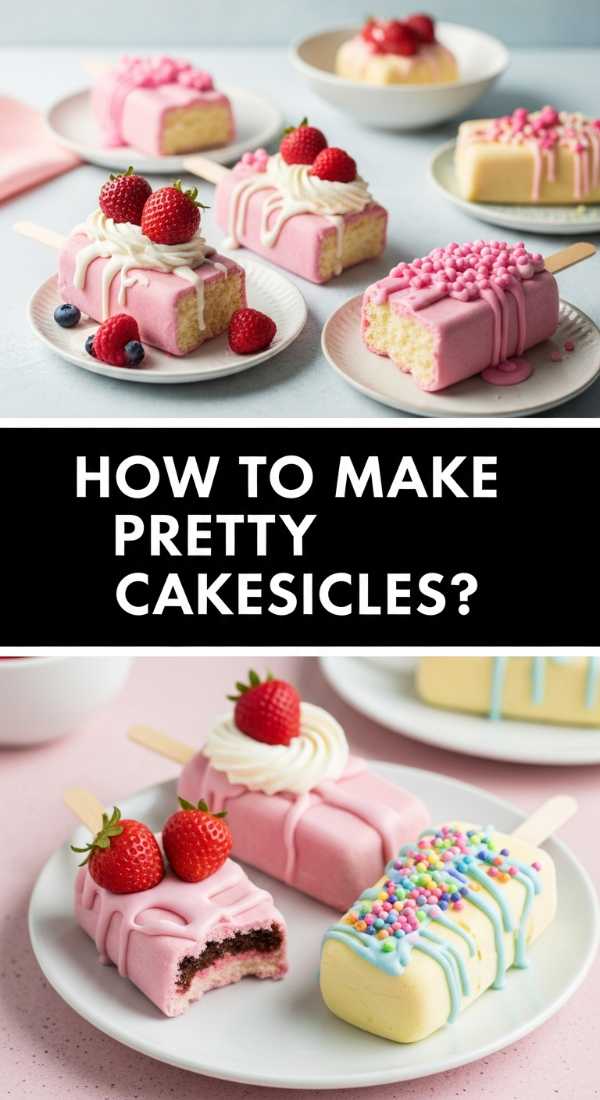
How to Make Pretty Cakesicles?
Why we love this
Cakesicles are the modern, more glamorous cousin of the cake pop, offering a larger canvas for decoration and a satisfying chocolate shell snap. There is something so fun about holding a dessert on a stick, and the internal mixture of crumbled cake and frosting creates a truffle-like texture that melts in your mouth. They are incredibly versatile, allowing for endless color combinations and toppings, making them a must-have for a trendy dessert board that needs a bit of ‘wow’ factor.
Ingredients
- 2 cups crumbled cake
- 1/4 cup buttercream frosting
- 2 cups high-quality melting chocolate
- Popsicle sticks
- Silicone cakesicle molds
- Gold leaf or sprinkles for decoration
How to make it
- Melt your chocolate in 30-second intervals in the microwave until smooth. Spoon about a tablespoon of chocolate into each mold cavity, using a brush or spoon to coat the bottom and sides completely.
- Insert the popsicle sticks through the slots and then remove them (this clears the path). Place the mold in the freezer for 5 minutes to set the shell.
- Mix your cake crumbs and buttercream until it reaches a dough-like consistency. It should hold together when squeezed but not be greasy.
- Press the cake mixture into the chocolate shells, leaving a small gap at the top. Re-insert the popsicle sticks all the way into the cake mixture.
- Cover the back of the cake with more melted chocolate, scraping off any excess with an offset spatula so the back is flush with the mold.
- Freeze for another 10 minutes until completely firm. Gently peel the silicone mold away from the cakesicles. Decorate with drizzles of contrasting chocolate or edible gold leaf for a high-end finish.
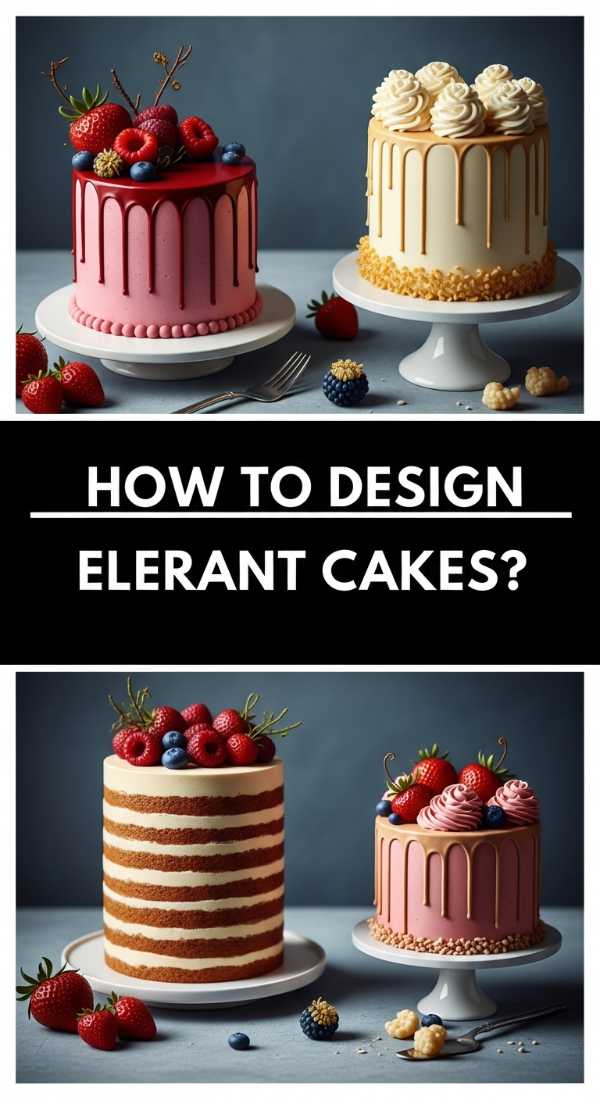
How to Design Elegant Cakes?
Why we love this
Elegant cakes prove that sometimes, less is truly more. We love the sophisticated minimalism of a perfectly smoothed cake, perhaps adorned with a single fresh bloom or a subtle metallic accent. The texture of a high-quality Swiss meringue buttercream provides a matte, satin-like finish that screams luxury. These cakes focus on precision and balance, making them the perfect centerpiece for a board that values understated beauty and refined flavors like Earl Grey or champagne.
Ingredients
- Three 6-inch cake layers
- Silky white buttercream
- Fresh eucalyptus or a single white rose
- Edible silver leaf
- Acrylic cake scraper
How to make it
- Stack your chilled cake layers with a modest amount of frosting between each to keep the profile sleek. Ensure the cake is perfectly level using a small spirit level if necessary.
- Apply a generous ‘coat’ of buttercream to the exterior. Use your acrylic scraper to pull the frosting around the cake in one smooth motion while spinning your turntable. The goal is a flawless, sharp-edged cylinder.
- Chill the cake until the frosting is cold and firm to the touch. This allows you to handle it slightly for the next decorative steps.
- Using sterilized tweezers, carefully apply small flakes of edible silver leaf to one side of the cake, creating a ‘cascading’ effect. The leaf is very delicate, so avoid touching it with your fingers.
- Trim the stem of your fresh rose or eucalyptus, wrap it in floral tape for food safety, and press it into the top or base of the cake as a singular focal point.
- Keep the board surrounding the cake clean and minimalist, perhaps adding a few white chocolate pearls to tie the design together.
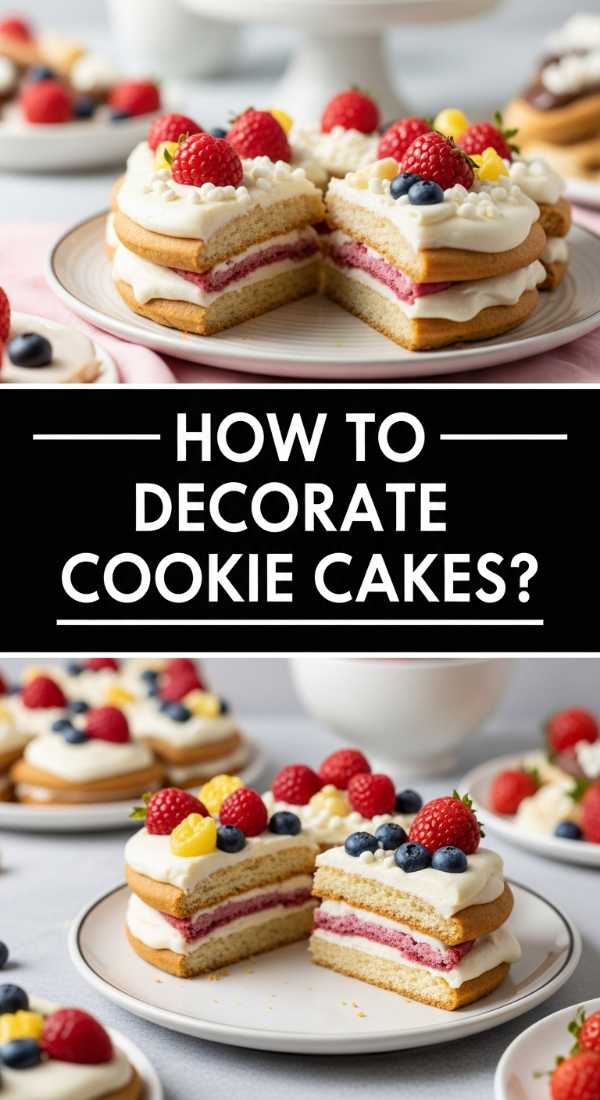
How to Decorate Cookie Cakes?
Why we love this
Cookie cakes are the ultimate crowd-pleaser, combining the chewy, buttery goodness of a giant cookie with the festive flair of a cake. The scent of browned butter and melting chocolate chips is enough to draw anyone into the kitchen. We love the contrast of the crisp outer edge and the soft, doughy center, all topped with swirls of rich frosting. It’s a nostalgic treat that feels casual and fun, making it an essential addition to a family-style food board.
Ingredients
- 1 batch of chocolate chip cookie dough (chilled)
- 2 cups chocolate fudge frosting
- Colorful chocolate candies (M&Ms)
- Star piping tip (No. 1M)
- Sprinkles
How to make it
- Press your cookie dough into a greased 9-inch cake pan or pizza pan. Ensure it is spread evenly to the edges to prevent uneven baking.
- Bake at 350°F (175°C) for 18-22 minutes. The key is to take it out when the edges are set and golden, but the center still looks slightly underbaked; it will firm up as it cools, maintaining that ‘chewy’ cake texture.
- Allow the cookie to cool completely in the pan. If you frost it while warm, the buttercream will melt and slide off.
- Fit a piping bag with a 1M star tip and fill with chocolate fudge frosting. Pipe large, swirling rosettes around the entire border of the cookie.
- Fill the center of the cookie with a message or a pattern of colorful chocolate candies. The bright colors against the chocolate frosting make the design pop.
- Finish with a heavy dusting of sprinkles over the frosting rosettes to give it that classic bakery look.
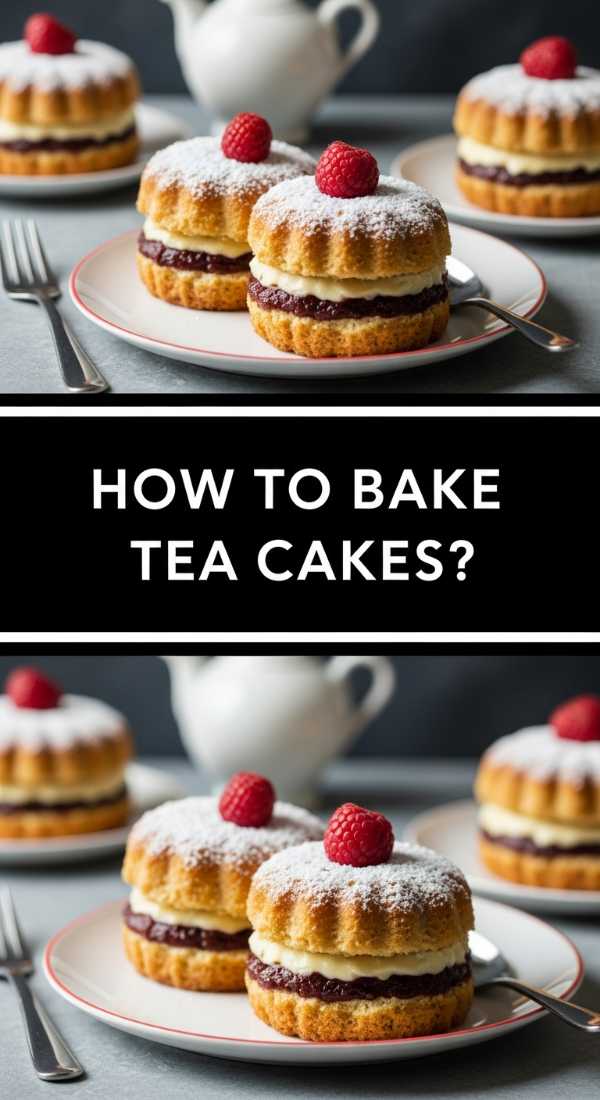
How to Bake Tea Cakes?
[IMAGE_10]
Why we love this
Tea cakes are the epitome of delicate charm, designed to be enjoyed in small, elegant bites. These petite treats often have a fine, tender crumb and a light glaze that shimmers under the light. We love the subtle infusions of citrus or almond that make them the perfect companion to a hot cup of Earl Grey. On a food board, they offer a variety of shapes and flavors, allowing guests to sample multiple treats without feeling overwhelmed. They are the ‘quiet luxury’ of the baking world.
Ingredients
- 1 1/2 cups flour
- 1/2 cup almond flour (for texture)
- 3/4 cup sugar
- 1/2 cup unsalted butter, softened
- 2 eggs
- 1 tablespoon lemon zest
- Simple powdered sugar glaze
How to make it
- Cream the butter and sugar until very light and airy. This provides the structure for these delicate cakes.
- Incorporate the eggs one at a time, followed by the lemon zest. The zest should be freshly grated to release the essential oils for maximum aroma.
- Fold in the flour and almond flour. The almond flour is the secret to a soft, melt-in-your-mouth crumb that stays moist longer than traditional flour-only cakes.
- Spoon the batter into mini-bundt pans or decorative tartlet molds, filling them about 3/4 full.
- Bake at 325°F (160°C) for 12-15 minutes. A slightly lower temperature ensures they bake evenly without browning too much, preserving their delicate appearance.
- Once cooled, dip the tops of the cakes into a thin glaze made of powdered sugar and lemon juice. Let the excess drip off for a sheer, elegant finish that highlights the cake’s shape.
The Art of the Board
Building a food board is about more than just the individual recipes; it’s about the harmony of the whole spread. When you arrange these cakes together, think about balance—place the larger cakes first as anchors, and fill the gaps with the smaller tea cakes, cakesicles, and fresh fruit. The goal is to create a lush, abundant look that invites people to linger and enjoy. I hope these recipes inspire you to host your own ‘board night’ and share the sweetness with those you love!
Frequently Asked Questions
Find answers to common questions about creating the perfect cake board and mastering these recipes below.