
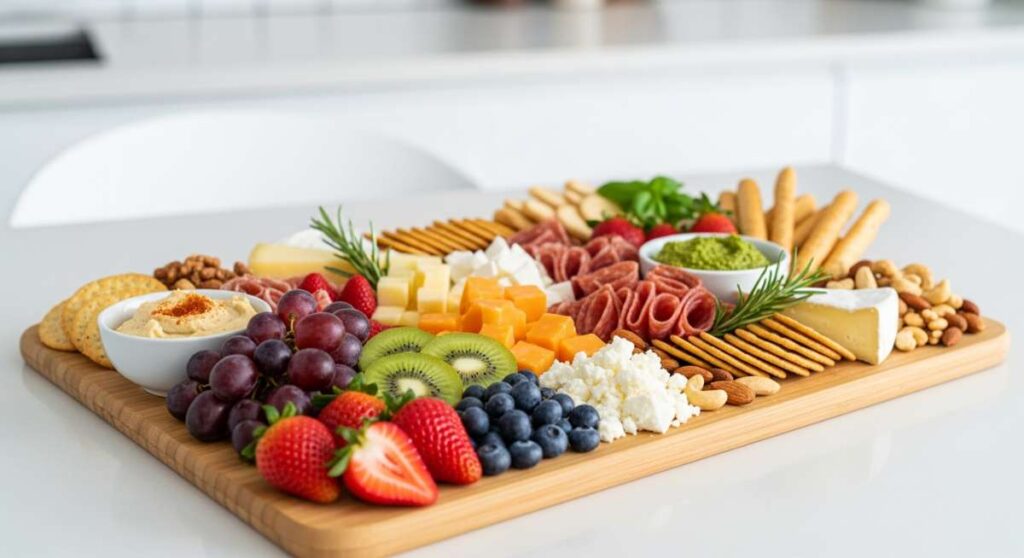
We have all been there: the sun is beginning to dip below the horizon, casting a golden, honeyed glow across the kitchen counter, and friends are due to arrive in mere minutes. You want to serve something that feels intentional, luxurious, and deeply comforting, but the clock is ticking. This is exactly how the 10-minute grazing board became my ultimate entertaining secret weapon. It is about more than just food; it is about creating a centerpiece that invites people to linger, to pick, and to savor the sweet moments of a slow afternoon.
There is a certain magic in the assembly—the way a rustic wooden board transforms when piled high with warm, flaky pastries, vibrant summer fruits, and the scent of freshly zested citrus. This isn’t just a snack; it’s a sensory experience that celebrates the art of baking. Whether you are hosting a backyard brunch or looking for a way to turn your weekend treats into a profitable side hustle, these elements are the heart and soul of the viral food board movement.
How to bake berry tarts?
Why we love this
There is nothing quite like the first bite of a perfectly baked berry tart, where the shortcrust pastry shatters into buttery flakes before giving way to a cool, velvety crème pâtissière. The aroma is a heavenly mix of toasted flour and the bright, floral scent of sun-ripened raspberries and blueberries. As you bite down, the berries burst with a tart sweetness that cuts through the richness of the cream, creating a symphony of textures that feels like a summer garden party on a plate. It is the quintessential elegant treat that looks far more complicated than it actually is to assemble.
Ingredients
- 1 ½ cups All-purpose flour
- ½ cup Unsalted butter (chilled and cubed)
- ¼ cup Granulated sugar
- 1 Egg yolk
- 2 cups Fresh mixed berries (raspberries, blueberries, blackberries)
- 1 cup Pastry cream or lemon curd
- Apricot jam for glazing
How to make it
- In a food processor, pulse the flour, sugar, and chilled butter until the mixture resembles coarse breadcrumbs with small, pea-sized bits of butter remaining.
- Add the egg yolk and a tablespoon of ice water, pulsing just until the dough begins to clump together. Do not overwork the dough, or the crust will become tough instead of flaky.
- Wrap the dough in plastic and chill for at least 30 minutes to relax the gluten. Pre-heat your oven to 375°F (190°C).
- Roll out the dough on a lightly floured surface to 1/8-inch thickness and press into mini tart pans. Prick the bottoms with a fork to prevent air bubbles.
- Blind bake the shells using pie weights or dried beans for 12 minutes, then remove weights and bake for another 5 minutes until the edges are a pale golden brown.
- Once completely cooled, pipe a generous layer of pastry cream into each shell. Arrange the fresh berries in a tight, overlapping pattern for a professional look.
- Heat a tablespoon of apricot jam with a splash of water and gently brush over the berries to give them a high-shine, viral-worthy finish.
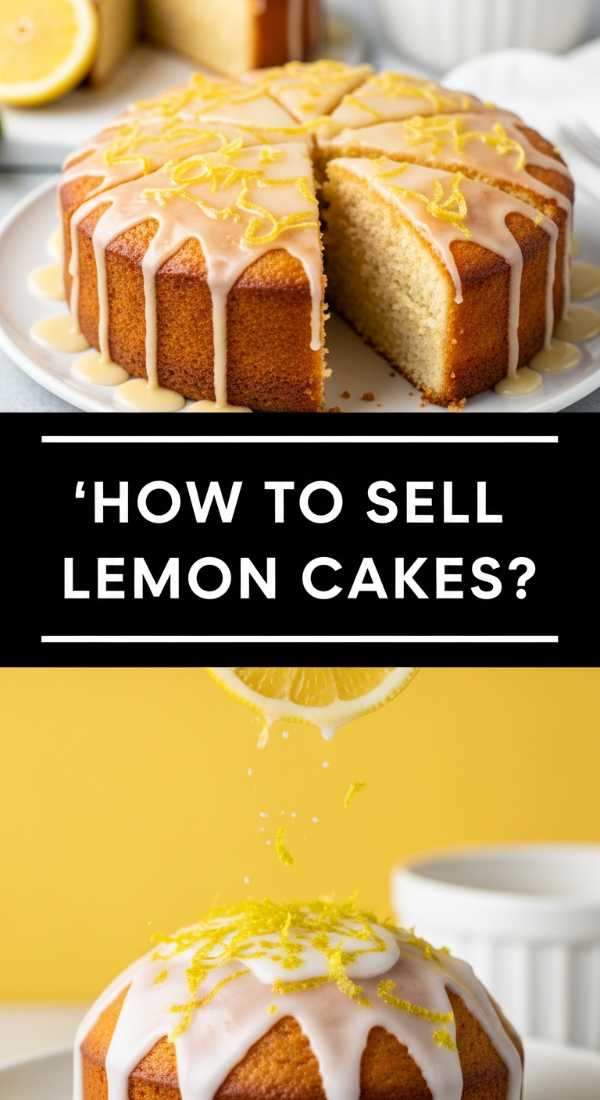
How to sell lemon cakes?
Why we love this
The allure of a lemon cake lies in its vibrant, zesty personality that wakes up the palate with every moist crumb. Imagine the scent of Meyer lemons filling your kitchen, a fragrance so bright it feels like bottled sunshine. The texture should be dense enough to hold a thick, sugary glaze, yet light enough to melt away the moment it hits your tongue. Selling these cakes is all about capturing that ‘homemade with love’ aesthetic—packaging them in parchment paper with a sprig of dried lavender makes them irresistible to anyone seeking a moment of citrusy bliss.
Ingredients
- 1 ¾ cups Cake flour
- 1 cup Granulated sugar
- 3 Large eggs
- ½ cup Sour cream
- Zest of 3 lemons
- ¼ cup Fresh lemon juice
- ½ cup Vegetable oil
- Powdered sugar for glaze
How to make it
- Preheat your oven to 325°F (165°C) and grease a small loaf pan or individual mini-cake molds. Lower heat ensures a flat top and even crumb structure.
- In a large bowl, rub the lemon zest into the sugar with your fingertips until the sugar is fragrant and moist; this releases the essential oils for maximum flavor.
- Whisk the eggs and flavored sugar until pale and frothy, then slowly stream in the oil while whisking constantly to create a stable emulsion.
- Gently fold in the sour cream and lemon juice, being careful not to deflate the air you’ve whipped into the eggs.
- Sift the flour into the wet ingredients in three batches, folding with a spatula until just combined. Over-mixing at this stage will develop too much gluten and make the cake rubbery.
- Bake for 45-50 minutes, or until a skewer inserted into the center comes out with just a few moist crumbs.
- While warm, pour a thick glaze made of powdered sugar and lemon juice over the top, letting it drip down the sides in thick, inviting ribbons.
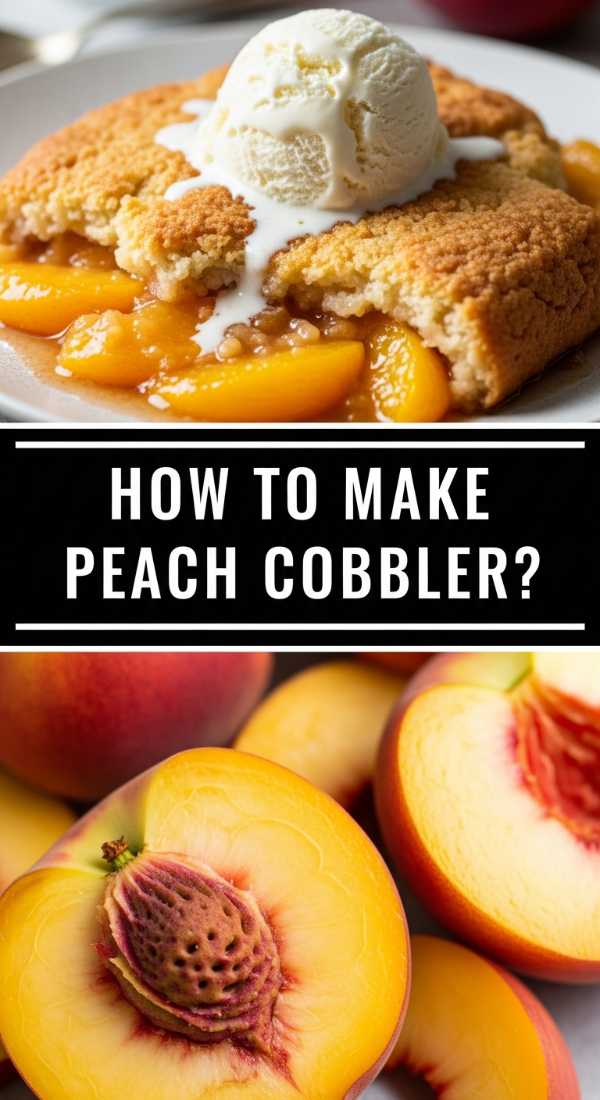
How to make peach cobbler?
Why we love this
Peach cobbler is the ultimate comfort food, a warm embrace in a bowl that smells of cinnamon, nutmeg, and caramelized fruit. There is a beautiful contrast between the bubbling, ruby-red juices of the peaches and the golden-brown, biscuit-like topping that soaks up all that sugary goodness. When served warm, the steam carries the scent of summer orchards, and adding a scoop of vanilla bean ice cream creates a dreamy ‘hot-meets-cold’ sensation that is absolutely addictive. It is rustic, unpretentious, and always the first thing to disappear from the grazing board.
Ingredients
- 6-8 Ripe peaches (sliced)
- ½ cup Brown sugar
- 1 tsp Cinnamon
- 1 ½ cups Self-rising flour
- 1 cup Milk
- ½ cup Melted butter
- 1 tsp Vanilla extract
How to make it
- Preheat your oven to 350°F (175°C). Pour the melted butter into a 9×13 inch baking dish, ensuring it coats the bottom evenly.
- Toss the sliced peaches with brown sugar and cinnamon in a separate bowl until the fruit starts to release its natural juices.
- In another bowl, whisk together the flour, milk, and vanilla until a smooth, thick batter forms.
- Pour the batter directly over the melted butter in the baking dish. Important: Do not stir the batter into the butter; they should remain in separate layers.
- Spoon the peaches and their juices over the batter. Again, do not stir. As the cobbler bakes, the batter will rise through the peaches to form a golden crust.
- Bake for 40-45 minutes. You are looking for the edges to be dark golden brown and the center to be set but still slightly jiggly.
- Let it rest for 10 minutes before serving; this allows the fruit juices to thicken into a rich syrup that clings to the cobbler topping.
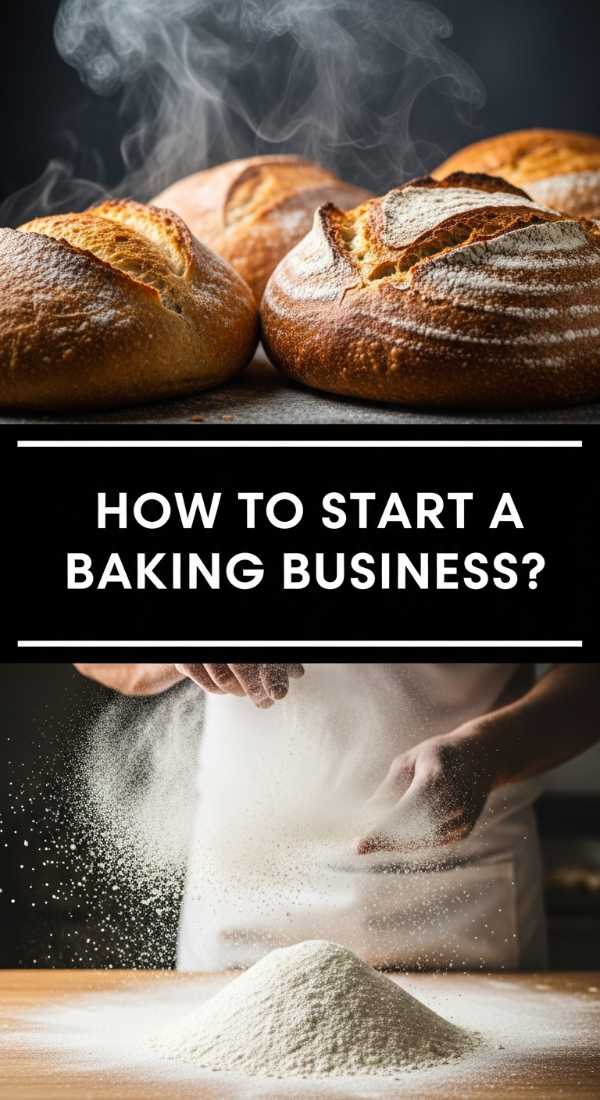
How to start baking business?

Why we love this
Turning your passion for flour and sugar into a thriving business is a journey of creativity and connection. There is a profound sense of pride in seeing someone’s face light up when they see your beautifully curated grazing board or a box of your signature cookies. It’s about building a brand that reflects your personal style—whether that’s minimalist and modern or rustic and cozy. The freedom to experiment with flavors and be your own boss is the ultimate ‘icing on the cake’ for any home baker looking to make their mark on the world.
Ingredients
- A signature recipe
- Business license and permits
- Food safety certification
- Branding (Logo, colors, voice)
- Packaging materials
- Social media presence
- Consistent ingredient supplier
How to make it
- Research local cottage food laws in your area to determine what items you can legally sell from a home kitchen and what labeling requirements you must follow.
- Define your niche. Instead of being a general baker, focus on one or two high-demand items, like ‘Artisan Grazing Boards’ or ‘Custom Sourdough,’ to stand out in the market.
- Develop a pricing strategy that accounts for ingredients, packaging, your labor time, and overhead costs like electricity and marketing.
- Create a ‘visual identity’ by taking high-quality, natural-light photos of your products for Instagram and Pinterest. Consistency in your aesthetic is key to going viral.
- Set up an ordering system, whether it’s through Direct Messages, a simple website, or a local farmer’s market booth.
- Invest in high-quality packaging. The unboxing experience is just as important as the taste; use custom stickers, twine, or personalized notes to build customer loyalty.
- Request reviews and encourage customers to tag you in their photos. Word-of-mouth is the most powerful tool for a growing baking business.
How to bake fluffy scones?
Why we love this
A true scone should be tall, proud, and so light that it practically floats off the plate. When you pull them apart, they should reveal a steaming, tender interior with visible layers of buttery goodness. The aroma of cold butter meeting a hot oven creates a savory-sweet scent that is utterly nostalgic. Paired with a dollop of clotted cream and a streak of strawberry jam, these scones provide a sophisticated crunch on the outside while remaining soft and pillow-like on the inside. They are the structural stars of any high-end grazing board.
Ingredients
- 2 cups All-purpose flour
- 1 tbsp Baking powder
- 3 tbsp Sugar
- ½ tsp Salt
- 5 tbsp Cold unsalted butter (grated)
- 1 cup Heavy cream
- 1 Egg (for wash)
How to make it
- Whisk the flour, baking powder, sugar, and salt in a large bowl. Ensure your baking powder is fresh, as this is the only leavening agent for that signature lift.
- Grate the cold butter into the flour mixture. Using grated butter is a professional secret that ensures even distribution without overworking the dough.
- Toss the butter shreds in the flour until coated, then slowly pour in the heavy cream. Stir with a fork just until the dough comes together; it should look slightly shaggy.
- Turn the dough onto a floured surface and gently pat it into a circle about 1-inch thick. Do not use a rolling pin, as the weight can crush the air pockets.
- Cut the circle into 8 wedges using a sharp knife or a bench scraper. Press straight down—do not saw—to keep the edges open for maximum rise.
- Place the scones on a baking sheet and brush the tops with a beaten egg for a glossy, golden finish.
- Bake at 400°F (200°C) for 15-18 minutes until the tops are golden and the bottoms are lightly browned. Serve warm for the best texture.
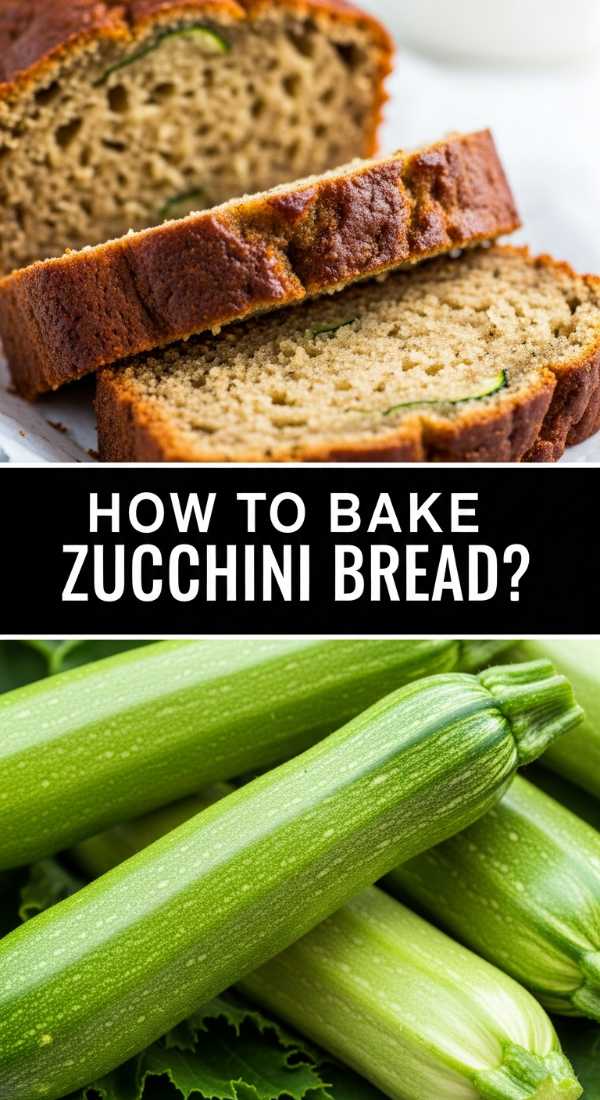
How to bake zucchini bread?

Why we love this
Zucchini bread is the ultimate ‘sneaky’ treat, offering a rich, moist density that keeps you coming back for slice after slice. The zucchini itself melts into the batter during baking, leaving behind tiny flecks of emerald green and a wealth of moisture that makes the bread incredibly tender. The warm notes of cinnamon and nutmeg permeate the air as it bakes, creating a cozy, grounding atmosphere. It’s a hearty, rustic addition to a grazing board that balances out the lighter, fruitier elements with its earthy sweetness and satisfying chew.
Ingredients
- 1 ½ cups All-purpose flour
- ½ tsp Baking soda & ½ tsp Baking powder
- 1 tsp Cinnamon
- ½ cup Vegetable oil
- 1 cup Sugar
- 1 Egg
- 1 ½ cups Grated zucchini (patted dry)
- ½ cup Chopped walnuts (optional)
How to make it
- Preheat your oven to 350°F (175°C) and grease a loaf pan thoroughly.
- Grate the zucchini using the fine side of a grater. This is crucial: place the grated zucchini in a clean kitchen towel and squeeze out the excess water. Too much moisture will result in a gummy bread.
- In one bowl, whisk together the flour, baking soda, baking powder, and spices.
- In a separate large bowl, beat the egg and sugar until light, then whisk in the oil until fully incorporated.
- Stir the zucchini into the wet ingredients before folding in the dry ingredients and walnuts. Mix until just combined to keep the bread airy.
- Pour the batter into the pan and bake for 50-60 minutes. Use a toothpick to check the center; it should come out clean or with dry crumbs.
- Allow the bread to cool in the pan for 10 minutes before transferring to a wire rack. Zucchini bread actually tastes better the next day once the flavors have melded!
How to market gourmet cookies?
Why we love this
Gourmet cookies are the rockstars of the baking world, especially when they feature pools of melted dark chocolate and a delicate sprinkling of flaky sea salt. The visual of a soft, thick cookie being pulled apart to reveal a gooey center is peak viral content. Marketing these beauties is about selling the ‘crave-ability’ factor—that moment of pure indulgence that everyone feels they deserve at the end of a long day. When you showcase the high-quality ingredients and the artisanal process, you turn a simple snack into a premium experience.
Ingredients
- High-quality chocolate chunks (70% cocoa)
- Flaky sea salt (Maldon is best)
- European-style butter
- Brown butter (for depth)
- Premium vanilla bean paste
- Professional photography lighting
- Engaging social media captions
How to make it
- Focus on ‘The Drop.’ Record short, high-frame-rate videos of cookies being broken open or salt being sprinkled on top to capture attention on social media.
- Use ‘Brown Butter’ as a selling point. Be sure to describe the nutty, toasted aroma in your marketing copy to appeal to the customer’s sense of smell.
- Create limited-edition seasonal flavors to build a sense of urgency (e.g., ‘Lavender Honey’ for Spring or ‘Spiced Pumpkin’ for Fall).
- Optimize your Instagram bio with a clear ‘Call to Action’ and a link to your ordering form or website.
- Engage with the ‘Foodie’ community by using relevant hashtags like #CookieArtisan or #GourmetBakes to reach a wider audience.
- Offer ‘Gift Bundles’ that include your cookies alongside coffee or tea, positioning them as the perfect gift for any occasion.
- Collect and share ‘User Generated Content.’ When customers post your cookies, reshare them to your stories to build social proof and trust.
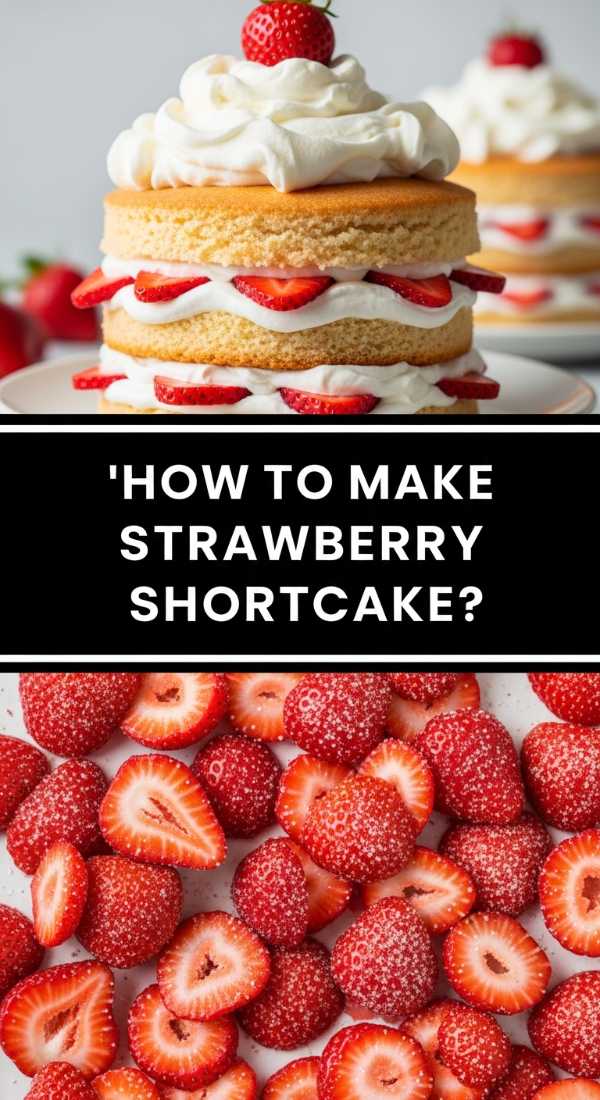
How to make strawberry shortcake?
Why we love this
Strawberry shortcake is like a breath of fresh air, a light and whimsical dessert that feels both nostalgic and sophisticated. The combination of macerated strawberries bleeding their bright red syrup into a cloud of whipped cream is visually stunning. The shortcake itself should be slightly sweet with a sugary, crunchy exterior that gives way to a soft, biscuit-like middle. It smells of vanilla and fresh fields, offering a clean, refreshing taste that cleanses the palate. It is the crown jewel of a summer grazing board, bringing a pop of vibrant color and joy.
Ingredients
- 2 cups Fresh strawberries (hulled and sliced)
- 3 tbsp Granulated sugar (for berries)
- 2 cups All-purpose flour
- 1 tbsp Baking powder
- ½ cup Cold butter
- 1 cup Heavy whipping cream
- 1 tsp Vanilla bean paste
How to make it
- Start by macerating the strawberries: toss the sliced berries with 2 tablespoons of sugar and let them sit for at least 30 minutes. This draws out the juices to create a natural syrup.
- For the shortcakes, combine flour, baking powder, and sugar. Cut in the cold butter until the mixture looks like coarse crumbs.
- Stir in enough heavy cream to form a soft dough. Drop large spoonfuls onto a baking sheet for a rustic ‘drop biscuit’ look, or roll and cut for a cleaner aesthetic.
- Bake at 425°F (220°C) for 12-15 minutes until the tops are golden brown. Let them cool slightly before splitting.
- Whip the remaining heavy cream with a tablespoon of sugar and vanilla bean paste until stiff peaks form. Avoid over-beating, or the cream will turn to butter.
- To assemble, split a warm shortcake in half. Spoon a generous amount of strawberries and syrup onto the bottom half, followed by a mountain of whipped cream.
- Place the top half of the shortcake on top and finish with another dollop of cream and a whole strawberry for a viral-ready presentation.
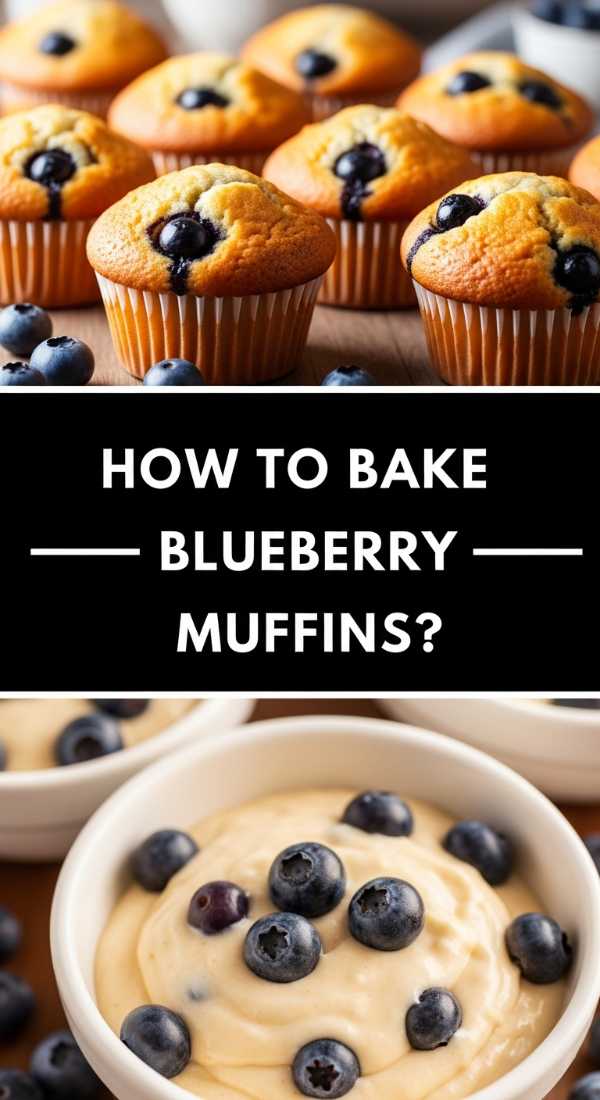
How to bake blueberry muffins?
Why we love this
A classic blueberry muffin is a masterpiece of simplicity, with a high-domed, sugar-crusted top and an interior bursting with juicy, indigo fruit. The scent of vanilla-scented batter and roasting berries is enough to pull anyone out of bed in the morning. As you peel back the paper liner, the muffin should be moist and tender, with the blueberries having softened into sweet, jammy pockets of flavor. It’s a handheld bit of heaven that brings a sense of wholesome, homemade goodness to any spread, making it a timeless favorite for all ages.
Ingredients
- 1 ½ cups All-purpose flour
- ¾ cup Granulated sugar
- 2 tsp Baking powder
- 1/3 cup Vegetable oil
- 1 Egg
- 1/3 cup Milk
- 1 cup Fresh blueberries
- Demerara sugar for topping
How to make it
- Preheat your oven to 400°F (200°C). High heat initially is the secret to getting those tall, bakery-style muffin tops.
- Whisk the dry ingredients in one bowl. In a small measuring cup, combine the oil, egg, and milk.
- Pour the wet ingredients into the dry and fold together with a spatula. Stop while you still see a few streaks of flour; over-mixing is the enemy of a fluffy muffin.
- Gently fold in the blueberries. If using frozen berries, do not thaw them first, or they will streak the batter purple.
- Fill muffin liners to the very top. This goes against most advice, but it’s how you get that iconic ‘muffin top’ overflow.
- Generously sprinkle the tops with Demerara sugar. This creates a crunchy, sparkling crust that looks beautiful and tastes even better.
- Bake for 15-20 minutes. Rotate the pan halfway through to ensure even browning. The muffins are done when the tops spring back when lightly touched.
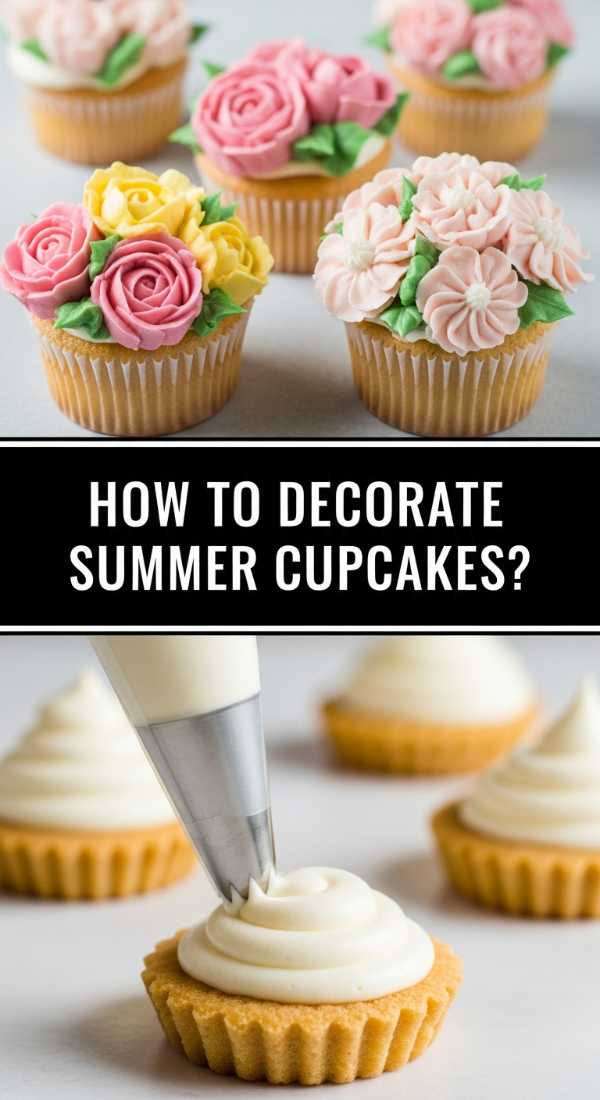
How to decorate summer cupcakes?
[IMAGE_10]
Why we love this
Decorating summer cupcakes is where you can truly let your artistic side shine, turning a simple cake into a miniature work of art. The feeling of a perfectly smooth buttercream being piped through a star tip is incredibly satisfying, resulting in delicate ruffles or bold swirls that catch the light. Using a palette of pastels, edible flowers, and fresh zest, these cupcakes become the focal point of the board. They smell of sweet buttercream and summer blossoms, offering a light-as-air texture that makes them the perfect dainty finish to a luxurious grazing experience.
Ingredients
- 12 Baked vanilla or lemon cupcakes (cooled)
- 2 cups Unsalted butter (softened)
- 4 cups Powdered sugar (sifted)
- 2 tbsp Heavy cream
- Natural food coloring (pink, yellow, green)
- Edible flowers or fresh mint leaves
- Piping bags and assorted tips
How to make it
- Begin with a ‘crusty’ buttercream. Beat the butter for 5 full minutes until it turns almost white and very fluffy before adding the sugar. This ensures a light texture.
- Add the powdered sugar one cup at a time, followed by the heavy cream and your chosen flavorings. Whip on high for another 2 minutes.
- Divide the frosting into bowls and use a toothpick to add tiny amounts of gel food coloring. Aim for soft, muted summer tones like peach, sage, and lemon.
- Fit a piping bag with a 1M ‘Open Star’ tip for classic rosettes. Start in the center of the cupcake and spiral outward for a rose effect.
- For a more modern ‘petal’ look, use a round tip to pipe small dots around the edge and use a small offset spatula to swipe them toward the center.
- Top each cupcake with a single edible flower (like a pansy or viola) or a tiny sprig of mint. The greenery makes the colors pop and adds a fresh aroma.
- Chill the cupcakes for 10 minutes after decorating to set the buttercream, ensuring they look perfect when transferred to your grazing board.
The Final Flourish: Bringing Your Board Together
As you arrange these baked treasures onto your grazing board, remember that the beauty lies in the abundance. Fill the gaps between your tarts and muffins with clusters of grapes, handfuls of nuts, and perhaps a few squares of dark chocolate. The goal is to create a landscape of flavors and textures that tells a story of craftsmanship and care. When you step back and look at your creation, you aren’t just looking at a meal; you’re looking at an invitation for your loved ones to slow down and enjoy the sweetness of life together. Happy baking!