

We’ve all been there—curled up on the sofa, scrolling through Instagram, and feeling that slight pang of envy at the perfectly curated homes filling our feeds. It feels like these magazine-worthy spaces belong to a different world, one filled with unlimited budgets and professional designers. But what if I told you that the secret to that polished, ‘viral’ look isn’t a massive bank account? It’s the magic of thoughtful, hands-on DIY projects that add character and soul to your home.
In this post, I’m pulling back the curtain on those high-end looks. We’re diving into the projects that have taken the internet by storm, from lush garden escapes to organized pantries that feel like a breath of fresh air. These aren’t just pretty pictures; they are actionable transformations that you can start this weekend. Grab your toolkit and a cup of coffee—let’s turn your home into the sanctuary you’ve always dreamed of.
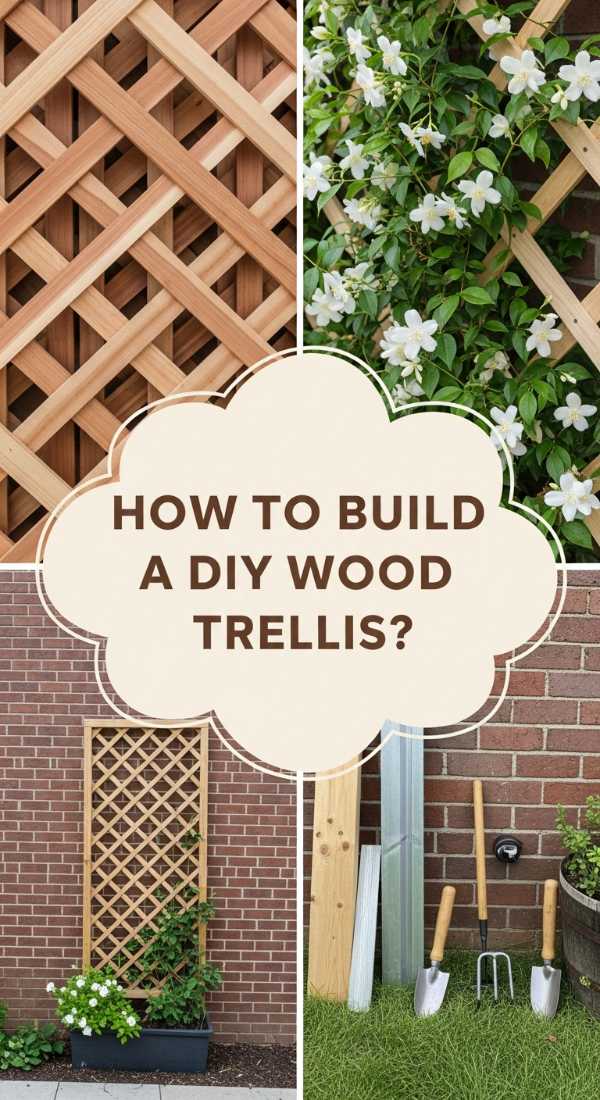
How to Build a DIY Wood Trellis for a Lush Garden Oasis
Why we love this
There is something incredibly romantic about a garden that grows upward, and a custom wood trellis is the key to that vertical magic. Imagine the sweet, heady aroma of climbing jasmine or the vibrant pops of climbing roses weaving through warm, sun-kissed cedar. The texture of the raw wood provides a sturdy, organic contrast to the delicate tendrils of your favorite vines, creating a living wall that feels both private and enchanting. It transforms a flat, boring fence into a dimensional masterpiece that breathes life into your backyard sanctuary.
Essential Elements:
- Pressure-treated or cedar 2×2 boards
- Galvanized exterior screws
- Wood glue (exterior grade)
- Measuring tape and level
- Miter saw or hand saw
- Stain or sealant
How to make it
- Determine the height and width of your trellis based on your plant’s needs. For a standard wall trellis, cut two vertical side rails at 6 feet and several horizontal slats at 2 feet.
- Lay your vertical rails on a flat surface. Mark every 10 inches where your horizontal slats will sit. This spacing allows for plenty of air circulation and climbing room for the plants.
- Apply a bead of exterior wood glue at each intersection mark. This provides secondary stability against wind and weight.
- Pre-drill holes at each joint to prevent the wood from splitting. Drive one 2.5-inch galvanized screw through the horizontal slat into the vertical rail.
- Check for squareness using a framing square or by measuring the diagonals; they should be equal.
- Once assembled, apply an exterior-grade stain or clear sealant. Use a brush to work the product into the end grains, which are most susceptible to rot.
- Secure the trellis to your wall or fence using spacers (like small blocks of wood) so there is a 1-2 inch gap behind it. This allows the vines to wrap around the slats effectively.
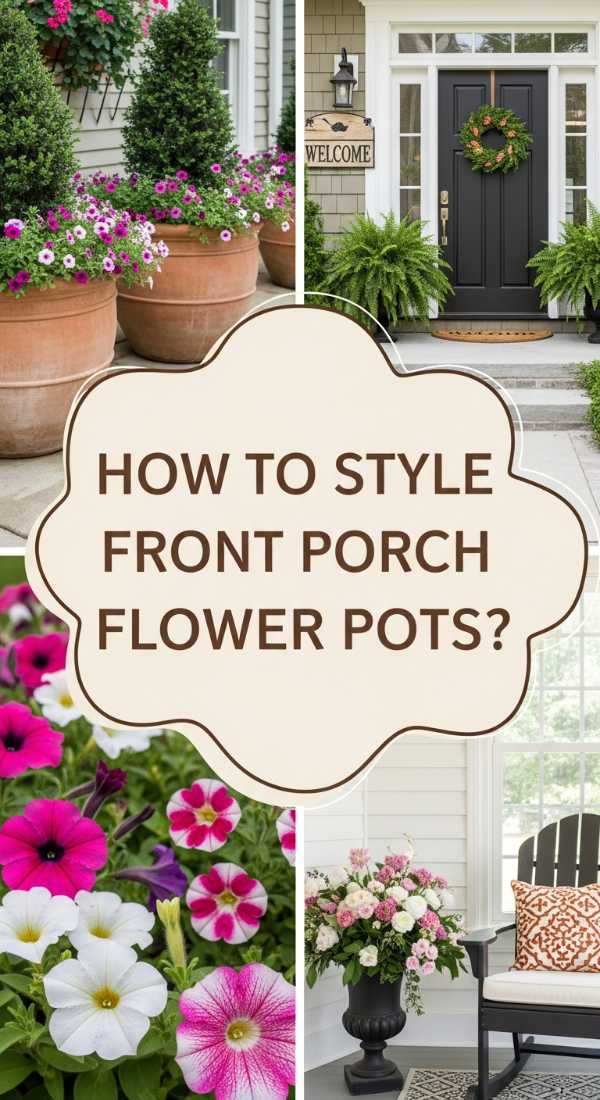
How to Style Front Porch Flower Pots for Instant Curb Appeal
Why we love this
The front porch is your home’s first impression, and nothing says ‘welcome’ quite like a curated collection of oversized planters. When you layer textures—the velvety leaves of Dusty Miller against the glossy sheen of a ceramic pot—you create a sensory experience before guests even reach the door. The smell of fresh potting soil and the bright, cheery faces of seasonal blooms provide an instant mood boost, making your entryway feel intentional, lush, and high-end. It’s about that perfect balance of height, color, and overflowing greenery.
Essential Elements:
- Large, weather-resistant planters in varying heights
- High-quality potting mix with perlite
- ‘Thriller’ plants (Dracaena, Canna Lily)
- ‘Filler’ plants (Geraniums, Petunias)
- ‘Spiller’ plants (Sweet Potato Vine, Creeping Jenny)
- Slow-release fertilizer granules
How to make it
- Select three pots of different heights but within a cohesive color palette to create a visual grouping.
- Fill the bottom third of large pots with empty plastic water bottles or packing peanuts to reduce weight and save on expensive soil. Cover with a layer of landscape fabric.
- Add high-quality potting mix until it is 2 inches below the rim. Mix in a tablespoon of slow-release fertilizer to ensure season-long nutrition.
- Start with your ‘Thriller.’ This is your tallest plant. Place it in the center (if the pot is seen from all sides) or at the back (if against a wall). Firm the soil around its root ball.
- Surround the Thriller with ‘Fillers.’ These are mid-height, mounded plants that add bulk and color. Space them evenly around the central plant.
- Tuck your ‘Spillers’ near the edges. These should be angled slightly outward so they naturally drape over the sides of the container.
- Water deeply until water runs out of the drainage holes. For the first two weeks, check the soil daily to ensure the new plants are hydrating properly.
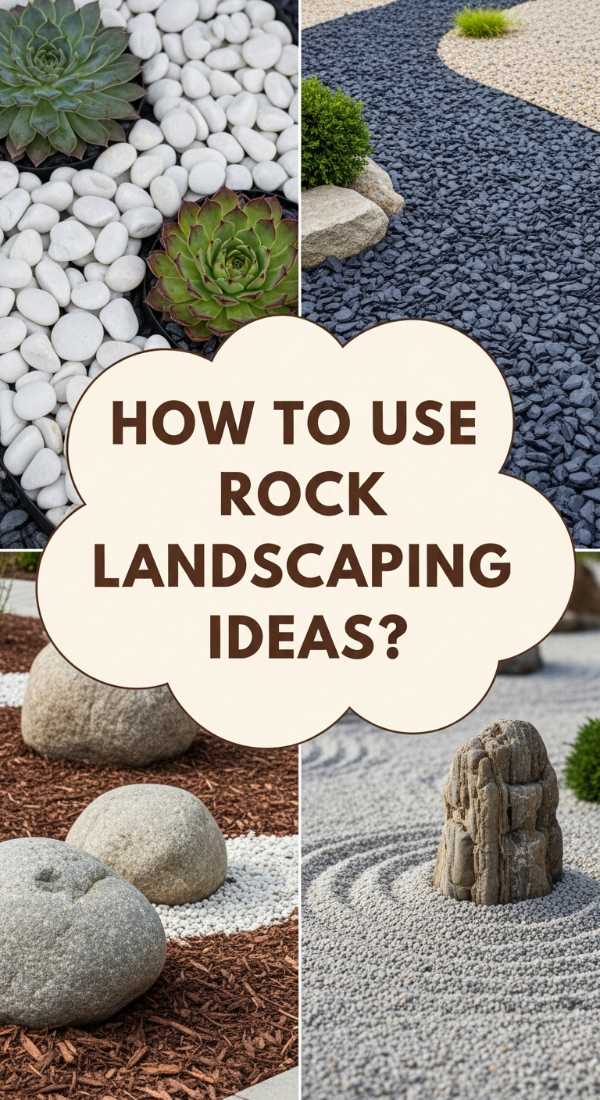
How to Use Rock Landscaping Ideas for a Modern Minimalist Yard
Why we love this
Rock landscaping brings a sense of permanence and zen-like tranquility to a modern yard. The tactile ‘crunch’ of smooth river rocks underfoot and the cool, grey tones of slate chips provide a sophisticated backdrop for architectural plants like agaves or ornamental grasses. It’s a low-maintenance dream that feels incredibly expensive, offering clean lines and a structured look that stays beautiful in every season. The way the stones darken and glisten after a light rain adds a whole new layer of atmospheric beauty to your outdoor space.
Essential Elements:
- Heavy-duty landscape fabric (weed barrier)
- Landscape staples
- Assorted rocks (River rock, Pea gravel, or Mexican Beach Pebbles)
- Metal or composite edging
- Steel rake
- Accent boulders for focal points
How to make it
- Clear the area of all grass and weeds. Dig down about 2-3 inches to create a recessed bed for the rocks to sit in, preventing them from spilling onto your lawn.
- Install your edging along the perimeter. This is crucial for a clean, professional look. Use a mallet to drive the edging deep enough that only an inch shows above ground.
- Lay down the heavy-duty landscape fabric, overlapping seams by at least 6 inches to prevent weed growth. Secure with staples every 12 inches.
- Place your large accent boulders first. Dig a shallow ‘nest’ for them so they look like they are emerging naturally from the earth rather than sitting on top.
- Pour your chosen rock mulch into the area. Aim for a depth of 2-3 inches. Using a steel rake, level the stones evenly across the fabric.
- Rinse the rocks with a garden hose once they are spread. This washes away the ‘rock dust’ and reveals their true, vibrant colors.
- Interspersed minimalist plants by cutting an ‘X’ in the fabric, digging a hole, and tucking the plant in before pulling the rocks back around the base.
How to Craft a DIY Grill Station for Epic Backyard Hosting

Why we love this
There is nothing like the sizzle of a steak on the grill while standing at a custom-built station that feels like a professional outdoor kitchen. The scent of charred oak and grilled vegetables mingles with the sturdy, tactile feel of a smooth stone countertop and warm wood cabinetry. It creates a hub for social interaction, allowing the cook to remain part of the party while prepping and serving. This project turns a basic backyard cookout into a luxury dining experience, providing organized storage and a dedicated space for culinary creativity.
Essential Elements:
- 4×4 pressure-treated posts for the frame
- Cedar or composite decking for siding
- Outdoor-rated countertop (Granite remnant or concrete)
- Heavy-duty locking casters
- Magnetic tool strip and hooks
- Exterior-grade wood stain
How to make it
- Design the frame to be at a comfortable working height (usually 36 inches). Build the base frame using 4×4 posts and 2×4 cross-members, securing them with heavy-duty structural screws.
- Install a bottom shelf using decking boards. This provides stability and a place to store your propane tank or charcoal bags.
- Attach heavy-duty locking casters to the bottom of the posts. This allows you to move the station out of the elements during winter or reposition it for better airflow.
- Clad the sides of the frame with cedar slats, leaving a 1/8-inch gap between boards for a modern look and ventilation.
- For the countertop, have a local stone yard cut a remnant piece of granite or marble to size. Secure it to the wooden frame using beads of high-strength construction adhesive.
- Install hardware like a bottle opener, a magnetic strip for grilling tools, and a towel rack on the sides for maximum functionality.
- Apply two coats of high-quality exterior stain or marine-grade varnish to protect the wood from grease splatters and UV damage.
How to Decorate a Vintage Teen Room for That Dreamy Nostalgic Vibe

Why we love this
The vintage teen room is all about creating a cocoon of comfort and self-expression. It’s the soft glow of amber-hued Edison bulbs, the fuzzy texture of a thrifted Moroccan rug, and the visual rhythm of a gallery wall filled with vinyl records and Polaroid memories. This aesthetic celebrates the ‘imperfect,’ mixing eras and styles to create a space that feels lived-in and deeply personal. It’s a sanctuary where every object tells a story, and the atmosphere is thick with a sense of cozy, creative nostalgia.
Essential Elements:
- Thrifted vintage furniture (wicker, mid-century modern)
- Warm string lights or neon signs
- Record player and vinyl display
- Textured textiles (velvet pillows, chunky knits)
- Macramé wall hangings
- Washi tape for ‘no-damage’ gallery walls
How to make it
- Choose a base color palette that is soft and muted—think sage green, dusty rose, or warm cream—to allow the vintage treasures to stand out.
- Source a focal piece of furniture, like a vintage wicker ‘peacock’ chair or a second-hand vanity. Clean it thoroughly and consider a light sanding or a coat of wax to restore its luster.
- Create a ‘Music Nook’ by installing floating shelves to display favorite record covers. This acts as both storage and rotating art.
- Layer your lighting. Avoid the ‘big light’ (overhead light). Instead, combine floor lamps with warm bulbs, string lights draped along the ceiling line, and a small desk lamp.
- Build a gallery wall using a mix of thrifted frames, magazine cutouts, and personal photos. Use Washi tape in a contrasting color for a casual, ‘curated over time’ look.
- Add ‘life’ with low-maintenance plants like Pothos or Snake plants in vintage brass or ceramic planters.
- Incorporate various textures through bedding; layer a velvet duvet cover with a crochet throw blanket to give that eclectic, cozy feel.
How to Design Flower Beds for a Vibrant Home Exterior

Why we love this
A well-designed flower bed is like a living painting that changes with the seasons. The rich, earthy smell of fresh mulch combined with the kaleidoscope of colors—from deep purple salvias to bright yellow black-eyed Susans—creates a visual feast. It softens the hard lines of your home’s architecture, grounding the house into the landscape. There is a deep sense of satisfaction in watching a small sprout grow into a blooming masterpiece, attracting butterflies and hummingbirds that add movement and joy to your front yard.
Essential Elements:
- Garden spade and edge trimmer
- Organic compost and topsoil
- Natural bark mulch
- Assorted perennials and annuals
- Soaker hose for irrigation
- Landscape design software or graph paper
How to make it
- Mark the shape of your bed using a garden hose or spray paint. Curved lines look more organic and professional than stiff, straight lines.
- Remove the grass within the marked area using a sharp spade. Dig down about 4 inches to ensure all roots are removed.
- Amend the soil by mixing in 2-3 inches of organic compost. This improves drainage and provides the nutrients necessary for vibrant blooms.
- Place your plants (still in their pots) in the bed to test the arrangement. Follow the rule of ‘Tall in the back, Short in the front’ and group in odd numbers (3s or 5s) for a natural look.
- Dig holes twice the width of the plant’s root ball. Set the plant in and backfill with soil, pressing firmly to remove air pockets.
- Install a soaker hose throughout the bed, snaking it around the base of the plants. This ensures water gets directly to the roots without wetting the foliage.
- Apply a 3-inch layer of natural wood mulch. This suppresses weeds, retains moisture, and gives the bed a finished, professional ‘viral’ look.
How to Master Realistic Pantry Organization for a Stress-Free Kitchen

Why we love this
An organized pantry is more than just a TikTok trend; it is a functional reset for your daily life. The satisfying ‘click’ of an airtight glass jar and the visual harmony of uniform labels turn a chaotic chore into a moment of calm. You can see exactly what you have, reducing food waste and making meal prep a breeze. The soft textures of woven baskets mixed with the sleek lines of acrylic bins create a boutique-grocery feel that makes even a simple Tuesday night dinner feel special and organized.
Essential Elements:
- Clear airtight glass or plastic canisters
- Woven or wire baskets for bulk items
- Tiered ‘stadium’ shelving for cans
- Lazy Susans for oils and sauces
- Uniform labels (chalkboard or vinyl)
- Over-the-door rack for extra space
How to make it
- Empty your entire pantry. Check expiration dates and discard anything old. This is the ‘blank slate’ phase.
- Categorize your items: Baking, Breakfast, Snacks, Grains, and Canned Goods. Grouping by use is more efficient than grouping by size.
- Decant ‘dry’ goods like flour, sugar, and pasta into clear, airtight containers. This keeps food fresh longer and allows you to see at a glance when you’re running low.
- Use tiered shelving for canned goods so you can see labels in the back row without digging.
- Place a Lazy Susan in the corner or on a high shelf. This is the perfect spot for vinegars, oils, or jars of honey that otherwise get lost in the back.
- Label everything. Even if you think you know what’s in the jar, labels maintain the system and help other family members keep the organization intact.
- Store frequently used items at eye level, while heavy items (like flour bags or gallon oils) go on the bottom shelf and seasonal items (like holiday cookie cutters) go on the very top.
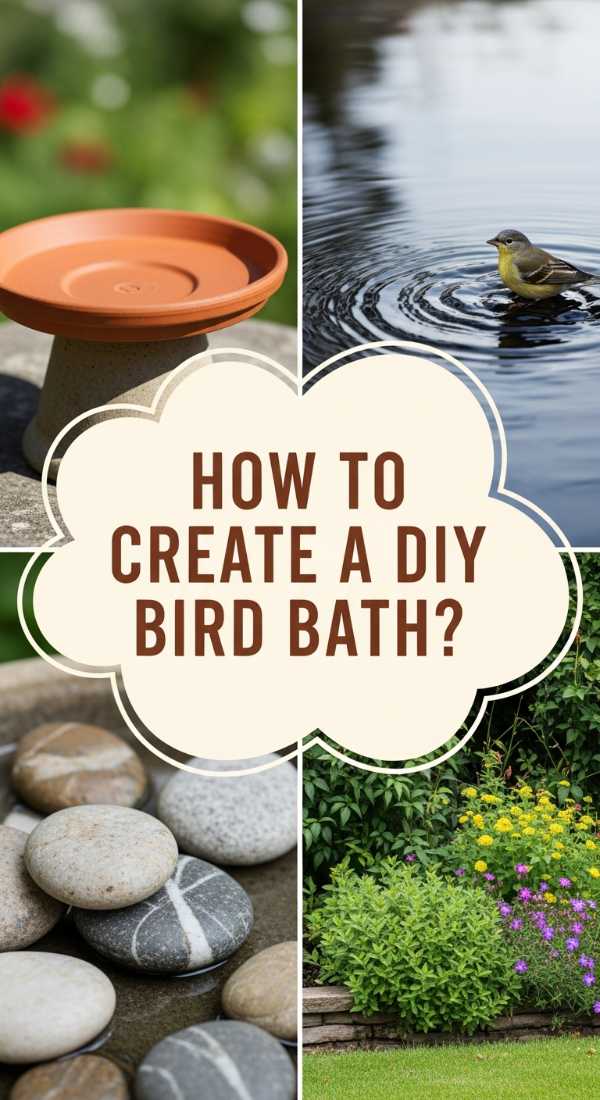
How to Create a DIY Bird Bath for a Serene Sanctuary
Why we love this
Adding a bird bath to your garden introduces the soothing element of water and the delightful activity of local wildlife. The gentle ‘drip-drip’ of a solar fountain and the sight of a blue jay splashing in the cool water bring a dynamic energy to your yard. The smooth, cool surface of a ceramic basin and the surrounding greenery create a focal point that feels peaceful and restorative. It’s a simple addition that makes your garden feel like a deliberate, living ecosystem, providing a moment of zen every time you look out the window.
Essential Elements:
- Large terracotta or ceramic saucer
- A sturdy base (a large upside-down planter or a stump)
- Solar-powered fountain pump
- Smooth river stones
- Outdoor-rated waterproof adhesive
- Clear sealant (if using terracotta)
How to make it
- Choose a saucer at least 15-18 inches wide. If using terracotta, spray the inside with a clear, non-toxic waterproof sealant to prevent the porous clay from soaking up all the water.
- Select a base that is heavy and stable. If using a large pot, turn it upside down and apply a generous amount of waterproof construction adhesive to the bottom (now the top).
- Center the saucer onto the base and press down firmly. Let the adhesive cure for at least 24 hours before adding water.
- Place a few large, flat river stones in the bottom of the saucer. These act as ‘landing pads’ for smaller birds so they don’t feel overwhelmed by the water depth.
- Fill with clean water to a depth of no more than 2 inches.
- Place a small solar-powered fountain pump in the center. These usually come with suction cups to stick to the bottom. The moving water prevents mosquitoes from breeding and attracts more birds.
- Position the bird bath in a shaded area near trees or shrubs so birds have a quick place to hide if they feel threatened.
How to Refresh a Concrete Slab Patio for an Outdoor Living Room

Why we love this
That old, grey concrete slab doesn’t have to be an eyesore; with a little paint and a stencil, it becomes the stylish foundation of an outdoor living room. The transformation is visual and tactile—suddenly, the space feels like a rug-covered interior room. The matte finish of the concrete paint feels cool under bare feet, and the intricate patterns mimic expensive Mediterranean tile. It completely changes the vibe of your backyard, turning a ‘utility space’ into a high-design area perfect for lounging with a book or hosting a summer cocktail hour.
Essential Elements:
- Concrete cleaner and degreaser
- Pressure washer or stiff scrub brush
- Concrete-grade primer
- Porch and floor paint (two contrasting colors)
- Large-scale floor stencil
- Long-handle paint roller and stencil brush
- Exterior-grade clear topcoat
How to make it
- Thoroughly clean the concrete. Use a degreaser and a pressure washer to remove every bit of dirt, oil, and old paint. This is the most important step for long-lasting results.
- Apply a high-quality concrete primer. This ensures the paint bonds to the porous surface and won’t peel after the first rain.
- Roll on two coats of your ‘base’ color paint. Allow at least 4-6 hours of drying time between coats.
- Secure your stencil in one corner using painter’s tape. Use a ‘dry brush’ technique—dip your brush in the accent paint and then dab most of it off onto a paper towel before hitting the stencil. This prevents bleeding under the edges.
- Repeat the pattern across the entire slab. Alignment is key, so use the registration marks provided on the stencil.
- Once the pattern is dry, apply two coats of a clear, slip-resistant exterior sealer. This protects the design from UV fading and foot traffic.
- Add an outdoor rug and some string lights to complete the transition from a ‘slab’ to a ‘living room.’
How to Curate a Hot Tub Area for the Ultimate Home Spa Experience

Why we love this
Transforming a hot tub area into a spa experience is all about the ‘vibe.’ Imagine the steam rising in the cool night air, the soft glow of lanterns, and the privacy provided by tall, rustling grasses or cedar screens. The contrast between the hot, bubbling water and the plush, soft texture of a nearby Turkish towel creates a luxurious sensory loop. It’s about creating a destination in your own backyard where the stresses of the day melt away into the sound of moving water and the scent of eucalyptus candles.
Essential Elements:
- Privacy screens (wood slats or tall planters)
- Weatherproof outdoor rug
- String lights or solar lanterns
- Towel rack or decorative ladder
- Side table for drinks/aromatherapy
- Potted aromatic plants (Lavender, Lemongrass)
How to make it
- Define the space by placing a large, weatherproof rug under or adjacent to the hot tub. This creates a soft spot for bare feet and visually anchors the ‘room.’
- Install privacy screens. You can build simple frames with cedar slats to block the view from neighbors while still allowing a breeze to flow through.
- Hang string lights overhead. If you don’t have a structure, use heavy-duty poles secured in planters to string the lights in a ‘criss-cross’ pattern over the tub.
- Set up a dedicated ‘towel station’ using a wooden blanket ladder. This keeps towels dry and within arm’s reach.
- Place a small, waterproof side table nearby for a Bluetooth speaker, a glass of water, or an aromatherapy diffuser.
- Surround the area with large pots of Lavender or Eucalyptus. The heat from the tub will help release the scent of the plants, enhancing the spa atmosphere.
- Add a few waterproof outdoor floor pillows nearby for a lounging area for those who want to chat with the people in the tub without getting in.
Conclusion: Your Dream Home is Just One Project Away
Creating a magazine-worthy home isn’t about perfection; it’s about the joy of the process and the pride of seeing your vision come to life. Whether you start with a small bird bath or tackle a full patio refresh, each of these DIYs adds a layer of ‘you’ to your space. Remember, the most viral homes are the ones that feel loved, lived-in, and full of personality. So, pick the project that speaks to you most, clear your schedule this weekend, and start building the lifestyle you’ve always admired from afar. Your sanctuary is waiting!