
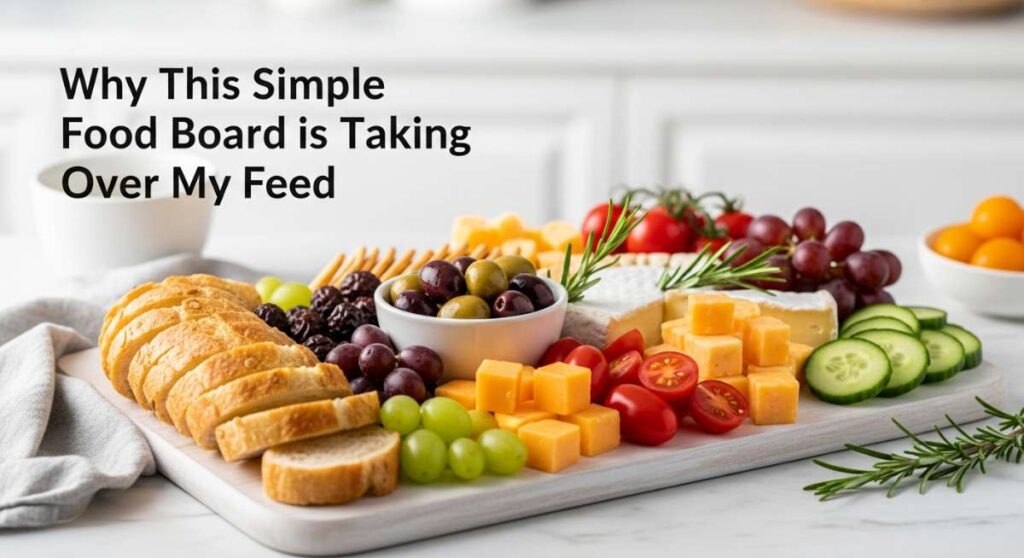
There is something almost magical about the way a simple food board can bring people together, turning a casual afternoon into a memory that lingers long after the last crumb is gone. Lately, my social media feeds have been overflowing with these beautifully curated spreads, but it’s not just about the aesthetic—it’s about the soul-soothing comfort of home-cooked staples. Whether it is the golden crust of a fresh cobbler or the vibrant green of a perfectly whisked latte, these dishes represent the warmth and hospitality we all crave in our daily lives.
Creating a food board isn’t just about placing items on a tray; it’s about telling a story through textures, aromas, and flavors. I’ve spent weeks perfecting these ten specific recipes to ensure they aren’t just ‘photo-ready,’ but genuinely delicious and approachable for any home cook. From the sizzle of fresh tacos to the earthy depth of a pumpkin soup, let’s dive into the recipes that have transformed my kitchen into a sanctuary of flavor and my feed into a gallery of inspiration.
How to bake apple crumble?
Why we love this
There is nothing quite like the sensory experience of a warm apple crumble emerging from the oven. The scent of cinnamon-kissed Fuji apples mingling with buttery oats fills the kitchen, creating an atmosphere of pure domestic bliss. As you scoop into it, you encounter the contrast between the tender, juicy fruit that has softened into a sweet compote and the crisp, golden-brown topping that shatters delightfully with every bite. It is the ultimate comfort food, best served with a melting scoop of vanilla bean ice cream that turns into a creamy sauce against the hot fruit.
Ingredients
- 6 large Granny Smith or Fuji apples, peeled and sliced
- 1 cup all-purpose flour
- 1 cup rolled oats
- 1 cup brown sugar, packed
- 1/2 cup cold unsalted butter, cubed
- 1 tsp ground cinnamon
- 1/4 tsp ground nutmeg
- 1 tbsp lemon juice
How to make it
- Preheat your oven to 375°F (190°C) and lightly grease a 9-inch baking dish. This ensures the fruit doesn’t stick and the edges caramelize beautifully.
- In a large mixing bowl, toss your sliced apples with lemon juice, half of the cinnamon, and 2 tablespoons of brown sugar. Ensure every slice is coated evenly to provide a consistent flavor throughout the base.
- In a separate medium bowl, combine the flour, oats, remaining brown sugar, and nutmeg. Use a pastry cutter or your fingertips to work the cold, cubed butter into the dry mixture until it resembles coarse crumbs with some pea-sized chunks remaining; this creates the signature ‘crumble’ texture.
- Spread the apple mixture evenly into the prepared dish, then sprinkle the crumble topping generously over the top, pressing down slightly so it adheres to the fruit.
- Bake for 40 to 45 minutes on the middle rack. You are looking for the fruit juices to bubble up around the edges and the topping to achieve a deep, golden-brown hue. Let it rest for 10 minutes before serving to allow the juices to thicken slightly.
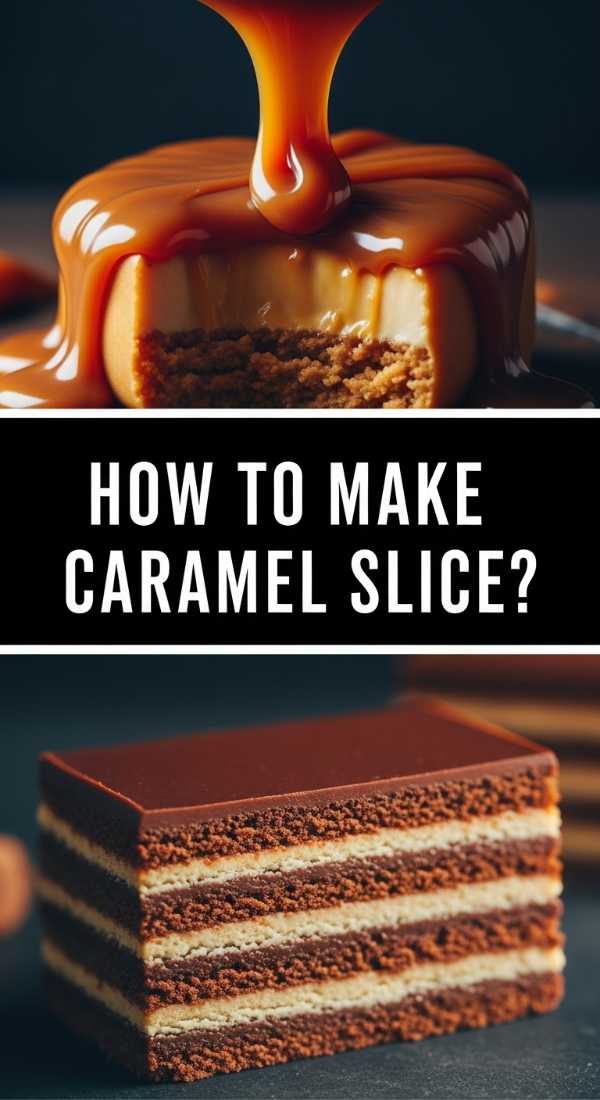
How to make caramel slice?
Why we love this
A caramel slice is a masterclass in textural layers, offering a decadent journey from the first bite to the last. The base is a shortbread-like biscuit that provides a firm, buttery foundation, followed by a thick, velvety layer of golden caramel that is both chewy and smooth. Finally, a thin layer of tempered dark chocolate sits on top, providing a satisfying snap that cuts through the richness of the sugar. It is an indulgent treat that looks like it came from a high-end patisserie but feels like a warm hug from home.
Ingredients
- 1 cup all-purpose flour
- 1/2 cup desiccated coconut
- 1/2 cup brown sugar
- 125g unsalted butter, melted
- 395g sweetened condensed milk
- 2 tbsp golden syrup
- 60g butter, extra
- 200g dark chocolate, chopped
- 1 tbsp coconut oil
How to make it
- Line a square baking tin with parchment paper, leaving an overhang on the sides for easy removal. Preheat your oven to 180°C (350°F).
- Mix the flour, coconut, brown sugar, and melted butter in a bowl until combined. Press this mixture firmly and evenly into the base of the tin. Bake for 12-15 minutes until lightly golden, then remove and let it cool slightly.
- To make the caramel, combine the condensed milk, golden syrup, and extra butter in a small saucepan over medium-low heat. Stir constantly for about 8-10 minutes. You must be diligent here; the caramel is ready when it thickens and turns a light golden-brown color and pulls away slightly from the sides of the pan.
- Pour the hot caramel over the baked base and return to the oven for another 10-12 minutes until the caramel is set and bubbling gently. Remove and cool completely in the refrigerator.
- Melt the dark chocolate and coconut oil together in a microwave-safe bowl in 30-second bursts. Pour over the chilled caramel layer, smoothing it with a spatula. Refrigerate for at least 3 hours before slicing with a hot knife to prevent the chocolate from cracking.
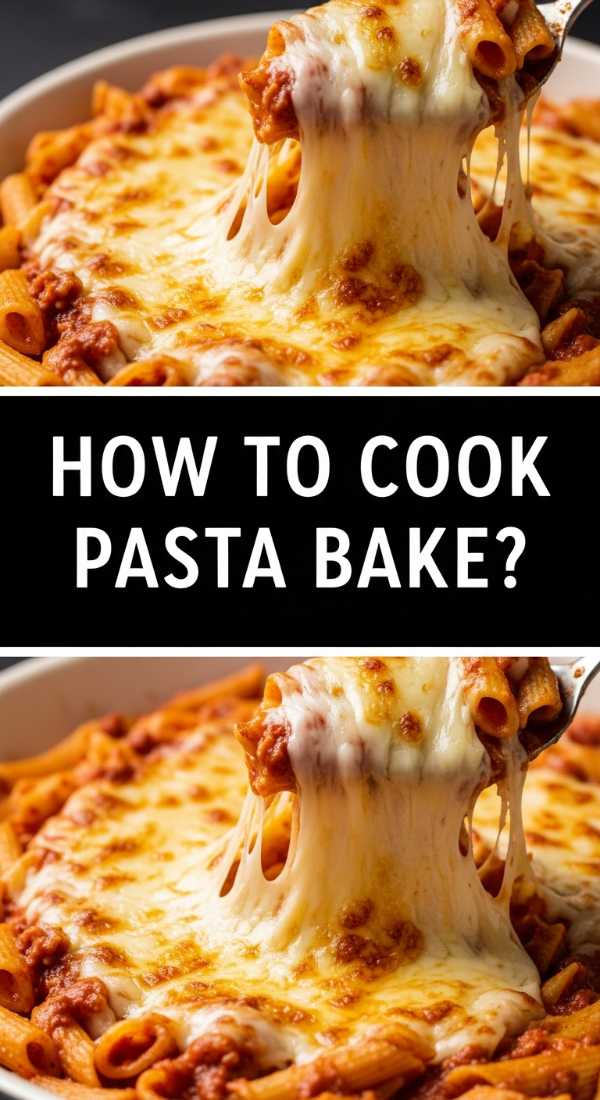
How to cook pasta bake?
Why we love this
The humble pasta bake is the king of weeknight dinners, offering a bubbling, cheesy surface that hides a treasure trove of al dente pasta and rich tomato sauce. There is something deeply satisfying about the way the cheese on top becomes charred and crispy, while the interior remains moist and flavor-packed. The aroma of roasted garlic and melting mozzarella wafting through the house is enough to bring everyone to the table without a second call. It’s hearty, rustic, and endlessly customizable, making it a true staple of the modern kitchen.
Ingredients
- 500g penne or rigatoni pasta
- 700g marinara or bolognese sauce
- 2 cups shredded mozzarella cheese
- 1/2 cup grated parmesan cheese
- 2 cloves garlic, minced
- 1 tsp dried oregano
- Fresh basil for garnish
How to make it
- Preheat your oven to 200°C (400°F). Bring a large pot of salted water to a rolling boil and cook the pasta for 2 minutes less than the package instructions suggest; the pasta will finish cooking in the sauce in the oven.
- In a large bowl, combine the par-cooked pasta with the marinara sauce, minced garlic, and oregano. Stir thoroughly so each tube of pasta is filled with sauce.
- Transfer half of the pasta mixture into a deep 9×13 inch baking dish. Sprinkle a layer of mozzarella and parmesan in the middle to create a hidden cheesy core.
- Add the remaining pasta and top with the rest of the cheese. Cover the dish with foil to prevent the cheese from burning before the pasta is heated through.
- Bake covered for 20 minutes, then remove the foil and bake for another 10-15 minutes until the cheese is melted, golden, and bubbling vigorously. Garnish with fresh basil leaves before serving.
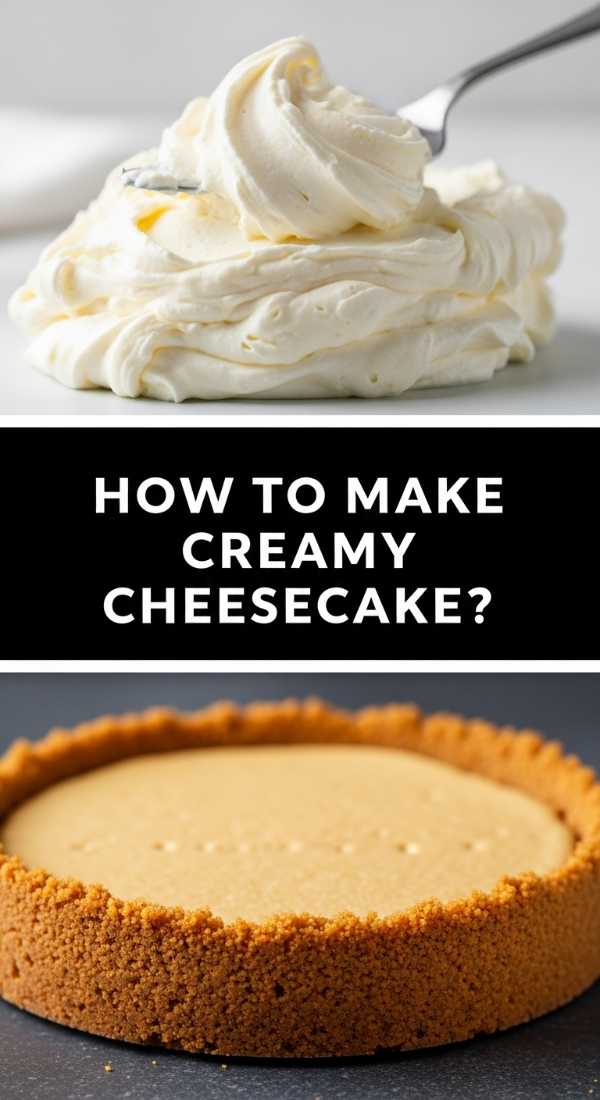
How to make creamy cheesecake?

Why we love this
A truly great cheesecake is a study in silkiness, offering a dense yet light-as-air texture that melts on the tongue with a tangy, sweet finish. The contrast between the crumbly, salty-sweet graham cracker crust and the rich, cream-cheese-laden filling is nothing short of iconic. When made correctly, it is smooth and unblemished, a blank canvas for fresh berries or a drizzle of salted caramel. It feels sophisticated and celebratory, making it the perfect centerpiece for a food board focused on dessert and decadence.
Ingredients
- 1.5 cups graham cracker crumbs
- 1/4 cup melted butter
- 900g cream cheese, softened
- 1 cup granulated sugar
- 1 cup sour cream
- 1 tsp vanilla extract
- 4 large eggs, room temperature
How to make it
- Prepare a 9-inch springform pan by greasing the sides and wrapping the bottom tightly in three layers of heavy-duty aluminum foil to prevent water from leaking in. Preheat oven to 325°F (160°C).
- Mix graham cracker crumbs with melted butter and press firmly into the bottom of the pan. Bake for 10 minutes, then let cool while preparing the filling.
- In a large bowl, beat the softened cream cheese and sugar together until completely smooth and free of lumps. Add the sour cream and vanilla, mixing on low speed; avoiding high speeds prevents air bubbles from forming, which causes cracking.
- Add eggs one at a time, mixing just until combined. Pour the batter over the crust. Place the springform pan inside a larger roasting pan and fill the roasting pan with hot water until it reaches halfway up the sides of the cheesecake pan (a water bath).
- Bake for 75-90 minutes. The edges should be set, but the center should still have a slight jiggle like gelatin. Turn off the oven, crack the door, and let it cool inside for an hour. Chill in the fridge for at least 6 hours before releasing from the pan.
How to prepare fresh tacos?
Why we love this
Fresh tacos are a celebration of vibrant colors and explosive flavors, bringing a zesty energy to any meal. The combination of charred, smoky protein, crisp slaw, and the bright acidity of fresh lime creates a profile that is both refreshing and deeply satisfying. There’s a tactile joy in assembling your own taco, choosing just the right amount of spicy salsa and cooling crema. The aroma of toasted corn tortillas and grilled spices is intoxicating, making this a favorite for social gatherings where everyone can customize their perfect bite.
Ingredients
- 12 small corn or flour tortillas
- 500g flank steak or chicken breast, thinly sliced
- 2 tbsp olive oil
- 1 tbsp taco seasoning (cumin, chili powder, garlic powder)
- 1 cup shredded cabbage
- 1 avocado, sliced
- 1/2 cup fresh cilantro, chopped
- 2 limes, cut into wedges
How to make it
- Marinate your protein of choice in olive oil and taco seasoning for at least 30 minutes. This allows the spices to penetrate the fibers of the meat for maximum flavor.
- Heat a cast-iron skillet or grill pan over high heat until it is smoking slightly. Sear the meat in batches to avoid crowding the pan, which ensures a deep, brown crust rather than steaming. Cook until the internal temperature reaches safe levels (approx 5-7 mins).
- While the meat rests, toast your tortillas. Place them directly over a low gas flame for 10-15 seconds per side using tongs, or in a dry skillet until they are pliable and show charred spots. Keep them warm in a clean kitchen towel.
- Prepare the ‘fixings’ by tossing the shredded cabbage with a squeeze of lime and a pinch of salt to create a quick, bright slaw.
- Assemble the tacos by placing a generous portion of meat on the tortilla, topped with the cabbage slaw, a slice of avocado, and a sprinkle of cilantro. Serve immediately with extra lime wedges on the side.
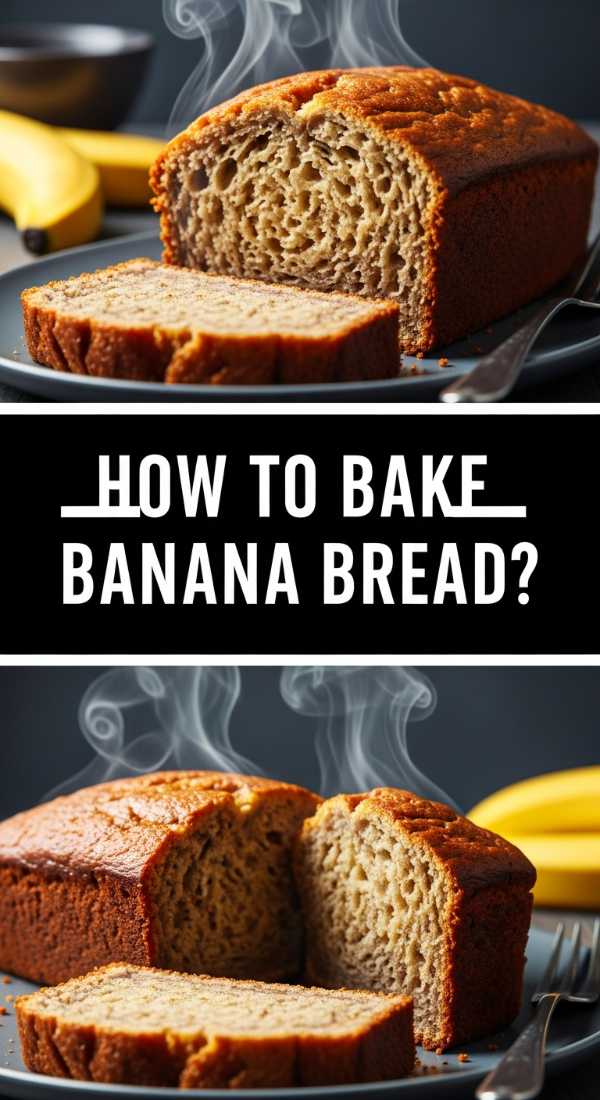
How to bake banana bread?

Why we love this
Banana bread is the ultimate kitchen alchemist, turning overripe, spotted fruit into a loaf of pure gold. The texture is dense, moist, and incredibly tender, with a sweetness that is deep and caramelized rather than sugary. When toasted and slathered with salted butter, the crumb becomes slightly crispy while the center remains soft and fragrant with the scent of vanilla and spice. It is a nostalgic bake that reminds us of slow mornings and the simple joy of a home-baked treat that only gets better the next day.
Ingredients
- 3 very ripe bananas, mashed
- 1/2 cup melted butter
- 1/2 cup white sugar
- 1/2 cup brown sugar
- 1 egg, beaten
- 1 tsp vanilla extract
- 1.5 cups all-purpose flour
- 1 tsp baking soda
- Pinch of salt
How to make it
- Preheat your oven to 350°F (175°C) and grease a 4×8 inch loaf pan. Line the bottom with parchment paper for an easy release.
- In a large bowl, mash the ripe bananas with a fork until they are smooth with only a few small lumps remaining. Stir in the melted butter until fully incorporated.
- Mix in the sugars, egg, and vanilla extract. Use a whisk to ensure the egg is fully integrated and the mixture is slightly frothy.
- Sift in the flour, baking soda, and salt. Use a spatula to fold the dry ingredients into the wet mixture. Stop as soon as no more streaks of flour are visible; overmixing will develop gluten and make the bread tough.
- Pour the batter into the prepared loaf pan and bake for 50 to 60 minutes. Test with a toothpick inserted into the center—it should come out clean or with just a few moist crumbs. Let the bread cool in the pan for 10 minutes before transferring to a wire rack.
How to whip matcha latte?

Why we love this
A matcha latte is a ritual in a cup, offering a serene, earthy flavor profile that is both grounding and energizing. The vibrant, emerald-green hue of high-quality ceremonial matcha is a feast for the eyes, while its velvety texture feels luxurious on the palate. Unlike coffee, it provides a calm alertness, paired with a subtle sweetness from the milk and a hint of grassy bitterness that is incredibly sophisticated. It is the perfect mid-afternoon pick-me-up, looking as beautiful as it tastes on any food board or café table.
Ingredients
- 1.5 tsp ceremonial grade matcha powder
- 2 tbsp hot water (not boiling, approx 80°C)
- 1 cup milk (oat, almond, or dairy)
- 1 tsp honey or maple syrup (optional)
How to make it
- Sift the matcha powder through a fine-mesh strainer into a small bowl or chawan. This step is crucial to remove any clumps and ensure a perfectly smooth latte.
- Add the hot water (ensure it is around 80°C/175°F, as boiling water will scorch the matcha and make it bitter). Use a bamboo whisk (chasen) to whisk in a ‘W’ or ‘M’ motion rapidly for about 20-30 seconds until a thick, frothy layer of tiny bubbles forms on the surface.
- If using a sweetener, stir it into the whisked matcha now.
- Heat your milk in a small saucepan or use a milk frother until it is hot and has a generous head of micro-foam.
- Pour the matcha base into your serving glass, then slowly pour the steamed milk over it. The green and white should swirl together beautifully. Top with a final dusting of matcha powder for a professional finish.
How to cook pumpkin soup?
Why we love this
Pumpkin soup is autumn in a bowl—silky, golden, and deeply warming. There is a rustic elegance to a well-made puree, where the natural sweetness of roasted pumpkin is balanced by the aromatic punch of onion, garlic, and a hint of warming nutmeg. The texture should be thick and coat the back of a spoon, providing a velvety mouthfeel that is incredibly comforting on a chilly day. Topped with a swirl of heavy cream and some toasted seeds, it becomes a gourmet experience that is as nourishing as it is delicious.
Ingredients
- 1kg pumpkin (Peeled and cubed)
- 1 large onion, chopped
- 2 cloves garlic, smashed
- 750ml vegetable stock
- 1/2 cup heavy cream
- 1/2 tsp ground nutmeg
- Salt and pepper to taste
How to make it
- Preheat your oven to 200°C (400°F). Toss the pumpkin cubes and garlic cloves with olive oil, salt, and pepper on a baking sheet. Roast for 25-30 minutes until the pumpkin is tender and starting to caramelize at the edges; roasting provides a much deeper flavor than boiling.
- In a large pot, sauté the chopped onion in a little oil until translucent and soft. Add the roasted pumpkin and garlic (squeezed out of their skins) into the pot.
- Pour in the vegetable stock and bring the mixture to a gentle simmer. Let it cook together for 10 minutes to allow the flavors to marry.
- Use an immersion blender to puree the soup directly in the pot until it is completely smooth. If you prefer it thinner, add a splash more stock or water.
- Stir in the heavy cream and nutmeg. Taste and adjust the seasoning. Serve hot with a drizzle of cream and a side of crusty sourdough bread for dipping.
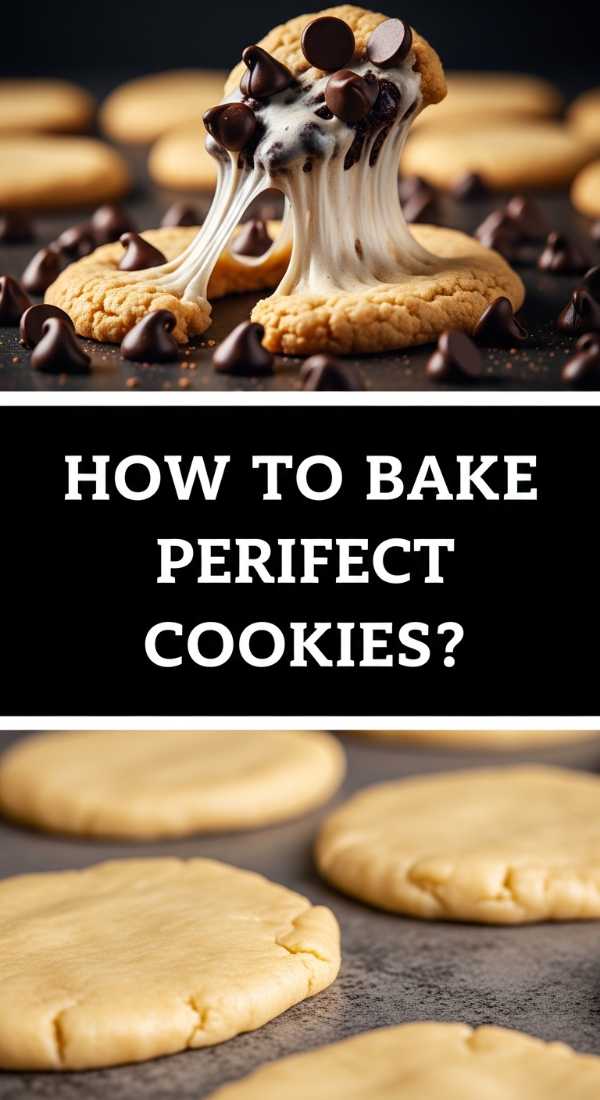
How to bake perfect cookies?

Why we love this
The perfect chocolate chip cookie is a holy grail of baking—it must have slightly crisp, buttery edges and a soft, chewy, almost doughy center. The pools of melted dark chocolate should be generous, countered by a light sprinkling of flaky sea salt that makes the flavors pop. When they come out of the oven, the aroma of caramelized sugar and vanilla is irresistible. These cookies aren’t just a snack; they are an experience of pure, unadulterated joy that appeals to the inner child in everyone.
Ingredients
- 1 cup unsalted butter, softened
- 3/4 cup white sugar
- 3/4 cup brown sugar, packed
- 2 large eggs
- 1 tsp vanilla extract
- 2.25 cups all-purpose flour
- 1 tsp baking soda
- 2 cups semi-sweet chocolate chips
- Flaky sea salt
How to make it
- In a large bowl, cream together the softened butter and both sugars until the mixture is pale and fluffy (about 3-5 minutes). This aeration is key to the cookie’s structure.
- Add the eggs one at a time, beating well after each addition, then stir in the vanilla extract.
- In a separate bowl, whisk together the flour, baking soda, and a pinch of salt. Gradually add the dry ingredients to the wet mixture, stirring by hand until just combined. Fold in the chocolate chips.
- Crucial Step: Chill the dough in the refrigerator for at least 2 hours, or ideally overnight. Chilling prevents the cookies from spreading too thin and develops a deeper flavor.
- Preheat oven to 350°F (175°C). Scoop rounded tablespoons of dough onto a parchment-lined baking sheet, spacing them 2 inches apart. Bake for 10-12 minutes until the edges are just beginning to turn golden but the centers still look slightly underdone. Sprinkle with flaky sea salt immediately upon removal and let cool on the pan for 5 minutes.
How to make fluffy gnocchi?
[IMAGE_10]
Why we love this
Homemade gnocchi are like little pillows of heaven, far superior to anything you can find in a vacuum-sealed pack at the store. When made correctly, they are incredibly light and airy, with a delicate potato flavor that pairs perfectly with a simple sage and brown butter sauce. The process of rolling the dough and cutting the individual pieces is meditative and rewarding. There is a rustic beauty to their imperfect shapes, and the way they melt in your mouth makes all the effort of boiling and ricing potatoes entirely worth it.
Ingredients
- 1kg starchy potatoes (like Russets)
- 1.5 to 2 cups all-purpose flour
- 1 large egg, lightly beaten
- 1 tsp salt
How to make it
- Boil the potatoes whole and unpeeled in salted water until they are fork-tender. Cooking them in their skins prevents them from absorbing too much water, which is the secret to light gnocchi.
- Peel the potatoes while still warm (use a towel to hold them) and pass them through a potato ricer into a large bowl. Let the riced potatoes cool slightly so the steam can escape.
- Create a well in the potatoes, add the beaten egg and salt, then sprinkle over 1 cup of flour. Gently fold the mixture together with your hands. Add more flour gradually until a soft, slightly sticky dough forms. Do not overwork the dough; you want to handle it as little as possible to keep it light.
- On a floured surface, cut the dough into four pieces and roll each into a long rope about 3/4 inch thick. Cut the ropes into 1-inch pieces. You can roll them over a fork for traditional ridges if desired.
- Bring a large pot of salted water to a boil. Drop the gnocchi in batches. They are done the moment they float to the surface (usually about 2-3 minutes). Remove with a slotted spoon and toss immediately into your favorite sauce.
The Art of the Board
Sharing these recipes is about more than just food; it’s about the connection we build when we break bread together. Whether you’re assembling a dessert board with caramel slices and cookies, or a savory spread with tacos and gnocchi, the key is to lean into the textures and smells that make home cooking so special. I hope these dishes bring as much joy to your table as they have to mine, and that they spark a little bit of viral inspiration in your own kitchen.