

There is a specific kind of magic that happens when you take a corner of your home that feels ‘just okay’ and turn it into a viral-worthy masterpiece with nothing but your own two hands and a little bit of weekend grit. I remember the first time I tackled a DIY project—a simple herb planter—and the sheer rush of dopamine I felt when that first sprout peeked through. It wasn’t just about the plant; it was about the realization that I had the power to curate my own surroundings without breaking the bank.
This year, social media has been buzzing with some of the most ingenious, budget-friendly home and garden hacks I’ve ever seen. From backyard transformations that look like five-star resorts to organizational systems that soothe the soul, these DIYs are more than just trends; they are lifestyle upgrades. Whether you’re looking to boost your curb appeal or create a sensory sanctuary for your little ones, these projects are designed to be accessible, beautiful, and deeply satisfying to complete.
How to Build a Wood Trellis for Vertical Garden Beauty

Why we love this
There is something incredibly romantic about watching a climbing vine find its way up a sturdy wooden structure, the green tendrils reaching for the sun against the warm, raw texture of cedar. The aroma of freshly cut wood mingles with the sweet scent of jasmine or honeysuckle, creating a living wall that adds both privacy and architectural interest to a plain garden fence. It transforms a flat, two-dimensional yard into a lush, multi-layered escape where every breeze brings the gentle rustle of leaves against timber.
Essential Elements:
- Pressure-treated cedar or redwood slats (1×2 inches)
- Exterior-grade wood screws
- Waterproof wood glue
- Power drill and miter saw
- Outdoor wood sealant or stain
- Measuring tape and level
How to make it
- Measure your designated wall or fence area to determine the height and width of your trellis, ensuring you leave at least two inches of clearance from the ground to prevent rot.
- Cut your vertical support beams to length using a miter saw, then lay them out on a flat surface, spacing them roughly 12 to 18 inches apart depending on the weight of the plants you intend to grow.
- Cut your horizontal cross-slats; for a modern look, space these evenly every 6 inches, or create a diamond pattern by cutting slats at 45-degree angles.
- Apply a small bead of waterproof wood glue at every junction point where the horizontal slats meet the vertical supports to ensure structural integrity over time.
- Pre-drill pilot holes at every intersection to prevent the cedar from splitting, then drive your exterior-grade screws in until they are flush with the wood surface.
- Sand any rough edges with 120-grit sandpaper and apply two coats of high-quality outdoor sealant, allowing the first coat to dry completely for 24 hours before applying the second to protect against UV rays and moisture.
How to Choose Concrete Colors for Modern Curb Appeal
Why we love this
Gone are the days of cold, industrial grey being the only option for your driveway or walkway; modern concrete staining offers a velvety, high-end finish that feels grounded and intentional. Imagine walking up a path that glows with the warmth of toasted terracotta or the sophisticated depth of slate charcoal, perfectly complementing the textures of your home’s siding. The visual weight of a beautifully colored concrete surface provides a solid, luxurious foundation that makes every potted plant and architectural detail pop with newfound vibrancy.
Essential Elements:
- Concrete acid stain or water-based dye
- Pressure washer and heavy-duty degreaser
- Plastic pump sprayer (no metal parts for acid stains)
- Concrete sealer (gloss or matte finish)
- Protective gear: gloves, goggles, and respirator mask
- Painter’s tape and plastic sheeting
How to make it
- Begin by thoroughly cleaning the concrete surface using a high-pressure washer and a specialized degreaser to remove any oils, waxes, or previous sealants that might prevent the stain from penetrating.
- Tape off any adjacent walls, siding, or landscaping with plastic sheeting to protect them from overspray, as concrete stains are permanent and difficult to remove from non-porous surfaces.
- Perform a water test by pouring a small amount of water on different areas; if the water beads up, the concrete needs further etching or cleaning to open the pores.
- Mix your stain according to the manufacturer’s instructions and pour it into a plastic pump sprayer, then apply it in a circular motion to avoid ‘lap lines’ and ensure even coverage across the entire slab.
- Allow the stain to react with the concrete for the recommended time (usually 4 to 8 hours), then neutralize the surface with a mixture of baking soda and water if using an acid-based product.
- Once the surface is completely dry and pH-neutral, apply two thin coats of UV-resistant concrete sealer using a medium-nap roller, ensuring the edges are well-saturated to prevent water ingress.
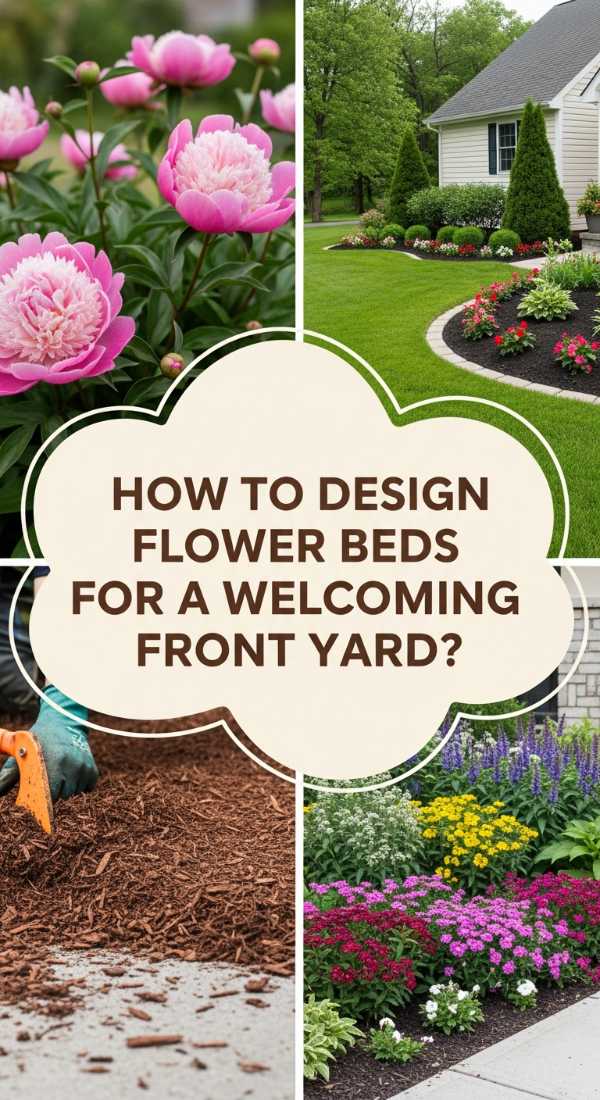
How to Design Flower Beds for a Welcoming Front Yard

Why we love this
A well-designed flower bed is like a warm embrace for your home, offering a tactile experience of soft petals, waxy leaves, and the grounding scent of damp, nutrient-rich mulch. The visual rhythm of varying heights—from low-creeping groundcovers to towering perennials—creates a sense of movement and life that greets you every time you pull into the driveway. It’s about the joy of seeing colors transition through the seasons, from the crisp whites of spring to the deep, moody purples of autumn, all framed by the crisp, clean lines of a perfectly edged border.
Essential Elements:
- Selection of perennials and annuals (staggered heights)
- High-quality garden soil and organic compost
- Hardwood mulch (dark brown or black)
- Edging material (stone, metal, or plastic)
- Spade, garden fork, and landscape fabric
- Slow-release fertilizer
How to make it
- Sketch a layout of your bed, placing taller ‘thriller’ plants like ornamental grasses in the back, medium ‘filler’ plants like hydrangeas in the middle, and low ‘spiller’ plants like lobelia at the front edge.
- Use a garden hose or spray paint to mark out a curved, organic shape on the lawn, which feels more natural and inviting than rigid straight lines.
- Remove the existing sod using a sharp spade, then turn the earth to a depth of about 12 inches with a garden fork to ensure the soil is loose and aerated for new root growth.
- Amend the soil by mixing in a 3-inch layer of organic compost and slow-release fertilizer, creating a nutrient-dense environment that will support long-term plant health.
- Arrange your plants while they are still in their nursery pots to finalize the spacing, ensuring you leave enough room for each species to reach its mature width without overcrowding.
- Dig holes twice the width of the root balls, set the plants in place at the same depth they were in their pots, backfill with soil, and apply a 2-to-3-inch layer of mulch to retain moisture and suppress weeds.
How to Style Mud Kitchen Accessories for Sensory Play

Why we love this
There is a profound, messy joy in a mud kitchen, where the cool squelch of wet earth meets the clinking of stainless steel pots under a summer sun. It is a space defined by the earthy aroma of pine needles and the tactile crunch of dried leaves, encouraging children to engage with the natural world in a way that is both creative and grounding. Watching a child ‘cook’ with flower petals and rainwater is a reminder of the simple beauty in imagination, framed by the rustic, splinter-free warmth of sanded wood and the glint of repurposed kitchen treasures.
Essential Elements:
- Wooden outdoor play structure (repurposed pallet or cedar unit)
- Stainless steel bowls, whisks, and measuring cups
- Natural ‘ingredients’ (pinecones, acorns, pebbles, flower petals)
- Outdoor chalkboard and chalk
- Water source (small gravity-fed barrel or hose access)
- Hooks for hanging utensils
How to make it
- Select a sturdy, weather-resistant wooden base, ensuring all surfaces are sanded with 80-grit then 120-grit sandpaper to remove any potential splinters before the kids start playing.
- Cut circular holes into the countertop surface using a jigsaw to drop in stainless steel ‘sinks’ (mixing bowls), securing them with a bead of outdoor silicone if you want them permanent.
- Install a vertical backboard and screw in small brass hooks to organize ladles, spatulas, and whisks, keeping the ‘workspace’ tidy and accessible for little hands.
- Create a ‘pantry’ section using weather-proof bins or baskets filled with sensory materials like smooth river stones, dried lavender, and assorted wood chips.
- Attach a small chalkboard to the backboard where daily ‘menus’ can be written, fostering literacy and role-play as children describe their muddy concoctions.
- Position the mud kitchen near a water source and provide a small watering can or a pump-style dispenser to allow for independent play without needing constant adult intervention for ‘liquids.’
How to Install a Rock River Bed for Better Drainage
Why we love this
A rock river bed is a masterful blend of form and function, turning a problematic drainage area into a serene, Zen-like feature that mimics the rugged beauty of a mountain stream. The smooth, cool surfaces of river rocks in varying shades of grey, tan, and blue catch the light differently after a rainstorm, glistening with a fresh, clean energy. It offers a satisfying auditory experience as water trickles through the crevices, while providing a permanent, low-maintenance solution that feels like a natural part of the landscape rather than a hardware store fix.
Essential Elements:
- River rocks in multiple sizes (1-inch to 8-inch diameters)
- Heavy-duty landscape fabric (weed barrier)
- Large ‘anchor’ boulders for visual weight
- Garden spade and metal rake
- Landscape staples
- Permeable gravel or crushed stone for the base
How to make it
- Observe your yard during a heavy rain to identify the natural path of runoff, then mark out a winding, slightly irregular trench that follows this flow to ensure maximum efficiency.
- Excavate the trench to a depth of 6 to 10 inches, sloping the sides slightly so the center is the deepest point, which helps channel the water effectively.
- Line the entire trench with professional-grade landscape fabric, overlapping the seams by at least 6 inches and securing it with landscape staples to prevent weeds from poking through the rocks.
- Pour a 2-inch base layer of crushed stone or coarse gravel over the fabric to provide a stable foundation and additional filtration for the water as it moves.
- Place your largest ‘anchor’ boulders first at the curves and edges of the river bed to create a natural look, then fill in the gaps with mid-sized river rocks.
- Finish by scattering smaller pebbles along the ‘shoreline’ and between the larger stones to create a realistic, graduated appearance that looks as though it was carved by nature itself.
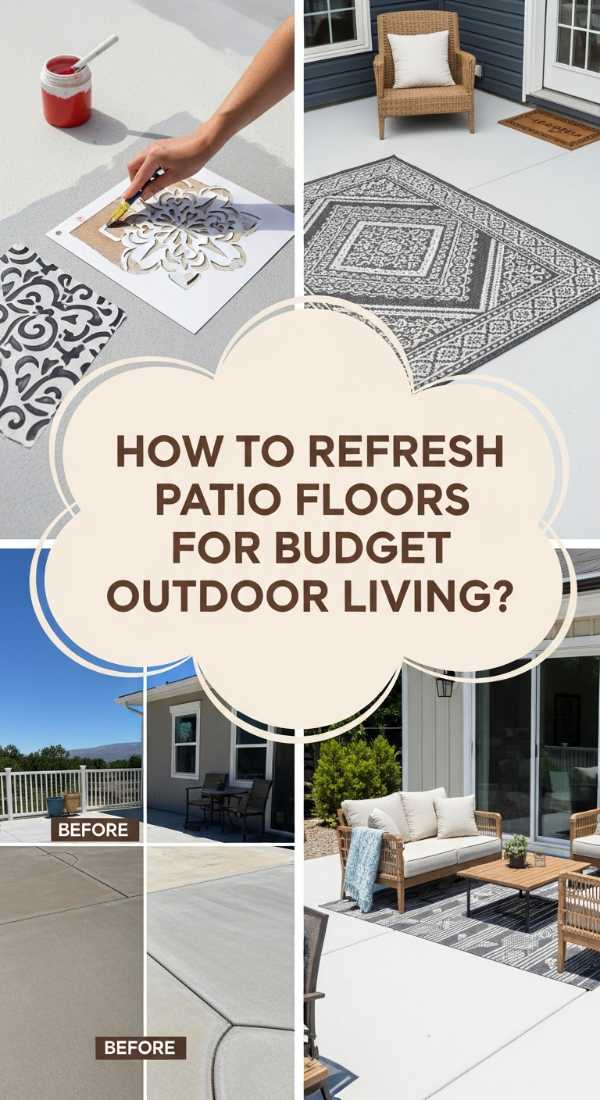
How to Refresh Patio Floors for Budget Outdoor Living

Why we love this
Walking out onto a freshly refreshed patio feels like gaining an entirely new room in your house, where the air is clear and the possibilities for relaxation are endless. Whether it’s the crisp, geometric pattern of a stenciled tile look or the smooth, cool-to-the-touch finish of a fresh solid stain, the transformation is visceral. It takes a tired, cracked slab and turns it into a chic foundation for outdoor rugs and wicker furniture, making your morning coffee feel like a vacation at a boutique hotel.
Essential Elements:
- Outdoor patio paint or concrete stain
- Large-scale floor stencil (optional)
- Long-handled paint roller and high-quality brushes
- Painter’s tape and heavy-duty cleaner
- Concrete patch compound for cracks
- Clear outdoor topcoat (non-slip additive recommended)
How to make it
- Clear the patio entirely and scrub the surface with a stiff brush and a heavy-duty cleaner or trisodium phosphate (TSP) to remove all dirt, mildew, and loose old paint.
- Fill any visible cracks or pits with a high-quality concrete patch compound, smoothing it with a putty knife and letting it cure fully according to the package directions.
- Apply a base coat of your chosen patio paint or stain using a roller for the main area and a brush for the edges, working in small sections to maintain a ‘wet edge’ and avoid visible lines.
- If stenciling, wait 24 hours for the base coat to dry, then secure your stencil with painter’s tape and apply the contrasting color using a dense foam roller with very little paint to prevent bleeding.
- Repeat the stencil pattern across the entire floor, being careful to align the edges perfectly; for a more forgiving look, choose a random or distressed pattern.
- Protect your hard work by applying a clear, UV-resistant topcoat mixed with a non-slip additive, which provides a slight texture to the floor so it isn’t slippery when wet.
How to Achieve Pantry Organization for Stress Free Cooking

Why we love this
There is a profound sense of calm that washes over you when you open a pantry door to see rows of uniform glass jars, the sunlight catching the textures of grains, pastas, and spices. Gone is the visual noise of mismatched cardboard boxes and crinkly plastic bags, replaced by a curated apothecary-style aesthetic that smells faintly of cinnamon and dried herbs. It turns the mundane task of meal prepping into a sensory delight, where everything has its place and the simple act of reaching for an ingredient feels intentional and organized.
Essential Elements:
- Airtight glass or BPA-free plastic canisters
- Woven or wire baskets for larger items
- Label maker or custom vinyl decals
- Tiered shelf risers for canned goods
- Lazy Susans for oils and vinegars
- Uniform spice jars
How to make it
- Empty your entire pantry, checking expiration dates and discarding anything that is no longer fresh to ensure you are only organizing items you actually use.
- Group like items together—baking supplies, snacks, pastas, canned goods—to determine how many containers and baskets of each size you will need for your specific inventory.
- Decant dry goods like flour, sugar, and cereal into airtight glass canisters; this not only looks better but also keeps food fresh longer and prevents pests from entering.
- Apply clear, legible labels to every container at a uniform height; consistency in labeling is the key to that ‘viral’ professional organizer look that feels so satisfying.
- Use tiered risers for your canned goods so you can see the labels on the back row, and place frequently used items like olive oil and salt on a Lazy Susan for easy access.
- Store bulkier, less attractive items like bags of potatoes or backup paper towels in matching woven baskets on the lower shelves to maintain a clean, cohesive visual field.
How to Use Solar Lights for Enchanting Garden Nights

Why we love this
As the sun sets, the magic begins—the soft, amber glow of solar lights flickering on one by one, casting long, dramatic shadows across the grass and highlighting the delicate textures of your favorite blooms. There is no harsh glare, only the gentle, warm hum of light that guides your path and makes the garden feel like a secret, enchanted forest. It invites you to linger outside long after the heat of the day has passed, wrapped in the cool night air and the shimmering beauty of a space that feels both safe and ethereal.
Essential Elements:
- Solar path lights (stake style)
- Solar-powered fairy or string lights
- Solar spotlights for trees or architectural features
- Rechargeable solar batteries (spares)
- Soft-bristle brush for cleaning panels
- Outdoor command hooks or zip ties
How to make it
- Map out your primary walkways and place stake-style solar lights every 3 to 5 feet, ensuring they are positioned in spots that receive at least 6 to 8 hours of direct sunlight daily.
- Weave solar-powered fairy lights through the branches of trees or along the top of a pergola, using clear zip ties to secure the wires without damaging the wood or bark.
- Place solar spotlights at the base of your most impressive plants or architectural features, angling them upward to create a dramatic ‘uplighting’ effect that adds depth to the landscape.
- Ensure the solar panels are tilted toward the southern sky if possible, and wipe them down weekly with a soft, damp cloth to remove dust and pollen that can block energy absorption.
- For a cozy ‘indoor’ feel outdoors, hang solar-powered Edison bulbs across a seating area, draping them slightly to create a relaxed, festive atmosphere.
- Mix different light temperatures, but try to stick to ‘warm white’ (approx 2700K) to keep the environment feeling inviting and natural rather than cold and blue.
How to Create a Pool Bar for Ultimate Summer Hosting
Why we love this
Imagine the condensation dripping off a chilled glass as you lean against the smooth, sun-warmed wood of your own private poolside bar. The air smells like coconut sunscreen and lime, and the sound of laughter mingles with the gentle splashing of water just inches away. It is the ultimate luxury of summer—a dedicated space for refreshing drinks and snacks that keeps the house dry and the party centered around the water. The combination of rustic wood accents and the cool, sparkling blue of the pool creates an irresistible vacation vibe right in your backyard.
Essential Elements:
- Weather-resistant wood (cedar, teak, or treated pine)
- Countertop material (stone, butcher block, or concrete)
- Built-in ice bucket or small outdoor fridge
- Outdoor-rated bar stools
- Corrugated metal or wood slat siding
- Heavy-duty casters (if making it mobile)
How to make it
- Build a sturdy rectangular frame using 4×4 pressure-treated posts for the corners and 2x4s for the horizontal supports, ensuring the bar stands at a standard 42-inch height.
- Clad the front and sides of the frame with your chosen material; corrugated metal offers a modern industrial look, while horizontal wood slats provide a more tropical, resort-style feel.
- Install a durable countertop that can withstand spills and sun; if using wood, apply at least three coats of marine-grade spar urethane to protect against water and UV damage.
- Cut a hole in the countertop to drop in a stainless steel ice bucket with a lid, allowing you to keep beverages cold without needing to run back to the kitchen.
- Add a shelf on the ‘bartender side’ for storing glassware, napkins, and mixers, keeping everything organized and off the main serving surface.
- Finish the project by adding a footrail made of galvanized pipe or a sturdy wood beam about 6 to 8 inches off the ground to ensure your guests can sit comfortably for hours.
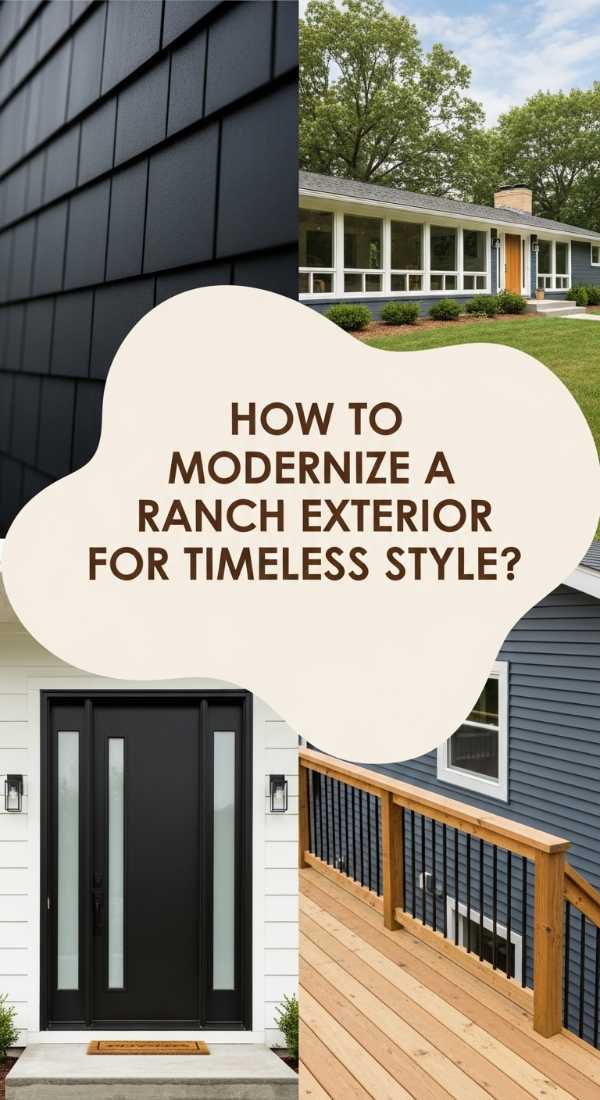
How to Modernize a Ranch Exterior for Timeless Style
[IMAGE_10]
Why we love this
There is a quiet dignity in a modernized ranch-style home, where the long, low lines are accentuated by a fresh, sophisticated color palette and crisp, black accents. The contrast between smooth, matte-finish siding and the warm, organic grain of a new wood front door creates a visual tension that is both contemporary and timeless. It’s the feeling of taking a classic piece of Americana and giving it a heartbeat for the 21st century—clean, minimalist, and undeniably welcoming, with every detail from the light fixtures to the house numbers feeling cohesive and deliberate.
Essential Elements:
- Modern exterior paint (charcoal, navy, or crisp white)
- Black or bronze hardware and light fixtures
- Natural wood accents (shutters, columns, or doors)
- Modern, oversized house numbers
- Updated mailbox and entry mat
- Low-profile landscaping
How to make it
- Choose a high-contrast color scheme, such as a deep ‘Iron Ore’ charcoal for the main body and a ‘Tricorn Black’ for the trim, which instantly makes the home look more architectural and expensive.
- Replace dated, ornate porch lights with sleek, matte black gooseneck or cylinder sconces that cast a focused, modern glow on the entry area.
- Swap out old plastic or painted shutters for custom-made cedar slat shutters, finished with a clear coat to highlight the natural orange and brown tones of the wood.
- Upgrade your front door to a modern design with frosted glass lites or a solid wood slab, ensuring the hardware matches the black or bronze finish of your new light fixtures.
- Install large, minimalist house numbers in a sans-serif font, mounting them either horizontally on the house or vertically on a dedicated wooden post for a high-end look.
- Keep the landscaping simple and structured by using boxwoods, ornamental grasses, and clean-edged stone borders that mimic the horizontal lines of the ranch architecture.
The Final Touch on Your DIY Journey
Stepping back and looking at a finished project—whether it’s a perfectly organized pantry or a glowing garden path—is one of the most rewarding feelings a homeowner can experience. These DIYs aren’t just about the ‘before and after’ photos; they’re about the pride of craftsmanship and the joy of living in a space that truly reflects your style. Start small, be patient with the process, and remember that every coat of paint and every planted flower is a step toward making your house feel like the home you’ve always dreamed of.