
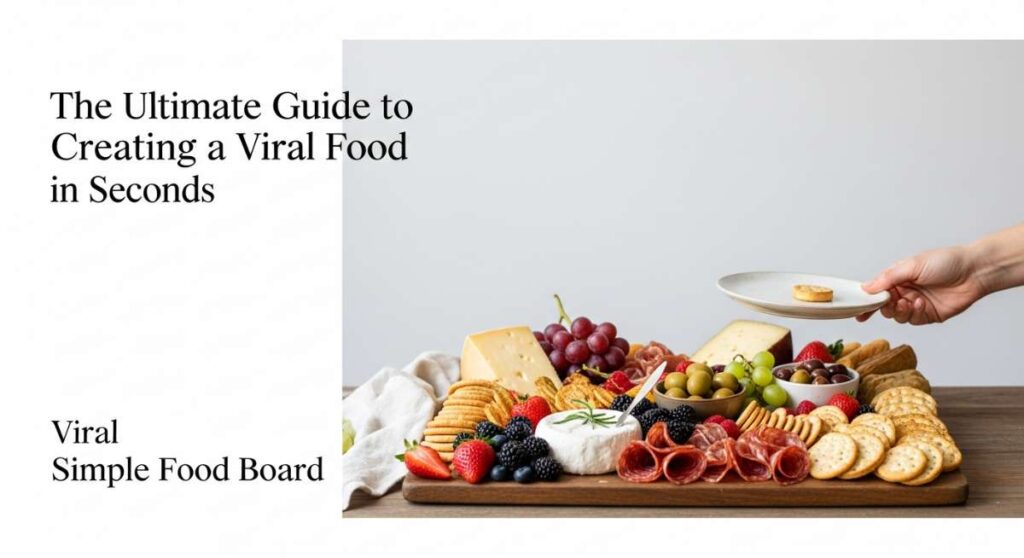
Have you ever scrolled through your feed and felt that instant spark of inspiration from a perfectly curated food board? There is something incredibly magical about the way a beautiful spread can bring people together, turning a simple Tuesday afternoon into a celebration of flavor and aesthetics. I remember the first time I set out a viral food board for my friends; the room went quiet for a second before everyone reached for their phones to capture the masterpiece. It’s not just about the food; it’s about the warmth, the shared joy, and the creative expression that goes into every single bite.
Creating a viral-worthy board doesn’t require a culinary degree or hours of stressful prep work. In fact, the secret to those stunning Pinterest-perfect spreads lies in the balance of textures, colors, and simple, high-quality ingredients that speak for themselves. This guide is your ultimate roadmap to crafting a ‘Viral Simple Food Board’ that will have your guests swooning and your notifications blowing up. We are going to dive into the most requested, most shared treats that look high-end but are secretly easy to master right in your own kitchen.
How to make viral brownies?
Why we love this
There is nothing quite like the intoxicating aroma of rich, dark chocolate wafting through the house as a batch of viral brownies reaches its peak in the oven. These aren’t your average box-mix squares; they boast a crackly, tissue-paper-thin top that shatters delicately with every bite, revealing a center so fudgy and decadent it almost feels like ganache. The deep, bittersweet notes of high-quality cacao are perfectly balanced by a hint of flaky sea salt, creating a sensory experience that is both comforting and sophisticated. It’s that perfect contrast between the chewy edges and the melt-in-your-mouth interior that makes these an absolute staple for any dessert board.
Ingredients
- 1 cup unsalted butter, melted and browned
- 2 cups granulated sugar
- 3 large eggs, room temperature
- 1 tablespoon vanilla bean paste
- 1 cup Dutch-processed cocoa powder
- 1 cup all-purpose flour
- 1 teaspoon sea salt
- 1/2 cup dark chocolate chunks
How to make it
- Begin by browning your butter in a light-colored saucepan over medium heat; whisk constantly until the butter foams, smells nutty, and you see golden-brown bits at the bottom. This adds a toasted depth that is essential for the viral flavor profile.
- In a large mixing bowl, vigorously whisk the melted brown butter and granulated sugar for at least two minutes. This aeration process is the secret to achieving that signature shiny, crackled top.
- Add the eggs one at a time, whisking thoroughly after each addition until the batter is glossy and thick. Stir in the vanilla bean paste for those beautiful black flecks.
- Sift in the cocoa powder, flour, and salt. Use a rubber spatula to gently fold the dry ingredients into the wet until just combined—over-mixing at this stage will lead to a cakey texture rather than a fudgy one.
- Gently fold in the dark chocolate chunks. Pour the batter into a parchment-lined 8×8 inch baking pan and smooth the top.
- Bake at 350°F (175°C) for 25-30 minutes. You’ll know they are ready when the edges are set but the center still has a slight jiggle. Let them cool completely in the pan to allow the structure to set before slicing into clean, sharp squares.
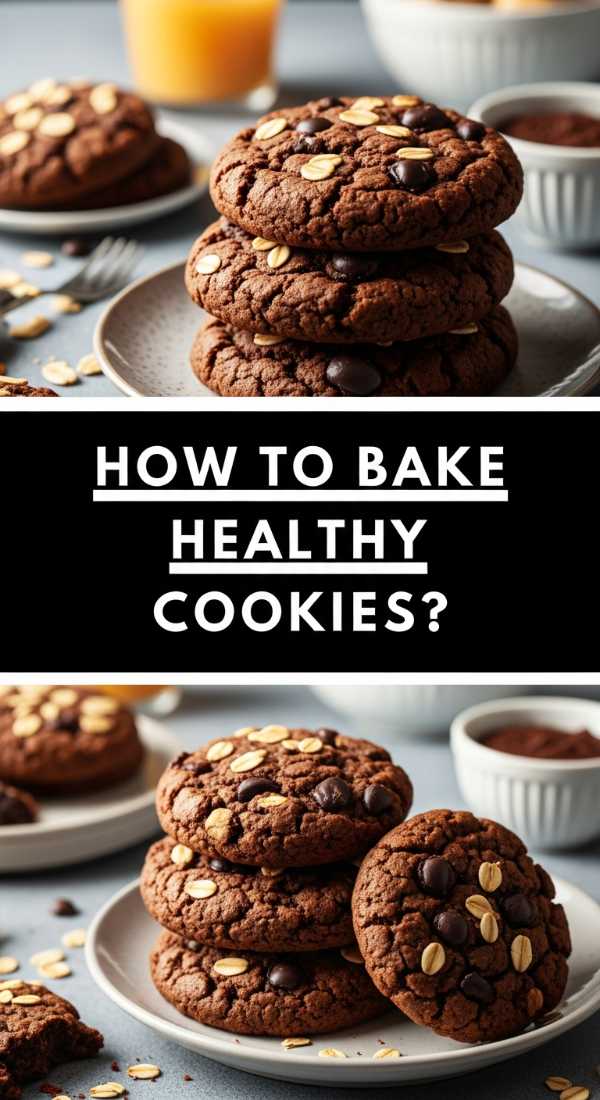
How to bake healthy cookies?
Why we love this
Healthy cookies often get a bad reputation for being dry, but these are a total game-changer with their chewy, soft-baked texture and nutty undertones. Imagine the scent of toasted oats and warm cinnamon filling your kitchen, promising a treat that nourishes the soul as much as the body. These cookies have a beautiful golden hue and a rustic charm that looks incredible nestled next to fresh berries on a food board. They provide a satisfying crunch from the nuts and a natural sweetness that doesn’t leave you with a sugar crash, making them the perfect guilt-free addition to your viral spread.
Ingredients
- 2 ripe bananas, mashed
- 1.5 cups rolled oats
- 1/2 cup almond butter (drippy consistency)
- 1/4 cup maple syrup
- 1 teaspoon cinnamon
- 1/2 cup sugar-free chocolate chips
- A pinch of salt
How to make it
- Preheat your oven to 325°F (160°C). A lower temperature is key here to ensure the natural sugars in the banana don’t burn before the oats are toasted.
- In a medium bowl, mash the bananas until they are almost liquid with very few lumps. Stir in the almond butter and maple syrup until the mixture is completely emulsified and smooth.
- Add the rolled oats, cinnamon, and salt. Stir the mixture until every oat flake is thoroughly coated in the wet base. Let the dough sit for 5 minutes; this allows the oats to hydrate, resulting in a much better texture.
- Fold in your chocolate chips. Using a cookie scoop, place even rounds onto a silicone baking mat or parchment paper. Gently flatten the tops with the back of a spoon, as these cookies won’t spread much on their own.
- Bake for 12-15 minutes until the bottoms are lightly browned and the tops feel firm to the touch.
- Allow them to cool on the baking sheet for at least 10 minutes. This cooling phase is crucial for the structure to firm up, as healthy cookies are delicate when hot.
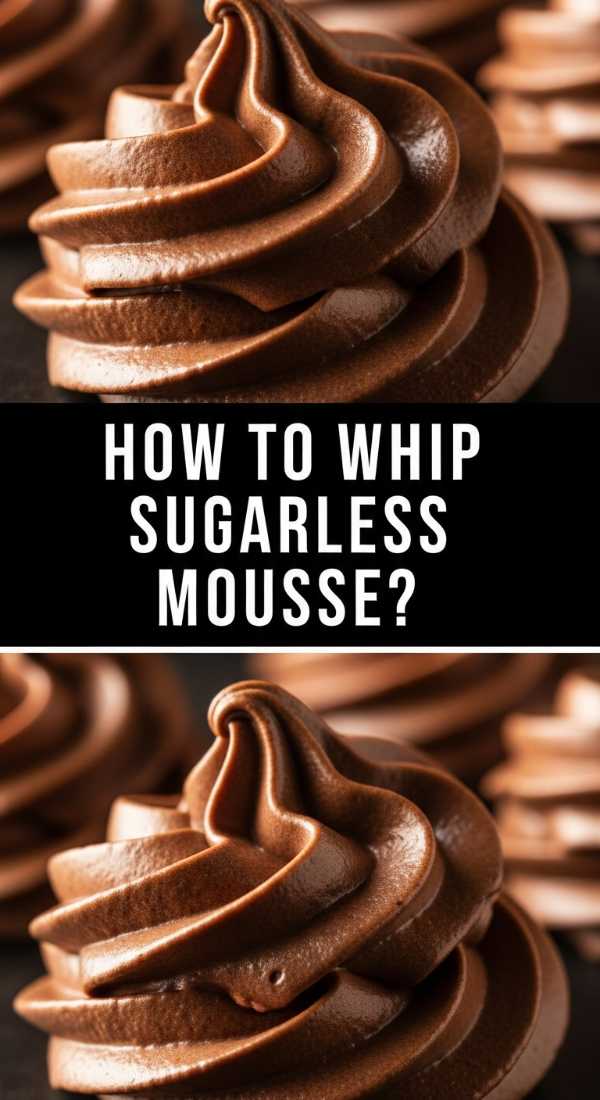
How to whip sugarless mousse?
Why we love this
This sugarless mousse is an ethereal cloud of pure chocolate bliss that feels impossibly light on the tongue yet incredibly rich in flavor. When you dip a spoon into its velvety depths, you can hear the tiny air bubbles popping, a testament to its airy, whipped perfection. The bitterness of the cacao is softened by the creamy base, creating a sophisticated dessert that feels like something served in a high-end Parisian bistro. It’s the ultimate dip for a fruit board, providing a dark, decadent contrast to the bright acidity of fresh strawberries and raspberries without the heaviness of traditional sugar-laden desserts.
Ingredients
- 1 cup heavy whipping cream (or chilled coconut cream)
- 1/4 cup unsweetened cocoa powder
- 1/3 cup powdered erythritol or monk fruit sweetener
- 1 teaspoon pure vanilla extract
- A pinch of espresso powder (optional, to enhance chocolate flavor)
How to make it
- Place your mixing bowl and whisk attachment in the freezer for 10 minutes before starting. A cold bowl is essential for achieving maximum volume when whipping cream without sugar.
- Pour the chilled heavy cream into the cold bowl and begin whisking on low speed, gradually increasing to medium-high as the cream begins to thicken.
- Once the cream reaches soft peaks (where the trail of the whisk stays visible for a moment), sift in the cocoa powder, sweetener, and espresso powder. Sifting is non-negotiable to avoid lumps in your sugar-free mousse.
- Add the vanilla extract and continue to whip on high speed until stiff peaks form. Be careful not to over-whip, or the mixture will become grainy and turn into chocolate butter.
- The mousse should be thick enough to hold its shape but light enough to feel like a cloud. Transfer to a piping bag or a decorative bowl for your board.
- Chill in the refrigerator for at least one hour before serving to allow the flavors to meld and the texture to firm up perfectly.
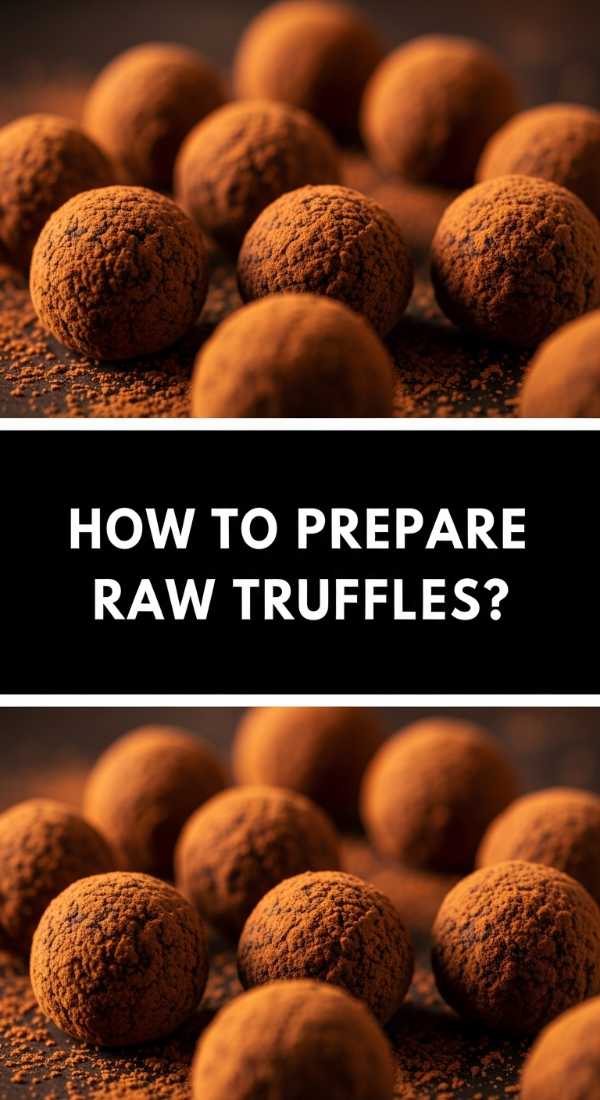
How to prepare raw truffles?
Why we love this
Raw truffles are the crown jewels of any viral food board, looking like artisan chocolates but made entirely from wholesome, earth-grown ingredients. They have a dense, satisfying chewiness and a rich, earthy flavor profile that feels deeply indulgent. The outer coating—whether it’s bright green pistachio dust, dark cocoa, or golden shredded coconut—adds a beautiful textural contrast and a pop of color that makes the board look professionally styled. Each bite is an explosion of natural sweetness from dates combined with the savory richness of nuts, making them a crowd favorite that caters to almost every dietary preference.
Ingredients
- 1 cup Medjool dates, pitted and soaked
- 1 cup walnuts or pecans
- 3 tablespoons raw cacao powder
- 1 tablespoon chia seeds
- 1/2 teaspoon sea salt
- Coating: Hemp seeds, shredded coconut, or extra cacao
How to make it
- Soak the pitted Medjool dates in warm water for 10 minutes to soften them. Drain thoroughly and pat dry; excess moisture will prevent the truffles from holding their shape.
- Place the walnuts in a food processor and pulse until they are broken down into a fine, sandy meal. Do not over-process or you will end up with nut butter.
- Add the softened dates, cacao powder, chia seeds, and salt to the food processor. Process on high until the mixture forms a large, sticky ball that pulls away from the sides of the bowl.
- Check the consistency by pinching a small amount; it should stick together easily without being overly greasy. If it’s too wet, add a tablespoon of ground flax or more nuts.
- Scoop out tablespoon-sized portions and roll them firmly between your palms to create smooth, even spheres.
- Immediately roll each truffle in your chosen coating while the surface is still slightly tacky. Place them on a tray and refrigerate for 30 minutes to set before arranging them on your board.
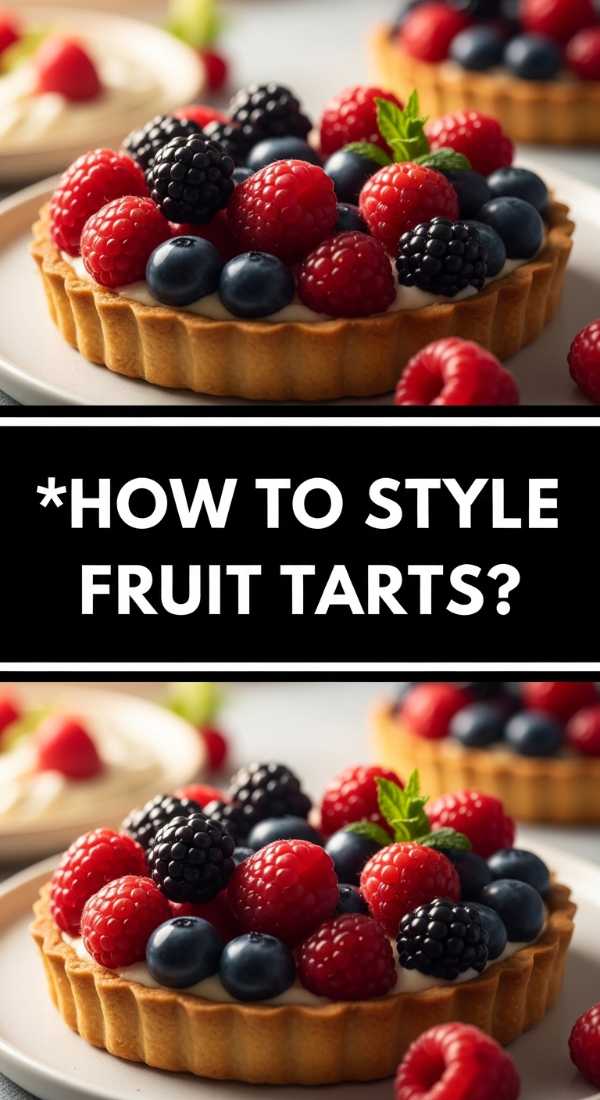
How to style fruit tarts?
Why we love this
A beautifully styled fruit tart acts as the vibrant centerpiece of a food board, drawing the eye with its kaleidoscope of fresh, seasonal colors. There is a wonderful contrast between the buttery, shortbread-like crust and the silky, cool pastry cream that lies beneath the fruit. The berries and kiwi slices provide a burst of refreshing tartness that cuts through the richness, while a light apricot glaze gives the whole thing a professional, high-gloss shine that looks stunning under any lighting. It’s a celebration of nature’s candy, arranged with a geometric precision that feels both artistic and inviting.
Ingredients
- 1 pre-baked 9-inch shortcrust pastry shell
- 1 cup vanilla pastry cream or thick Greek yogurt
- 2 cups assorted fresh fruit (strawberries, blueberries, kiwi, mango)
- 2 tablespoons apricot preserves (for glaze)
- Fresh mint leaves for garnish
How to make it
- Ensure your pre-baked pastry shell is completely cool before filling. If the shell is even slightly warm, the filling will melt and cause the crust to become soggy.
- Spread a thick, even layer of pastry cream or Greek yogurt across the bottom of the shell, using an offset spatula to reach the very edges.
- Prepare your fruit by washing and drying it thoroughly. Slice larger fruits like strawberries and kiwi into uniform, thin slices to make the styling easier.
- Starting from the outer edge of the tart, arrange the fruit in concentric circles. Overlap the slices slightly to create a ‘rose’ effect, working your way toward the center. Use smaller berries to fill in any gaps for a lush, full look.
- Heat the apricot preserves with a teaspoon of water in the microwave for 15 seconds, then strain to remove lumps. Gently brush this warm glaze over the fruit using a pastry brush. This adds shine and prevents the fruit from drying out.
- Garnish with a few tiny mint leaves in the center for a pop of green. Chill for at least 30 minutes before serving to ensure the tart is easy to slice.
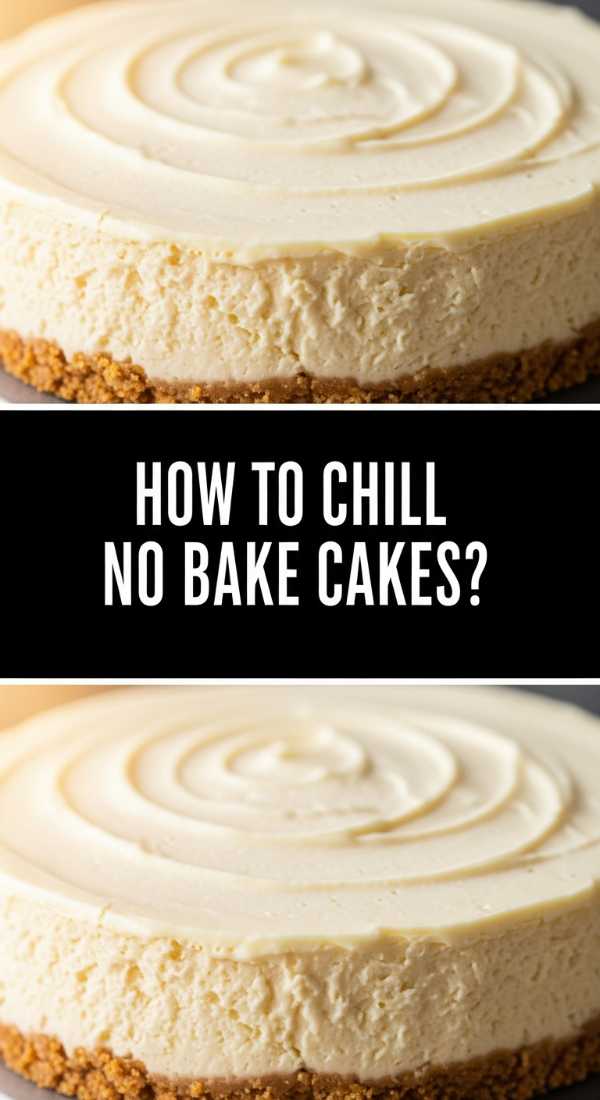
How to chill no bake cakes?
Why we love this
No-bake cakes are the ultimate secret weapon for the busy host, offering a creamy, cheesecake-like indulgence without ever having to turn on the oven. The texture is exceptionally smooth and light, often featuring a crumbly, salty-sweet base that provides the perfect foundation for a luscious filling. As the cake chills, the flavors intensify and the texture transforms into a firm yet velvety consistency that slices like a dream. Serving a chilled no-bake cake on your board adds an element of cool refreshment that balances out heavier baked goods, making it a versatile favorite for summer gatherings and holiday parties alike.
Ingredients
- 2 cups graham cracker crumbs
- 1/2 cup melted butter
- 16 oz cream cheese, softened
- 1 cup heavy cream, whipped
- 1/2 cup powdered sugar
- 1 teaspoon lemon juice
- Fresh berries for topping
How to make it
- Mix the graham cracker crumbs with melted butter until the mixture resembles wet sand. Press this firmly into the bottom of a springform pan, using the bottom of a flat glass to ensure the crust is compact and even.
- Chill the crust in the freezer for 15 minutes while you prepare the filling. This ‘flash-chill’ helps the crust stay together when the filling is added.
- In a large bowl, beat the softened cream cheese with powdered sugar and lemon juice until completely smooth and free of lumps.
- Gently fold in the whipped heavy cream. Folding is key here; you want to maintain the airiness of the cream to keep the cake light rather than dense.
- Pour the filling over the chilled crust and smooth the top with a spatula. Tap the pan on the counter a few times to release any trapped air bubbles.
- Cover with plastic wrap and chill in the deepest part of the refrigerator (usually the back) for a minimum of 6 hours, though overnight is best. For a viral ‘clean cut’ look, place the cake in the freezer for 30 minutes right before slicing.
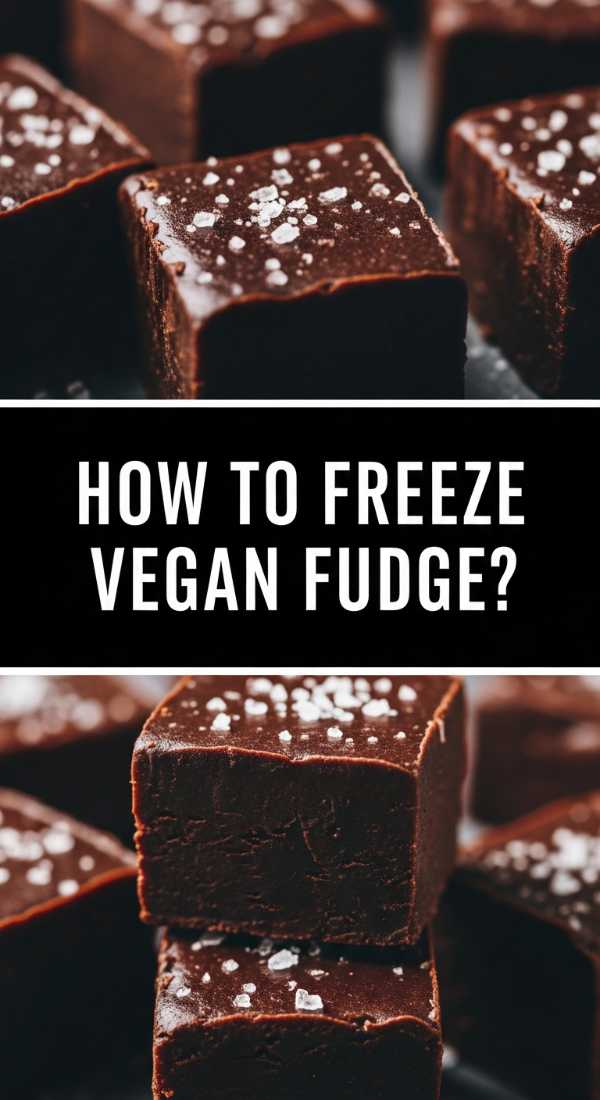
How to freeze vegan fudge?
Why we love this
Vegan fudge is a revelation of smooth, melt-in-your-mouth richness that relies on the natural creaminess of coconut and nut butters. It has a glossy finish and a deep, concentrated flavor that makes a little square go a long way. Because it’s stored in the freezer, it has a unique, cooling mouthfeel that slowly gives way to a decadent, buttery texture as it warms up on your tongue. It’s a sophisticated addition to a board, especially when topped with crushed nuts or a swirl of tahini, providing a gourmet touch that feels incredibly modern and inclusive for all your guests.
Ingredients
- 1/2 cup coconut oil, melted
- 1/2 cup creamy almond or peanut butter
- 1/2 cup maple syrup
- 1/2 cup unsweetened cocoa powder
- 1 teaspoon vanilla extract
- Flaky sea salt for topping
How to make it
- In a heat-proof bowl, whisk together the melted coconut oil, nut butter, and maple syrup until the mixture is completely uniform and has a silky sheen.
- Sift in the cocoa powder to ensure there are no clumps, then add the vanilla extract. Whisk vigorously until the mixture thickens slightly and looks like liquid gold.
- Line a small rectangular container with parchment paper, leaving an overhang on the sides to act as handles for easy removal later.
- Pour the fudge mixture into the container. At this stage, you can swirl in extra nut butter or sprinkle with sea salt for that viral aesthetic.
- Place the container on a level surface in the freezer. Freezing is essential for vegan fudge as coconut oil is liquid at room temperature; the freezer ‘sets’ the molecular structure into a solid block.
- Freeze for at least 2-3 hours. Once solid, use the parchment handles to lift the block out and slice into small, sharp cubes using a knife dipped in hot water for the cleanest edges. Keep frozen until the moment of serving.
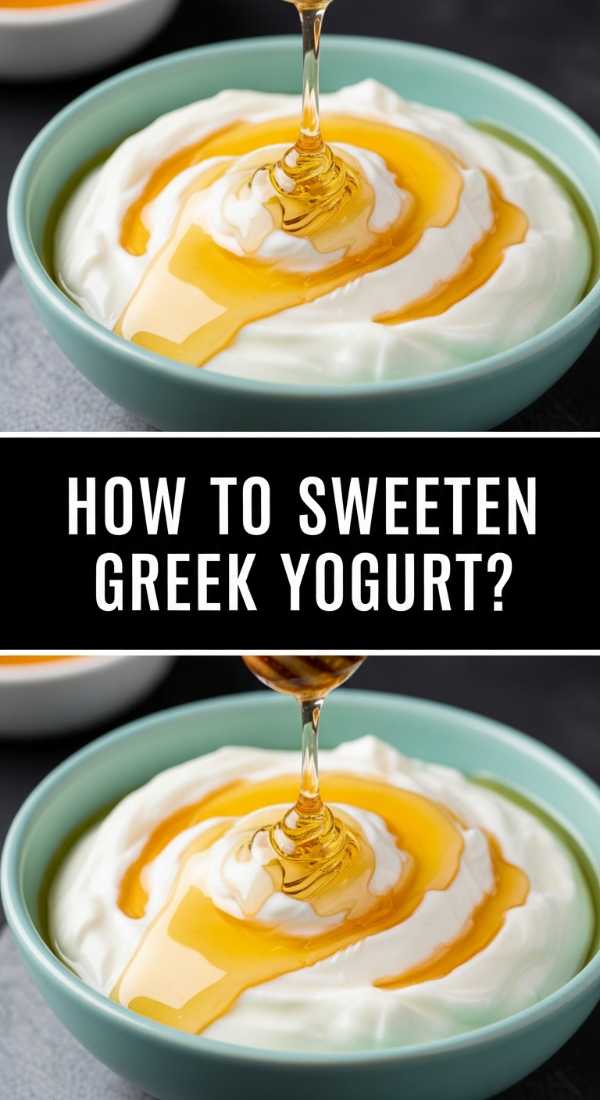
How to sweeten greek yogurt?
Why we love this
Greek yogurt is the perfect ‘blank canvas’ for a food board, offering a tangy, creamy counterpoint to the sweet elements spread throughout. When sweetened correctly, it takes on a luxurious, dessert-like quality that reminds one of thick Devonshire cream or a light cheesecake mousse. The subtle tang helps to cleanse the palate between bites of rich chocolate or dense fudge, making the entire eating experience more balanced. Swirled with honey and topped with a dusting of cinnamon, it looks rustic and inviting, serving as both a dip and a standalone treat that everyone can enjoy.
Ingredients
- 2 cups plain, full-fat Greek yogurt
- 2 tablespoons high-quality honey or agave
- 1/2 teaspoon vanilla bean paste
- 1/4 teaspoon ground cinnamon
- Optional: Fresh orange zest for brightness
How to make it
- Start with cold, full-fat Greek yogurt. The fat content is vital for that thick, indulgent mouthfeel that makes it board-worthy; low-fat versions can be too watery.
- In a small bowl, mix the honey and vanilla bean paste. If your honey is crystallized, warm it for 5 seconds in the microwave so it incorporates smoothly without leaving streaks.
- Fold the honey mixture into the yogurt using a gentle circular motion. Don’t over-mix if you want to see beautiful golden ribbons of honey throughout the white yogurt.
- Add a pinch of cinnamon and a touch of orange zest. The zest releases aromatic oils that make the yogurt smell heavenly and taste much more complex.
- Transfer the yogurt to a shallow serving bowl. Use the back of a spoon to create ‘swooshes’ and well-defined ridges on the surface.
- Drizzle a tiny bit of extra honey into the ridges just before serving. This creates a glistening effect that looks amazing in photos and adds a burst of sweetness to the first bite.
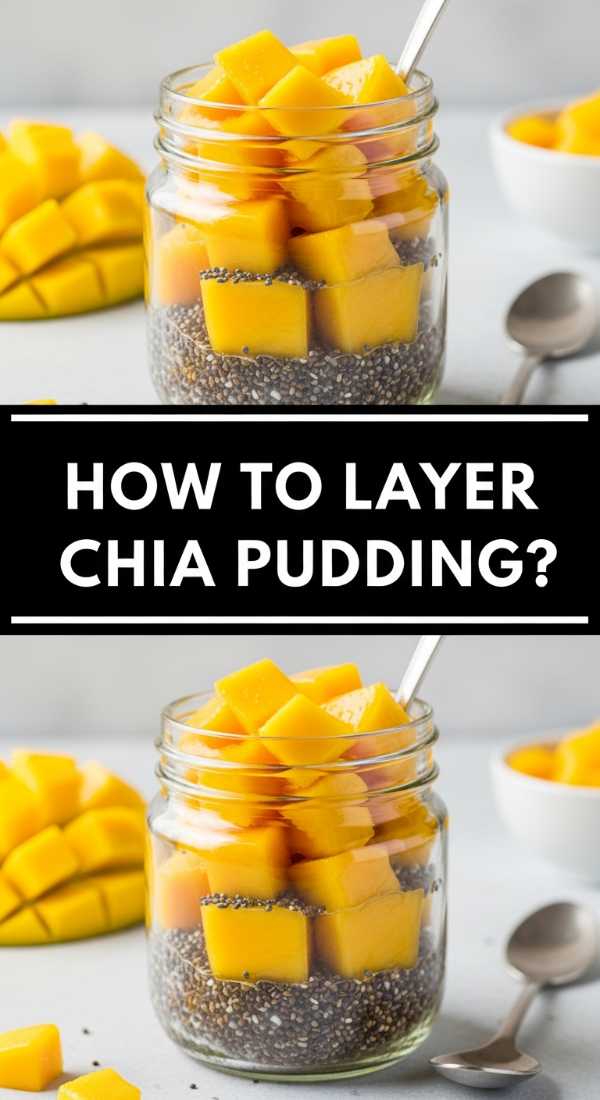
How to layer chia pudding?
[IMAGE_9]
Why we love this
Chia pudding brings a playful, pearl-like texture to your board that is as fun to eat as it is beautiful to look at. When layered in small glass jars, it creates a striking visual effect, especially when contrasted with vibrant fruit purees or crunchy granola. The pudding itself is cool and refreshing, with the chia seeds having expanded into soft, jelly-like spheres that carry the flavors of coconut or almond milk beautifully. It’s a modern, health-conscious addition that provides a wonderful ‘scoopable’ element to the board, allowing guests to customize their own mini-parfaits with the other toppings available.
Ingredients
- 1/4 cup chia seeds
- 1 cup unsweetened coconut milk (from a carton)
- 1 tablespoon maple syrup
- 1/2 teaspoon vanilla extract
- Layering: Raspberry coulis, mango puree, or almond butter
How to make it
- In a mason jar, combine the chia seeds, coconut milk, maple syrup, and vanilla. Stir vigorously for at least 2 minutes to ensure no seeds are clumping at the bottom.
- Wait 5 minutes and stir again. This second stir is the professional secret to a perfect pudding; it breaks up any ‘seed clumps’ that formed as the outer shells began to gel.
- Cover and refrigerate for at least 4 hours, or ideally overnight. The pudding should be thick enough to hold a spoon upright.
- To layer for the board, use small, clear glass votives or jars. Begin with a spoonful of fruit puree or nut butter at the very bottom for a ‘surprise’ base.
- Carefully spoon the chia pudding on top, being careful not to smudge the sides of the glass so the layers remain distinct and sharp.
- Add another thin layer of fruit or a topping like hemp seeds on top. Wipe the rim of the glass for a clean, professional finish before placing the jars in a cluster on your food board.
Conclusion
Creating a viral food board is truly an art form that anyone can master with a little bit of heart and the right techniques. By focusing on a variety of textures—from the fudgy depth of brownies to the airy lightness of sugarless mousse—you create a landscape of flavors that invites exploration and conversation. Remember, the best boards are the ones that reflect your personal style and the love you have for your guests. So, gather your ingredients, find your favorite platter, and start building something beautiful today. Your viral moment is just a spread away!