
Forget Cooking: This Simple Food Board is Your New Best Friend
We’ve all been there—standing in the kitchen at 6 PM, staring into a fridge that feels more like a puzzle than a pantry, while the weight of the day still hangs heavy on our shoulders. The constant cycle of ‘what’s for dinner’ can feel like a chore, but what if we shifted the perspective? Instead of a single, stressful plated meal, imagine a giant, rustic wooden board overflowing with textures, colors, and comforting flavors that everyone can pick at their own pace.
This viral simple food board isn’t just about feeding people; it’s about creating an experience that feels like a warm hug. It’s the ultimate lifestyle hack for the busy soul who craves the coziness of a home-cooked meal without the rigid structure of a three-course sit-down dinner. By mastering a few key elements—from the perfect sear on a steak to the earthy depth of a mushroom sauce—you can assemble a masterpiece that looks like it belongs on a magazine cover but feels like home.
How to cook juicy steak

Why we love this
There is something primal and deeply satisfying about a perfectly cooked steak, its exterior boasting a dark, caramelized crust while the inside remains a tender, blushing pink. The aroma of butter swirling with fresh thyme and crushed garlic in a hot pan is enough to bring anyone to the kitchen. As you slice into it, the juices pool slightly, inviting you to dip a crusty piece of bread or a forkful of mash into that rich, meaty goodness. It’s the centerpiece of any great board, offering a high-protein punch that feels incredibly indulgent yet simple.
Ingredients
- 2 thick-cut Ribeye or New York Strip steaks (room temperature)
- 3 tablespoons unsalted butter
- 4 cloves garlic, smashed
- 3 sprigs fresh thyme or rosemary
- Kosher salt and freshly cracked black pepper
- 2 tablespoons high-smoke point oil (avocado or grapeseed)
How to make it
- Begin by patting your steaks completely dry with paper towels; moisture is the enemy of a good sear, and a dry surface ensures that beautiful brown crust.
- Season aggressively with kosher salt and cracked black pepper on all sides, including the edges, pressing the seasoning into the meat.
- Heat a heavy cast-iron skillet over medium-high heat until it is just starting to wisps of smoke, then add your oil, swirling to coat the bottom.
- Carefully lay the steaks into the pan, laying them away from you to avoid oil splashes, and sear undisturbed for 3-4 minutes until a deep brown crust forms.
- Flip the steaks using tongs and immediately add the butter, garlic cloves, and herbs to the pan; as the butter melts and foams, tilt the pan slightly.
- Use a large spoon to continuously baste the steaks with the hot, herb-infused butter for another 3 minutes, which adds moisture and deep flavor.
- Check the internal temperature with a meat thermometer, aiming for 130°F-135°F for medium-rare, then remove to a cutting board.
- Crucially, let the steak rest for at least 8-10 minutes before slicing to allow the fibers to relax and the juices to redistribute throughout the meat.
How to bake chocolate bars

Why we love this
Nothing rounds out a grazing board quite like a touch of homemade sweetness, and these dense, fudgy baked chocolate bars are the ultimate crowd-pleaser. They fill the entire house with a rich, cocoa-heavy scent that lingers long after the oven is turned off. The texture is a dream—crispy, crackly on the top with a center that is almost like a ganache, melting on the tongue with every bite. Topped with a sprinkle of sea salt, they provide that perfect balance of sweet and savory that keeps you coming back for just one more piece.
Ingredients
- 1 cup unsalted butter, melted and cooled
- 2 cups granulated sugar
- 4 large eggs, room temperature
- 1 cup unsweetened cocoa powder
- 1 cup all-purpose flour
- 1 teaspoon vanilla extract
- 1/2 teaspoon sea salt
- 1 cup dark chocolate chunks
How to make it
- Preheat your oven to 350°F (175°C) and line an 8×8 inch square baking pan with parchment paper, leaving an overhang on the sides for easy removal.
- In a large mixing bowl, whisk together the melted butter and sugar until the mixture looks slightly grainy but well-combined.
- Add the eggs one at a time, whisking vigorously after each addition to incorporate air, which creates that iconic crackly top.
- Stir in the vanilla extract, then sift in the cocoa powder and flour to ensure there are no lumps in your batter.
- Gently fold the dry ingredients into the wet using a spatula until just combined; be careful not to overmix, as this can make the bars tough.
- Fold in the dark chocolate chunks, then pour the thick batter into the prepared pan and smooth the top with the back of a spoon.
- Bake for 25-30 minutes; you are looking for the edges to be set and the center to have a slight wobble, as they will firm up while cooling.
- Allow the bars to cool completely in the pan before lifting them out by the parchment paper and slicing into thick, decadent rectangles.
How to make creamy mash

Why we love this
Creamy mashed potatoes are the literal glue that holds a food board together, providing a velvety, buttery base for everything else to rest upon. The texture should be as smooth as silk, flowing across the board with a richness that feels like pure comfort in a bowl. Each spoonful carries the delicate aroma of warm cream and roasted garlic, creating a neutral yet luxurious canvas that soaks up sauces and meat juices perfectly. It’s the kind of side dish that feels like a warm embrace on a cold evening, grounding the entire meal.
Ingredients
- 2 lbs Yukon Gold potatoes, peeled and chopped
- 1/2 cup heavy cream
- 4 tablespoons unsalted butter, softened
- 3 cloves garlic, minced
- Salt and white pepper to taste
- Fresh chives for garnish
How to make it
- Place your peeled and chopped potatoes into a large pot of cold, heavily salted water; starting with cold water ensures the potatoes cook evenly throughout.
- Bring the water to a rolling boil over high heat, then reduce to a simmer and cook for 15-20 minutes until the potatoes are fork-tender.
- While the potatoes cook, heat the heavy cream, butter, and minced garlic in a small saucepan over low heat until the butter is melted and the garlic is fragrant.
- Drain the potatoes thoroughly in a colander, then return them to the hot pot for 1 minute over low heat to steam off any excess moisture.
- For the smoothest texture, pass the potatoes through a potato ricer or food mill into a clean bowl; alternatively, use a hand masher for a more rustic feel.
- Slowly fold the warm cream and butter mixture into the potatoes using a wooden spoon, stirring gently until the liquid is fully absorbed and the mash is fluffy.
- Season with salt and white pepper, adjusting to your taste, and keep warm until you are ready to smear a generous dollop onto your board.
How to roast garlic broccoli

Why we love this
Roasting broccoli transforms it from a humble vegetable into a charred, nutty delicacy that adds much-needed crunch and brightness to your board. The high heat of the oven caramelizes the edges of the florets, creating little ‘trees’ of flavor that are crispy on the outside and tender within. The scent of toasted garlic mingling with the earthy green aroma of the broccoli is intoxicating, especially when finished with a squeeze of fresh lemon. It provides a vibrant pop of color and a healthy, fiber-rich balance to the richer elements of the meal.
Ingredients
- 2 large heads of broccoli, cut into florets
- 3 tablespoons olive oil
- 4 cloves garlic, thinly sliced
- 1/2 teaspoon red pepper flakes (optional)
- Salt and black pepper
- Zest and juice of half a lemon
How to make it
- Preheat your oven to 425°F (220°C) and ensure your baking sheet is clean and dry; a hot oven is key to achieving those crispy, charred edges.
- In a large bowl, toss the broccoli florets with olive oil, sliced garlic, salt, pepper, and red pepper flakes until every piece is evenly coated.
- Spread the broccoli out in a single layer on the baking sheet, making sure not to overcrowd the pan, which would cause the broccoli to steam rather than roast.
- Place the pan in the oven and roast for 15-20 minutes, tossing the florets halfway through the cooking time to ensure even browning.
- Look for the edges to be dark brown or even slightly blackened and the stems to be easily pierced with a fork.
- Remove from the oven and immediately sprinkle with lemon zest and a squeeze of fresh lemon juice while the broccoli is still piping hot.
- Taste and add an extra pinch of salt if needed, then arrange the warm florets in clusters across your food board for a beautiful presentation.
How to slow cook beef
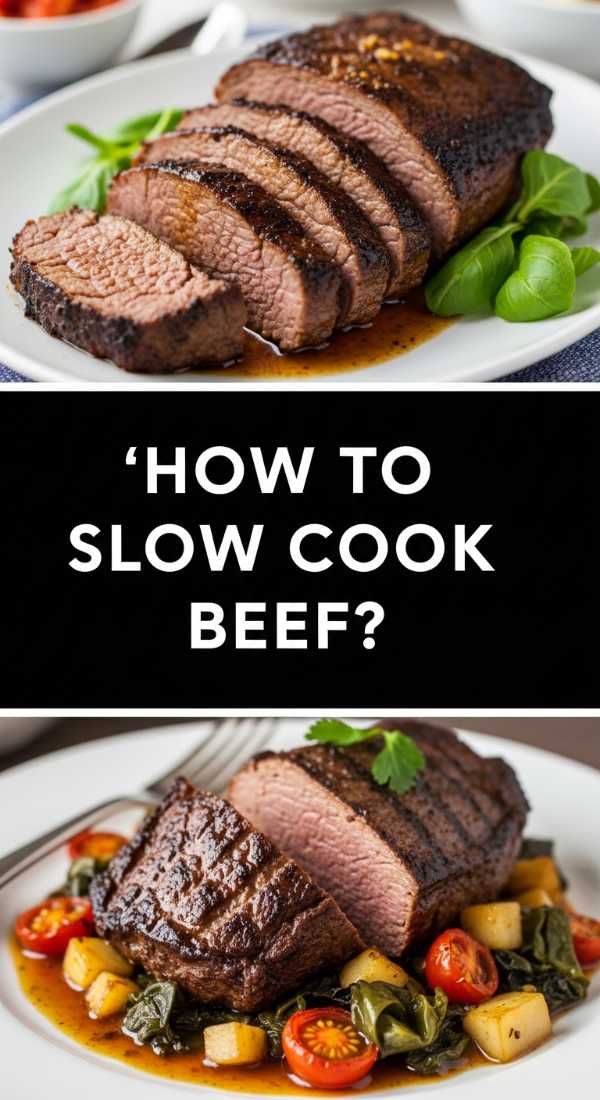
Why we love this
Slow-cooked beef is the epitome of ‘set it and forget it’ luxury, resulting in meat so tender that it collapses at the mere suggestion of a fork. As it simmers for hours in a rich bath of red wine and aromatics, the connective tissues melt away, leaving behind succulent shards of beef saturated with deep, savory flavor. The aroma that fills your home as it cooks is warm and inviting, promising a meal that is both hearty and sophisticated. It adds a rustic, soul-warming element to the board that feels like it’s been simmering in a farmhouse kitchen all day.
Ingredients
- 3 lbs beef chuck roast, cut into large chunks
- 1 cup dry red wine (like Cabernet)
- 2 cups beef bone broth
- 2 tablespoons tomato paste
- 2 carrots, chopped
- 1 large onion, diced
- 3 sprigs fresh thyme
- Salt, pepper, and flour for dredging
How to make it
- Season the beef chunks generously with salt and pepper, then lightly dredge them in flour, shaking off any excess.
- In a large skillet over medium-high heat, sear the beef in batches until a deep brown crust forms on all sides, then transfer the meat to your slow cooker.
- In the same skillet, sauté the onions and carrots for 5 minutes, then stir in the tomato paste and cook for 1 minute to remove the raw metallic taste.
- Deglaze the pan with the red wine, scraping up all the brown bits (fond) from the bottom of the pan, then pour this liquid over the beef.
- Add the beef broth and thyme sprigs to the slow cooker, ensuring the liquid covers at least two-thirds of the meat.
- Cover and cook on Low for 8 hours or on High for 4-5 hours until the beef is incredibly tender and easily shreds with a fork.
- Once cooked, remove the beef and strain the liquid into a saucepan, simmering it on the stove for 10 minutes to reduce it into a thick, glossy gravy.
- Pour the gravy back over the beef and serve it in a shallow bowl nestled directly on your food board for guests to help themselves.
How to prep healthy meals

Why we love this
Meal prepping for a food board is the ultimate way to ensure you always have a vibrant, nutritious spread ready to go without the daily stress of chopping and cleaning. There is a deep sense of satisfaction in seeing rows of colorful, prepped ingredients in the fridge, ready to be assembled into a feast at a moment’s notice. It turns healthy eating into a visual delight, making it easier to reach for nutrient-dense veggies and proteins. This approach emphasizes freshness and variety, allowing you to mix and match flavors throughout the week so you never feel bored with your diet.
Ingredients
- Assorted raw vegetables (bell peppers, cucumbers, carrots)
- Pre-cooked grains (quinoa or brown rice)
- Hard-boiled eggs
- Wash and dried leafy greens
- Lemon-tahini dressing
- Roasted chickpeas or nuts
How to make it
- Dedicate a 90-minute block on a Sunday to wash, peel, and slice all your raw vegetables into uniform sticks or bite-sized pieces for easy grabbing.
- Store the sliced vegetables in airtight glass containers with a damp paper towel to maintain crispness and prevent them from drying out.
- Cook a large batch of grains in salted water or broth, then fluff them with a fork and store them in the fridge to use as a base for your board components.
- Boil a dozen eggs for exactly 9 minutes, then immediately plunge them into an ice bath to ensure they peel easily and have a creamy yolk.
- Whisk together a large jar of versatile dressing using tahini, lemon juice, garlic, and olive oil, storing it in the fridge to use as a dip or a drizzle.
- When it’s time to eat, simply pull out your prepped containers and arrange the items on your board, adding a few fresh elements like sliced avocado or herbs.
- This method reduces food waste and ensures that even on your busiest days, you can assemble a professional-looking, healthy board in under 10 minutes.
How to bake sweet potatoes

Why we love this
Baked sweet potatoes are like nature’s candy, offering a creamy, orange interior that is bursting with natural sweetness and a hint of caramel. When baked properly, the skin becomes slightly crisp and papery, while the inside turns into a fluffy, vibrant puree that pairs beautifully with both sweet and savory toppings. They add a gorgeous pop of color to your board and provide a complex carbohydrate source that keeps you full and energized. The smell of sweet potatoes roasting is warm and autumnal, making the whole kitchen feel like a sanctuary.
Ingredients
- 4 medium sweet potatoes, scrubbed clean
- 2 tablespoons olive oil
- 1 teaspoon sea salt
- Optional: Cinnamon and honey or butter and chives
How to make it
- Preheat your oven to 400°F (200°C) and line a baking sheet with foil or parchment paper to catch any sugary drips that might leak out.
- Scrub the sweet potatoes thoroughly under cold water to remove any dirt, then pat them completely dry with a kitchen towel.
- Use a fork to prick the skin of each potato 5-6 times; this allows steam to escape during the baking process and prevents the potatoes from bursting.
- Rub the skins with a thin layer of olive oil and a generous sprinkle of sea salt, which helps the skin crisp up and enhances the flavor.
- Place the potatoes on the baking sheet and bake for 45-60 minutes, depending on their size, until they feel very soft when squeezed (use a mitt!).
- For an extra caramelized finish, let them bake until a little bit of the internal sugar starts to bubble out through the fork holes and turns dark brown.
- Slice them down the center and fluff the insides with a fork, then place them on the board either whole or cut into thick rounds.
How to make mushroom sauce

Why we love this
This mushroom sauce is the ultimate umami bomb, providing a deep, earthy richness that elevates anything it touches, from steak to mashed potatoes. The texture is velvety and luxurious, with tender slices of sautéed mushrooms providing a meaty bite within the creamy liquid. It smells like a walk through a forest in autumn—woodsy, savory, and incredibly comforting. Adding a bowl of this sauce to your board provides an interactive element, allowing guests to ladle as much or as little as they want over their favorite components.
Ingredients
- 1 lb mixed mushrooms (cremini, shiitake, or button), sliced
- 2 tablespoons butter
- 1 shallot, finely minced
- 1/2 cup dry white wine or sherry
- 1 cup heavy cream
- 1 teaspoon fresh thyme leaves
- Salt and black pepper
How to make it
- In a wide skillet over medium-high heat, melt the butter and add the sliced mushrooms in a single layer, resisting the urge to stir them immediately.
- Let the mushrooms brown undisturbed for 3-4 minutes to develop a deep color and concentrated flavor, then toss them and cook for another 3 minutes.
- Add the minced shallots and thyme to the pan, sautéing for about 2 minutes until the shallots are translucent and fragrant.
- Deglaze the pan by pouring in the white wine, using a wooden spoon to scrape up the flavorful browned bits from the bottom of the skillet.
- Simmer the wine until it has reduced by half, then turn the heat down to medium-low and pour in the heavy cream.
- Allow the sauce to simmer gently for 5-8 minutes, stirring occasionally, until it has thickened enough to coat the back of a spoon.
- Season generously with salt and plenty of cracked black pepper, then transfer to a small pitcher or bowl to place in the center of your board.
How to sauté green beans

Why we love this
Sautéed green beans are all about that perfect ‘snap’—they should be vibrant green and tender-crisp, never mushy or dull. This dish brings a fresh, garden-bright energy to the board, cutting through the richness of meats and cheeses with its clean flavor. The aroma of toasted garlic and a hint of lemon zest makes them feel sophisticated yet effortless. They are the perfect finger food for a board, easy to pick up and munch on while you chat, providing a satisfying crunch that rounds out the dining experience.
Ingredients
- 1 lb fresh green beans, trimmed
- 2 tablespoons olive oil
- 3 cloves garlic, thinly sliced
- 1/2 teaspoon red pepper flakes
- 2 tablespoons water
- Salt and lemon wedges
How to make it
- Heat the olive oil in a large skillet over medium-high heat until shimmering, then add the trimmed green beans to the pan.
- Sauté the beans for 2-3 minutes, tossing frequently, until they start to develop small charred spots on the outside.
- Add the sliced garlic and red pepper flakes, stirring constantly for 1 minute to ensure the garlic browns slightly without burning.
- Carefully pour in the 2 tablespoons of water; it will steam up immediately, so quickly cover the pan with a lid for 2 minutes.
- Remove the lid; the beans should now be a bright, vivid green and have softened just enough while maintaining their structural integrity.
- Continue to cook for 1 more minute uncovered to evaporate any remaining water and allow the oil to recoat the beans.
- Season with a big pinch of salt and a final squeeze of lemon juice, then pile them high on your board for a rustic look.
How to make loaded potatoes

Why we love this
Loaded potatoes are the ultimate indulgence, a playground of textures where crispy skin meets fluffy potato and gooey, melted cheese. Each bite is a symphony of flavors: the saltiness of crispy bacon, the tang of sour cream, and the sharp bite of fresh green onions. They are visually stunning on a board, looking like little treasure chests overflowing with toppings. It’s the kind of dish that sparks joy and conversation, making everyone feel like they’re at a celebration regardless of what day of the week it actually is.
Ingredients
- 4 large russet potatoes, baked (see sweet potato method)
- 1 cup shredded sharp cheddar cheese
- 1/2 cup cooked bacon bits
- 1/2 cup sour cream
- 2 green onions, thinly sliced
- Butter, salt, and pepper
How to make it
- Take your hot, freshly baked russet potatoes and carefully slice them open lengthwise, being careful not to cut all the way through the bottom skin.
- Use a fork to gently mash and fluff the potato flesh inside the skin, adding a small pat of butter and a pinch of salt to each one while they are still steaming.
- Stuff a generous amount of shredded cheddar cheese into the opening, letting the heat of the potato melt the cheese naturally.
- If you want extra-melted cheese, pop the stuffed potatoes under the oven broiler for 1-2 minutes until the cheese is bubbling and golden.
- Remove from the oven and top each potato with a sprinkle of crispy bacon bits and a dollop of cold sour cream.
- Finish with a handful of sliced green onions for a fresh, oniony crunch that balances the rich dairy and salty bacon.
- Arrange these prominently on your food board, perhaps surrounding them with your steak or green beans for a cohesive and enticing display.
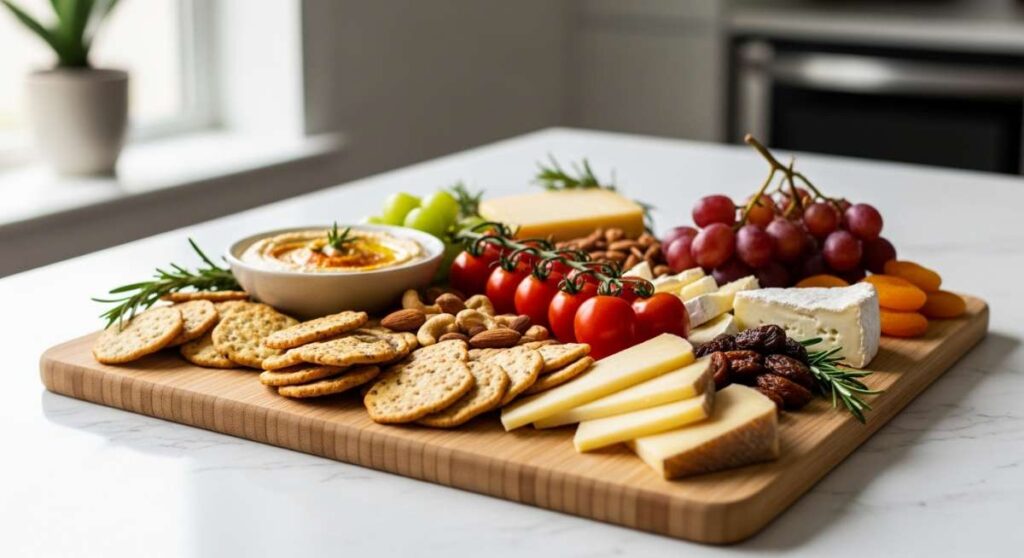
The Art of the Board
Assembling your simple food board is where the magic happens. Don’t worry about perfection; the beauty of this lifestyle hack lies in its rustic, lived-in feel. Start by placing your larger items—like the slow-cooked beef or the loaded potatoes—first, then fill in the gaps with your roasted broccoli, green beans, and sliced steak. Finish by tucking in your baked chocolate bars at the corners. This board represents more than just a meal; it’s a commitment to slowing down and enjoying the variety of life, one bite at a time.
Frequently Asked Questions
What kind of board should I use?
Any large, food-safe wooden cutting board or a clean slate tray works perfectly. If you don’t have one, you can even line your dining table with brown parchment paper and arrange the food directly on it for a fun, ‘low-country boil’ style aesthetic.
How do I keep everything warm?
The trick is to prep your sauces and cold items first, then cook your meats and potatoes last. Use warmed plates or small bowls for things like the mash and mushroom sauce, and don’t be afraid to serve things ‘family style’—a little bit of cooling is natural and often makes the flavors easier to appreciate.
Can I make these components ahead of time?
Absolutely! The slow-cooked beef and mushroom sauce actually taste better the next day as the flavors develop. You can roast the potatoes and prep the veggies in advance, then just do a quick sear on the steak right before you’re ready to serve.