

The Masterclass: Seasonal Nail Art for Every Occasion and Weather
Hello, my loves! Welcome back to our little corner of the world, where we take a deep breath and let our creativity flow right down to our fingertips. I was sitting by the window this morning, watching the soft morning light dance across my vanity, and I realized that our nails are such a beautiful, quiet way to tell the world how we feel. They are like tiny canvases for our souls, aren’t they?
Today, I want to wrap you in a cloud-soft embrace and walk you through the ultimate seasonal nail art guide. Whether you’re feeling the vibrant energy of a blooming garden or the moody, romantic edge of a spring rainstorm, there is a design here waiting to make you feel like the masterpiece you are. Grab a cup of lavender tea, find a cozy spot, and let’s dive into some magic together.
3 Easy Steps to Achieve Spring Red Nails
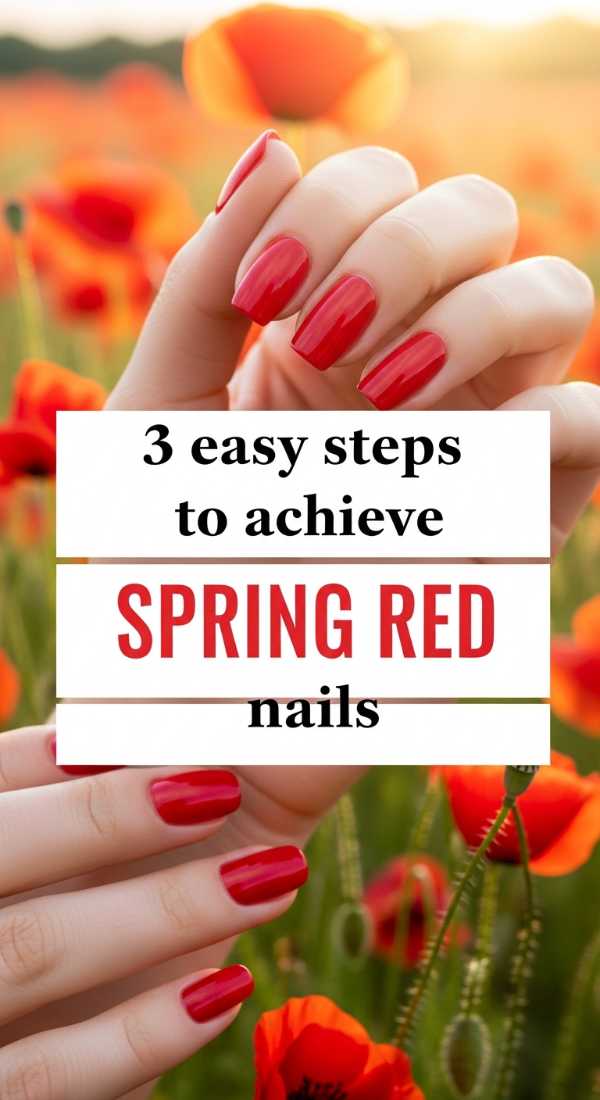
Why to love this Design:
Spring red isn’t your typical holiday crimson; it’s a poppy, joyful shade that feels like the first tulip breaking through the soil. It’s vibrant, energetic, and brings a flush of life to your hands that is simply undeniable.
Essential Elements:
- Poppy Red Polish
- High-shine Top Coat
- Nourishing Cuticle Oil
How to Prepare:
- Cleanse and shape your nails into a soft oval to mimic petal shapes.
- Apply one thin layer of red, focusing on smooth, even strokes from base to tip.
- Seal with a glass-like top coat and wait for that vibrant shine to emerge.
Budget Range
- Essie ‘Geranium’ ($10)
- Seche Vite Dry Fast Top Coat ($9)
- Sally Hansen Cuticle Rehab ($7)
4 Ways to Master Goth Spring Nails
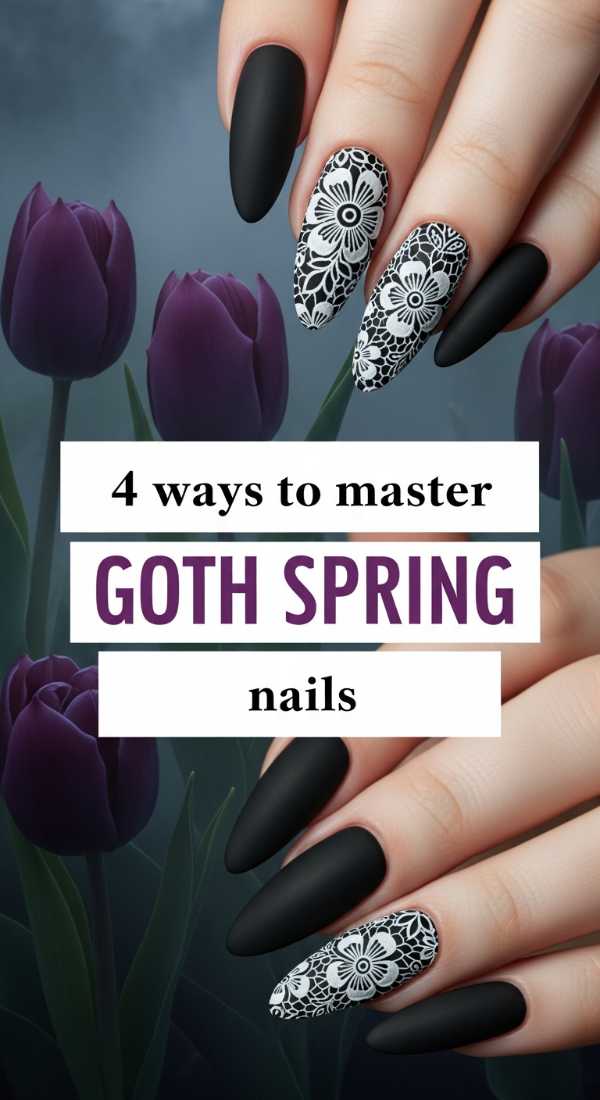
Why to love this Design:
For my darlings who love the shadows even when the sun is out, goth spring is all about that delicate balance between dark romanticism and seasonal freshness. It’s edgy, mysterious, and incredibly chic for rainy afternoons.
Essential Elements:
- Sheer Black ‘Stocking’ Polish
- Fine Liner Brush
- Pressed Flower Decals
- Matte Top Coat
How to Prepare:
- Layer a sheer black polish for a ‘veil’ effect.
- Use a liner brush to add delicate black vines or thorns.
- Incorporate a single dark-toned pressed flower for a botanical touch.
- Finish with a matte top coat to give it that velvet, moody texture.
Budget Range
- Zoya ‘Willa’ ($12)
- Holo Taco ‘One-Coat Black’ ($13)
- Nail Art Brush Set from Amazon ($6)
5 Tips for Perfect Summer Toe Nails
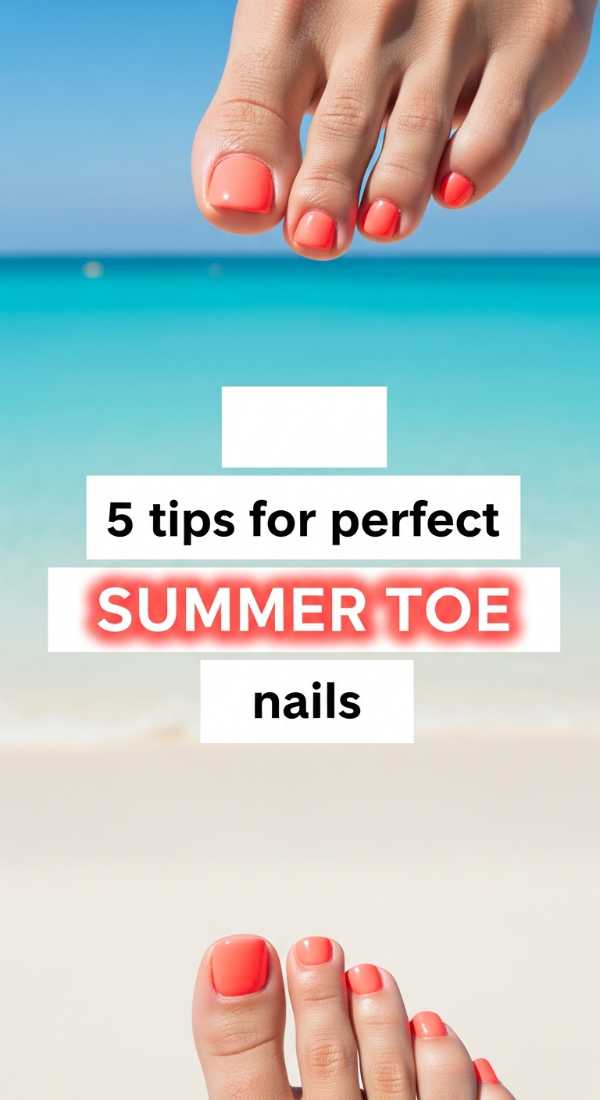
Why to love this Design:
There is nothing quite like the feeling of stepping into the sand with a fresh pedicure. It’s the ultimate signal that summer has arrived, giving you that extra boost of confidence in your favorite sandals.
Essential Elements:
- Exfoliating Foot Scrub
- Neon or Pastel Coral Polish
- White Base Coat
- Toe Spacers
- Moisturizing Foot Mask
How to Prepare:
- Exfoliate thoroughly to ensure a smooth canvas.
- Apply a white base coat to make your neon colors truly ‘pop’ against the skin.
- Use toe spacers to prevent smudging during application.
- Apply two thin layers of your chosen bright shade.
- Lock it in with a UV-resistant top coat to prevent fading in the sun.
Budget Range
- Dr Teal’s Epsom Salt Scrub ($5)
- OPI ‘Live.Love.Refresh’ ($11)
- Olive & June Super Glossy Top Coat ($9)
6 Steps to Paint Viral Pucci Nails
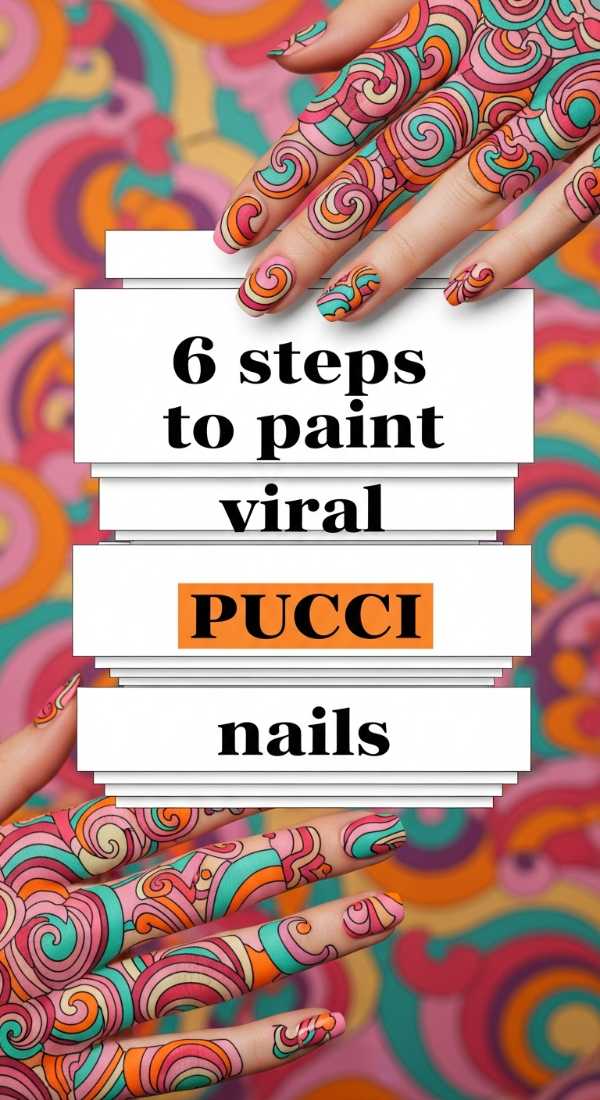
Why to love this Design:
Pucci-inspired nails are a swirling dream of retro elegance. They feel like a vintage scarf caught in a breeze, combining bold geometry with soft, flowing movement that captures everyone’s attention.
Essential Elements:
- At least 4 contrasting polish colors
- Long Striper Brush
- Dotting Tool
- Nail Surface Cleanser
How to Prepare:
- Apply a neutral base color to unify the design.
- Map out your ‘zones’ using the striper brush and your first color.
- Fill in the shapes with alternating colors, keeping the layers thin.
- Outline the intersections with a crisp black or white line for that ‘scarf’ look.
- Add small dots in the centers of the curves for extra detail.
- Wait five minutes before applying a thick top coat to avoid dragging the colors.
Budget Range
- Modelones Gel Liner Set ($15)
- Beetles Pastel Polish Kit ($20)
- Isopropryl Alcohol for cleaning ($4)
3 Tricks for Flawless Solid Spring Nails
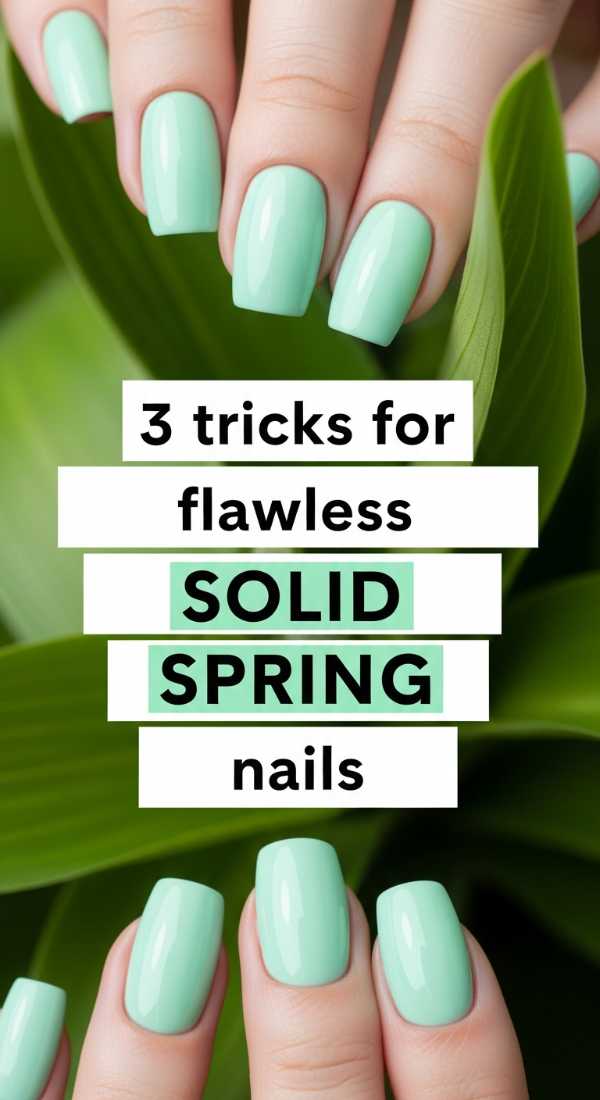
Why to love this Design:
Sometimes, simplicity is the highest form of sophistication. A flawless solid nail in a creamy pastel tone feels like a clean slate and a fresh start, matching perfectly with every spring outfit in your closet.
Essential Elements:
- Cream-finish Pastel Polish
- Ridge-filling Base Coat
- Clean-up Brush
How to Prepare:
- Use a ridge-filling base coat to ensure a perfectly smooth surface for light colors.
- Paint in three strokes: middle, left, right, to minimize streaks.
- Use a clean-up brush dipped in acetone to crisp up the edges around the cuticle.
Budget Range
- Orly Bonder Base Coat ($12)
- Lights Lacquer ‘Paper Snow’ ($13)
- Elf Concealer Brush for clean-up ($5)
7 Ideas for Dreamy Almond Nails Spring

Why to love this Design:
The almond shape is so incredibly flattering, loves! It elongates the fingers and provides the perfect soft-curved canvas for romantic, ethereal designs that feel like a daydream.
Essential Elements:
- Nail Files (180/240 grit)
- Pearlescent Chrome Powder
- Micro-pearls
- Lavender Gel Polish
How to Prepare:
- File nails into a tapered point, then round off the tip.
- Try a ‘glazed donut’ finish with chrome powder.
- Add a single micro-pearl at the base of the ring finger.
- Experiment with a soft lavender gradient.
- Use a milky white base for a ‘cloud’ effect.
- Apply a gold foil flake for a touch of luxury.
- Finish with a high-gloss gel top coat.
Budget Range
- Born Pretty Chrome Powder ($8)
- OPI ‘You’re Such a Budapest’ ($11)
- Makartt Nail Files ($7)
5 Secrets for Long-Lasting Spring Red Nails

Why to love this Design:
Red is a bold commitment, and there is nothing more frustrating than a chip on day two. These secrets ensure your fiery spring look stays as perfect as the moment you finished it.
Essential Elements:
- Nail Dehydrator
- Acid-free Primer
- Edge-capping Technique
- Daily Cuticle Oil
How to Prepare:
- Dehydrate the nail plate with alcohol to remove all oils.
- Apply a primer to create a ‘sticky’ bond for the red pigment.
- Always ‘cap the free edge’ by running the brush along the very tip of the nail.
- Apply two thin coats rather than one thick one to prevent peeling.
- Re-apply a thin layer of top coat every three days to refresh the seal.
Budget Range
- Mia Secret Glass Finish ($10)
- CND SolarOil ($9)
- Modelones Dehydrator and Primer Duo ($13)
4 Hacks for Edgy Goth Spring Nails
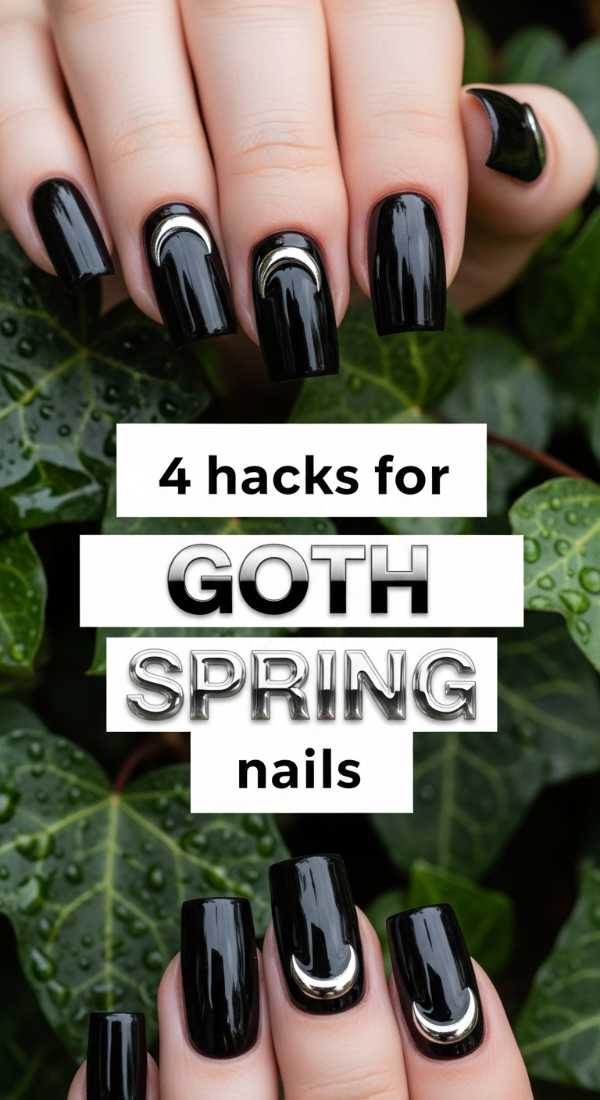
Why to love this Design:
Edgy goth spring is all about texture and unexpected details. It’s for the rebel who still wants to acknowledge the season but on their own dark, beautiful terms.
Essential Elements:
- Black Rhinestones
- Matte/Gloss Contrast Top Coats
- Silver Striping Tape
- Spider Gel
How to Prepare:
- Mix matte and glossy finishes on the same nail for a ‘shadow’ pattern.
- Use spider gel to create ‘cobweb’ effects over a soft grey base.
- Apply silver striping tape for a sharp, architectural look.
- Cluster black stones near the cuticle for a ‘jewelry’ vibe.
Budget Range
- Saviland Spider Gel ($12)
- Mixed Size Black Rhinestones ($6)
- Silver Striping Tape ($5)
8 Minutes to Create Retro Pucci Nails
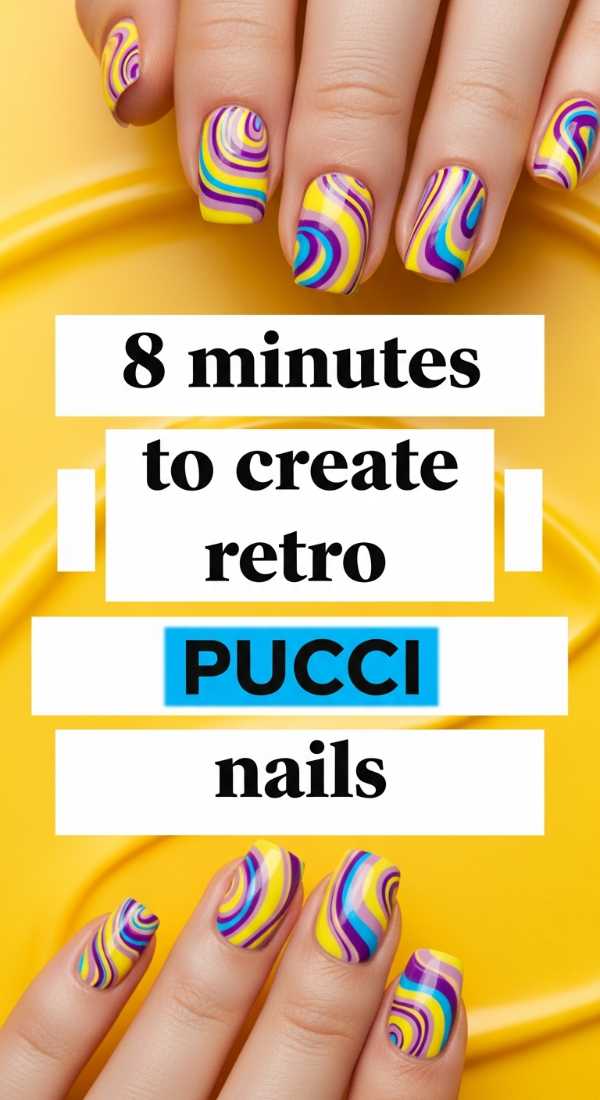
Why to love this Design:
We don’t always have hours to spend on art, do we? This ‘speed’ version of the Pucci look gives you that high-fashion aesthetic in the time it takes to brew a pot of coffee.
Essential Elements:
- Fast-drying Polish
- Large Dotting Tool
- Toothpick
- Quick-dry Drops
How to Prepare:
- Apply a quick-dry base.
- Place three large dots of different colors in a row.
- Immediately drag a toothpick through the dots in a ‘S’ shape.
- Repeat on the other side of the nail.
- Wipe the toothpick between every stroke.
- Add one small dot in a contrasting color to the center of a swirl.
- Apply quick-dry drops to set the design instantly.
- Finish with a fast-set top coat.
Budget Range
- Sally Hansen Insta-Dri ($6)
- Dashing Diva Fast Dry Drops ($10)
- Basic Toothpicks ($2)
5 Methods for Chic Almond Nails Spring
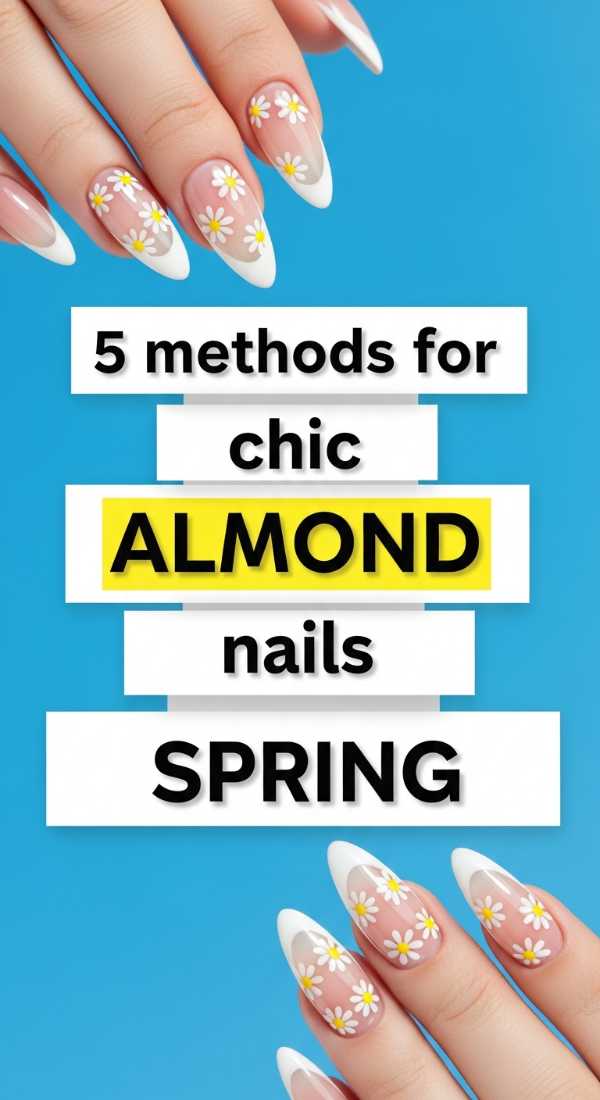
Why to love this Design:
Chic almond nails are the ‘quiet luxury’ of the nail world. These methods focus on subtle details that make your hands look expensive, polished, and perfectly ready for a spring brunch.
Essential Elements:
- Nude Polish with Pink Undertones
- White Liner Gel
- Gold Leaf
- Buffing Block
How to Prepare:
- The Micro-French: A whisper-thin line at the very tip of the almond.
- The Gold Accent: A tiny speck of gold leaf near the side of the nail.
- The Jelly Look: Using translucent polishes for a ‘glass’ effect.
- The Velvet Finish: Using a magnetic ‘cat-eye’ polish for soft movement.
- The Pressed Leaf: Embedding a tiny green leaf decal for an organic feel.
Budget Range
- Cirque Colors Jelly Polish ($14)
- ILNP Magnetic Polish ($12)
- Gold Leaf Sheets from Craft Store ($5)
Embrace Your Inner Artist
As the seasons shift and the world turns its colors, I hope you find a moment to sit down and treat yourself to one of these designs. Remember, my loves, it’s not about perfection—it’s about the joy of the process and the way it makes you feel when you catch a glimpse of your hands throughout the day. You are beautiful, you are creative, and your nails are just one more way to shine your light. Stay cozy, stay inspired, and keep blooming!