

The Ultimate Hack for the Perfect Viral Food Board
There is something inherently magical about a gathering where the food isn’t just a meal, but a centerpiece of conversation and connection. We have all seen those stunning, viral food boards on social media—overflowing with colors, textures, and aromas that seem almost too beautiful to eat. But the real secret isn’t just about the aesthetics; it’s about creating a ‘Viral Simple Food Board’ that balances ease of preparation with high-impact flavors. It is about taking the stress out of hosting and replacing it with the pure joy of shared discovery.
When I first started hosting, I felt the pressure to make everything look like a professional catering display, but I soon realized that the most memorable nights were the ones where the food was approachable, fresh, and vibrant. This guide is my love letter to the ‘Simple Food Board’—a collection of recipes that transition seamlessly from individual bowls to a massive, grazing-style feast. Whether you are hosting a spring brunch or a cozy evening with friends, these dishes provide the ultimate hack for a board that tastes even better than it looks.
Easy Salmon Bowl Recipe
Why we love this
This salmon bowl is the epitome of a fresh, nourishing meal that feels like a warm hug for your senses. Imagine the delicate, buttery flakes of perfectly seared salmon melting into a bed of fluffy, steaming rice, while the cool crunch of cucumbers and the creaminess of ripe avocado create a delightful contrast in every bite. The aroma of toasted sesame oil and the zesty tang of sriracha mayo wafting through the air instantly trigger a sense of comfort and excitement. It is a harmonious blend of textures—silky, crunchy, and soft—that makes you feel revitalized and satisfied all at once.
Ingredients
- 2 Fresh salmon fillets
- 1 cup Jasmine or Sushi rice
- 1 ripe Avocado, sliced
- 1 Mini cucumber, thinly sliced
- 1/2 cup Shelled edamame
- 2 tbsp Soy sauce
- 1 tbsp Honey
- 1 tsp Sriracha
- Mayonnaise and furikake for garnish
How to make it
- Begin by rinsing your rice under cold water until the water runs clear to remove excess starch. Cook the rice according to package instructions, then fluff with a fork and keep covered to maintain moisture.
- Pat the salmon fillets completely dry with a paper towel—this is the secret to a crispy skin. Season generously with salt and pepper.
- In a small bowl, whisk together the soy sauce, honey, and sriracha to create a simple glaze.
- Heat a non-stick skillet over medium-high heat with a drizzle of neutral oil. Once the oil is shimmering, place the salmon skin-side down. Press firmly with a spatula for 30 seconds to prevent curling.
- Cook for 4-5 minutes until the skin is crispy and the flesh has turned opaque halfway up the side. Flip gently and cook for another 2-3 minutes while brushing the glaze over the cooked skin.
- Remove salmon from heat and let it rest for 2 minutes. Assemble the bowl by layering the rice, adding the sliced avocado, cucumbers, and edamame, and topping with the glazed salmon. Drizzle with sriracha mayo and a sprinkle of furikake.
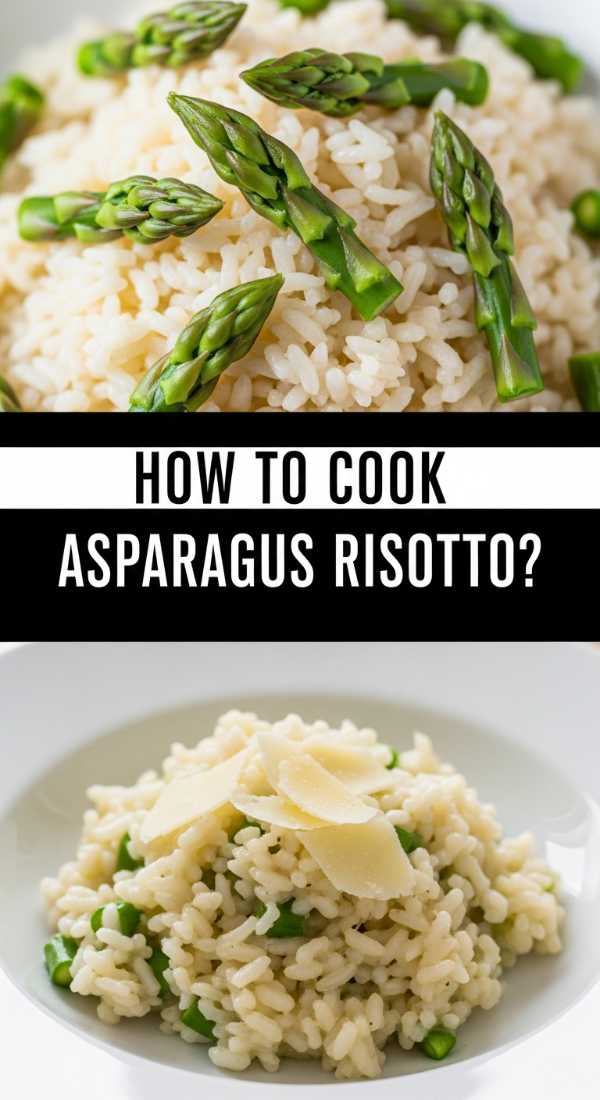
Creamy Asparagus Risotto
Why we love this
There is a profound, meditative quality to making a risotto that translates directly into its taste—a velvet-like richness that coats the palate with the essence of spring. As you stir, the starch from the Arborio rice transforms into a luxurious sauce, infused with the bright, grassy notes of tender asparagus and the sharp, salty punch of aged Parmesan. The scent of sautéed shallots and dry white wine simmering together creates a sophisticated atmosphere in the kitchen that promises a meal of true elegance. Every spoonful is a balance of creamy indulgence and the refreshing snap of green vegetables, making it an absolute showstopper on any food board.
Ingredients
- 1.5 cups Arborio rice
- 1 bunch Fresh asparagus, woody ends trimmed
- 5 cups Vegetable or chicken broth, kept warm
- 1/2 cup Dry white wine (Pinot Grigio or Sauvignon Blanc)
- 2 Shallots, finely minced
- 3 tbsp Unsalted butter
- 1/2 cup Grated Parmesan cheese
- Fresh lemon zest and cracked black pepper
How to make it
- Cut the asparagus into 1-inch pieces, keeping the tips separate. Blanch the stalks in boiling water for 2 minutes, then plunge into an ice bath to preserve the vibrant green color. Save the tips to sauté separately for garnish.
- In a large, heavy-bottomed pot, melt 2 tablespoons of butter over medium heat. Add the minced shallots and cook until translucent and fragrant, but not browned, about 3-4 minutes.
- Add the Arborio rice to the pot and stir constantly for 2 minutes until the edges of the grains become translucent. This ‘toasting’ phase is crucial for a nutty flavor.
- Pour in the white wine and stir until it is fully absorbed.
- Begin adding the warm broth one ladleful at a time. Stir frequently; the friction helps release the starch. Wait until the liquid is almost entirely absorbed before adding the next ladle.
- Continue this process for about 18-20 minutes until the rice is ‘al dente’—firm but not crunchy.
- Stir in the blanched asparagus stalks, the remaining butter, and the Parmesan cheese. Remove from heat, cover, and let sit for 2 minutes to achieve maximum creaminess. Top with sautéed asparagus tips and lemon zest before serving.
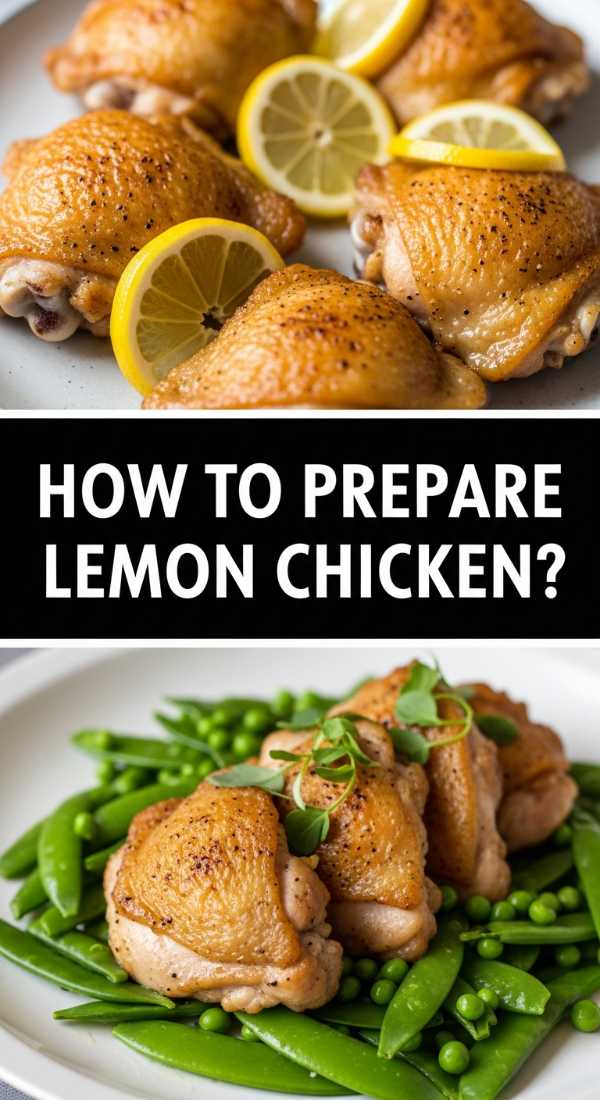
Zesty Lemon Chicken

Why we love this
Zesty Lemon Chicken is the ultimate crowd-pleaser, offering a vibrant burst of citrus sunshine that cuts through the richness of any spread. The skin of the chicken, rendered down to a shatteringly crisp golden-brown, hides meat that is incredibly juicy and infused with the aromatics of garlic and fresh rosemary. As the chicken roasts, the lemon slices caramelize in the pan juices, creating a sticky, tangy sauce that is utterly addictive. It’s the kind of dish that fills your home with an inviting, herbaceous fragrance, signaling to your guests that a truly soulful and revitalizing meal is about to be served.
Ingredients
- 1.5 lbs Chicken thighs (bone-in, skin-on)
- 2 Lemons (one sliced, one juiced)
- 4 cloves Garlic, smashed
- 3 sprigs Fresh rosemary
- 1/4 cup Olive oil
- 1 tsp Smoked paprika
- Salt and cracked black pepper to taste
How to make it
- Preheat your oven to 400°F (200°C). In a large bowl, whisk together the olive oil, lemon juice, smashed garlic, chopped rosemary, and paprika.
- Pat the chicken thighs dry with paper towels to ensure a crispy exterior. Season both sides generously with salt and pepper.
- Place the chicken in the marinade and toss to coat thoroughly. Let it marinate for at least 20 minutes at room temperature, or up to 4 hours in the fridge for deeper flavor.
- Heat an oven-proof skillet over medium-high heat. Place the chicken skin-side down in the hot pan. Sear for 5-6 minutes without moving them until the skin is deep golden and crispy.
- Flip the chicken pieces and tuck the lemon slices and rosemary sprigs around them.
- Transfer the entire skillet to the oven. Roast for 15-20 minutes, or until the internal temperature reaches 165°F (74°C).
- Let the chicken rest for 5 minutes before serving to allow the juices to redistribute. Pour any accumulated pan juices over the meat for extra zing.
Vibrant Spring Pea Soup

Why we love this
This soup is like a garden in a bowl, capturing the fleeting, sweet essence of early spring in every silky-smooth spoonful. The color is a stunning, electric green that instantly brightens up a food board, while the flavor is a delicate dance between the sweetness of the peas and the cooling brightness of fresh mint. There is a lightness to this soup that feels incredibly refreshing, yet a swirl of crème fraîche adds just enough decadence to make it feel special. It’s a sensory experience that starts with the vivid visual and ends with a clean, herbaceous finish that leaves you craving more.
Ingredients
- 4 cups Frozen or fresh shelled peas
- 1 large Yellow onion, diced
- 2 cloves Garlic, minced
- 4 cups Vegetable stock
- 1/2 cup Fresh mint leaves
- 1/4 cup Heavy cream or crème fraîche
- 2 tbsp Olive oil
- Salt and white pepper
How to make it
- Heat olive oil in a large pot over medium heat. Add the diced onion and cook for 5-7 minutes until soft and translucent, ensuring they do not brown.
- Add the minced garlic and cook for an additional 1 minute until fragrant.
- Pour in the vegetable stock and bring the mixture to a gentle boil.
- Add the peas to the boiling stock. If using frozen peas, cook for 3-4 minutes; if using fresh, cook for about 5-6 minutes until they are bright green and tender.
- Remove the pot from the heat. Stir in the fresh mint leaves—the residual heat will wilt them without losing their vibrant flavor.
- Using an immersion blender (or transferring in batches to a high-speed blender), puree the soup until it is completely smooth and velvety.
- Return to low heat, stir in the heavy cream, and season with salt and white pepper. Serve warm or chilled for a refreshing twist.
Ultimate Rotel Dip

Why we love this
No viral food board is complete without a dip that everyone gravitates toward, and this Ultimate Rotel Dip is the undisputed champion of comfort food. It’s a gooey, molten masterpiece of melted cheese studded with zesty tomatoes and savory, spiced ground beef that provides a satisfying, salty kick. The texture is thick and scoopable, making it the perfect companion for a sturdy tortilla chip or a slice of crusty bread. The aroma of melted cheese and cumin is nostalgic and inviting, creating an instant focal point for grazing and communal dipping that brings everyone together.
Ingredients
- 1 lb Velveeta cheese, cubed
- 1 can (10 oz) Rotel Original Diced Tomatoes and Green Chilies
- 1 lb Ground beef or bulk sausage
- 1 tsp Chili powder
- 1/2 tsp Cumin
- 1/4 cup Fresh cilantro, chopped
- Tortilla chips for serving
How to make it
- In a large skillet over medium-high heat, brown the ground beef or sausage, breaking it into small crumbles with a wooden spoon. Cook until no pink remains.
- Drain the excess fat from the skillet to ensure the dip isn’t greasy. Stir in the chili powder and cumin, coating the meat evenly.
- Lower the heat to medium-low. Add the cubed Velveeta cheese and the entire can of Rotel (including the liquid, as this provides the perfect consistency).
- Stir constantly as the cheese melts to prevent it from scorching on the bottom of the pan. This should take about 5-8 minutes until the mixture is smooth and bubbling.
- If the dip is too thick, you can stir in a splash of milk or splashes of the Rotel juice to reach your desired consistency.
- Transfer to a serving bowl or a small slow cooker to keep warm. Garnish with fresh cilantro and serve immediately with plenty of chips.
Savory Dirty Spaghetti
Why we love this
Dirty Spaghetti is the rebellious, umami-packed cousin of the traditional pasta dish, offering a deep, savory complexity that is hard to resist. The ‘dirty’ comes from a rich base of finely chopped mushrooms, garlic, and soy sauce that coats every strand of al dente spaghetti in a dark, glossy, and intensely flavorful sauce. It’s a dish that smells of earth and butter, with a taste that is surprisingly sophisticated despite its humble appearance. The silky texture of the noodles combined with the concentrated mushroom flavor makes it an incredibly satisfying addition to a board, offering a hearty element that keeps people coming back for seconds.
Ingredients
- 12 oz Spaghetti noodles
- 8 oz Cremini mushrooms, very finely chopped
- 4 tbsp Unsalted butter
- 3 tbsp Soy sauce
- 4 cloves Garlic, minced
- 1/2 tsp Red pepper flakes
- 1/4 cup Grated Parmesan
- Fresh parsley for garnish
How to make it
- Bring a large pot of heavily salted water to a boil. Cook the spaghetti for 1-2 minutes less than the package directions for a true ‘al dente’ texture. Reserve 1 cup of pasta water before draining.
- While the pasta cooks, melt the butter in a large skillet over medium heat. Add the finely chopped mushrooms. Sauté for 8-10 minutes, allowing the mushrooms to release their moisture and eventually turn a deep, golden brown. This ‘browning’ is where all the flavor lives.
- Add the minced garlic and red pepper flakes to the mushrooms and cook for 1 minute until fragrant.
- Stir in the soy sauce, scraping the bottom of the pan to release any browned bits (fond).
- Add the cooked spaghetti directly to the skillet. Pour in half of the reserved pasta water and toss vigorously with tongs.
- The starch in the water will emulsify with the butter and soy sauce to create a glossy coating. Add more water if needed.
- Finish with a sprinkle of Parmesan and fresh parsley. Serve hot as a pile of savory goodness.
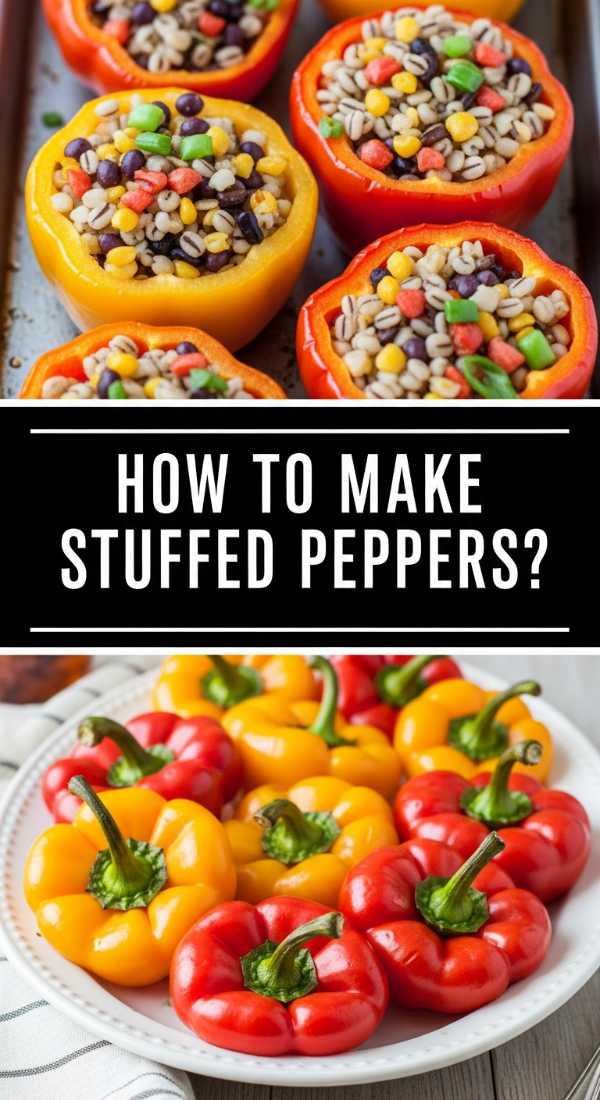
Stuffed Spring Peppers

Why we love this
These stuffed mini peppers are like little jewels on your food board—bright, colorful, and packed with a surprising explosion of flavor. The sweetness of the roasted peppers perfectly complements the tangy, creamy filling, while the crunch of bacon or toasted breadcrumbs on top adds a necessary layer of texture. They are the ultimate finger food, designed to be picked up and enjoyed in two bites. The contrast between the warm, softened pepper and the cool, herb-infused center creates a delightful temperature play that makes them incredibly addictive and visually stunning.
Ingredients
- 12-15 Mini sweet peppers
- 8 oz Cream cheese, softened
- 1/2 cup Shredded sharp cheddar
- 2 cloves Garlic, grated
- 2 tbsp Fresh chives, chopped
- 4 slices Bacon, cooked and crumbled
- 1/2 tsp Smoked paprika
How to make it
- Preheat your oven to 400°F (200°C). Line a baking sheet with parchment paper for easy cleanup.
- Slice each mini pepper in half lengthwise. Use a small spoon to carefully scrape out the seeds and ribs, leaving the stems intact for a beautiful presentation.
- In a medium bowl, combine the softened cream cheese, shredded cheddar, grated garlic, chives, and smoked paprika. Mix until smooth and well-incorporated.
- Using a small spoon or a piping bag, fill each pepper half with the cream cheese mixture, mounding it slightly.
- Top each pepper with the crumbled bacon, pressing it gently into the cheese so it stays in place during baking.
- Arrange the peppers on the baking sheet and roast for 10-12 minutes. You want the peppers to be slightly softened and the cheese to be bubbly and just beginning to brown.
- Let them cool for 5 minutes before placing them on your board to prevent the filling from running.
Fresh Strawberry Balsamic Salad

Why we love this
This salad is a masterclass in balance, bringing together the sweetness of peak-season strawberries, the peppery bite of fresh arugula, and the deep, syrupy richness of a balsamic glaze. It provides a much-needed acidic lift to a food board, cleansing the palate between heavier bites. The creamy crumbles of feta cheese add a salty tang, while toasted walnuts provide a satisfying, earthy crunch. It’s a visually arresting dish with its deep reds and vibrant greens, smelling of summer berries and aged vinegar—a combination that is both sophisticated and incredibly approachable.
Ingredients
- 4 cups Baby arugula
- 2 cups Fresh strawberries, hulled and sliced
- 1/2 cup Feta cheese, crumbled
- 1/3 cup Walnuts or pecans, toasted
- 3 tbsp Extra virgin olive oil
- 2 tbsp Balsamic glaze (the thick kind)
- Salt and cracked black pepper
How to make it
- In a small dry skillet over medium heat, toast the walnuts for 3-5 minutes, tossing frequently until they are fragrant and slightly darkened. Let them cool, then roughly chop.
- Wash and thoroughly dry the arugula. Any moisture on the leaves will prevent the dressing from sticking, resulting in a soggy salad.
- In a large wide bowl or on a flat platter (best for food boards), layer the arugula as the base.
- Scatter the sliced strawberries and toasted walnuts evenly over the greens.
- Drizzle the olive oil first, then use a spoon to decoratively swirl the balsamic glaze over the top. The glaze is thicker and sweeter than regular vinegar, providing that ‘viral’ restaurant look.
- Finish with the crumbled feta and a generous crack of black pepper. Do not toss the salad until right before serving to keep the leaves crisp and the strawberries looking fresh.
Golden Carrot Ginger Soup
Why we love this
There is something fundamentally healing about the combination of carrots and ginger, and this soup captures that energy in a vibrant, golden liquid. The natural sweetness of roasted carrots is heightened by the spicy, warming kick of fresh ginger and the tropical creaminess of coconut milk. It’s a soup that feels like sunshine in a bowl, with an aroma that is both earthy and energizing. The texture is thick and comforting, making it perfect for dipping crusty bread or simply sipping from a small glass as part of a larger grazing experience. It is a bold, beautiful addition that brings a healthy, glowing element to your board.
Ingredients
- 1 lb Carrots, peeled and chopped
- 1 can (14 oz) Full-fat coconut milk
- 2 tbsp Fresh ginger, grated
- 1 Yellow onion, chopped
- 3 cups Vegetable broth
- 2 tbsp Olive oil
- 1 tsp Turmeric
- Salt and lime juice to taste
How to make it
- Preheat oven to 400°F. Toss chopped carrots with 1 tablespoon of olive oil and salt. Roast on a baking sheet for 20-25 minutes until tender and slightly caramelized at the edges.
- In a large pot, heat the remaining oil over medium heat. Sauté the onion until soft and sweet, about 5 minutes.
- Add the grated ginger and turmeric to the pot. Stir for 1 minute until the spices are toasted and fragrant.
- Add the roasted carrots and the vegetable broth. Bring to a boil, then reduce heat and simmer for 10 minutes to allow the flavors to meld.
- Stir in the coconut milk, reserving a tablespoon for garnish.
- Use a blender to puree the soup until it is completely smooth and glowing golden.
- Add a squeeze of fresh lime juice to brighten the flavors and adjust salt as needed. Serve with a swirl of the remaining coconut milk on top.
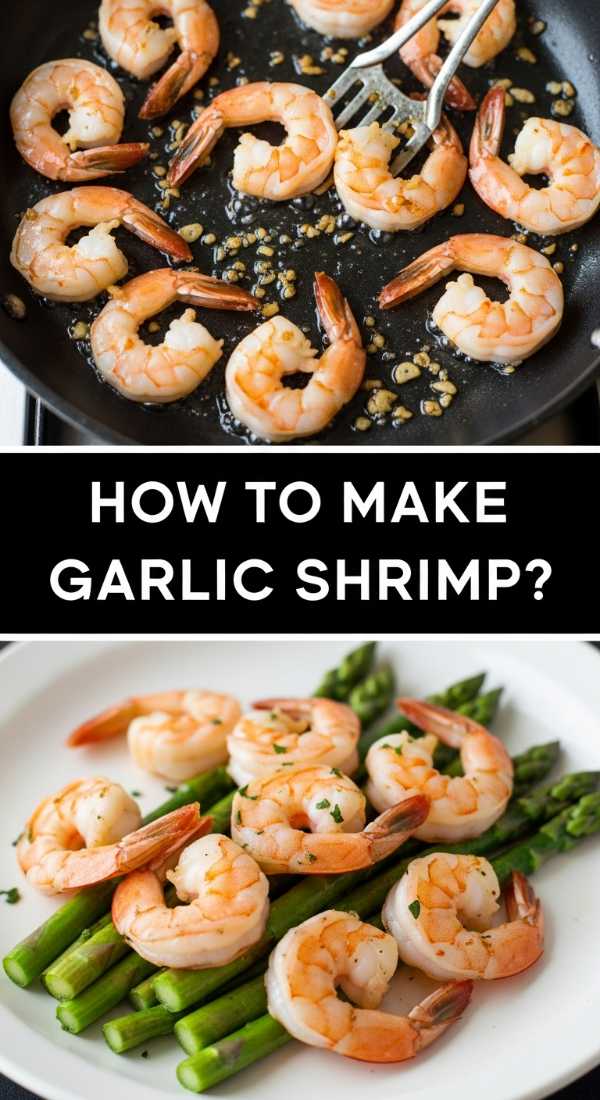
Garlic Butter Spring Shrimp
[IMAGE_10]
Why we love this
Shrimp is the ultimate ‘fast luxury,’ and when bathed in a pool of garlic-infused butter and fresh herbs, it becomes an irresistible centerpiece for any board. The shrimp should be cooked just until they curl into perfect pink ‘C’ shapes, retaining a snappy, succulent texture that contrasts beautifully with the rich sauce. The scent of sizzling garlic and lemon zest hitting the pan is enough to draw everyone into the kitchen. It’s a dish that feels celebratory and indulgent, yet it takes only minutes to prepare, making it the perfect final touch to a viral food board that demands high impact with minimal effort.
Ingredients
- 1 lb Large shrimp, peeled and deveined (tail on)
- 4 tbsp Unsalted butter
- 4 cloves Garlic, minced
- 1/2 tsp Red pepper flakes
- 1 tbsp Lemon juice
- 2 tbsp Fresh parsley, finely chopped
- 1/2 tsp Kosher salt
How to make it
- Pat the shrimp extremely dry with paper towels. This ensures that they sear rather than steam in the pan. Season with salt and red pepper flakes.
- In a large skillet, melt 2 tablespoons of butter over medium-high heat. Once the butter is foaming, add the shrimp in a single layer. Do not overcrowd the pan; cook in two batches if necessary.
- Sear the shrimp for 1-2 minutes per side until they turn opaque and pink. Remove them from the pan immediately to a plate so they don’t overcook.
- Reduce the heat to medium. Add the remaining 2 tablespoons of butter to the skillet. Once melted, add the minced garlic. Cook for only 30-60 seconds—garlic burns quickly and becomes bitter.
- Whisk in the lemon juice, scraping up any savory bits from the bottom of the pan.
- Return the shrimp and any accumulated juices to the skillet. Toss quickly to coat in the garlic butter sauce.
- Remove from heat, garnish with fresh parsley, and serve immediately with lemon wedges.
Conclusion
Creating a viral food board isn’t about perfection; it’s about the abundance of flavor and the joy of sharing. By combining these ten diverse recipes—from the hearty ‘Dirty Spaghetti’ to the light and zesty ‘Lemon Chicken’—you create a landscape of tastes that caters to every craving. The secret hack is simple: prep your components, keep your colors vibrant, and let the ingredients speak for themselves. Now, go forth and host with confidence, knowing your board is as delicious as it is beautiful.
Frequently Asked Questions
How do I keep the food warm on a grazing board?
To keep food warm, use small heated servers or slate boards that have been warmed in the oven. Alternatively, serve items like the Rotel Dip in a small slow cooker and replenish the smaller bowls on the board frequently from the hot source.
Can I make these recipes ahead of time?
Many components can be prepped in advance! You can roast the carrots for the soup, chop the vegetables for the risotto, and marinate the chicken the night before. However, for the best texture, sear the shrimp and assemble the salad right before serving.
What is the best way to arrange a food board for photos?
Start with your largest items or bowls (like the soup and dip) to create ‘anchor points.’ Fill in the gaps with your proteins and pastas, and use the bright salads and stuffed peppers to add pops of color. Don’t be afraid of ‘overflow’—a full board looks more inviting and viral-ready than one with empty spaces.