
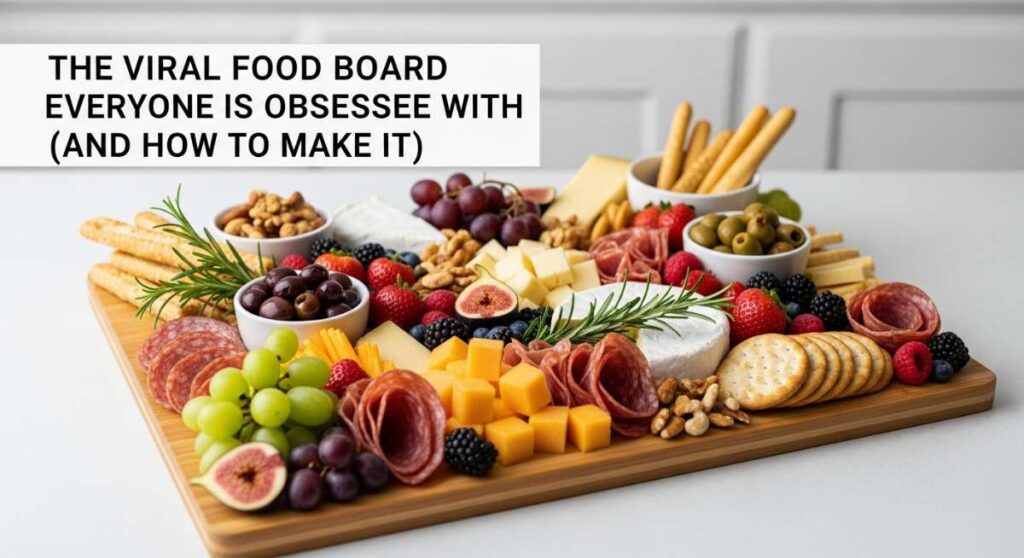
The Viral Food Board Everyone is Obsessed With (And How to Make It)
There is something inherently magical about the way food brings us together, especially when it is presented as a vibrant, edible canvas. I remember the first time I set out a sprawling picnic board for my best friends under the dappled shade of an old oak tree; the gasps of delight and the immediate reach for cameras told me I’d stumbled onto something special. It isn’t just about the cheese or the crackers; it’s about the intentionality of creating a moment that feels like a scene from a sun-drenched indie film, where every bite is a celebration of the season.
Lately, my feed has been overflowing with these ‘Viral Simple Food Boards,’ and I’ve spent weeks perfecting the art of the portable, aesthetic feast. Whether you’re heading to the beach, a local park, or just your own backyard, these tips and recipes will help you craft a spread that is as delicious as it is scroll-stopping. We’re moving beyond basic sandwiches and into a world of texture, color, and flavor that will make your next outdoor gathering absolutely unforgettable.
How to pack aesthetic picnics

Why we love this
An aesthetic picnic transforms a simple meal into a sensory experience that lingers in your memory long after the sun goes down. The sight of crisp linen napkins against a rustic wicker basket, paired with the gentle clinking of glass jars filled with colorful treats, creates an atmosphere of effortless elegance and calm. It’s about the tactile pleasure of smooth wooden boards and the visual harmony of coordinated colors that make you feel truly pampered in the great outdoors. This approach turns dining into an art form, encouraging us to slow down and savor the beauty of our surroundings alongside our food.
Ingredients
- Wicker picnic basket with insulated lining
- Linen or cotton neutral-toned picnic blanket
- Reusable bamboo or gold-toned cutlery
- Small glass jars with clip-on lids
- Fresh sprigs of eucalyptus or wildflowers
- Cloth napkins in soft earth tones
How to make it
- Begin by selecting a sturdy wicker basket that features an insulated interior to ensure your perishables stay at a safe, cool temperature throughout your journey.
- Layer your heaviest items, such as bottled drinks or large containers, at the very bottom of the basket to provide a stable base and prevent crushing delicate items.
- Wrap your cutlery in individual cloth napkins and secure them with a piece of twine or a small ribbon, which prevents rattling and adds a sophisticated, handmade touch to the presentation.
- Utilize small glass jars for condiments, nuts, or berries; the transparency allows the natural colors of the food to serve as decoration while keeping everything airtight and leak-proof.
- Place a linen blanket on top of the food items before closing the basket lid; this acts as an extra layer of insulation and ensures the first thing you pull out is the foundation of your picnic site.
- Once you arrive at your location, shake out the blanket and use the fresh flowers or eucalyptus sprigs to create a small centerpiece on one corner of the blanket for an instant ‘Pinterest-worthy’ vibe.
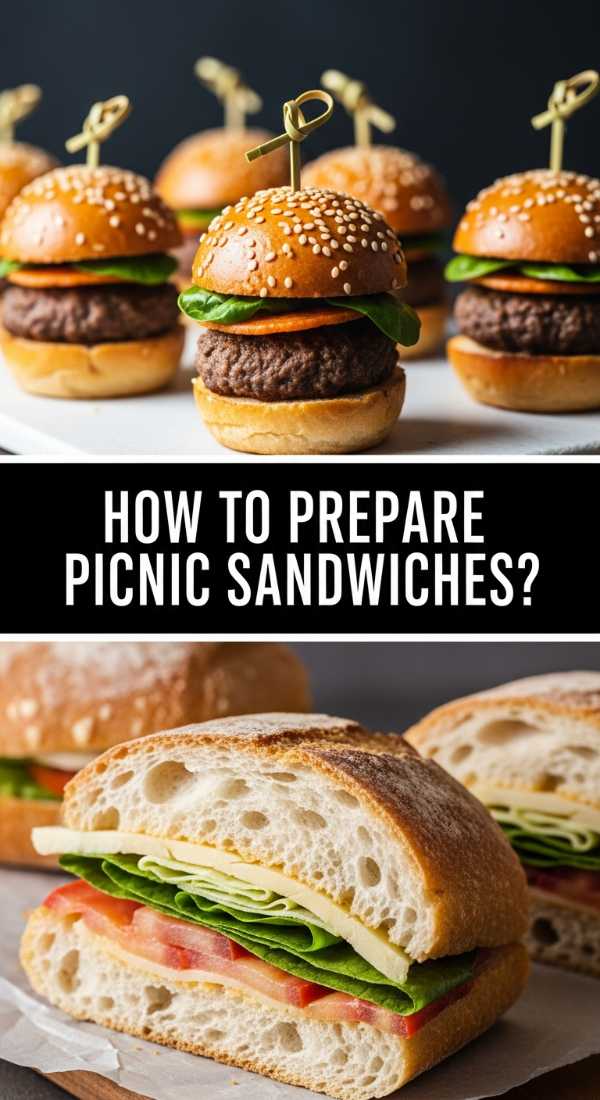
How to prepare picnic sandwiches
Why we love this
There is nothing quite as satisfying as biting into a perfectly constructed picnic sandwich where the crusty exterior of a baguette gives way to a symphony of savory fillings. The aroma of fresh basil and aged balsamic glaze wafting from the paper wrapping immediately builds anticipation, promising a lunch that is far superior to any standard deli offering. We love the way the flavors meld together over time, with the juices from ripe tomatoes slightly softening the bread without making it soggy, creating a rich and cohesive bite. It is the ultimate portable comfort food, designed to be held in one hand while you enjoy the breeze.
Ingredients
- 1 large artisanal sourdough baguette
- Thinly sliced prosciutto or smoked turkey
- Fresh buffalo mozzarella or creamy brie
- Organic heirloom tomatoes
- Fresh basil leaves
- Aged balsamic glaze and extra virgin olive oil
- Parchment paper and baker’s twine
How to make it
- Select a baguette with a very firm, golden-brown crust; this structure is essential for holding up against moisture during transport without becoming mushy.
- Slice the baguette lengthwise, but do not cut all the way through the back edge, creating a ‘hinge’ that will help keep all your ingredients tucked neatly inside.
- Apply a thin layer of extra virgin olive oil to both interior sides of the bread; this fat layer acts as a moisture barrier between the bread and the wetter ingredients.
- Layer your proteins first, folding the prosciutto or turkey to create volume and air pockets, which results in a lighter, more pleasant texture than flat-stacking.
- Add the sliced mozzarella and tomatoes, followed by a generous layer of fresh basil leaves, then drizzle the balsamic glaze directly onto the cheese to keep it contained.
- Close the sandwich firmly and wrap it tightly in parchment paper, folding the ends like a gift; secure the middle with baker’s twine to maintain pressure, which helps the flavors fuse together beautifully.
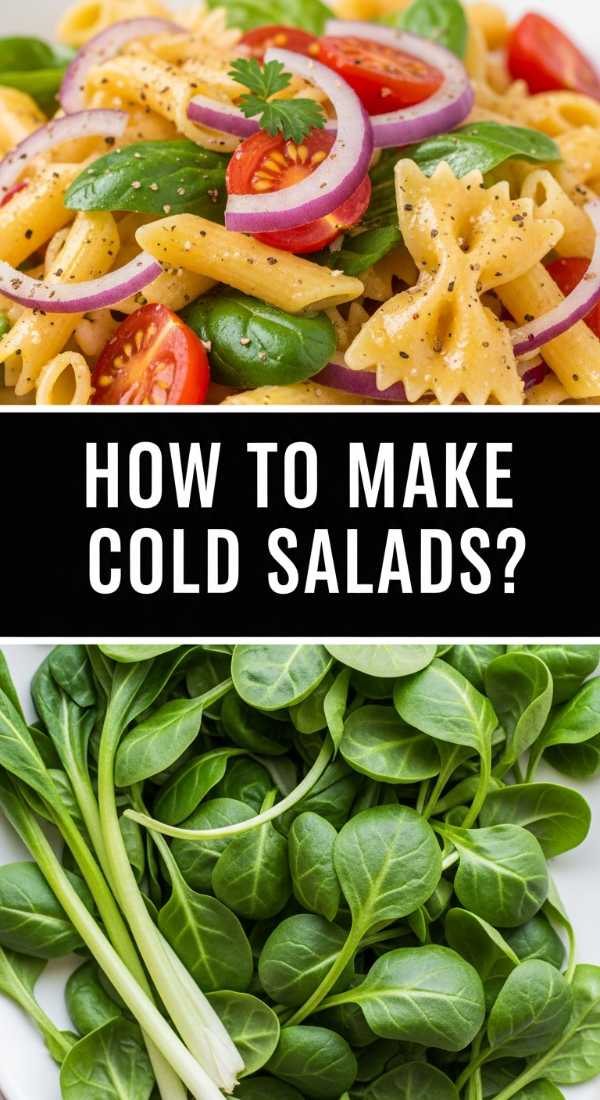
How to make cold salads
Why we love this
Cold salads are the unsung heroes of the food board, offering a burst of cooling refreshment that cleanses the palate between richer bites of cheese and charcuterie. We adore the vibrant contrast of pearly orzo or al dente pasta mixed with the sharp, salty tang of crumbled feta and the zesty brightness of lemon zest. The aroma of chopped dill and mint creates an olfactory garden that makes every forkful feel light and energizing, perfect for a warm afternoon. These salads hold their integrity well, staying crisp and inviting even after an hour in the sun, making them a reliable and beautiful staple.
Ingredients
- 2 cups Orzo pasta or Farfalle
- 1 English cucumber, finely diced
- 1/2 cup Kalamata olives, halved
- 1/2 cup crumbled Feta cheese
- Zest and juice of 2 organic lemons
- 1/4 cup chopped fresh dill and parsley
- 3 tablespoons cold-pressed olive oil
How to make it
- Boil a large pot of salted water and cook your pasta for exactly one minute less than the package instructions; ‘al dente’ is crucial here as the pasta will continue to soften as it absorbs the dressing.
- Drain the pasta and immediately rinse it under cold running water to stop the cooking process and remove excess starch, which prevents the salad from becoming gummy.
- In a small bowl, whisk together the lemon juice, lemon zest, olive oil, and a pinch of sea salt until the mixture is fully emulsified and slightly thickened.
- In a large mixing bowl, combine the cooled pasta with the diced cucumber, olives, and crumbled feta, ensuring the vegetables are cut into uniform sizes for a balanced bite.
- Pour the dressing over the mixture and toss gently with a large wooden spoon, then fold in the fresh herbs at the very end to preserve their bright green color and potent aroma.
- Transfer the salad to a chilled glass container and let it sit in the refrigerator for at least 30 minutes before packing; this allows the pasta to fully soak up the citrus notes.
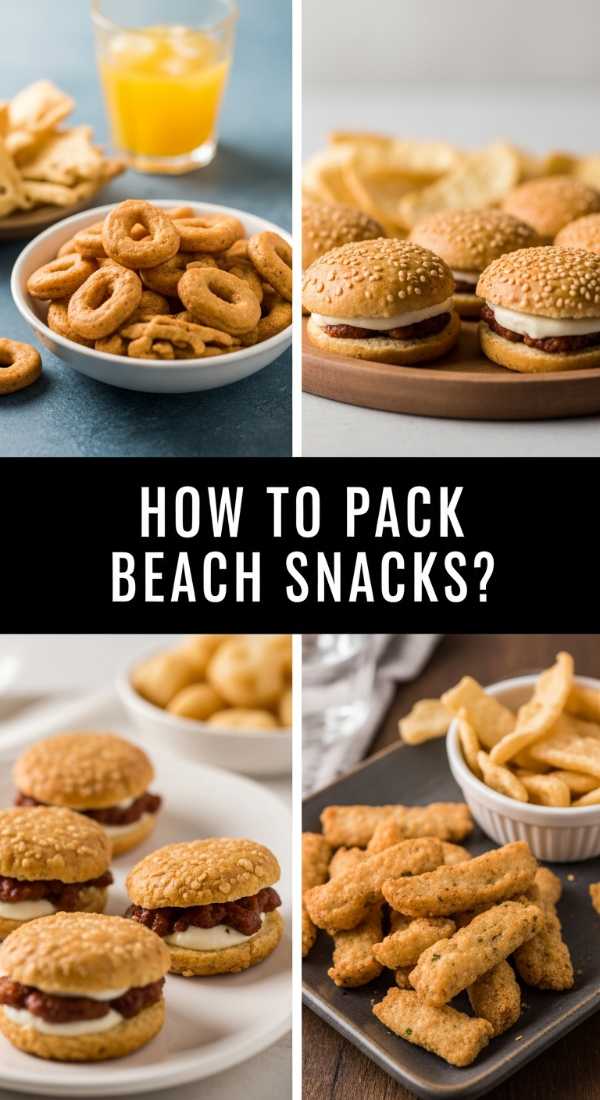
How to pack beach snacks
Why we love this
Packing for the beach requires a strategic balance of hydration and easy-to-eat treats that won’t get ruined by a little salt or sand. We love the refreshing explosion of chilled watermelon wedges and the sweet, snappy crunch of frozen grapes that act like edible ice cubes on a scorching day. There is a primal joy in enjoying juicy, sun-ripened fruit while listening to the rhythmic crashing of the waves, providing a natural sugar boost that keeps your energy high for swimming. These snacks are designed for minimal cleanup, allowing you to focus entirely on the ocean view and the feeling of sand between your toes.
Ingredients
- 1/2 seedless watermelon
- 2 cups green or red grapes
- Tajin seasoning or sea salt
- Fresh lime wedges
- Insulated reusable silicone bags
- Hand sanitizer or wet wipes
How to make it
- Slice the watermelon into thick, easy-to-grip wedges, keeping the rind on to serve as a natural ‘handle’ that keeps sandy hands away from the fruit flesh.
- Place the watermelon wedges into a large, flat airtight container, layering them with parchment paper in between to prevent them from sticking together or losing too much juice.
- Wash the grapes thoroughly, remove them from the stems, and pat them dry; place them in a silicone bag and freeze them overnight for a refreshing, sorbet-like texture.
- Pack a small container of Tajin or sea salt separately; sprinkling this on the watermelon just before eating enhances the sweetness and replenishes electrolytes lost in the heat.
- Place your fruit containers at the very bottom of your cooler, directly against the ice packs, as fruit loses its refreshing quality quickly if it reaches room temperature.
- Always include a pack of wet wipes or hand sanitizer at the top of your snack bag to ensure your hands are clean before you dive into your beach feast.
How to create healthy snacks
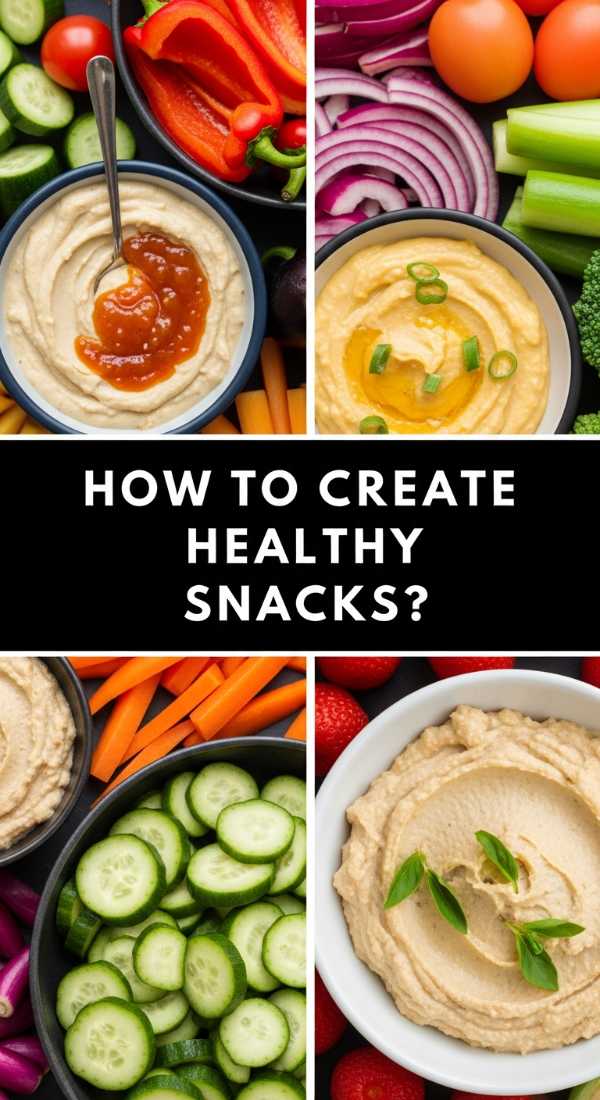
Why we love this
Healthy snacks don’t have to be boring; in fact, when done right, they are the most colorful and texturally diverse part of any viral food board. We love the satisfying ‘snap’ of garden-fresh sugar snap peas and the earthy, velvet smoothness of a well-made roasted garlic hummus. The visual appeal of rainbow carrots and watermelon radishes sliced thinly into rounds adds an element of sophisticated whimsy that feels like high-end catering. It’s the kind of food that leaves you feeling light, nourished, and ready for an afternoon of adventure, proving that wellness and indulgence can live on the same plate.
Ingredients
- 1 cup classic or roasted garlic hummus
- 1 bunch rainbow carrots with tops
- 1 cup sugar snap peas
- 2 watermelon radishes
- 1/2 cup raw almonds or walnuts
- Paprika and olive oil for garnish
How to make it
- Wash the rainbow carrots thoroughly and peel them, leaving about an inch of the green tops for a rustic, farm-to-table appearance that adds height to your board.
- Prepare a bowl of ice water and soak the sliced radishes and snap peas for 10 minutes; this ‘shocks’ the vegetables, making them incredibly crisp and enhancing their vibrant colors.
- Transfer the hummus into a shallow ceramic bowl and use the back of a spoon to create deep swirls and craters on the surface.
- Drizzle high-quality olive oil into the hummus swirls and dust with a pinch of smoked paprika for a professional finish that adds a layer of smoky depth to the flavor.
- Pat the vegetables completely dry with a paper towel after their ice bath to ensure the hummus clings to them perfectly rather than sliding off.
- Arrange the nuts in small clusters around the hummus bowl to fill in gaps and provide a protein-rich, crunchy contrast to the soft dip and crisp veggies.
How to style picnic food

Why we love this
Styling food is where the ‘viral’ magic truly happens, turning a collection of ingredients into a breathtaking visual story. We love the way color blocking—placing similar shades together—creates a sense of organized abundance that is incredibly pleasing to the eye. The addition of edible flowers or sprigs of rosemary adds a layer of organic texture that makes the board feel alive and thoughtfully curated. When a board is styled with care, it invites people to linger, to talk about the ingredients, and to take their time choosing the perfect combination of flavors, making the meal feel like a special event.
Ingredients
- Large wooden or slate serving board
- Small ramekins or bowls in varying heights
- Edible pansies or nasturtiums
- Fresh rosemary or thyme sprigs
- Selection of dried apricots or figs
- Honeycomb or a small jar of jam
How to make it
- Start by placing your largest items first, such as bowls of dip or large blocks of cheese, using the ‘rule of thirds’ to position them off-center for a more dynamic and balanced look.
- Create ‘movement’ on the board by arranging crackers or sliced baguette in curved, flowing lines that lead the eye from one side of the board to the other.
- Group items by color to create a gradient effect; for example, transition from green grapes to green herbs, then to pale cheeses, creating a cohesive visual flow.
- Use small dried fruits like apricots or figs to fill in any ‘dead space’ or small gaps between the larger items, which gives the board a lush, overflowing appearance of plenty.
- Add height and different levels by placing some items directly on the board and others in elevated ramekins, which prevents the spread from looking flat and uninteresting.
- The final touch is the ‘garnish layer’: tuck sprigs of fresh herbs under cheeses and scatter edible flowers across the top to add pops of color and a professional, botanical finish.
How to prep simple lunches
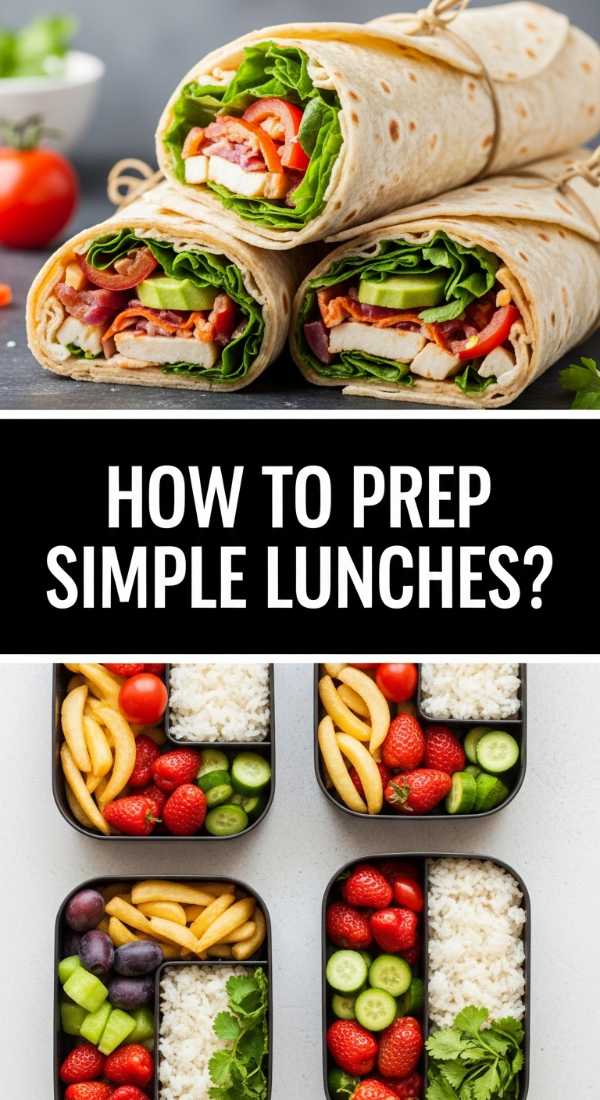
Why we love this
Simple lunches are the backbone of a stress-free lifestyle, offering a reliable way to eat well without spending hours in the kitchen. We love the airy, buttery flakes of a fresh croissant stuffed with a creamy, herb-flecked chicken salad that feels like a treat from a Parisian bistro. The aroma of toasted nuts and the slight sweetness of grapes hidden within the salad provide unexpected moments of joy in every bite. It’s about taking high-quality, pre-prepped components and assembling them with a bit of flair, proving that a ‘simple’ lunch can still be a highlight of your day.
Ingredients
- 4 large, all-butter croissants
- 2 cups shredded rotisserie chicken
- 1/2 cup Greek yogurt or mayo
- 1/4 cup sliced celery and scallions
- 1/2 cup halved red grapes
- 1 bag of mixed microgreens
How to make it
- Shred the rotisserie chicken while it is still slightly warm; this allows it to better absorb the moisture and flavor of the dressing, resulting in a more tender salad.
- In a mixing bowl, combine the Greek yogurt, celery, scallions, and grapes, seasoning with salt and plenty of cracked black pepper to cut through the richness of the chicken.
- Gently fold the shredded chicken into the dressing, being careful not to over-mix, which preserves the texture of the individual components rather than turning them into a paste.
- Slice the croissants horizontally but leave them attached at the back; toast them in a low oven (300°F) for 3-5 minutes until the edges are just barely crisp and the butter aroma is released.
- Place a generous handful of microgreens on the bottom half of the croissant to provide a peppery crunch and protect the bread from any moisture in the salad.
- Scoop the chicken salad onto the greens and close the croissant, pressing down slightly to secure the filling before wrapping it in a decorative paper sleeve for transport.
How to bake picnic cookies

Why we love this
No food board is truly complete without a sweet finale, and these picnic cookies are designed to be the star of the show. We are obsessed with the deep, nutty aroma of browned butter and the way it complements the pools of melting dark chocolate and the sharp hit of flaky sea salt. These cookies strike the perfect balance between a soft, chewy center and golden, caramelized edges that provide a satisfying crunch. They are sturdy enough to be stacked in a tin but feel like an artisan bakery creation, making them the ultimate crowd-pleaser that everyone will be asking for the recipe for.
Ingredients
- 1 cup unsalted butter (to be browned)
- 3/4 cup brown sugar and 1/2 cup granulated sugar
- 1 large egg plus 1 egg yolk
- 2 cups all-purpose flour
- 1 teaspoon baking soda
- 1.5 cups dark chocolate chunks
- Maldon flaky sea salt
How to make it
- Melt the butter in a light-colored saucepan over medium heat, swirling constantly until it foams up and then subsides into a deep amber liquid with a nutty aroma; remove immediately and let cool.
- Whisk the cooled brown butter with both sugars for at least 2 minutes until the mixture is light and aerated, then add the egg and yolk, whisking again until glossy.
- Sift the flour and baking soda into the wet ingredients and fold gently with a spatula until just combined; over-mixing at this stage will result in a tough cookie.
- Fold in the dark chocolate chunks by hand, ensuring they are evenly distributed throughout the dough so every cookie gets a balanced amount of chocolate.
- Chill the dough in the refrigerator for at least 2 hours (or overnight); this step is vital for developing the flavor and preventing the cookies from spreading too thin during baking.
- Scoop balls of dough onto a parchment-lined sheet and bake at 350°F for 10-12 minutes until the edges are golden brown but the centers still look slightly underdone; sprinkle with sea salt immediately after removing from the oven.
How to plan romantic picnics

Why we love this
A romantic picnic is an intimate dance of flavors and settings, designed to make your partner feel like the center of the world. We love the decadence of hand-dipped chocolate strawberries paired with a crisp, bubbling champagne that sparkles in the afternoon light. The scent of a high-quality scented candle or a small bunch of fragrant lilies adds an extra layer of luxury to the outdoor setting. It’s about the small, thoughtful details—like a handwritten menu or a cozy cashmere throw—that turn a simple meal into a heartfelt gesture of affection and a beautiful shared memory.
Ingredients
- 1 bottle of chilled Champagne or Prosecco
- 1 pint large, fresh strawberries
- 1/2 cup high-quality dark chocolate melting wafers
- A selection of soft cheeses (like Camembert or Brillat-Savarin)
- Small unscented candles in glass holders
- A portable Bluetooth speaker for soft music
How to make it
- Select a secluded spot with a beautiful view, ideally timed for ‘golden hour’—the hour before sunset—when the light is soft, warm, and naturally flattering.
- Prepare the strawberries by washing and drying them completely (moisture prevents chocolate from sticking); melt the chocolate in a double boiler over low heat until smooth.
- Dip each strawberry halfway into the chocolate, let the excess drip off, and place them on parchment paper to set in the fridge for at least 20 minutes before packing.
- Choose cheeses that are meant to be eaten at room temperature; take them out of the cooler about 20 minutes before serving so they reach their peak creaminess and aroma.
- Set the scene by laying out a thick, comfortable blanket and arranging a few outdoor pillows to encourage lounging and long conversation.
- Keep the drinks in a small ice bucket or insulated sleeve until the very moment you are ready to pour, ensuring the first sip is perfectly chilled and refreshing.
How to assemble picnic skewers
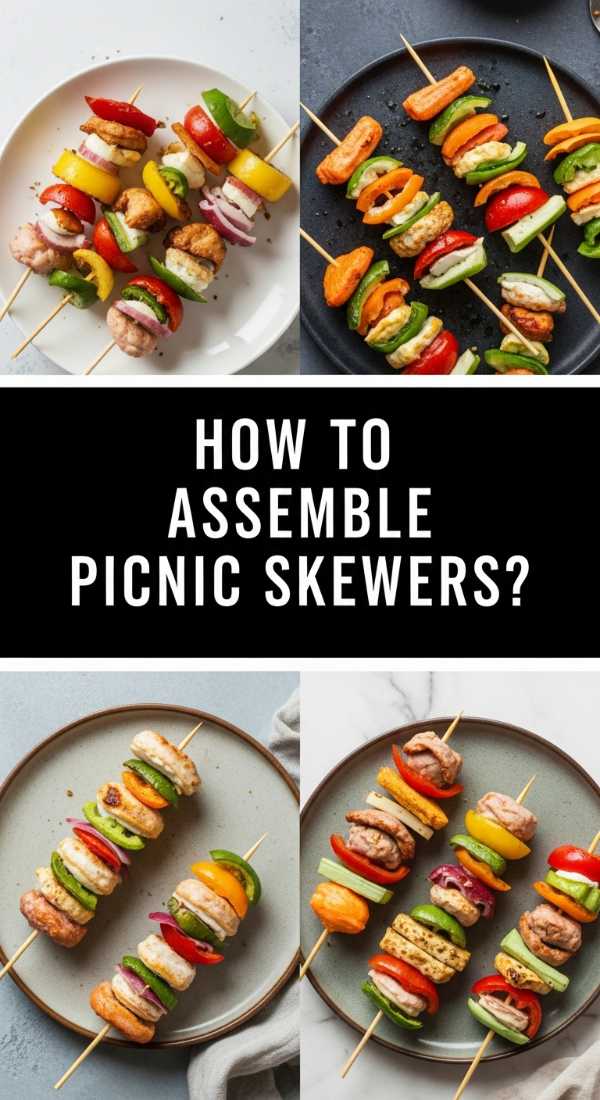
Why we love this
Picnic skewers are the ultimate mess-free finger food, offering a perfectly proportioned bite that is as convenient as it is charming. We love the classic Italian combination of juicy cherry tomatoes, creamy bocconcini mozzarella, and fragrant basil, all drizzled with a rich balsamic reduction. The contrast between the cold, smooth cheese and the burst of sweet tomato juice is incredibly satisfying and refreshing. They look beautiful lined up on a board, adding a sense of height and precision that elevates the entire spread, and they are so easy for guests to grab while they mingle.
Ingredients
- 20 wooden or bamboo 4-inch skewers
- 1 pint cherry or grape tomatoes
- 1 container ‘bocconcini’ (mini mozzarella balls)
- 1 bunch large fresh basil leaves
- Balsamic glaze for drizzling
- Dried oregano and sea salt
How to make it
- Drain the mozzarella balls and pat them dry with a paper towel; toss them in a small bowl with a teaspoon of olive oil, dried oregano, and a pinch of salt for extra flavor.
- To assemble, thread one cherry tomato onto the skewer, followed by a basil leaf that has been folded in half to create a thick green layer.
- Add the seasoned mozzarella ball to the skewer, pushing it up against the basil to keep everything tight and secure so it doesn’t slide around during transport.
- Finish the skewer with another folded basil leaf and one more cherry tomato, creating a colorful, symmetrical look that highlights the freshness of the ingredients.
- Lay the completed skewers in a single layer in a rectangular airtight container to prevent the cheese from getting squashed or the tomatoes from bruising.
- Wait until you are at your picnic site to drizzle the balsamic glaze over the skewers; this ensures the glaze stays thick and glossy on top rather than pooling at the bottom of the container.
Conclusion
Creating the ‘viral’ food board of your dreams isn’t about being a professional chef; it’s about embracing the beauty of fresh ingredients and the joy of shared experiences. From the crunch of a perfectly baked cookie to the refreshing zing of a cold pasta salad, every element we’ve discussed today is designed to make your next picnic feel like a true celebration. So, grab your basket, find a beautiful patch of grass, and start building your own edible masterpiece. I can’t wait to see what you create!