
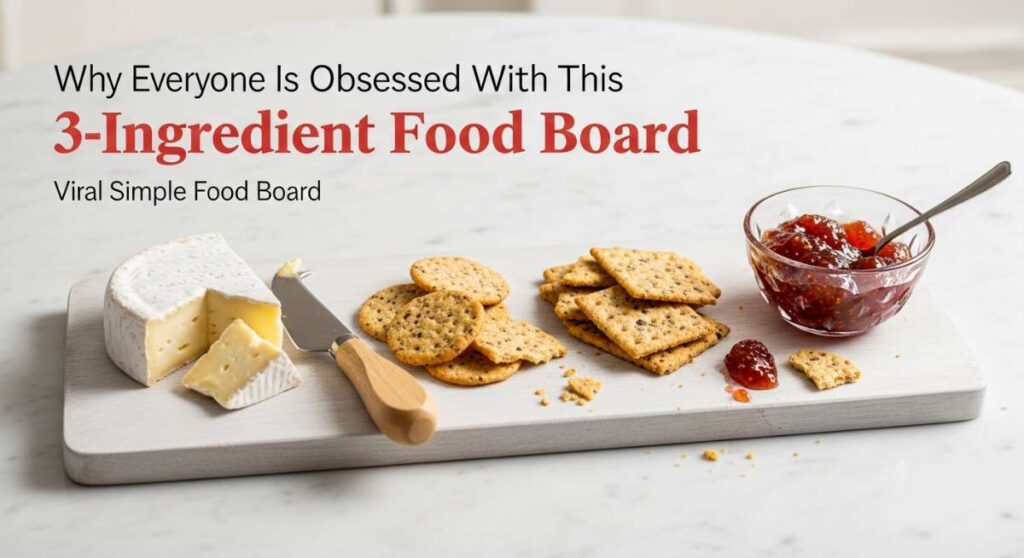
Why Everyone Is Obsessed With This 3-Ingredient Food Board
There is something inherently magical about a slow Sunday morning where the light filters through the kitchen window just right, and the only thing on the agenda is a long, lingering brunch. We have all been there—trying to host the perfect gathering but ending up stressed over a sink full of dishes and a dozen different timers going off at once. That is exactly why the 3-ingredient food board has taken the internet by storm; it strips away the complexity and returns us to the heart of why we eat together: simplicity, connection, and incredible flavor.
This isn’t just about putting food on a wooden plank; it’s an emotional shift in how we approach hosting. By focusing on just three high-quality components for each element of your board, you create a visual masterpiece that feels abundant without being overwhelming. It’s the ultimate hack for the modern lifestyle, proving that you don’t need a culinary degree to create a viral-worthy spread that tastes like a five-star resort breakfast. Let’s dive into the essential components that will make your board the talk of the neighborhood.
How to make crispy potatoes

Why we love this
Nothing beats the satisfying, audible crunch of a perfectly roasted potato that gives way to a center as light and airy as a cloud. The aroma of roasting starch mingling with a hint of earthy olive oil fills the entire home, creating an immediate sense of warmth and comfort that draws everyone to the kitchen. When you hit that sweet spot of a deep mahogany crust and a steaming, fluffy interior, these potatoes become more than just a side dish; they are the golden, salty stars of the board that pair perfectly with everything from runny yolks to spicy salsas.
Ingredients
- 2 lbs Yukon Gold potatoes, chopped into 1-inch cubes
- 1/4 cup extra virgin olive oil
- 1 tablespoon flaky sea salt
How to make it
- Start by parboiling your cubed potatoes in a large pot of heavily salted water for about 8-10 minutes. You want them tender enough that a fork can pierce the surface but not so soft that they fall apart; this releases the starches that create the ultimate crunch.
- Drain the potatoes and let them steam dry in the colander for 2 minutes. Give the colander a vigorous shake to roughen up the edges of the potatoes—those fuzzy, starchy bits are what will transform into crispy glass-like shards in the oven.
- Preheat your baking sheet in a 425°F (220°C) oven for 5 minutes before adding anything. Pour the olive oil onto the hot sheet, then carefully toss the potatoes in the oil until every single surface is glistening.
- Spread the potatoes out in a single layer, ensuring they aren’t touching; crowding the pan will cause them to steam instead of roast. Bake for 25-30 minutes, flipping halfway through with a metal spatula until they are a deep golden brown and sound hollow when tapped.
How to bake breakfast casserole

Why we love this
The breakfast casserole is the quintessential soul-soother, offering a harmonious blend of savory proteins and melted cheese that bubbles at the edges of the dish. There is a specific, nostalgic joy in cutting into a thick square of baked eggs and watching the steam rise, carrying the scent of toasted bread and savory sausage throughout the room. It feels like a warm hug on a plate, providing a dense, satisfying texture that grounds the lighter elements of your food board and keeps everyone full well into the afternoon.
Ingredients
- 12 large organic eggs
- 1 lb ground breakfast sausage (browned and drained)
- 2 cups shredded sharp cheddar cheese
How to make it
- Begin by browning your breakfast sausage in a skillet over medium-high heat. Use a wooden spoon to break the meat into small, even crumbles, cooking until no pink remains and the edges are slightly caramelized for maximum flavor depth.
- In a large glass mixing bowl, crack your 12 eggs and whisk them vigorously for at least 60 seconds. You are looking to incorporate air into the proteins, which ensures the casserole remains light and bouncy rather than dense and rubbery.
- Grease a 9×13 inch ceramic baking dish with butter or non-stick spray. Layer the cooked sausage across the bottom, then sprinkle the shredded cheddar cheese evenly over the meat, ensuring the corners are well-covered.
- Pour the egg mixture slowly over the layers and bake at 350°F (175°C) for 35 to 45 minutes. You’ll know it’s done when the center is set and no longer jiggles, and the top has developed a beautiful, golden-brown lace pattern of melted cheese.
How to roll breakfast burritos

Why we love this
There is a tactile satisfaction in holding a perfectly rolled, warm burrito that is difficult to replicate with any other food. The way the soft, floury tortilla stretches to encompass the steaming fillings creates a portable pocket of pure joy. We love the contrast between the tender, folded dough and the rich, savory interior, especially when the burrito is seared to a slight crisp on the outside, adding a subtle toasted aroma that elevates the entire experience to something truly gourmet yet incredibly approachable.
Ingredients
- 4 large flour tortillas
- 6 scrambled eggs
- 8 slices of crispy cooked bacon
How to make it
- Place your flour tortillas on a damp paper towel and microwave them for 20 seconds. This step is crucial; warm tortillas are pliable and elastic, whereas cold tortillas will crack and spill your precious fillings everywhere.
- Lay a tortilla flat and place a strip of bacon in the center, topped with a generous portion of scrambled eggs. Leave at least two inches of space on the sides to ensure you have enough room to create a secure seal.
- Fold the left and right sides of the tortilla inward toward the center, then take the bottom edge and fold it over the fillings, tucking it tightly underneath the mound of eggs and bacon.
- Roll the burrito forward away from you, keeping the tension tight as you go. For a professional finish, place the rolled burrito seam-side down in a hot, dry skillet for 30 seconds to ‘glue’ the fold shut and add a delightful golden crunch to the exterior.
How to make healthy breakfast

Why we love this
In a world of heavy batters and fried sides, a healthy, vibrant bowl offers a refreshing reset that awakens the palate. The visual appeal of bright, jewel-toned berries against a snowy background of thick yogurt is enough to make anyone feel energized before they even take a bite. We love the cooling sensation of the yogurt paired with the natural, floral sweetness of honey, creating a clean and light finish to the meal that leaves you feeling fueled and ready to take on the day without a heavy food coma.
Ingredients
- 2 cups plain Greek yogurt
- 1 cup fresh mixed berries (blueberries, raspberries, strawberries)
- 2 tablespoons raw local honey
How to make it
- Spoon your Greek yogurt into a bowl and use a small whisk to whip it for thirty seconds. This aerates the thick yogurt, turning it from a dense block into a silky, whipped mousse-like texture that feels far more indulgent.
- Wash your berries in cold water and pat them completely dry with a lint-free towel. If the strawberries are large, slice them into thin rounds to ensure every spoonful of your breakfast contains a balanced ratio of fruit to yogurt.
- Arrange the berries in a decorative ring or a central pile on top of the yogurt. For an aesthetic touch, you can slightly crush a few raspberries to release their juices, creating a beautiful natural swirl of color.
- Finish by drizzling the raw honey in a thin, continuous stream from about six inches above the bowl. This height allows the honey to thin out, ensuring a perfectly even distribution of sweetness across the entire surface.
How to cook breakfast dinner

Why we love this
Cooking breakfast for dinner—lovingly known as ‘Brinner’—feels like a delightful rebellion against the rules of adulthood. It brings a sense of whimsy and nostalgia to the table, turning a standard Tuesday night into a festive occasion. There is something deeply satisfying about the smell of savory gravy and flaky biscuits wafting through the house at 7:00 PM, creating a cozy, low-stakes atmosphere where the only requirement is showing up in your favorite lounge clothes and enjoying the ultimate comfort food combination.
Ingredients
- 1 can refrigerated biscuits (or homemade dough)
- 2 cups white pepper gravy
- 4 sunny-side-up fried eggs
How to make it
- Preheat your oven according to the biscuit package directions and bake them on a parchment-lined sheet until they have risen and the tops are a glowing, golden brown. Split them open while they are still steaming to ensure the centers stay soft.
- While the biscuits bake, heat your white gravy in a small saucepan over medium-low heat. Constant whisking is the secret here; you want to ensure the gravy stays smooth and velvety, never allowing it to reach a rolling boil which could cause the milk solids to separate.
- In a non-stick skillet, crack your eggs over medium heat. To get a perfect sunny-side-up finish, cover the pan with a lid for the last 60 seconds of cooking—this steams the top of the whites perfectly while leaving the yolk vibrant, liquid, and ready to burst.
- Place two biscuit halves on a plate, smother them generously with the hot gravy, and carefully slide a fried egg on top. The moment the yolk breaks and mixes with the peppery gravy, you’ve achieved the ultimate brinner perfection.
How to poach perfect eggs
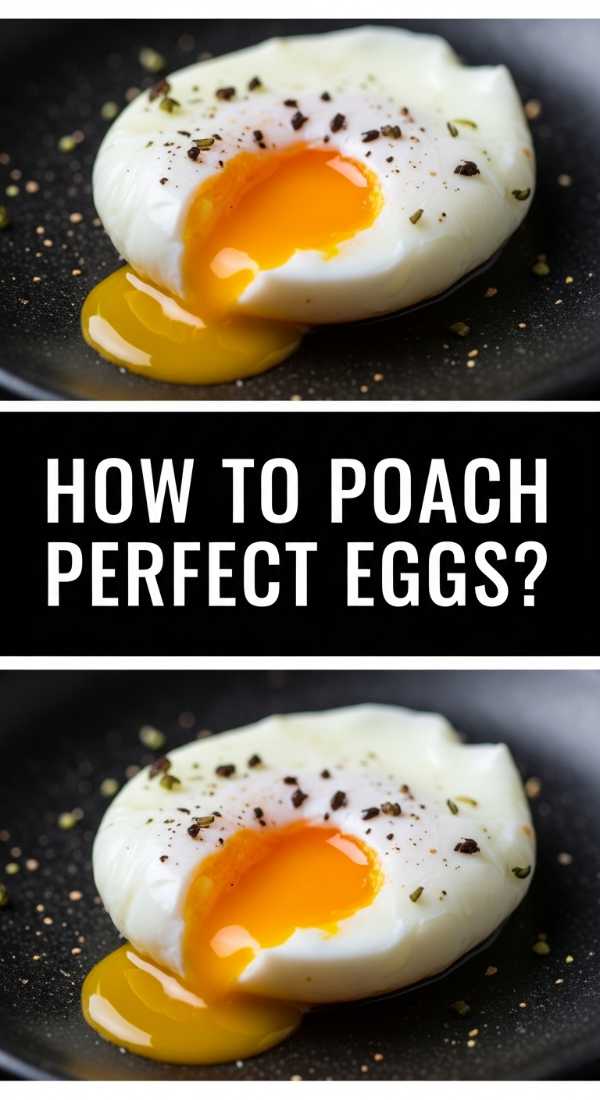
Why we love this
Poached eggs are the height of breakfast elegance, transforming humble ingredients into a gourmet experience. The sight of a pristine, white teardrop of egg white hiding a treasure of molten gold yolk is pure culinary art. We love the delicate, silken texture of the whites which lacks the oily residue of frying, offering a pure, unadulterated egg flavor that feels sophisticated and incredibly light, making it the perfect centerpiece for a high-end food board.
Ingredients
- 4 cold, fresh large eggs
- 1 tablespoon white distilled vinegar
- A pinch of fine sea salt
How to make it
- Fill a deep saucepan with water and bring it to a very gentle simmer. You aren’t looking for big bubbles; rather, you want small ‘fish eyes’ appearing on the bottom of the pot. Stir in the vinegar and salt—the vinegar helps the egg whites coagulate quickly rather than feathering out.
- Crack one egg into a small fine-mesh sieve over a bowl. Let the watery, thin part of the white drain away for 30 seconds; this is the pro secret to preventing those messy ‘spider webs’ in your poaching water.
- Use a spoon to create a gentle vortex in the simmering water. Carefully drop the egg from a small ramekin into the center of the swirl. The motion will naturally wrap the whites around the yolk, creating a tight, neat package.
- Cook for exactly 3 minutes for a runny yolk or 4 minutes for a jammy consistency. Lift the egg out with a slotted spoon and gently pat the bottom of the spoon with a paper towel to remove excess water before serving.
How to prep breakfast meals
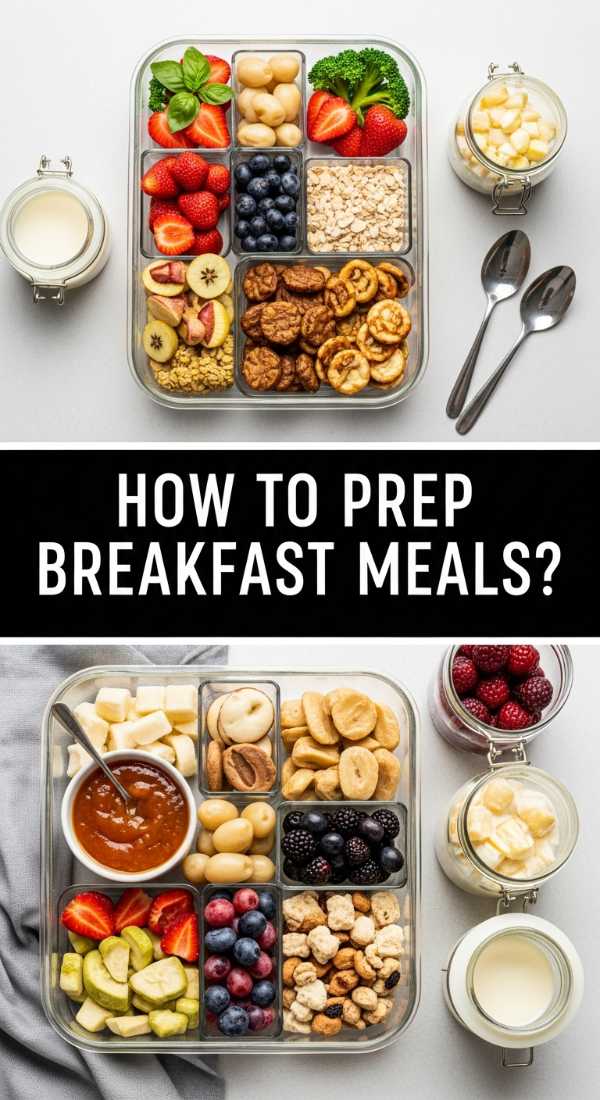
Why we love this
The beauty of meal prepping lies in the gift of time and the elimination of morning decision-fatigue. There is a profound sense of calm that comes with opening the fridge to find a beautiful, ready-to-eat meal waiting for you. We love the way the ingredients meld together overnight, with oats softening into a creamy texture and chia seeds creating a delightful, caviar-like pop, resulting in a dish that is not only convenient but actually tastes better for having had the time to rest and develop.
Ingredients
- 2 cups rolled oats
- 2 cups unsweetened almond milk
- 1/4 cup chia seeds
How to make it
- In a large glass mason jar or airtight container, combine the rolled oats and chia seeds. Give them a quick shake or stir to ensure the seeds are distributed evenly so they don’t clump together once the liquid is added.
- Pour the almond milk over the dry mixture. If you prefer a thinner consistency, add an extra splash of milk now; the oats and chia will absorb a surprising amount of liquid as they hydrate in the refrigerator.
- Seal the container tightly and give it a vigorous shake for 30 seconds. Place it in the refrigerator for at least 6 hours, though overnight is ideal for the creamiest results and maximum nutrient availability.
- In the morning, give the mixture one final stir. The chia seeds will have transformed the milk into a thick, pudding-like consistency. Serve cold directly from the jar or scoop onto your food board and garnish with fresh fruit for an effortless, high-fiber start.
How to flip fluffy pancakes

Why we love this
Pancakes are the ultimate symbol of a leisurely morning, their sweet, buttery aroma acting like a siren song for the whole family. We love the contrast of the golden-brown, slightly crisp exterior against the impossibly soft, airy interior that soaks up syrup like a sponge. Achieving that perfect, uniform circular shape and a light-as-air lift provides a sense of accomplishment that makes the breakfast table feel like a special event every single time.
Ingredients
- 2 cups pancake mix (or flour/baking powder base)
- 1.5 cups cold buttermilk
- 3 tablespoons melted salted butter
How to make it
- Whisk your buttermilk and melted butter into the dry mix using a light hand. The biggest mistake is overmixing; you want to stop the moment the flour streaks disappear. A few small lumps in the batter are actually your friends—they create the air pockets that result in fluffiness.
- Heat a non-stick griddle over medium-low heat. You can test the temperature by flicking a drop of water on the surface; if it dances and sizzles, you’re ready. Wipe the surface with a tiny bit of butter to create those classic lacey edges.
- Pour 1/4 cup of batter per pancake. Now, be patient. Watch for bubbles to form on the surface and, more importantly, for the edges of the pancake to look dry and matte. This is the visual cue that the structure is set enough to flip.
- Slide a thin spatula underneath and flip with a quick flick of the wrist. Do not press down on the pancake with the spatula! Pressing squeezes out the air you worked so hard to keep in. Cook for another 60-90 seconds until the bottom is golden.
How to make avocado toast
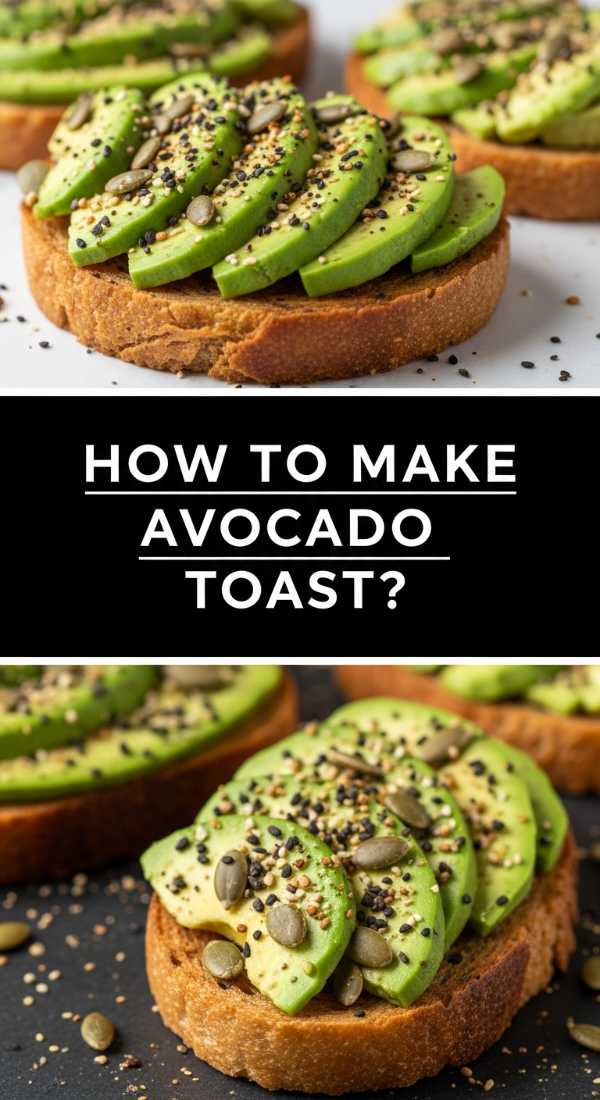
Why we love this
Avocado toast has become a modern classic for a reason: it is the perfect marriage of textures. The crunch of artisanal sourdough provides a robust foundation for the buttery, decadent creaminess of a perfectly ripe avocado. We love how a simple squeeze of lime and a dash of red pepper flakes can transform basic ingredients into a zesty, peppery, and deeply satisfying meal that feels both indulgent and nourishing at the same time.
Ingredients
- 2 thick slices of sourdough bread
- 1 large ripe Hass avocado
- 1 teaspoon red pepper flakes
How to make it
- Toast your sourdough slices until they are a deep, rust-colored brown. You want a very firm toast to provide a structural contrast to the soft avocado—if the bread is too soft, the whole dish becomes mushy.
- Cut your avocado in half, remove the pit, and scoop the flesh into a small bowl. Do not over-mash; use a fork to gently break it down until it is mostly smooth but still retains some chunky texture for a better mouthfeel.
- Stir in a pinch of salt and a squeeze of lime directly into the avocado mash. The acid in the lime not only brightens the flavor but also prevents the avocado from oxidizing and turning brown while it sits on your food board.
- Spread a thick layer of the avocado mixture onto the toast, reaching all the way to the crust. Sprinkle the red pepper flakes from a height to ensure an even distribution of heat, adding a final pop of color and spice that brings the whole dish to life.
How to make cheesy casserole

Why we love this
There is nothing quite like the sight of golden, bubbling cheese stretching from a serving spoon to evoke a sense of pure culinary decadence. This cheesy casserole is the ultimate crowd-pleaser, offering a rich, velvety texture that coats every bite of potato in a savory embrace. We love the way the edges of the cheese bake into a slightly chewy, caramelized crust, providing a flavor depth that makes this dish the most requested item at every gathering.
Ingredients
- 1 bag (30 oz) frozen shredded hash browns, thawed
- 2 cups shredded sharp cheddar cheese
- 1 can (10.5 oz) condensed cream of mushroom soup
How to make it
- In a massive mixing bowl, combine the thawed hash browns, the cream of mushroom soup, and half of the shredded cheddar cheese. Use a large rubber spatula to fold the ingredients together until every shred of potato is evenly coated in the creamy base.
- Transfer the mixture to a 9×13 inch baking dish that has been generously greased. Press the potatoes down gently to create an even surface, which ensures that the casserole bakes at a uniform rate without any cold spots in the middle.
- Top the entire dish with the remaining cup of cheddar cheese. For an extra touch of texture, you can even add a few crushed cornflakes or panko breadcrumbs on top of the cheese to create a delightful crunch.
- Bake at 350°F (175°C) for 45 to 50 minutes. The visual cue for doneness is when the cheese in the center is fully melted and the edges are vigorously bubbling with a deep, golden-brown crust forming around the perimeter of the dish.
Why the Simple Board Wins Every Time
As we wrap up this journey through the world of the 3-ingredient food board, it’s clear that the obsession isn’t just about the food—it’s about the feeling. By choosing simple, high-quality ingredients and focusing on the techniques that make them shine, you take the pressure off yourself as a host and put the focus back on the joy of sharing a meal. Whether you are flipping fluffy pancakes or mashing the perfect avocado, remember that the best boards are made with love and a little bit of patience. So, grab your favorite wooden board, pick three of these sections to start with, and watch as your kitchen becomes the heart of your home.