

5 Simple Food Boards You Can Make in Under 10 Minutes
There is something undeniably magical about the art of grazing. In my home, the ‘food board’ has become more than just a meal; it is a ritual of slow living and shared joy. Whether I am hosting a last-minute gathering or simply treating myself to a quiet ‘girl dinner’ on the balcony, these boards represent the perfect intersection of effortless style and soul-satisfying flavor. They turn the mundane act of eating into a curated experience that celebrates color, texture, and the seasons.
We have all seen those viral boards on social media that look like they took hours to assemble, but the secret I have learned as a busy blogger is that beauty doesn’t have to be complicated. With the right ingredients and a few clever styling tricks, you can create a masterpiece in the time it takes to brew a pot of coffee. These ten ideas are my go-to’s for transforming simple pantry staples and fresh market finds into a feast that is as Instagrammable as it is delicious.
How to pack aesthetic fruit for a picnic

Why we love this
There is nothing quite like the vibrant, jewel-toned explosion of a perfectly packed fruit board to signal that summer has truly arrived. We love this approach because it elevates simple produce into a work of art, featuring a symphony of textures—from the crisp, refreshing snap of a chilled grape to the velvety, sun-drenched sweetness of a ripe peach. The aroma of fresh mint mingling with citrus zest creates an olfactory experience that is as invigorating as a cool breeze, making every bite feel like a celebration of nature’s bounty.
Ingredients
- Fresh strawberries, hulled and halved
- Green and purple seedless grapes
- Sliced kiwi with skins removed
- Honeycrisp apple slices (dipped in lemon water)
- Fresh blueberries and raspberries
- Fresh mint sprigs for garnish
- Micro-honey drizzle (optional)
How to make it
- Begin by washing all fruit thoroughly in a cold water bath with a splash of vinegar to ensure they are sparkling clean and vibrant.
- Prepare the larger fruits first by slicing the kiwis into perfect rounds and the apples into thin wedges; immediately submerge the apple slices in a bowl of cold water mixed with a tablespoon of lemon juice to prevent oxidation and keep them bright white.
- Select a shallow, rectangular wooden board or a high-quality airtight container if you are heading outdoors immediately.
- Create a ‘river’ of grapes diagonally across the board to act as a structural anchor for the smaller berries.
- Nestle the strawberry halves and kiwi rounds into the curves of the grape river, ensuring the colors contrast—place the bright green kiwi next to the deep red strawberries for maximum visual impact.
- Fill the remaining gaps with clusters of blueberries and raspberries until no part of the board or container bottom is visible.
- Finely tuck fresh mint sprigs into the corners and lightly drizzle with honey if you prefer an extra sheen and a touch of floral sweetness before serving.
How to make picnic wraps easily
Why we love this
Picnic wraps are the ultimate unsung heroes of outdoor dining, offering a self-contained explosion of flavor that stays perfectly intact while you lounge on a blanket. We adore the way a soft, flour tortilla yields to a crunch of fresh greens followed by the savory richness of thinly sliced deli meats and a velvety spread. It’s a handheld meal that feels sophisticated yet grounded, providing a balanced bite that keeps you fueled for an afternoon of sunshine and laughter without any of the mess of traditional sandwiches.
Ingredients
- Large spinach or sun-dried tomato flour tortillas
- Herbed cream cheese or roasted garlic hummus
- Thinly sliced smoked turkey or roast beef
- Baby spinach leaves or butter lettuce
- Shredded carrots and thinly sliced cucumbers
- A pinch of sea salt and cracked black pepper
How to make it
- Lay your tortilla flat on a clean cutting board and spread a generous, even layer of herbed cream cheese or hummus across the entire surface, leaving a half-inch border at the top edge to act as a ‘glue.’
- Layer your greens across the bottom two-thirds of the tortilla, ensuring they are flat and not piled too high, which prevents the wrap from becoming bulky and difficult to roll.
- Place your sliced meat over the greens, overlapping the slices slightly to ensure every bite contains protein.
- Add a thin layer of shredded carrots and cucumber slices near the center to provide a structural ‘spine’ for the roll.
- Fold the left and right sides of the tortilla inward about an inch, then starting from the bottom, roll the tortilla tightly toward the top, applying gentle pressure to keep the fillings compressed.
- Once rolled, let the wrap rest on its seam for one minute to allow the spread to seal the tortilla shut.
- Using a very sharp serrated knife, slice the wrap diagonally in the center to reveal the beautiful, colorful layers inside, then wrap tightly in parchment paper or beeswax wrap for transport.
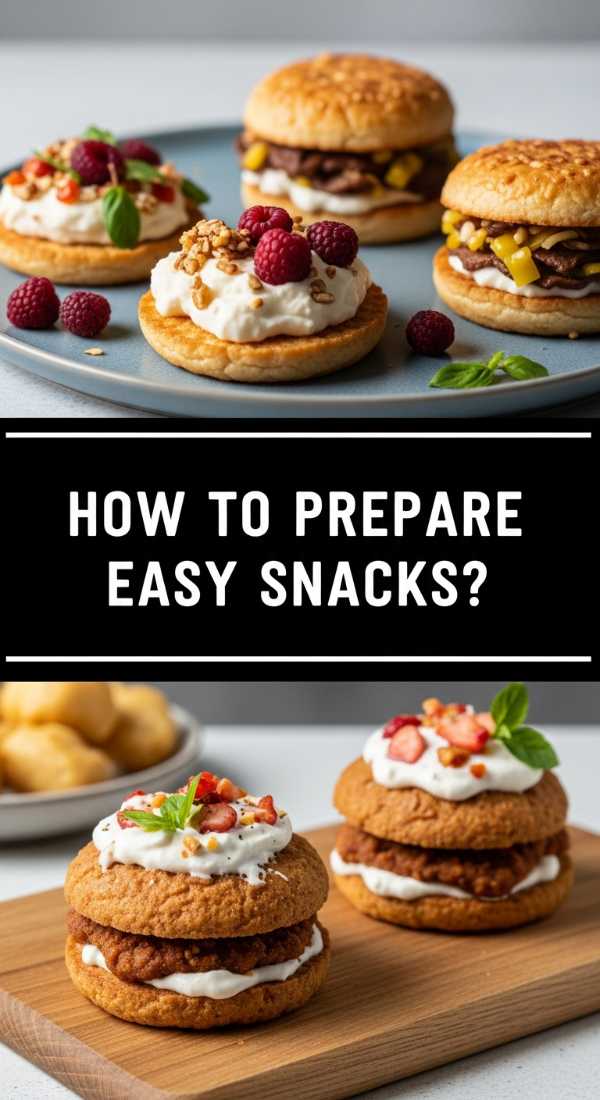
How to prepare easy picnic snacks

Why we love this
The beauty of a snack board lies in its versatility and the delightful medley of salty, crunchy, and savory notes that dance across your palate. We love this because it encourages a communal dining experience where everyone can pick their favorite treasures, from the briny pop of a marinated olive to the smoky, earthy crunch of roasted almonds. It’s the kind of food that invites conversation, paired with a chilled glass of rosé and the warm glow of the golden hour, creating a sensory memory that lingers long after the last almond is gone.
Ingredients
- Marinated Kalamata and Castelvetrano olives
- Smoked almonds or candied walnuts
- Pretzel thins or multi-seed crackers
- Cubed sharp cheddar or Manchego cheese
- Dried apricots or mission figs
- Prosciutto ribbons
How to make it
- Start by selecting a variety of small ceramic bowls to hold the wetter ingredients like olives, ensuring the brine doesn’t soak into your crunchy crackers.
- Place the bowls on opposite corners of a medium-sized wooden board to create balance and focal points.
- Fan out your crackers or pretzel thins in a circular pattern around one of the bowls, creating a sense of movement across the board.
- Arrange the cheese cubes in neat piles or ‘stacks’ near the center; if using Manchego, slice it into thin triangles for a more professional, architectural look.
- Take individual slices of prosciutto, fold them in half lengthwise, and then roll them into ‘ribbons’ or rosettes, tucking them into any open spaces to add height and a touch of elegance.
- Scatter the nuts and dried fruits into the smaller crevices of the board, filling every empty spot to create that lush, ‘abundant’ look that makes snack boards so appealing.
- Finish with a light sprinkle of flaky sea salt over the cheese and nuts to enhance the natural flavors just before heading out.
How to store picnic salads
Why we love this
Nothing ruins a picnic faster than a soggy, limp salad, which is why we are absolutely obsessed with the art of vertical storage. By layering ingredients strategically, you preserve the crispness of the vegetables and the integrity of the dressing until the very moment you’re ready to eat. There is a deep satisfaction in seeing the colorful strata of a mason jar salad—it’s organized, beautiful, and ensures that the first bite is just as fresh and vibrant as the last, regardless of how long you’ve been traveling.
Ingredients
- Wide-mouth 16oz or 32oz glass mason jars
- Vinaigrette or creamy dressing
- Hard vegetables (chickpeas, cucumbers, cherry tomatoes)
- Grains or proteins (quinoa, grilled chicken, farro)
- Soft vegetables and cheeses (feta, avocado, berries)
- Leafy greens (arugula, kale, or romaine)
How to make it
- Pour 2-3 tablespoons of your chosen dressing into the very bottom of the clean, dry mason jar; this prevents the dressing from touching the delicate greens during transport.
- Layer your ‘barrier’ vegetables first—these are the hardy items like chickpeas, sliced cucumbers, or halved cherry tomatoes that won’t get soggy when sitting in the dressing.
- Add your grains or protein layer next, such as chilled quinoa or cubed chicken, which will absorb some of the dressing’s flavor without losing its texture.
- Follow with a layer of softer items like crumbled feta or sliced strawberries, keeping them safely away from the liquid at the bottom.
- Pack the remainder of the jar tightly with your leafy greens; the goal is to have as little air as possible in the jar to maintain freshness, but avoid bruising the leaves.
- Seal the jar with a tight-fitting lid and keep it upright in your cooler or picnic basket.
- When ready to serve, simply shake the jar vigorously to distribute the dressing, or pour the entire contents into a bowl for a perfectly tossed, crisp salad.
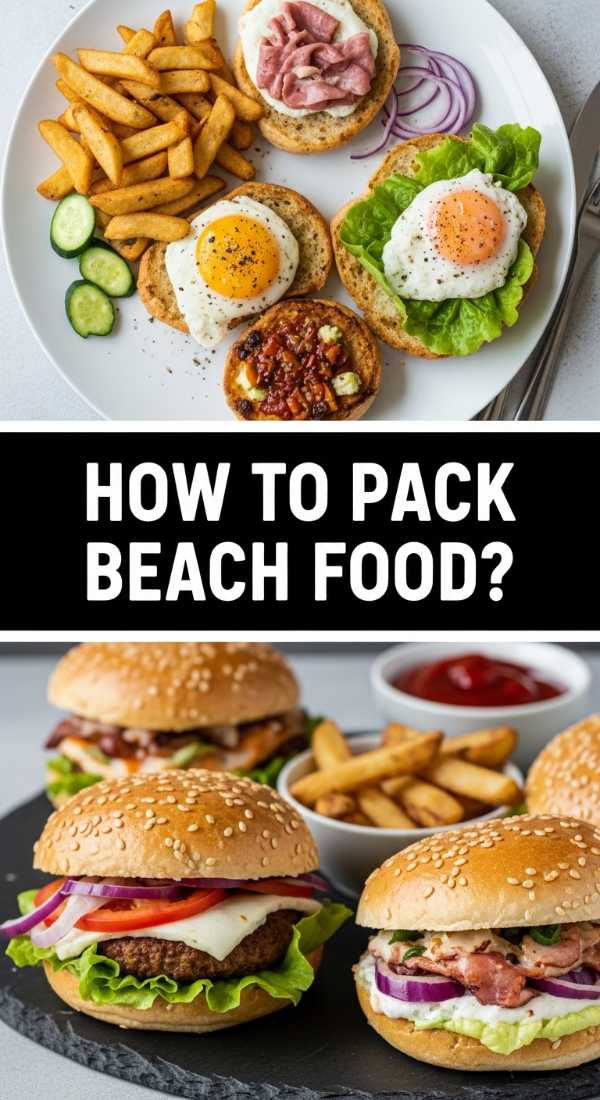
How to pack beach food properly
Why we love this
Eating at the beach presents the unique challenge of sand and sun, but with the right packing technique, it becomes a luxurious seaside banquet. We love this method because it focuses on individual portions and temperature control, ensuring your food stays chilled and sand-free. Imagine biting into a crisp, cold snack while the salt air fills your lungs and the waves crash nearby—it turns a simple beach day into a gourmet getaway where the food is as refreshing as the ocean itself.
Ingredients
- Insulated cooler bag with high-quality ice packs
- Individual clear containers with locking lids
- Frozen water bottles (double as ice packs)
- Pre-cut chilled veggies (bell peppers, snap peas)
- Hummus or tzatziki in small sealed pods
- Eco-friendly disposable bamboo utensils
How to make it
- Chill all your food and beverages in the refrigerator for at least 4 hours (ideally overnight) before packing; a cold start is the most important rule for beach food safety.
- Place heavy-duty ice packs or frozen water bottles at the very bottom of your insulated cooler bag to create a ‘basement’ of cold air.
- Pack your food in individual, single-serving containers; this prevents the ‘communal bowl’ sand catastrophe—if one person gets sand on their hands, it only affects their portion.
- Place the heaviest and least temperature-sensitive items at the bottom of the bag, directly on the ice, and save the top layer for delicate items like fruit or sandwiches.
- Fill any empty air gaps in the cooler with clean kitchen towels or extra ice packs; air is the enemy of cold, so a full cooler stays chilled much longer than a half-empty one.
- Pack a separate ‘dry’ bag for napkins, utensils, and trash bags to ensure they don’t get damp from condensation.
- Keep the cooler zipped shut at all times and stored in the shade of an umbrella or under a towel to maximize the life of your ice.
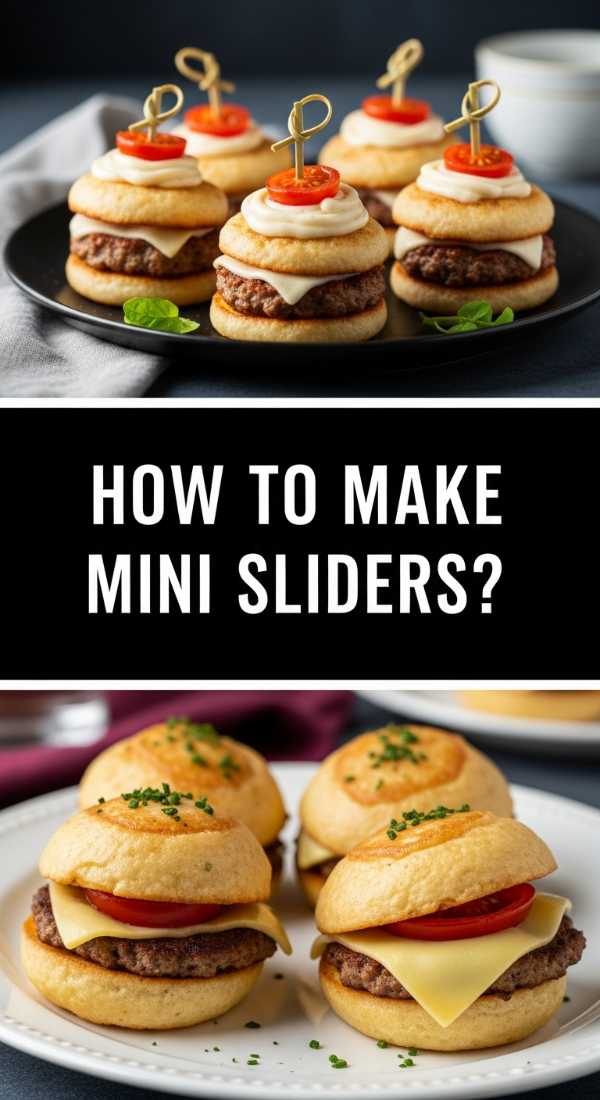
How to make mini sliders for two

Why we love this
Mini sliders are the epitome of cozy, intimate dining, offering all the savory satisfaction of a gourmet burger in a charming, bite-sized package. We love the way the melted cheese blankets the warm meat, tucked inside a toasted, pillowy brioche bun that has been brushed with garlic butter. It’s a playful and indulgent dish that feels like a special occasion treat, perfect for a romantic sunset picnic or a quiet evening at home when you want maximum flavor with minimal fuss.
Ingredients
- 6 mini brioche slider buns
- 1/2 lb ground wagyu beef or high-quality turkey
- Slices of sharp cheddar or gruyere cheese
- Caramelized onions
- Arugula and a slice of plum tomato
- Melted butter with garlic powder and parsley
How to make it
- Preheat your skillet or griddle over medium-high heat until it is lightly smoking; a hot surface is essential for achieving that savory, caramelized crust on the meat.
- Form the meat into small, uniform patties that are slightly wider than your slider buns, as they will shrink slightly during the cooking process.
- Season both sides of the patties generously with salt and pepper, then sear them for 2-3 minutes per side; top with a small square of cheese during the last minute of cooking and cover the pan with a lid to steam the cheese into a perfect melt.
- While the meat rests, slice your brioche buns and brush the insides with the garlic-parsley butter.
- Toast the buns face-down in the skillet for about 30 seconds until they are golden brown and fragrant.
- Assemble the sliders by placing a dollop of caramelized onions on the bottom bun, followed by the cheesy patty, a slice of tomato, and a small pinch of arugula for a peppery crunch.
- Secure each slider with a bamboo toothpick to keep the layers aligned and serve immediately while the cheese is still gooey and the buns are warm.
How to cook cold pasta salad

Why we love this
A well-executed cold pasta salad is a masterclass in balance—tangy, herbaceous, and incredibly satisfying. We love this dish because it actually improves with time, as the pasta shells act like little sponges, soaking up the zest of the vinaigrette and the essence of the fresh herbs. The combination of chewy pasta, crunchy vegetables, and creamy cheese creates a multi-dimensional texture that feels incredibly refreshing on a warm afternoon, making it the quintessential side dish for any outdoor feast.
Ingredients
- 1 lb fusilli or rotini pasta
- Italian vinaigrette (olive oil, red wine vinegar, oregano)
- Halved cherry tomatoes and diced cucumbers
- Salami or pepperoni pearls
- Fresh mozzarella pearls or cubed provolone
- Black olives and fresh basil leaves
How to make it
- Bring a large pot of heavily salted water to a rolling boil; the water should taste like the sea to properly season the pasta from the inside out.
- Cook the pasta until it is just slightly past ‘al dente’—when pasta cools, it firms up, so cooking it an extra 60 seconds ensures it remains tender once chilled.
- Drain the pasta and immediately rinse it under cold running water for 2 minutes to stop the cooking process and wash away excess starch, which prevents the pasta from sticking together.
- Transfer the cold pasta to a large mixing bowl and toss with half of your vinaigrette while it is still slightly damp; this helps the dressing adhere to the surface.
- Fold in your chopped vegetables, meats, and cheese, ensuring a balanced distribution of color and texture throughout the bowl.
- Add the remaining dressing and finely chopped fresh basil, then cover and refrigerate for at least two hours before serving.
- Just before serving, give the salad one final toss and add a splash of olive oil if the pasta has absorbed too much liquid, which will restore that beautiful, glossy sheen.
How to bake picnic cookies
Why we love this
There is a specific kind of joy found in a cookie designed for travel—one that is sturdy enough to survive a journey but soft enough to melt in your mouth. We love these picnic cookies because they lean into a rich, buttery base with hints of sea salt that perfectly balance the sweetness of the chocolate. They provide that nostalgic, comforting finish to an outdoor meal, evoking memories of childhood summers while offering a sophisticated flavor profile that adults will absolutely crave.
Ingredients
- 1 cup browned butter (cooled)
- 3/4 cup brown sugar and 1/4 cup white sugar
- 1 egg plus 1 egg yolk (for chewiness)
- 2 cups all-purpose flour
- 1 tsp baking soda and 1/2 tsp sea salt
- Dark chocolate chunks (which hold their shape better than chips)
- Flaky sea salt for topping
How to make it
- Preheat your oven to 350°F (175°C) and line two heavy baking sheets with parchment paper to ensure even heat distribution and prevent the bottoms from burning.
- In a large bowl, cream together the browned butter and sugars until the mixture is light and aerated; the browned butter adds a nutty, toasted aroma that is vital for the ‘picnic’ flavor profile.
- Beat in the egg and the extra yolk one at a time, followed by a splash of vanilla extract, until the mixture is smooth and pale.
- Sift in the dry ingredients—flour, baking soda, and salt—and fold gently with a spatula until just combined; over-mixing at this stage will result in a tough cookie.
- Fold in the dark chocolate chunks by hand, then chill the dough in the refrigerator for at least 30 minutes; chilling the dough prevents the cookies from spreading too thin in the oven.
- Scoop rounded tablespoons of dough onto the sheets and bake for 9-11 minutes, or until the edges are just barely golden but the centers still look slightly underdone.
- Remove from the oven and immediately sprinkle with flaky sea salt; let them cool completely on the pan to allow the centers to set into a fudgy, chewy texture that is perfect for packing.
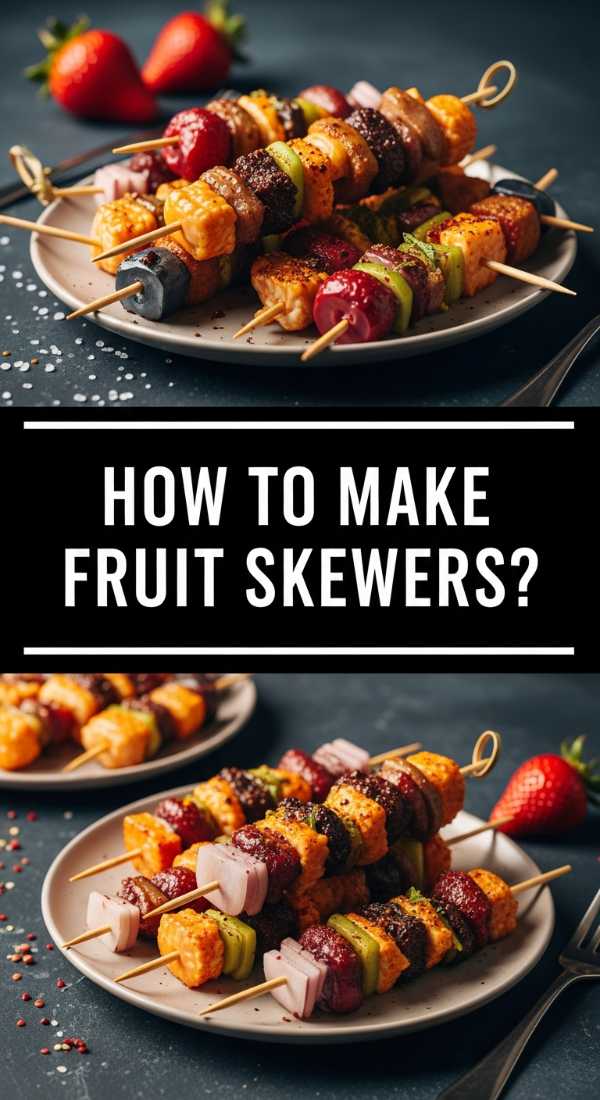
How to make fruit skewers

Why we love this
Fruit skewers are the ultimate ‘clean’ way to enjoy nature’s candy, offering a playful, rainbow-colored presentation that is impossible to resist. We love them because they eliminate the need for utensils and plates, making them the perfect grab-and-go option for a bustling picnic. Each skewer is a curated sequence of flavors—a burst of citrus, a mellow berry, and a crisp melon—creating a rhythmic eating experience that is as fun for kids as it is elegant for adults.
Ingredients
- Wooden or bamboo skewers (soaked in water for 10 mins)
- Pineapple chunks and cantaloupe balls
- Whole blackberries and raspberries
- Green grapes
- Honeydew melon slices
- Optional: Honey-yogurt dip for the side
How to make it
- Prepare your fruit by cutting them into uniform, bite-sized pieces; consistency is key here so that the skewer looks professionally made and fits comfortably in the mouth.
- If using wooden skewers, soak them in water for a few minutes to prevent any splintering and to make sliding the fruit on much smoother.
- Plan your color sequence beforehand—a classic ‘rainbow’ pattern (red, orange, yellow, green, purple) is always a crowd-pleaser and looks stunning on a white platter.
- Carefully thread the fruit onto the skewer, starting with a firmer fruit like a grape or pineapple at the bottom to act as an anchor.
- Avoid over-crowding the skewer; leave about an inch of space at the top and two inches at the bottom for a handle.
- Once assembled, lay the skewers flat in a single layer in a shallow container; placing them in multiple layers can cause the softer berries to get crushed.
- Keep the skewers chilled until the very moment of serving to maintain the crispness of the melon and the structural integrity of the berries.
How to make picnic sandwiches
[IMAGE_10]
Why we love this
A classic picnic sandwich is a study in texture and ‘the build.’ We love this version because it focuses on a crusty exterior and a moisture-barrier interior, ensuring that the bread remains perfectly chewy rather than soggy after an hour in the basket. There is something profoundly satisfying about unwrapping a tightly bound sandwich to find layers of savory meats and crisp vegetables perfectly preserved, offering a hearty and soul-warming meal that feels like a hug in every bite.
Ingredients
- A long, crusty baguette or ciabatta loaf
- Basil pesto or sun-dried tomato spread
- Thinly sliced prosciutto, salami, and ham
- Provolone or fresh mozzarella slices
- Roasted red peppers (patted dry)
- Fresh arugula or microgreens
How to make it
- Slice your baguette or ciabatta loaf lengthwise, but leave one side slightly attached like a hinge; this helps keep the fillings from sliding out the back as you eat.
- Apply a ‘moisture barrier’ to both sides of the bread—a thin layer of pesto, butter, or mayo works perfectly to prevent the juices from the meat and veggies from soaking into the crumb.
- Layer your cheeses first, directly against the spread; cheese acts as a secondary shield against sogginess.
- Add your meats in thin, folded layers rather than flat sheets; this creates air pockets that make the sandwich feel lighter and easier to bite through.
- Ensure any ‘wet’ ingredients, like roasted peppers or pickles, are thoroughly patted dry with a paper towel before being added to the center of the sandwich.
- Top with a handful of fresh arugula for a peppery bite, then close the sandwich and press down firmly with your hand to ‘set’ the layers.
- Wrap the entire sandwich tightly in parchment paper and tie it with kitchen twine; let it sit for at least 20 minutes before slicing, as the pressure helps the flavors meld together beautifully.
The Final Flourish
Creating the perfect food board or picnic spread is less about culinary expertise and more about the love you put into the details. It’s about choosing the freshest ingredients, playing with colors, and considering the environment where the food will be enjoyed. Whether you’re at the beach or in your backyard, these simple, 10-minute preparations ensure that you spend less time in the kitchen and more time making memories with the people who matter most. Happy grazing!