
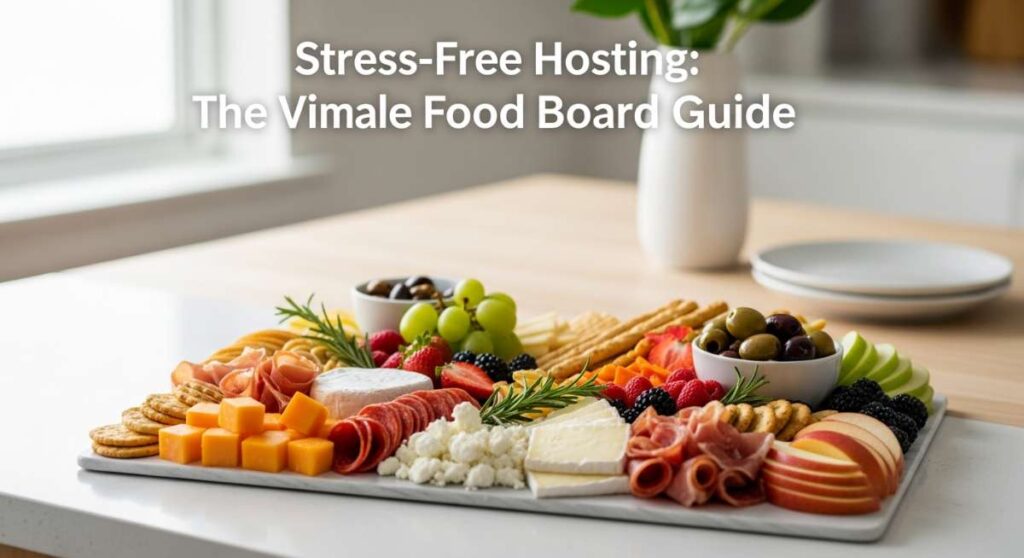
Stress-Free Hosting: The Viral Simple Food Board Guide
We’ve all been there: the guests are arriving in twenty minutes, the kitchen is a disaster zone, and you’re still trying to figure out how to plate three different appetizers while the main course is burning. I used to spend my entire party stuck behind the kitchen island, missing all the laughter and the stories. But then, I discovered the magic of the ‘Viral Simple Food Board.’ It’s more than just a trend; it’s a philosophy of hosting that prioritizes connection over complexity. By laying out a beautiful, self-serve spread of artisanal breads, decadent sweets, and refreshing drinks, you invite your guests to build their own perfect plate while you actually enjoy the party.
The beauty of this approach is in the mix of textures and temperatures. Imagine a massive wooden board overflowing with warm, crusty loaves, vibrant bowls of acai, and towers of fudgy brownies. It looks like a professional caterer spent days on it, but with the right techniques, you can master every element in your own kitchen. This guide is your roadmap to creating that effortless, high-end hosting experience that will have your friends talking for months. Let’s dive into the recipes that will make your next gathering absolutely legendary.
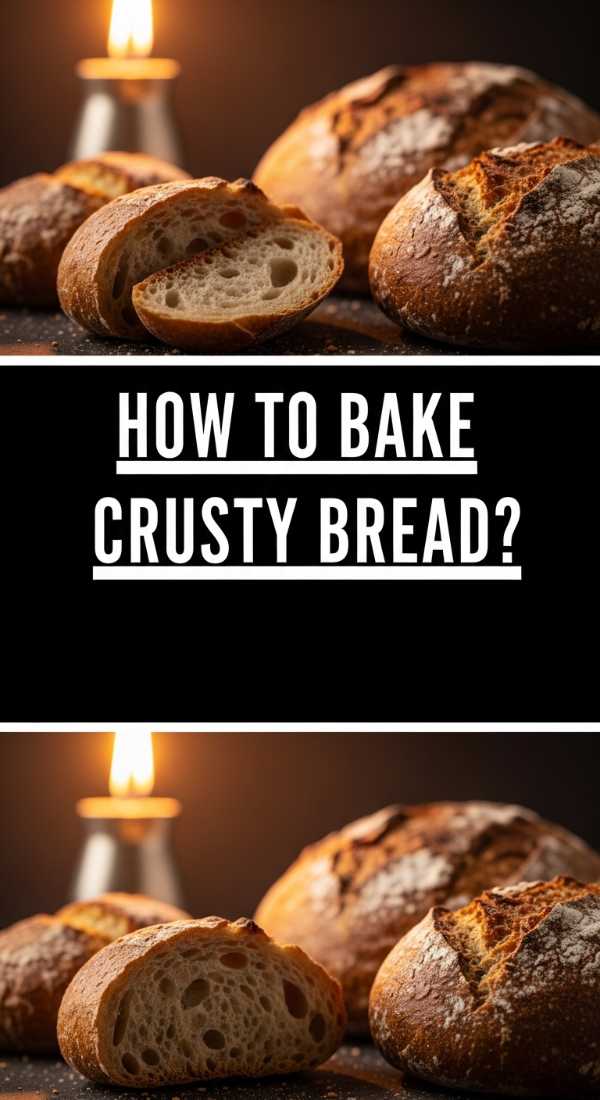
How to bake crusty bread?
Why we love this
There is nothing quite like the sound of a loaf of bread singing as it comes out of the oven—that delicate crackle of the crust as it meets the cool air. The aroma of toasted grain and yeast fills the room, creating an instant sense of home and comfort. When you tear into it, the contrast between the shatteringly crisp exterior and the pillowy, steam-filled center is pure heaven. Slathered with salted butter, it becomes the ultimate centerpiece of any food board, inviting guests to break bread together in the most literal and beautiful sense.
Ingredients
- 3 cups all-purpose flour
- 1.5 cups warm water (about 105°F)
- 1 teaspoon active dry yeast
- 1.5 teaspoons sea salt
- Cornmeal for dusting
How to make it
- In a large glass bowl, whisk together the flour, salt, and active dry yeast until fully combined. Pour in the warm water and use a sturdy wooden spoon or your hands to mix until a shaggy dough forms and no dry flour remains. Cover the bowl tightly with plastic wrap and let it sit at room temperature for 12 to 18 hours until doubled in size and covered in bubbles.
- Preheat your oven to 450°F (230°C) and place a heavy Dutch oven (with the lid) inside to heat up for at least 30 minutes. This preheating phase is critical for achieving that professional-grade steam-puffed crust.
- Turn the dough out onto a well-floured surface. It will be sticky, so use a bench scraper or floured hands to gently fold it into a round ball. Do not overwork the dough; you want to preserve those precious air bubbles.
- Carefully remove the hot Dutch oven from the heat. Place the dough onto a piece of parchment paper and lower it into the pot. Cover with the lid and bake for 30 minutes. The lid traps steam, which allows the bread to expand before the crust sets.
- Remove the lid and bake for another 15 minutes until the crust is a deep golden brown. Internal temperature should reach 190-200°F. Let it cool on a wire rack for at least 1 hour before slicing to ensure the crumb structure sets perfectly.
How to make chocolate cake?

Why we love this
A deep, dark chocolate cake is the emotional anchor of a dessert board. This version is incredibly moist, with a velvet-like crumb that melts on the tongue, releasing a rich cocoa intensity that isn’t masked by over-sweetness. The aroma of high-quality chocolate baking is hypnotic, drawing everyone to the kitchen. When paired with fresh berries or a dollop of cream, it offers a sophisticated, indulgent experience that feels like a warm hug in cake form. Its structural elegance makes it the perfect canvas for any garnish you choose.
Ingredients
- 2 cups granulated sugar
- 1.75 cups all-purpose flour
- 0.75 cup unsweetened cocoa powder
- 1.5 teaspoons baking powder
- 1.5 teaspoons baking soda
- 1 teaspoon salt
- 2 large eggs
- 1 cup whole milk
- 0.5 cup vegetable oil
- 2 teaspoons vanilla extract
- 1 cup boiling water
How to make it
- Preheat your oven to 350°F (175°C). Grease and flour two 9-inch round cake pans or line them with parchment paper. This ensures a clean release, which is vital for a viral-worthy presentation.
- In a large mixing bowl, sift together the sugar, flour, cocoa, baking powder, baking soda, and salt. Sifting is non-negotiable here as it prevents cocoa clumps and aerates the dry ingredients for a lighter crumb.
- Add the eggs, milk, oil, and vanilla extract. Beat on medium speed with a hand mixer or stand mixer for about 2 minutes. The batter will be thick at this point.
- Stir in the boiling water by hand. This ‘blooms’ the cocoa powder, intensifying the chocolate flavor and thinning the batter to a liquid consistency. Don’t be alarmed; a thin batter leads to the moistest cake.
- Pour the batter evenly into the prepared pans. Bake for 30 to 35 minutes. Test with a wooden skewer; it should come out clean or with just a few moist crumbs. Cool in the pans for 10 minutes before transferring to wire racks to cool completely before frosting.
How to make acai bowls?

Why we love this
The acai bowl is the crown jewel of the vibrant, healthy food board. Its deep, royal purple hue is visually stunning, and the texture is a delightful cross between a thick sorbet and a smooth smoothie. It tastes like a tropical dream—earthy, berry-forward, and incredibly refreshing. When topped with crunchy granola, juicy fruit, and a golden drizzle of honey, it provides a sensory playground of cold, crunch, and sweetness that feels both decadent and nourishing at the same time.
Ingredients
- 2 frozen acai packets (unsweetened)
- 1 frozen banana
- 0.5 cup frozen blueberries
- 0.25 cup almond milk (or coconut water)
- Toppings: Granola, sliced strawberries, hemp seeds, honey
How to make it
- Slightly thaw your acai packets under warm water for 5 seconds just to loosen the packaging. Break the frozen acai into chunks and drop them into a high-powered blender.
- Add the frozen banana slices and blueberries. Using frozen fruit is the secret to achieving that thick, ice-cream-like consistency that won’t melt instantly on your board.
- Add the liquid sparingly. Start with just 2 tablespoons of almond milk. Blend on low, using a tamper to push the frozen fruit down toward the blades.
- Continue adding liquid one tablespoon at a time only if the blender stalls. You want a very thick, smooth mixture that holds its shape when scooped.
- Divide the mixture into chilled bowls. Smooth the top with a spoon and immediately add your toppings in aesthetic rows. Serve immediately, as the friction from blending starts the melting process.
How to make green juice?

Why we love this
Fresh green juice is the ultimate palate cleanser. It smells like a dewy garden in the morning—bright, herbaceous, and intensely clean. The first sip is a zingy explosion of ginger and lemon, followed by the crisp, hydrating sweetness of green apple and the earthy depth of kale. It’s a liquid glow-up that adds a pop of vibrant emerald color to your food board, offering a healthy, refreshing counterpoint to richer breads and cheeses.
Ingredients
- 2 cups fresh kale or spinach
- 2 large green apples
- 1 cucumber
- 4 stalks celery
- 1-inch piece of fresh ginger
- 0.5 lemon, peeled
How to make it
- Thoroughly wash all produce in cold water to remove any sediment or organic debris. Pat dry with a clean kitchen towel.
- Cut the apples, cucumber, and celery into sizes that fit your juicer’s feeding chute. You don’t need to peel the apples or cucumber, as the skins contain concentrated nutrients.
- Turn on your juicer and begin with the leafy greens (kale or spinach). Follow immediately with the high-moisture items like cucumber or celery; this helps ‘flush’ the pulp of the greens through the machine for maximum yield.
- Feed the ginger and lemon through the juicer. The ginger adds a spicy kick, while the lemon preserves the bright green color by preventing rapid oxidation.
- Finish with the remaining apples. Stir the juice with a glass rod to incorporate the flavors and serve over ice in clear glass carafes to showcase the stunning color.
How to make iced lattes?

Why we love this
An iced latte is the height of casual luxury. There is a specific visual magic in watching the dark, concentrated espresso swirl through the cold, creamy milk, creating marble-like patterns in the glass. The aroma is sophisticated—roasted beans and toasted sugar. The taste is a perfect balance of bold bitterness and silky sweetness, providing a much-needed caffeine kick that keeps the party energy high and the conversation flowing.
Ingredients
- 2 shots of espresso (or 0.5 cup cold brew concentrate)
- 1 cup whole milk or oat milk
- 1 tablespoon vanilla or simple syrup
- 2 cups large ice cubes
How to make it
- Brew your espresso shots using an espresso machine or a Moka pot. If you are using a Moka pot, ensure the heat is low so the coffee doesn’t burn. If you don’t have espresso, a very strong cold brew concentrate works as a great substitute.
- If you want a sweetened latte, stir your syrup into the hot espresso immediately. This ensures the sugar dissolves completely and creates a uniform flavor profile.
- Fill a tall, 16-ounce glass to the brim with large, solid ice cubes. Large cubes melt slower, preventing your latte from becoming watery while you chat with guests.
- Pour the cold milk over the ice, filling the glass about 3/4 of the way full. This leaves enough room for the espresso and a beautiful ‘layered’ look.
- Slowly pour the espresso over the milk. Do not stir immediately if you want to present it with the viral ‘marble’ effect. Serve with a reusable straw.
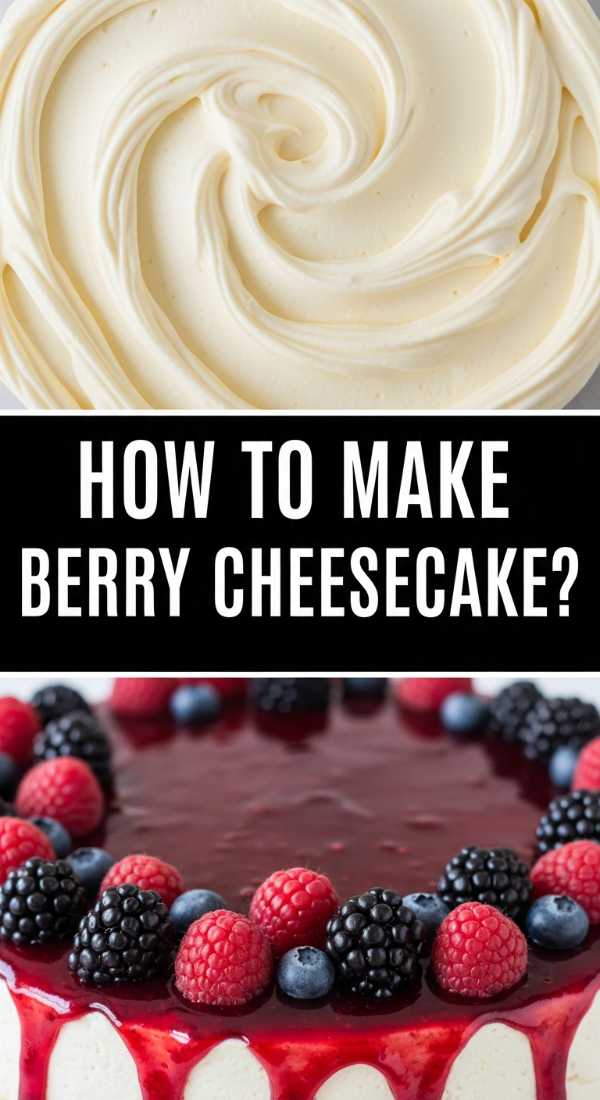
How to make berry cheesecake?
Why we love this
This berry cheesecake is a showstopper, featuring a buttery graham cracker crust and a filling so creamy it feels like silk. The topping is a vibrant compote of bursting blueberries and raspberries that provides a tart, acidic snap against the sweet, dense cheese. The smell is a heavenly mix of vanilla bean and toasted butter. It is the perfect ‘special occasion’ dish that looks incredibly intricate but relies on simple, high-quality ingredients.
Ingredients
- 2 cups graham cracker crumbs
- 0.5 cup melted butter
- 24 oz cream cheese (softened)
- 1 cup granulated sugar
- 1 cup sour cream
- 3 large eggs
- 1 tablespoon vanilla extract
- 2 cups mixed berries (fresh or frozen)
- 2 tablespoons lemon juice
How to make it
- Preheat your oven to 325°F (160°C). Combine graham cracker crumbs and melted butter, then press firmly into the bottom of a 9-inch springform pan. Bake for 10 minutes to set the crust, then let cool.
- In a large bowl, beat the softened cream cheese and sugar until completely smooth and fluffy. Use a low speed to avoid whipping too much air into the batter, which causes cracks.
- Add the sour cream and vanilla, mixing until combined. Add eggs one at a time, beating on the lowest speed just until the yellow disappears. Over-mixing at this stage is the leading cause of cheesecake failure.
- Pour the batter over the crust. Place the pan in a larger roasting pan filled with 1 inch of hot water (a water bath). Bake for 60-70 minutes until the edges are set but the center still has a slight jiggle.
- Cool in the oven with the door ajar for one hour, then refrigerate for at least 6 hours. Before serving, simmer the berries and lemon juice in a small saucepan until they burst and thicken, then pour over the chilled cake.
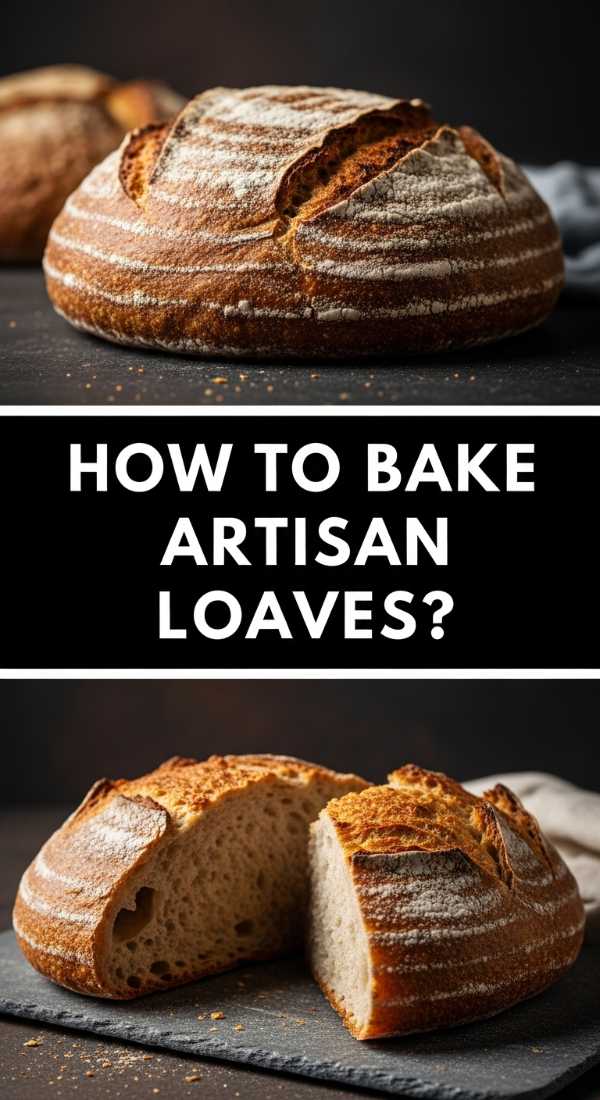
How to bake artisan loaves?
Why we love this
Artisan loaves are the rugged, handsome cousins of standard bread. They feature an open, airy crumb with large ‘ears’ or ridges on the crust that provide an incredible crunch. The long fermentation process develops a complex, slightly tangy flavor that commercial bread simply can’t match. Holding a warm, flour-dusted loaf feels like holding a piece of history. It’s the ultimate vessel for dipping into high-quality olive oils or topping with whipped feta on your board.
Ingredients
- 500g bread flour
- 375g warm water
- 10g sea salt
- 2g instant yeast
- Extra flour for dusting
How to make it
- Mix the flour, water, salt, and yeast in a large bowl until a wet, sticky dough forms. Let it rest for 30 minutes to allow for autolyse, where the flour fully hydrates.
- Perform four sets of ‘stretch and folds’ every 30 minutes. Reach under the dough, pull it up, and fold it over itself. Rotate the bowl and repeat four times. This builds gluten strength without heavy kneading.
- Cover and let the dough undergo a bulk fermentation for 4-6 hours at room temperature until it has increased in volume by about 50% and feels full of air.
- Gently shape the dough into a tight boule on a floured surface. Place it in a floured proofing basket (banneton) and let it rise for another hour, or refrigerate overnight for better flavor.
- Preheat a Dutch oven to 500°F. Score the top of the loaf with a sharp blade (lame) to control the rise. Bake covered at 450°F for 25 minutes, then uncovered for 20 minutes until the crust is dark and resonates with a hollow thud when tapped.
How to make fudgy brownies?

Why we love this
Forget cakey brownies; these are the dense, fudgy, ‘stick-to-the-roof-of-your-mouth’ variety that chocolate lovers dream about. They have that iconic, paper-thin crinkle top that shines under the kitchen lights. The center is almost truffle-like in its richness, offering a deep cocoa punch balanced by a hint of flaky sea salt. They are easy to slice into bite-sized squares, making them the perfect ‘grab-and-go’ treat for a communal food board.
Ingredients
- 1 cup melted unsalted butter
- 2 cups granulated sugar
- 2 eggs + 1 egg yolk
- 1 tablespoon vanilla extract
- 0.75 cup unsweetened cocoa powder
- 1 cup all-purpose flour
- 0.5 teaspoon salt
- 1 cup chocolate chunks
How to make it
- Preheat your oven to 325°F (160°C) and line an 8×8 inch baking pan with parchment paper, leaving an overhang on the sides for easy removal.
- In a large bowl, whisk the melted butter and sugar vigorously for about 2 minutes. This high-energy whisking is what creates the coveted ‘crinkle top’ by dissolving the sugar into the fat.
- Add the eggs, extra yolk, and vanilla. Whisk until the batter lightens in color and looks smooth. The extra egg yolk adds that signature fudgy, chewy texture.
- Sift in the cocoa powder, flour, and salt. Fold these in gently with a spatula just until combined. Do not over-mix, as this will develop gluten and make the brownies tough.
- Fold in the chocolate chunks. Spread the thick batter into the pan and bake for 35-40 minutes. The center should be slightly under-baked when you pull them out; they will firm up as they cool to create that perfect fudgy consistency.
How to make citrus juice?

Why we love this
Pure citrus juice is liquid sunshine. The aroma of freshly sliced oranges, grapefruits, and limes is incredibly uplifting and energizing. It’s a bright, acidic, and sweet experience that cuts through the richness of any brunch board. The color is a stunning, natural sunset hue that looks beautiful in vintage glass bottles. It tastes exponentially better than anything from a carton—vibrant, zesty, and alive with Vitamin C.
Ingredients
- 6 large Navel oranges
- 2 Ruby Red grapefruits
- 1 lemon
- Optional: Sprig of mint for garnish
How to make it
- Before cutting, roll the citrus fruits firmly on the countertop with the palm of your hand. This breaks the internal membranes and ensures you get the maximum amount of juice.
- Cut all the fruits in half crosswise. If you are using a manual reamer or a lever-press juicer, ensure you remove any visible surface seeds first to prevent bitterness.
- Juice the oranges first to create the sweet base. Follow with the grapefruits for depth and a slight bitterness, and finish with the lemon to provide the necessary acidity to balance the sugars.
- If you prefer clear juice, strain the liquid through a fine-mesh sieve to remove the pulp. If you like a rustic, ‘viral’ look, keep the pulp for added texture and nutrients.
- Chill the juice in the refrigerator for at least 30 minutes before serving. Pour into a carafe and garnish with fresh mint or thin citrus slices to elevate the presentation on your board.
How to make tropical smoothies?

Why we love this
This tropical smoothie is an instant vacation in a glass. It has a creamy, luscious base of coconut milk and banana, punctuated by the tart, sunny flavors of mango and pineapple. The texture is thick and frosty, perfect for sipping through a straw while the sun sets. It smells like a beach paradise and tastes like pure joy. It adds a wonderful exotic element to your spread, making the gathering feel like a true escape from the everyday.
Ingredients
- 1 cup frozen mango chunks
- 1 cup frozen pineapple
- 1 frozen banana
- 1 cup unsweetened coconut milk
- 0.5 cup Greek yogurt (for creaminess)
- Squeeze of lime juice
How to make it
- Place the liquid ingredients—the coconut milk and the lime juice—into the blender first. Putting liquids at the bottom helps the blades spin freely and prevents ‘air pockets’ from forming.
- Add the Greek yogurt. This provides a protein boost and creates a velvety, thick mouthfeel that makes the smoothie feel more like a treat.
- Layer in the frozen mango, pineapple, and banana. Using all-frozen fruit eliminates the need for ice, which can dilute the intense tropical flavors.
- Blend on high speed for 60 seconds until the mixture is completely uniform and has a ‘swirl’ pattern at the top. If it’s too thick, add a splash more coconut milk.
- Pour into chilled glasses immediately. For a viral-ready look, garnish with a small wedge of pineapple or a sprinkle of toasted coconut flakes on top.
Hosting Made Simple and Stunning
Creating a viral-worthy food board isn’t about being a perfect chef; it’s about the joy of sharing. By focusing on these ten versatile recipes, you can mix and match to suit any occasion, from a cozy Sunday brunch to a sophisticated evening gathering. Remember, the best boards are the ones where the host is actually present, enjoying the food and the company. So, take a deep breath, put on your favorite playlist, and let the food do the talking. Happy hosting!