

From TikTok to Your Table: How to Master the Simple Food Board
There is something undeniably magical about the way a perfectly curated food board looks under the warm glow of kitchen lights, surrounded by the laughter of friends. We’ve all been there—scrolling through TikTok at midnight, mesmerized by the rhythmic chopping of fresh herbs and the satisfying sizzle of a pan, dreaming of hosting that perfect, effortless gathering. It’s more than just food; it’s about creating a moment that feels both curated and comfortable, a tapestry of flavors that invites everyone to lean in, grab a fork, and stay a while.
The secret to a ‘Simple Food Board’ isn’t actually about keeping things basic; it’s about mastering a few vibrant, seasonal dishes that look like high-end catering but feel like home. This spring, I’m obsessed with bringing those viral aesthetics to life with textures that pop and aromas that fill the house with promise. Whether you’re planning a Sunday brunch or a cozy patio dinner, these recipes are designed to be the stars of your next spread, turning your dining table into a destination.
In this guide, we are diving deep into the art of the board, featuring everything from succulent salmon to the comforting warmth of southern-style spaghetti. We aren’t just tossing things on a tray; we are building a sensory experience. So, grab your favorite wooden board, pour a glass of something bubbly, and let’s get cooking!
How to make spring salmon?

Why we love this
This spring salmon is the epitome of elegance meets ease, offering a buttery, flaky texture that practically melts on the tongue. The aroma of fresh dill and bright lemon zest wafting through the kitchen creates an immediate sense of refreshment and renewal, perfectly echoing the blooming world outside. When you pull this out of the oven, the vibrant pink hue against the charred citrus slices makes it an instant center-piece for any board. It’s light yet satisfying, leaving you feeling nourished and ready to enjoy a sun-drenched afternoon with loved ones.
Ingredients
- 2 lb side of fresh Atlantic salmon
- 3 tablespoons extra virgin olive oil
- 1 organic lemon, thinly sliced
- 2 tablespoons fresh dill, chopped
- 1 teaspoon flaky sea salt
- 1/2 teaspoon cracked black pepper
- 1 tablespoon honey
How to make it
- Preheat your oven to 400°F (200°C) and line a large baking sheet with parchment paper to ensure easy cleanup and prevent sticking.
- Pat the salmon completely dry with paper towels; this is a professional secret to ensuring the seasoning sticks and the skin gets a slight crisp rather than steaming.
- In a small bowl, whisk together the olive oil, honey, salt, and pepper until emulsified, then brush the mixture generously over the entire surface of the fish.
- Layer the thin lemon slices across the top of the salmon in an overlapping pattern, which protects the delicate flesh from direct heat and infuses it with citrus oils.
- Roast for 12-15 minutes, depending on the thickness; you are looking for the internal temperature to reach 145°F, or for the meat to flake easily with a fork while remaining moist in the center.
- Remove from the oven and immediately sprinkle with the fresh dill, allowing the residual heat to release the herb’s essential oils for maximum fragrance.
How to cook rotel dip?

Why we love this
Rotel dip is the ultimate nostalgic comfort food that somehow always manages to be the first thing finished at any gathering. There is something deeply satisfying about the velvety, molten cheese combined with the zesty kick of green chilies and savory browned meat. The texture is thick and scoopable, perfect for a sturdy tortilla chip, and the aroma is a mouth-watering blend of spices and salt that calls everyone to the table. It’s messy, it’s decadent, and it brings a playful, high-low energy to your sophisticated food board that guests absolutely adore.
Ingredients
- 1 lb ground beef or breakfast sausage
- 1 block (16 oz) Velveeta or high-quality melting cheese
- 1 can (10 oz) Ro-Tel Diced Tomatoes and Green Chilies
- 1/2 cup whole milk
- 1/2 teaspoon taco seasoning
- Fresh cilantro for garnish
How to make it
- Place a large skillet over medium-high heat and add your ground meat, breaking it into small crumbles with a wooden spoon as it browns.
- Cook until the meat is fully browned and no pink remains, then carefully drain the excess fat into a heat-safe container to ensure the dip isn’t greasy.
- Reduce the heat to low and add the cubed melting cheese and the entire can of Ro-Tel (do not drain the liquid, as that provides the signature tang and spice).
- Stir continuously as the cheese melts to prevent scorching on the bottom of the pan; add the milk slowly to achieve your desired consistency—it should be thick enough to coat a chip but thin enough to pour.
- Stir in the taco seasoning and let the dip simmer on low for 5 minutes, allowing the flavors to meld and the texture to become silk-smooth.
- Transfer to a warmed ceramic bowl on your board and garnish with cilantro for a pop of color.
How to make pea soup?
Why we love this
This isn’t your grandmother’s drab pea soup; this is a vibrant, neon-green celebration of spring that tastes like pure sunshine. The texture is incredibly silky and light, offering a clean sweetness from the peas that is balanced by the earthy depth of fresh leeks and vegetable stock. Every spoonful feels like a refreshing breath of air, and the aroma is crisp and vegetal, immediately evoking images of a thriving garden. Topped with a swirl of cream or a few crunchy radishes, it adds a stunning visual element and a sophisticated liquid component to your food board spread.
Ingredients
- 4 cups fresh or frozen sweet peas
- 2 large leeks, white and light green parts only, sliced
- 4 cups high-quality vegetable broth
- 2 tablespoons unsalted butter
- 1/4 cup fresh mint leaves
- Salt and white pepper to taste
- Crème fraîche for serving
How to make it
- In a large Dutch oven, melt the butter over medium heat and add the sliced leeks, sautéing them for 5-7 minutes until they are soft and translucent but not browned.
- Pour in the vegetable broth and bring the mixture to a gentle boil; then add the peas and cook for exactly 3-4 minutes to preserve their bright green color and sweet flavor.
- Remove the pot from the heat and stir in the fresh mint leaves, which will provide a cooling back-note to the soup.
- Using an immersion blender, or working in batches with a standard blender, puree the soup on high speed until it is completely smooth and aerated.
- Season with salt and white pepper, then pass the soup through a fine-mesh sieve if you want a truly professional, velvet-like texture.
- Serve warm or chilled in small glass jars on your board, topped with a dollop of crème fraîche.
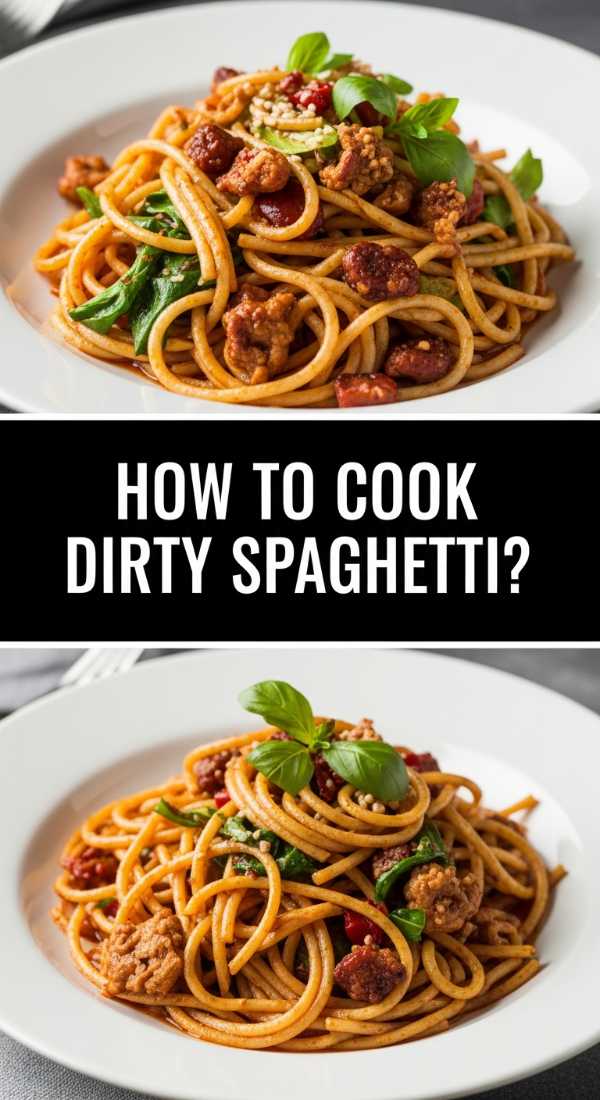
How to cook dirty spaghetti?

Why we love this
Dirty spaghetti is a soulful, flavor-packed twist on Italian classics that brings an incredible depth of savory richness to your meal. The texture is a beautiful contrast between the al dente pasta and the crumbly, spicy meat sauce that clings to every strand. The aroma is heavy with the scent of browned garlic, smoked paprika, and simmered peppers, creating an inviting, hearth-like atmosphere in your kitchen. It is the kind of dish that feels substantial and rewarding, providing a rustic, hearty anchor for the lighter elements on your spring food board.
Ingredients
- 1 lb spaghetti noodles
- 1 lb ground pork or beef
- 1 bell pepper, finely diced
- 1 small onion, minced
- 3 cloves garlic, pressed
- 1 tablespoon Worcestershire sauce
- 1 teaspoon smoked paprika
- 1/2 cup beef broth
- Grated parmesan and parsley
How to make it
- Bring a large pot of heavily salted water to a rolling boil; cook the spaghetti for 1-2 minutes less than the package instructions to ensure it remains firm and doesn’t get mushy when tossed with the sauce.
- While the pasta cooks, brown the meat in a large skillet over medium-high heat, using a spatula to break it into very fine bits.
- Add the diced pepper, onion, and garlic to the meat, sautéing for 6-8 minutes until the vegetables are tender and slightly caramelized.
- Stir in the smoked paprika, Worcestershire sauce, and beef broth, letting it simmer on low heat until the liquid reduces by half, creating a concentrated, savory glaze.
- Drain the pasta (reserving 1/2 cup of pasta water) and add the noodles directly into the skillet with the meat mixture.
- Toss vigorously over medium heat, adding a splash of the pasta water to help the sauce emulsify and coat the noodles perfectly; serve with a mountain of parmesan.
How to grill spring chicken?
Why we love this
There is nothing quite like the smoky, charred aroma of chicken hitting a hot grill on the first warm day of the year. This spring chicken is exceptionally juicy on the inside with a crisp, herb-crusted skin that provides a satisfying crunch in every bite. The lemon and rosemary marinade infuses the meat with a bright, woody fragrance that cuts through the richness of the grill marks. It’s a rustic, finger-licking addition to a food board that encourages guests to dig in and enjoy the simple pleasures of outdoor cooking.
Ingredients
- 4 chicken thighs, bone-in and skin-on
- 1/4 cup olive oil
- 2 sprigs fresh rosemary, stripped and chopped
- 3 cloves garlic, smashed
- Juice and zest of 1 lemon
- 1 teaspoon sea salt
- 1/2 teaspoon chili flakes
How to make it
- Place the chicken thighs in a zip-top bag with the olive oil, rosemary, garlic, lemon juice, zest, salt, and chili flakes; marinate in the fridge for at least 2 hours or overnight for maximum flavor penetration.
- Preheat your grill to medium-high heat (about 375°F-400°F) and ensure the grates are clean and lightly oiled to prevent the skin from tearing.
- Place the chicken skin-side down on the grill; cook undisturbed for 6-8 minutes until the skin is golden brown and releases easily from the grates.
- Flip the chicken and move it to a slightly cooler part of the grill (indirect heat) to finish cooking without burning the exterior.
- Close the grill lid and cook for another 10-15 minutes until the internal temperature reaches a safe 165°F and the juices run clear.
- Let the meat rest for 5 minutes before serving on your board; this allows the juices to redistribute, ensuring every bite is succulent.
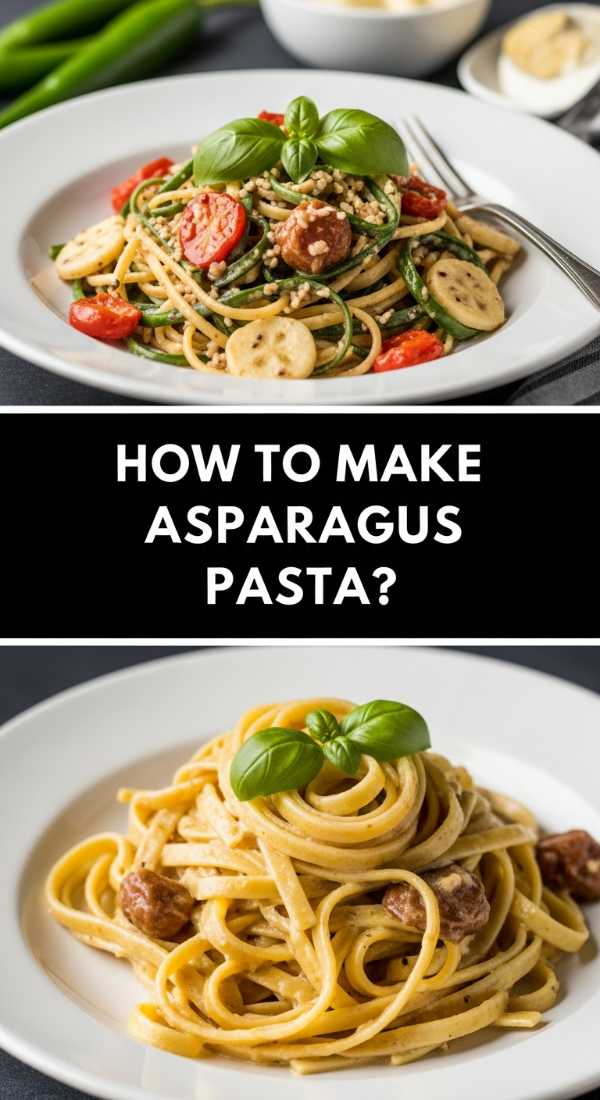
How to make asparagus pasta?
Why we love this
Asparagus pasta is the quintessential dish for a spring board, offering a snappy, fresh texture that feels incredibly light and healthful. The aroma of sautéed garlic and the green, grassy scent of fresh asparagus create an olfactory experience that is pure garden-to-table bliss. Each bite is a mix of tender-crisp vegetables and silky pasta coated in a light, buttery sheen that doesn’t weigh you down. It provides a beautiful pop of green to your board’s color palette and serves as a sophisticated side that pairs beautifully with grilled meats or fish.
Ingredients
- 12 oz linguine or fettuccine
- 1 bunch thin asparagus, woody ends trimmed, cut into 2-inch pieces
- 3 tablespoons unsalted butter
- 2 tablespoons pine nuts, toasted
- Zest of 1 lemon
- 1/2 cup freshly grated Pecorino Romano
- Salt and cracked black pepper
How to make it
- Boil the pasta in salted water until it is almost al dente; about 3 minutes before the pasta is done, drop the asparagus pieces directly into the boiling water with the noodles to blanch them.
- While the pasta and greens finish cooking, melt the butter in a wide skillet over medium heat until it begins to foam and turn slightly golden.
- Drain the pasta and asparagus together, reserving a small cup of the starchy cooking liquid.
- Transfer everything into the skillet with the butter, adding the lemon zest and pine nuts, and toss gently to coat.
- Slowly sprinkle in the Pecorino Romano, adding a splash of the pasta water as needed to create a light, creamy sauce that clings to the linguine.
- Season generously with black pepper and serve immediately while the cheese is still warm and the asparagus is vibrant.
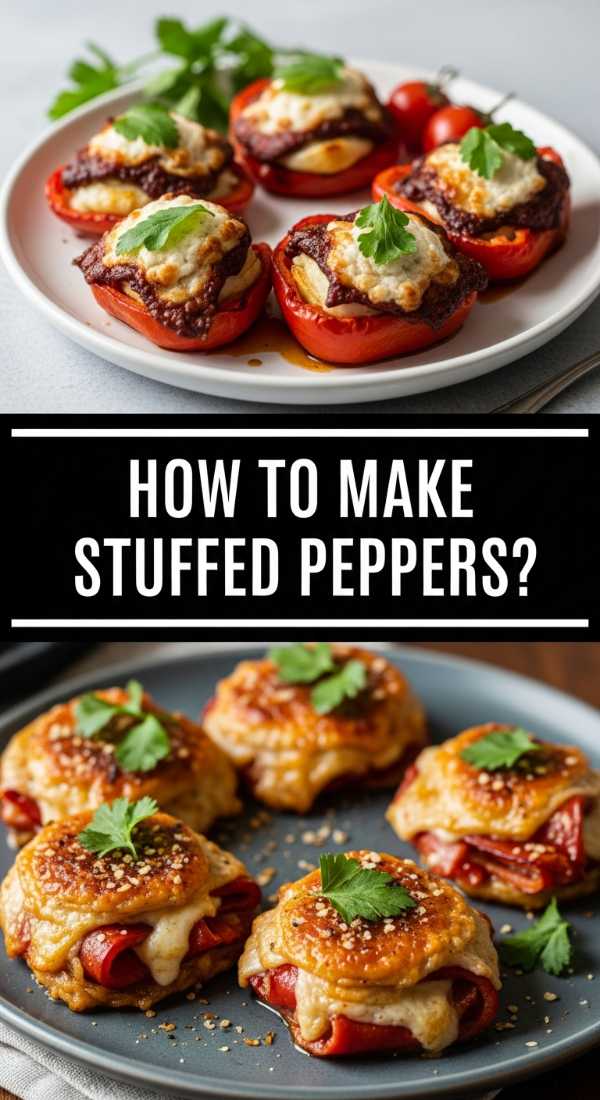
How to make stuffed peppers?

Why we love this
Stuffed peppers are like little edible gifts on a food board, each one packed with a hearty, savory filling and topped with a crown of golden, bubbly cheese. The texture of the softened bell pepper provides a sweet, succulent vessel for the rich grains and seasoned meat inside. The aroma is a comforting blend of roasted vegetables and melting cheese that feels incredibly welcoming. They are visually stunning with their bold reds, yellows, and oranges, making them a fantastic focal point that offers a complete, balanced meal in a single serving.
Ingredients
- 4 large bell peppers, tops removed and seeded
- 1 lb cooked quinoa or white rice
- 1 lb ground turkey or beef
- 1 cup marinara sauce
- 1 teaspoon Italian seasoning
- 1.5 cups shredded mozzarella cheese
- Fresh basil for garnish
How to make it
- Preheat your oven to 375°F (190°C) and lightly grease a baking dish that is deep enough to hold the peppers upright.
- In a large bowl, combine the cooked grains, browned meat (cooked beforehand), marinara sauce, and Italian seasoning until well mixed.
- Stuff each pepper tightly with the mixture, pressing down with a spoon to ensure there are no air pockets and the filling is compact.
- Place the peppers in the dish and pour 1/4 cup of water into the bottom of the pan; cover tightly with foil to create a steam chamber that softens the peppers.
- Bake for 30 minutes, then remove the foil and top each pepper with a generous handful of mozzarella cheese.
- Bake for another 10-15 minutes uncovered until the cheese is melted, browned in spots, and the peppers are tender when pierced with a knife.
How to make spring minestrone?

Why we love this
Spring minestrone is a lighter, brighter cousin to the winter classic, filled with the season’s best bounty like snap peas, zucchini, and spinach. The texture is a delightful medley of soft beans, tender vegetables, and tiny pasta shapes, all swimming in a clear, herb-infused broth. The aroma is incredibly fresh, dominated by basil and simmered onions, making it feel like a spa-day in a bowl. It’s the perfect way to incorporate more vegetables into your food board in a way that feels indulgent and artisanal rather than just a side dish.
Ingredients
- 1 onion, diced
- 2 carrots, sliced into rounds
- 1 zucchini, chopped
- 1 can (15 oz) cannellini beans, rinsed
- 4 cups vegetable stock
- 1/2 cup small pasta like ditalini
- 1 cup fresh spinach
- 1 tablespoon pesto for finishing
How to make it
- In a large pot, sauté the onion and carrots in a splash of olive oil over medium heat for about 5 minutes until they start to soften.
- Add the zucchini and the cannellini beans, stirring to coat them in the aromatics, and then pour in the vegetable stock.
- Bring the liquid to a simmer and add the pasta; cook for about 8-10 minutes, or until the pasta is tender and the carrots are soft.
- During the last 2 minutes of cooking, stir in the fresh spinach and allow it to wilt into the hot broth.
- Taste the broth and adjust the seasoning with salt and pepper; if the soup is too thick, add an extra splash of stock.
- Serve in small bowls with a dollop of fresh pesto swirled on top to add a burst of concentrated herbal flavor.
How to grill vegetable skewers?

Why we love this
Vegetable skewers bring a fantastic charred, smoky element to your board that celebrates the natural sweetness of produce when exposed to high heat. The texture is a fun variety of tender mushrooms, crisp onions, and juicy tomatoes that explode with flavor. The aroma of fire-roasted vegetables is quintessential for any outdoor gathering, providing a rustic, caramelized scent that is hard to resist. They look beautiful lined up on a board, adding height and structure to the arrangement while offering a healthy, vegan-friendly option that feels substantial.
Ingredients
- 1 red onion, cut into large chunks
- 1 pint cherry tomatoes
- 2 zucchinis, sliced into thick rounds
- 8 oz cremini mushrooms
- 1/4 cup balsamic glaze
- 2 tablespoons olive oil
- 1 teaspoon dried oregano
How to make it
- If using wooden skewers, soak them in water for at least 30 minutes prior to grilling to prevent them from catching fire.
- Thread the vegetables onto the skewers, alternating colors and types to ensure even cooking and a beautiful visual presentation.
- In a small bowl, whisk the olive oil and oregano together, then brush the mixture over all sides of the vegetables.
- Place the skewers on a hot grill (medium-high heat) and cook for 3-4 minutes per side, turning them carefully with tongs.
- You are looking for distinct grill marks and for the vegetables to soften slightly while still maintaining some structural integrity.
- Once removed from the grill, drizzle the balsamic glaze over the hot skewers immediately so the warmth helps the glaze coat the vegetables evenly.
How to cook lemon chicken?
[IMAGE_10]
Why we love this
Lemon chicken is a bright, zingy powerhouse that brings a punch of acidity to your food board, cutting through any richer or cheesier elements. The texture of the chicken is golden-brown and slightly crisp on the outside while remaining incredibly juicy and tender within. The aroma of sizzling citrus and browned garlic is intoxicating, filling the air with a zest that makes your mouth water instantly. It’s a versatile dish that works just as well served warm as it does at room temperature, making it a reliable staple for long, leisurely afternoons of grazing.
Ingredients
- 1.5 lbs chicken breast, sliced into medallions
- 1/2 cup all-purpose flour
- 4 tablespoons butter
- 1/4 cup dry white wine or chicken broth
- Juice of 2 lemons
- 2 tablespoons capers (optional)
- Fresh parsley, chopped
How to make it
- Dredge the chicken medallions in the flour, shaking off the excess; this creates a thin, protective layer that browns beautifully and helps thicken the sauce later.
- Melt 2 tablespoons of butter in a large skillet over medium-high heat and sear the chicken in batches, cooking for 3-4 minutes per side until golden and cooked through.
- Remove the chicken from the pan and set aside; lower the heat to medium and pour in the wine or broth to deglaze the pan, scraping up all the flavorful browned bits.
- Add the lemon juice and the remaining 2 tablespoons of butter, whisking until the sauce is glossy and slightly thickened.
- Stir in the capers and return the chicken to the pan for 1 minute to coat it thoroughly in the bright, acidic sauce.
- Finish with a generous sprinkle of fresh parsley and serve tucked between the other delights on your food board.
The Art of the Final Presentation
Once your dishes are prepared, the real magic happens in the assembly. A ‘Simple Food Board’ isn’t about perfection; it’s about abundance. Start by placing your larger items—like the salmon or the stuffed peppers—down first as anchors. Fill in the gaps with your bowls of soup and dip, and then use the skewers and pasta to create flow and movement. Don’t be afraid to let things overlap or to tuck fresh herbs and lemon slices into the tiny spaces. The goal is to create a visual feast that looks as good as it tastes, inviting your guests to explore and enjoy every corner of the table.
Common Questions About Food Boards
Hosting can be intimidating, but it doesn’t have to be. Whether you’re worried about food temperatures or how much to make, the key is preparation. Remember that these boards are meant to be enjoyed slowly, so choosing dishes that still taste great as they cool—like the lemon chicken or the vegetable skewers—is a pro move. Most importantly, have fun with it! Your guests will feed off your energy, so if you’re relaxed and enjoying the flavors, they will be too.