

The Lazy Host’s Guide to the Ultimate Viral Food Platter
We’ve all been there—that frantic thirty minutes before guests arrive where you’re scrubbing the counter with one hand and trying to whip up a gourmet appetizer with the other. My kitchen used to look like a flour-dusted disaster zone every time I hosted, leaving me too exhausted to actually enjoy the company. But then, I discovered the magic of the ‘Viral Food Platter.’ It’s the ultimate secret weapon for the lazy host who still wants that ‘wow’ factor without the breakdown.
The beauty of a food board isn’t just in the variety; it’s in the curated chaos. By gathering vibrant, seasonal components and arranging them with a little bit of intention, you create a centerpiece that invites people to linger, snack, and talk. Whether you’re leaning into savory grilled meats or delicate spring sweets, these boards turn a simple meal into an event. Grab a glass of wine, take a deep breath, and let’s build something beautiful together.
How to make the best cookout side dishes

Why we love this
There is nothing quite like the smoky, charred aroma of fresh street corn salad wafting through a backyard gathering. This dish combines the crunch of golden kernels with the creamy, tangy zip of lime-infused crema and crumbled cotija cheese. Every bite is a celebration of texture—the snap of the corn, the silkiness of the avocado, and the sharp bite of red onion—making it the essential companion to any grilled main. It’s light enough for a hot day but flavorful enough to steal the spotlight from the burgers.
Ingredients
- 4 ears of fresh sweet corn, husked
- 1/4 cup Mexican crema or sour cream
- 1/2 cup crumbled cotija cheese
- 1 tablespoon fresh lime juice
- 1 teaspoon smoked paprika
- 1/4 cup chopped cilantro
- 1 ripe avocado, diced
How to make it
- Preheat your grill to medium-high heat (about 400°F). Lightly oil the grates to prevent sticking.
- Place the corn ears directly on the grill. Rotate them every 2-3 minutes until charred spots appear and the kernels are tender, usually taking about 10-12 minutes total.
- Once charred, remove the corn and let it cool slightly. Hold the cob vertically and use a sharp knife to shave the kernels into a large mixing bowl.
- In a small separate bowl, whisk together the crema, lime juice, and smoked paprika until smooth and aerated.
- Pour the dressing over the warm corn. Add the cotija cheese, cilantro, and diced avocado.
- Fold the ingredients together gently using a rubber spatula to avoid mashing the avocado. Season with a pinch of sea salt and serve immediately while the corn is still warm.
How to create refreshing summer desserts

Why we love this
Imagine a dessert that tastes like a frozen sunbeam; that’s exactly what this No-Churn Peach Mascarpone Ice Cream feels like. The richness of the mascarpone provides a sophisticated, velvety mouthfeel that balances the floral sweetness of peak-summer peaches. As it melts on your tongue, you get hints of vanilla and the slight acidity of the fruit, creating a refreshing finish that isn’t overly sugary. It’s the kind of effortless luxury that makes your guests think you own an expensive Italian gelato machine.
Ingredients
- 2 cups heavy whipping cream, cold
- 1 can (14 oz) sweetened condensed milk
- 8 oz mascarpone cheese, softened
- 2 cups fresh peaches, finely chopped
- 1 teaspoon vanilla bean paste
- 2 tablespoons honey
How to make it
- In a small saucepan over medium heat, simmer the chopped peaches with honey for about 8 minutes until they break down into a thick, jammy consistency. Let this cool completely in the fridge.
- In a chilled large bowl, whip the heavy cream using a stand mixer or hand mixer on high speed until stiff peaks form. Be careful not to over-whip into butter; look for peaks that stand straight up when the whisk is lifted.
- In a separate bowl, whisk the mascarpone, sweetened condensed milk, and vanilla bean paste until completely smooth and free of lumps.
- Gently fold the mascarpone mixture into the whipped cream using a large metal spoon or spatula. Use a figure-eight motion to preserve the air bubbles.
- Swirl in the cooled peach compote, leaving thick streaks of fruit for visual appeal.
- Transfer the mixture to a loaf pan, cover with plastic wrap (touching the surface to prevent ice crystals), and freeze for at least 6 hours or overnight.
How to bake soft butter squishy bread

Why we love this
There is a primal comfort in tearing into a warm, squishy milk bread roll that pulls apart in delicate, feathery layers. The aroma of toasted butter and sweet yeast fills the entire house, creating an instant sense of home and warmth. These rolls are incredibly soft—almost cloud-like—with a golden, glossy crust that yields to a pillowy interior. They are the perfect vessel for sliders or simply enjoyed plain, slathered in even more salted butter while they’re still steaming.
Ingredients
- 3 1/2 cups all-purpose flour
- 1 cup whole milk, lukewarm (110°F)
- 1/4 cup granulated sugar
- 2 1/4 teaspoons active dry yeast
- 1 large egg
- 4 tablespoons unsalted butter, softened
- 1 teaspoon fine sea salt
How to make it
- In the bowl of a stand mixer, combine lukewarm milk, sugar, and yeast. Let it sit for 5-10 minutes until it becomes foamy, indicating the yeast is active.
- Add the flour, egg, and salt. Use the dough hook attachment on low speed to bring the dough together into a shaggy mass.
- Increase the speed to medium and add the softened butter one tablespoon at a time. Knead for about 8-10 minutes until the dough is smooth, elastic, and passes the ‘windowpane test’ (you can stretch a small piece thin enough to see light through it without it tearing).
- Place the dough in a greased bowl, cover with a damp cloth, and let rise in a warm, draft-free spot for 1-1.5 hours or until doubled in size.
- Punch the dough down and divide into 12 equal pieces. Roll each into a tight, smooth ball and place in a greased 9×13 inch baking pan.
- Let rise for another 45 minutes. Preheat your oven to 350°F (175°C).
- Brush the tops with an egg wash (1 egg beaten with 1 tablespoon water) and bake for 20-25 minutes until deep golden brown. Immediately brush with melted butter upon removal.
How to use sourdough discard for easy recipes

Why we love this
Discarding sourdough starter feels like a waste, but turning it into crispy, herb-flecked crackers is pure kitchen alchemy. These crackers have a complex, fermented tang that you simply cannot find in store-bought versions, paired with a satisfying, brittle snap. The addition of flaky sea salt and dried rosemary creates an addictive snack that elevates any charcuterie board. They are light, airy, and carry the deep, rustic essence of artisan baking with minimal effort.
Ingredients
- 1 cup sourdough discard (unfed)
- 1 cup all-purpose flour
- 1/2 teaspoon fine sea salt
- 4 tablespoons unsalted butter, melted
- 2 tablespoons dried herbs (rosemary, thyme, or oregano)
- Flaky sea salt for topping
How to make it
- In a medium bowl, mix the sourdough discard, flour, sea salt, melted butter, and dried herbs until a stiff dough forms.
- Divide the dough into two equal halves. Wrap in plastic and refrigerate for 30 minutes to allow the flour to hydrate and the dough to firm up.
- Preheat your oven to 350°F (175°C) and place a piece of parchment paper on your work surface.
- Place one dough half on the parchment and roll it out as thin as possible—ideally 1/16th of an inch. The thinner the dough, the crispier the cracker.
- Lightly brush the surface with a tiny bit of water or oil and sprinkle with flaky sea salt. Use a pizza cutter to score the dough into squares or rectangles.
- Slide the parchment onto a baking sheet and bake for 20-25 minutes. Watch closely at the 15-minute mark; the edges should be golden brown and the centers should feel firm. Let cool completely on a wire rack to reach maximum crispness.
How to cook fresh summer pasta recipes
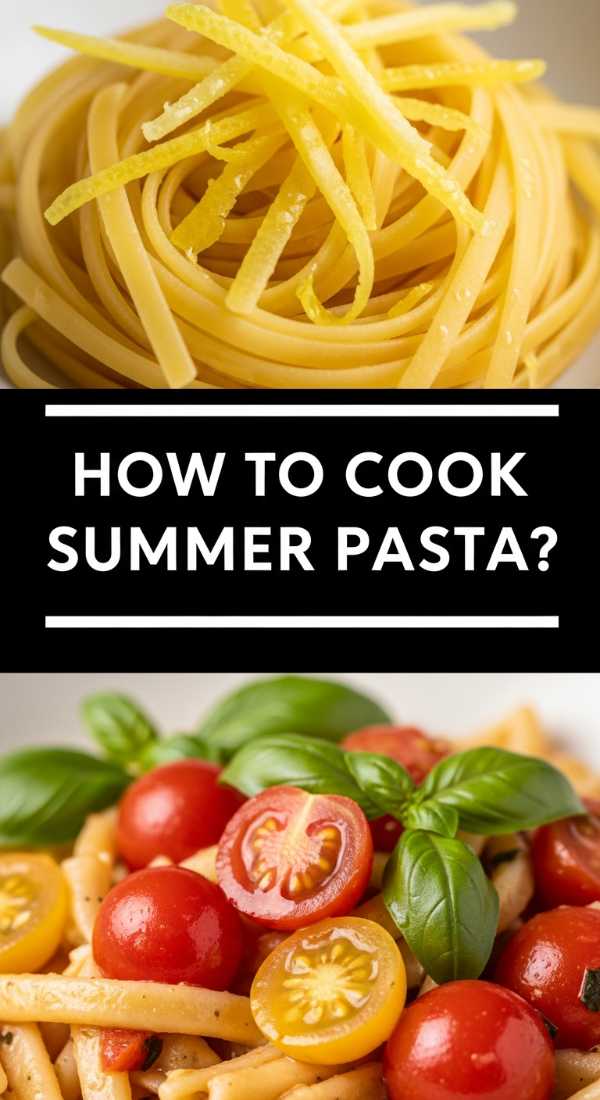
Why we love this
Summer pasta should feel like a breeze, and this burst cherry tomato and burrata dish is the epitome of seasonal elegance. As the tomatoes hit the hot oil, they blister and release their sweet, concentrated juices, forming a natural sauce that clings to every strand of pasta. The final addition of cold, creamy burrata creates a stunning temperature contrast, melting slightly into the warm noodles to create a luxurious, silken finish. Fragrant basil leaves torn by hand add a peppery freshness that cuts through the richness perfectly.
Ingredients
- 1 lb linguine or spaghetti
- 2 pints cherry tomatoes
- 4 cloves garlic, thinly sliced
- 1/2 cup extra virgin olive oil
- 1/2 teaspoon red pepper flakes
- 1 ball fresh burrata cheese
- Large handful of fresh basil
How to make it
- Bring a large pot of heavily salted water to a boil. Cook the pasta according to package directions until just ‘al dente.’ Reserve 1 cup of pasta water before draining.
- While the water boils, heat the olive oil in a large skillet over medium heat. Add the sliced garlic and red pepper flakes, cooking for 1 minute until fragrant but not browned.
- Add the whole cherry tomatoes to the skillet. Cook for 8-10 minutes, stirring occasionally, until the skins begin to burst and release their juices. Use the back of a wooden spoon to gently press down on any stubborn tomatoes.
- Toss the cooked pasta into the skillet with the tomatoes. Add a splash of the reserved pasta water and toss vigorously over medium heat for 2 minutes. The starch in the water will emulsify with the oil to create a glossy sauce.
- Remove from heat and stir in the torn basil.
- Plate the pasta and place the burrata ball right in the center. Break it open with a knife just before serving so the creamy interior flows over the noodles.
How to host a beautiful spring brunch

Why we love this
A Smoked Salmon Bagel Board is the ultimate low-effort, high-impact brunch centerpiece that feels incredibly sophisticated. The visual appeal of bright pink salmon against vibrant green cucumbers, purple onions, and golden-brown bagels is enough to make anyone reach for their phone for a photo. There’s a wonderful ritual in guests building their own perfect bite—layering cool, velvety cream cheese with salty capers and the citrusy brightness of lemon. It’s fresh, communal, and allows the host to actually sit down and enjoy the mimosas.
Ingredients
- Assorted mini bagels, toasted
- 8 oz high-quality smoked salmon (Lox)
- 1 cup plain cream cheese
- 1/2 red onion, very thinly sliced
- 1 English cucumber, sliced
- 2 tablespoons capers, drained
- Fresh dill sprigs and lemon wedges
How to make it
- Choose a large wooden board or a flat marble slab as your canvas.
- Place the cream cheese in a small decorative bowl and set it in the center of the board. Surround it with the toasted bagel halves.
- Artfully drape the smoked salmon slices in a separate section, overlapping them slightly to create volume and texture.
- Arrange the cucumber slices and red onion rings in overlapping rows or small piles to fill in the larger gaps on the board.
- Scatter the capers over the salmon and nestle the lemon wedges in the remaining small spaces.
- Tuck fresh dill sprigs around the edges for a pop of color and aroma. Serve with small spreaders and forks so guests can easily assemble their bagels.
How to decorate beautiful spring cookies

Why we love this
Spring cookies are all about delicate flavors and botanical beauty, and these Lemon Lavender Shortbreads are a masterclass in edible art. The shortbread is buttery and crumbly, providing a neutral base that allows the floral notes of lavender and the zesty punch of lemon to shine. When decorated with a simple glaze and pressed with tiny, colorful edible petals, they look like something out of a high-end boutique bakery. They are light, fragrant, and perfectly capture the essence of a garden in bloom.
Ingredients
- 2 cups all-purpose flour
- 3/4 cup unsalted butter, softened
- 1/2 cup powdered sugar
- 1 tablespoon dried culinary lavender, crushed
- Zest of 2 lemons
- 1 cup powdered sugar + 2 tablespoons lemon juice (for glaze)
- Assorted edible flowers (optional)
How to make it
- In a large bowl, cream together the softened butter, powdered sugar, lemon zest, and crushed lavender until light and fluffy.
- Gradually add the flour on low speed until a soft dough forms. Do not overmix, or the shortbread will lose its characteristic tender crumb.
- Roll the dough between two sheets of parchment paper to about 1/4 inch thickness. Chill the rolled dough in the fridge for 30 minutes.
- Preheat oven to 325°F (160°C). Cut the dough into circles or flower shapes and place on a baking sheet.
- Bake for 12-15 minutes until the edges are just barely beginning to turn golden. Let cool completely on the pan.
- Whisk the powdered sugar and lemon juice together to create a thick but pourable glaze. Dip the top of each cookie into the glaze and immediately press a tiny edible flower or a sprinkle of lavender onto the center while wet. Let the glaze set for 1 hour before serving.
How to cook light summer soups

Why we love this
When the temperature soars, a chilled Watermelon and Heirloom Tomato Gazpacho is the ultimate culinary air conditioner. This soup is a vibrant, ruby-red bowl of refreshment that balances the sugary sweetness of melon with the savory, umami depth of sun-ripened tomatoes. It’s incredibly light and hydrating, with a subtle kick of jalapeño that lingers on the palate. The texture is smooth yet substantial, making it a sophisticated starter for an outdoor dinner party where you want to keep things elegant and cool.
Ingredients
- 4 cups seedless watermelon, cubed
- 3 large heirloom tomatoes, chopped
- 1 small cucumber, peeled and seeded
- 1 red bell pepper, chopped
- 1 clove garlic
- 2 tablespoons red wine vinegar
- 1/4 cup extra virgin olive oil
- 1/2 jalapeño (optional)
How to make it
- Combine the watermelon, tomatoes, cucumber, bell pepper, garlic, and jalapeño in a high-powered blender.
- Pulse until the mixture is broken down, then blend on high speed for 1-2 minutes until completely smooth.
- With the blender running on low, slowly drizzle in the olive oil and red wine vinegar. This creates a light emulsion that gives the soup a silky, professional finish.
- Taste and season generously with sea salt and black pepper. The cold temperature dulls flavors, so you may need more salt than usual.
- Pour the soup through a fine-mesh sieve into a large pitcher if you prefer a perfectly thin consistency, or leave it as-is for a more rustic feel.
- Chill in the refrigerator for at least 4 hours. Serve in chilled bowls garnished with a drizzle of olive oil and a few small cubes of fresh watermelon.
How to master professional grilling recipes

Why we love this
Mastering the perfect Chimichurri Skirt Steak is like earning your stripes as a backyard chef. The steak itself is intensely beefy and thin, allowing for a high-heat sear that creates a salty, caramelized crust while keeping the inside juicy and tender. When topped with a bright, herbaceous chimichurri sauce—bursting with fresh parsley, garlic, and vinegar—the richness of the meat is perfectly cut by the acidity. It’s a bold, masculine dish that feels celebratory and smells absolutely divine as the fat hits the hot coals.
Ingredients
- 1.5 lbs skirt steak
- 2 tablespoons olive oil
- 1 tablespoon kosher salt
- 1 teaspoon cracked black pepper
- 1 cup fresh parsley, finely chopped
- 3 cloves garlic, minced
- 2 tablespoons red wine vinegar
- 1/2 cup extra virgin olive oil
- 1 teaspoon red pepper flakes
How to make it
- Start by making the chimichurri: mix the parsley, garlic, vinegar, red pepper flakes, and olive oil in a bowl. Let it sit at room temperature for at least 30 minutes to allow the flavors to marry.
- Remove the steak from the fridge 30 minutes before grilling to bring it to room temperature; this ensures even cooking.
- Pat the steak extremely dry with paper towels. Rub with olive oil and season heavily with salt and pepper.
- Heat your grill to its highest setting (500°F+). You want screaming hot grates to achieve a professional sear.
- Place the steak on the grill. For skirt steak, cook for only 3-4 minutes per side. You are looking for a deep brown crust and an internal temperature of 130°F for medium-rare.
- Remove the steak and let it rest for a full 10 minutes. This is critical—it allows the juices to redistribute. Slice thinly *against* the grain to ensure every bite is tender. Top with a generous amount of chimichurri.
How to bake a stunning spring cake

Why we love this
This Strawberry Basil Olive Oil Cake is a revelation for those who find traditional buttercreams too heavy for spring. The use of high-quality olive oil creates a crumb that is incredibly moist and almost savory, providing a sophisticated backdrop for the bright, jammy strawberries. The addition of fresh basil might sound unusual, but it offers a subtle, peppery herbal note that makes the fruit taste even sweeter. It’s a rustic, single-layer cake that looks effortlessly beautiful topped with a dusting of powdered sugar and fresh berries.
Ingredients
- 1 1/2 cups all-purpose flour
- 1 cup granulated sugar
- 3/4 cup extra virgin olive oil
- 2 large eggs
- 1/2 cup whole milk
- 1 1/2 teaspoons baking powder
- 1 cup fresh strawberries, sliced
- 2 tablespoons fresh basil, finely chiffonaded
How to make it
- Preheat your oven to 350°F (175°C) and grease an 8-inch round cake pan. Line the bottom with parchment paper for easy removal.
- In a large bowl, whisk the eggs and sugar together until the mixture is pale and slightly thickened (about 2 minutes).
- Slowly stream in the olive oil and milk while whisking constantly to create a smooth emulsion.
- Sift the flour and baking powder into the wet ingredients. Fold gently with a spatula until just combined; do not overmix or the cake will be tough.
- Stir in the finely chopped basil. Pour the batter into the prepared pan.
- Arrange the sliced strawberries on top of the batter in a decorative circular pattern. They will sink slightly during baking, creating little pockets of jam.
- Bake for 40-45 minutes, or until a toothpick inserted into the center comes out clean. Let the cake cool in the pan for 15 minutes before transferring to a wire rack. Serve at room temperature with a dollop of whipped cream.
The Secret to Viral Hosting
At the end of the day, the best food boards aren’t about perfection—they’re about presence. Whether you’re serving a perfectly seared steak or a pile of squishy rolls, the joy comes from the shared experience. These recipes are designed to be flexible, beautiful, and most importantly, delicious. So, put down the phone (after you take that one perfect shot!), grab a plate, and enjoy the feast you’ve created.