
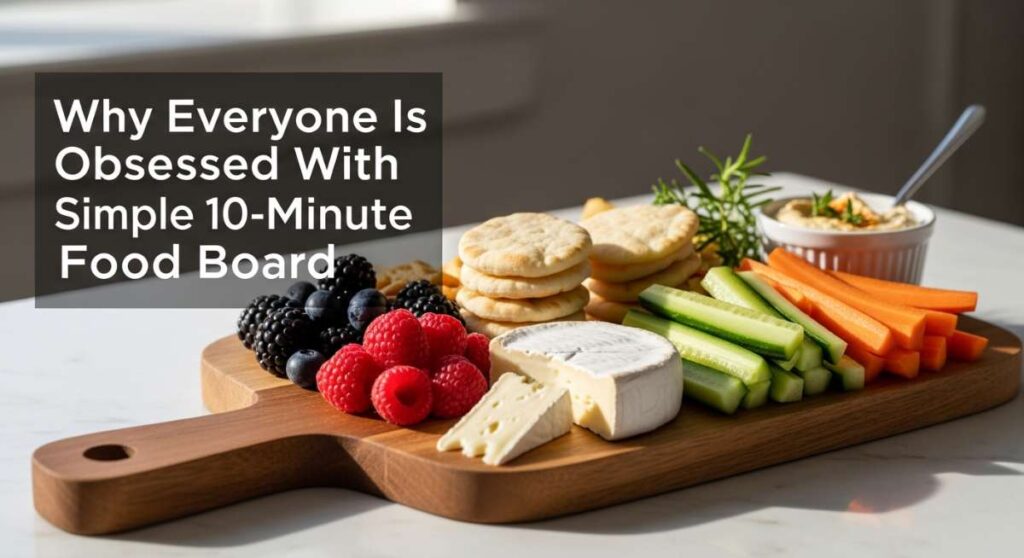
Why Everyone Is Obsessed With This Simple 10-Minute Food Board
We’ve all been there—friends are texting that they’re ‘on their way,’ and your kitchen looks less like a Pinterest dream and more like a chaotic storage unit. The pressure to entertain used to mean hours of slaving over a hot stove, but lately, I’ve discovered the magic of the simplified food board. It’s not just about the food; it’s about that effortless, welcoming vibe that says, ‘I’m so glad you’re here,’ without you looking like you’ve been through a culinary marathon.
The secret to this viral obsession is the perfect blend of colors, textures, and just enough variety to keep everyone grazing happily. It turns a standard weeknight into a special occasion and a weekend brunch into a memory. It’s light, it’s vibrant, and most importantly, it takes less time to assemble than it does to find a decent playlist. Let’s dive into the components that make this board the ultimate crowd-pleaser!
How to make pink sprite?
![]()
Why we love this
There is something incredibly whimsical and nostalgic about a sparkling pink beverage sitting in a tall glass. The effervescent bubbles of the Sprite dance around the sweet, floral notes of the coloring agent, creating a drink that looks like a sunset and tastes like pure summer joy. It’s the ultimate thirst-quencher that feels fancy enough for a party but is simple enough for a Tuesday afternoon. The gentle hiss of the carbonation combined with the tart zing of citrus makes every sip feel like a tiny celebration on your tongue.
Ingredients
- 1 can (12 oz) Chilled Sprite or Lemon-Lime Soda
- 1-2 tablespoons Grenadine syrup or Maraschino cherry juice
- Fresh lime wedges
- Maraschino cherries for garnish
- Crushed ice
How to make it
- Begin by selecting a high-quality glass, preferably a tall Collins glass or a festive goblet, and fill it to the brim with crushed ice; the smaller ice crystals help chill the drink faster and create a beautiful frosted look on the glass.
- Pour 1 to 2 tablespoons of grenadine syrup or cherry juice over the ice, allowing it to settle at the very bottom of the glass to create a stunning ombré gradient effect.
- Slowly pour the chilled Sprite over the syrup; do this gently to preserve as much carbonation as possible and to prevent the colors from mixing too quickly.
- Squeeze the juice of one fresh lime wedge into the glass to add a bright, acidic counterpoint to the sweet syrup, then drop the wedge into the glass.
- Using a long bar spoon, give the drink a very brief, gentle stir from the bottom up—just enough to swirl the pink color throughout without losing the bubbles.
- Top with a couple of Maraschino cherries and an extra lime wheel on the rim for a professional, viral-ready presentation.
How to toss summer salad?

Why we love this
A perfectly tossed summer salad is a masterclass in balance, offering a symphony of crisp textures and vibrant, garden-fresh flavors. We love the way the light dressing coats every leaf without making it soggy, ensuring that the peppery arugula and sweet berries sing in harmony. There’s a certain tactile satisfaction in the tossing process itself, watching the colors of the feta and nuts distribute evenly through the greens. It smells of fresh basil and vine-ripened tomatoes, bringing the essence of an outdoor garden party right to your dinner table.
Ingredients
- 5 oz Mixed baby greens or Arugula
- 1 cup Sliced fresh strawberries or peaches
- 1/4 cup Crumbled feta or goat cheese
- 1/4 cup Toasted walnuts or pecans
- 3 tablespoons Extra virgin olive oil
- 1 tablespoon Balsamic glaze
- Pinch of sea salt and cracked black pepper
How to make it
- Start with a very large, wide mixing bowl—much larger than you think you need—to allow the ingredients to move freely without being crushed or bruised during the process.
- Place your washed and thoroughly dried greens into the bowl; using a salad spinner is highly recommended because any excess water will prevent the dressing from adhering to the leaves.
- Drizzle the olive oil evenly over the greens first, then use clean hands or large wooden salad tongs to gently lift and turn the leaves until they are lightly glistening with oil.
- Sprinkle your salt and pepper over the oiled leaves; the oil acts as a binder, ensuring the seasoning sticks to every piece of lettuce rather than falling to the bottom.
- Add your delicate ingredients—the fruit, cheese, and nuts—and give the salad just two or three more gentle tosses to distribute them without breaking the cheese or macerating the fruit.
- Finish by drizzling the balsamic glaze in a decorative zigzag pattern over the top just seconds before serving to maintain the visual contrast and peak freshness.
How to slow cook meals?

Why we love this
Slow cooking is the ultimate act of kitchen love, turning humble ingredients into meltingly tender masterpieces while you go about your day. The aroma that fills the house—a deep, savory scent of caramelized onions, garlic, and slow-roasted meats—is better than any scented candle ever made. We love the way the fibers of the meat break down until they can be pulled apart with a mere fork, and how the vegetables soak up every drop of the seasoned broth. it’s the culinary equivalent of a warm hug at the end of a long, busy day.
Ingredients
- 2-3 lbs Beef chuck roast or Pork shoulder
- 1 lb Baby potatoes, halved
- 3 Large carrots, cut into 1-inch chunks
- 1 Yellow onion, quartered
- 3 cloves Garlic, smashed
- 2 cups Beef or vegetable broth
- Fresh sprigs of rosemary and thyme
How to make it
- Prior to placing the meat in the slow cooker, pat it completely dry with paper towels and sear it in a hot skillet with a tablespoon of oil for 3-4 minutes per side until a deep, dark brown crust forms; this Maillard reaction is essential for deep flavor.
- Place the quartered onions and smashed garlic at the very bottom of the slow cooker crock to create a flavor base and prevent the meat from sticking to the bottom.
- Layer the potatoes and carrots around the edges of the crock, then place the seared meat directly in the center on top of the aromatics.
- Pour the broth over the vegetables rather than over the meat to avoid washing off the seasoning and crust you just created.
- Tuck the fresh herb sprigs into the liquid around the meat, then secure the lid tightly to ensure no steam escapes during the long cooking process.
- Set the slow cooker to ‘Low’ and cook for 8 to 10 hours; resisting the urge to lift the lid is crucial, as each peek releases heat and adds significantly to the total cooking time.
How to cook spring dinner?

Why we love this
Spring dinners are all about celebrating the return of light and fresh growth, featuring ingredients that feel energetic and bright. We love the snap of fresh asparagus paired with the buttery, flakey texture of a perfectly cooked piece of salmon. It’s a meal that feels sophisticated yet wholesome, carrying the scent of lemon zest and fresh dill that clears the palate. The colors alone—vibrant greens and soft pinks—make the plate look like a work of art, reflecting the blooming world outside your window.
Ingredients
- 2 Salmon fillets (6 oz each)
- 1 bunch Thin asparagus, woody ends trimmed
- 2 tablespoons Unsalted butter, melted
- 1 Lemon, half sliced into rounds and half for juicing
- 2 tablespoons Fresh dill, chopped
- Salt, pepper, and garlic powder to taste
How to make it
- Preheat your oven to 400°F (200°C) and line a large sheet pan with parchment paper to ensure even cooking and an effortless cleanup.
- Arrange the trimmed asparagus in a single layer on one side of the pan, drizzling them with half of the melted butter and a sprinkle of salt; toss them to ensure full coverage.
- Place the salmon fillets on the other side of the pan, skin-side down, and brush the remaining butter over the tops of the fish.
- Season the salmon generously with garlic powder, salt, and pepper, then press the freshly chopped dill into the surface of the fish to create a flavorful herb crust.
- Lay the lemon slices directly on top of the salmon and the asparagus to infuse them with citrus oils as they roast in the high heat.
- Bake for 12 to 15 minutes, checking for doneness by pressing a fork into the thickest part of the salmon; it should flake easily and look opaque while the asparagus should be tender-crisp with slightly charred tips.
How to mix bird nectar?

Why we love this
While not a dish for humans, mixing bird nectar is a beautiful ritual that connects our kitchen to the nature right outside our back door. We love the simplicity of this two-ingredient recipe and the immense reward of watching shimmering hummingbirds visit the feeder. It’s a peaceful, meditative process that brings a sense of harmony to the home, making the garden feel like an extension of the living space. The clear, sweet liquid is a lifeline for these tiny creatures, and providing it feels like a small, meaningful way to give back to the environment.
Ingredients
- 1 cup White granulated sugar (do not use honey or substitutes)
- 4 cups Filtered water
How to make it
- Measure out four cups of water and pour them into a clean saucepan, bringing the liquid to a full, rolling boil on the stovetop to neutralize any impurities or bacteria.
- Remove the pan from the heat and immediately stir in one cup of white granulated sugar; use a whisk to ensure the sugar dissolves completely until the liquid is crystal clear.
- Allow the mixture to cool completely at room temperature; this is a vital step, as hot nectar can warp plastic feeders or harm the delicate birds.
- Do not add red food coloring, as the dyes can be harmful to birds; the red parts of your bird feeder are more than enough to attract them.
- Once the nectar is cold, pour it into a clean bird feeder and store any leftover mixture in a sealed glass jar in the refrigerator for up to one week.
- Clean your feeder thoroughly with hot water every 3 to 5 days to prevent mold growth, especially during the hot summer months.
How to bake spring cookies?

Why we love this
Spring cookies are a delight for the senses, offering a soft, buttery bite that practically melts in your mouth. We love the subtle infusion of floral lavender or bright lemon that makes these treats feel elevated and elegant. The texture is key—slightly crisp on the outer edges with a tender, pale center that feels light despite the richness of the butter. Decorating them with pastel-colored royal icing or a simple glaze makes them the centerpiece of any food board, looking almost too pretty to eat, but smelling too good to resist.
Ingredients
- 1 cup Unsalted butter, softened to room temperature
- 3/4 cup Granulated sugar
- 1 Egg
- 2 1/2 cups All-purpose flour
- 1 teaspoon Vanilla extract
- 1 tablespoon Lemon zest or dried culinary lavender
- 1/2 teaspoon Baking powder
How to make it
- In a large stand mixer, cream together the softened butter and granulated sugar for at least 3-5 minutes until the mixture is pale, light, and fluffy; this aeration is the secret to a tender cookie.
- Add the egg, vanilla extract, and lemon zest (or lavender), beating well to ensure the flavors are fully incorporated into the fat of the butter.
- In a separate bowl, whisk together the flour and baking powder, then slowly add it to the wet ingredients on low speed just until no streaks of flour remain—be careful not to overmix, which leads to tough cookies.
- Wrap the dough in plastic wrap and chill it in the refrigerator for at least one hour; chilling prevents the cookies from spreading too much and helps the flavors develop.
- Roll the chilled dough out on a floured surface to 1/4-inch thickness and use your favorite spring shapes (flowers, bunnies, or circles) to cut out the cookies.
- Bake at 350°F (175°C) for 8 to 10 minutes; the cookies should still look pale and not browned, as they will continue to firm up on the hot baking sheet once removed from the oven.
How to serve summer pasta?

Why we love this
Summer pasta is the ultimate chilled comfort food, trading heavy sauces for the bright, zesty notes of fresh herbs and olive oil. We love how the curly ridges of fusilli or farfalle trap bits of garlic and parmesan, ensuring every mouthful is packed with flavor. It’s a dish that feels cooling on a hot day, especially when loaded with sun-ripened tomatoes that burst with sweetness. The aroma of fresh basil clinging to the noodles is intoxicating, making this a staple for outdoor picnics and lazy patio dinners.
Ingredients
- 12 oz Dried pasta (Fusilli, Rotini, or Farfalle)
- 1/2 cup Fresh basil pesto or high-quality olive oil
- 1 cup Cherry tomatoes, halved
- 1/2 cup Fresh mini mozzarella pearls
- 1/4 cup Toasted pine nuts
- Freshly grated Parmesan cheese
How to make it
- Boil a large pot of heavily salted water—it should taste like the sea—and cook your pasta until it is just slightly past ‘al dente’; for cold pasta dishes, a softer noodle holds the dressing better once chilled.
- Drain the pasta and immediately rinse it under cold running water for 60 seconds to stop the cooking process and wash away excess starch, which prevents the noodles from sticking together.
- Transfer the cold noodles to a large bowl and toss with the pesto or olive oil while the noodles are still slightly damp; this helps the sauce create a smooth, even coating.
- Gently fold in the halved cherry tomatoes and mozzarella pearls, being careful not to squash the tomatoes so they keep their juices inside.
- Cover the bowl and let the pasta sit in the refrigerator for at least 30 minutes; this ‘marinating’ time allows the noodles to absorb the flavors of the sauce.
- Just before serving on your board, sprinkle with toasted pine nuts and a generous dusting of Parmesan cheese for added texture and a salty finish.
How to prep summer salads?

Why we love this
Preparation is the secret ingredient to a successful food board, and prepping summer salads ahead of time ensures that everything stays incredibly crisp and vibrant. We love the organized beauty of neatly chopped radishes, cucumbers, and peppers waiting to be assembled. There’s a wonderful peace of mind in knowing that the ‘hard work’ is done, allowing you to enjoy your guests while the ingredients remain at their peak freshness. The crunch of a well-prepped vegetable is a sensory delight that makes healthy eating feel like a true indulgence.
Ingredients
- 2 heads Romaine lettuce or butter lettuce
- 3 Persian cucumbers, sliced
- 1 Red bell pepper, diced
- 1 bunch Radishes, thinly sliced
- Clean, airtight glass containers
- Damp paper towels
How to make it
- Wash all your leafy greens in cold water and use a salad spinner to remove every drop of moisture; any water left on the leaves will cause them to wilt and turn slimy in the fridge.
- Wrap the dried greens loosely in a slightly damp paper towel before placing them in a large airtight container; the towel maintains the perfect humidity level to keep them crisp for days.
- Chop your ‘hard’ vegetables like peppers and cucumbers, but keep them in separate containers from the greens; vegetables with high water content can make the lettuce soggy if stored together.
- For radishes and carrots, store them in a container submerged in cold filtered water; this technique keeps them incredibly crunchy and prevents them from drying out or becoming woody.
- Prepare your dressing in a small mason jar but do not add it to the vegetables; keep it separate and give it a vigorous shake just before pouring it over the salad at the last possible second.
- Label your containers with the date of prep and store them in the crisper drawer of your refrigerator to ensure maximum longevity and flavor retention.
How to stew summer meals?

Why we love this
Summer stewing, often called ratatouille or a vegetable ragoût, is about celebrating the bounty of the harvest in a way that feels light yet deeply satisfying. We love the way zucchini, eggplant, and peppers melt together into a silken texture that is perfect for scooping up with a piece of crusty bread. It smells like a rustic kitchen in Provence, with the earthy scent of thyme and the sweetness of cooked-down tomatoes. It’s a slow, rhythmic process that rewards patience with a depth of flavor that raw vegetables simply can’t match.
Ingredients
- 1 Large eggplant, cubed
- 2 Zucchini, sliced into rounds
- 1 Yellow onion, diced
- 3 Large tomatoes, chopped or 1 can crushed tomatoes
- 2 cloves Garlic, minced
- Fresh thyme and bay leaf
- Extra virgin olive oil
How to make it
- In a large, heavy-bottomed pot or Dutch oven, heat two tablespoons of olive oil over medium heat and sauté the eggplant cubes first until they are golden brown and have softened; remove them and set aside.
- Add a bit more oil if needed and sauté the zucchini until it has a nice sear, then remove and set aside with the eggplant—cooking the vegetables separately at first prevents them from steaming and getting mushy.
- Add the diced onions to the pot and cook until they are translucent and sweet, then stir in the minced garlic and cook for just 60 seconds until fragrant but not burnt.
- Pour in the chopped tomatoes with their juices, the thyme, and the bay leaf, then return the browned eggplant and zucchini to the pot.
- Turn the heat down to the lowest setting, cover the pot, and let the mixture simmer gently for 30 to 40 minutes, stirring occasionally to ensure nothing sticks to the bottom.
- The stew is done when the vegetables have melded together into a thick, jammy consistency; remove the bay leaf and serve warm or at room temperature for the best flavor profile.
How to roast spring vegetables?

Why we love this
Roasting spring vegetables transforms them into caramelized gems of concentrated sweetness and earthy depth. We love the contrast between the tender, soft interiors and the slightly charred, crispy edges of a roasted radish or a baby carrot. There is a rustic beauty in the way the high heat intensifies their natural colors, making them look like jewels scattered across the board. The scent of roasting garlic and olive oil wafting through the house is the ultimate welcome, promising a meal that is both healthy and incredibly flavorful.
Ingredients
- 1 bunch Baby carrots, tops trimmed
- 1 lb Fingerling potatoes, halved lengthwise
- 1 bunch Asparagus or Broccolini
- 3 tablespoons Olive oil
- 1 tablespoon Balsamic vinegar
- Flaky sea salt and cracked black pepper
How to make it
- Preheat your oven to a high temperature, around 425°F (220°C); a high heat is essential to achieve caramelization without overcooking the delicate spring centers.
- Place your sturdier vegetables—the potatoes and carrots—on a large baking sheet and toss them thoroughly with olive oil and salt.
- Spread them out so they are in a single layer with plenty of space between each piece; if the pan is crowded, the vegetables will steam instead of roast, losing that coveted crispy texture.
- Roast the potatoes and carrots for 15 to 20 minutes first, as they take longer than the greener spring vegetables.
- Slide the tray out and add the asparagus or broccolini to the pan, tossing them quickly in the hot oil already on the sheet, then roast everything together for another 10 minutes.
- Finish the dish by drizzling the balsamic vinegar over the hot vegetables the moment they come out of the oven; the residual heat will slightly reduce the vinegar, creating a sweet and tangy glaze.
Conclusion
Creating a viral food board isn’t about being a professional chef; it’s about the joy of assembly and the celebration of seasonal ingredients. Whether you’re serving up a shimmering pink sprite or a tray of perfectly roasted spring vegetables, the goal is always the same: to bring people together over something beautiful and delicious. So, grab your favorite board, pick a few of these sections, and start building your own masterpiece. Your friends (and your Instagram feed) will thank you!