
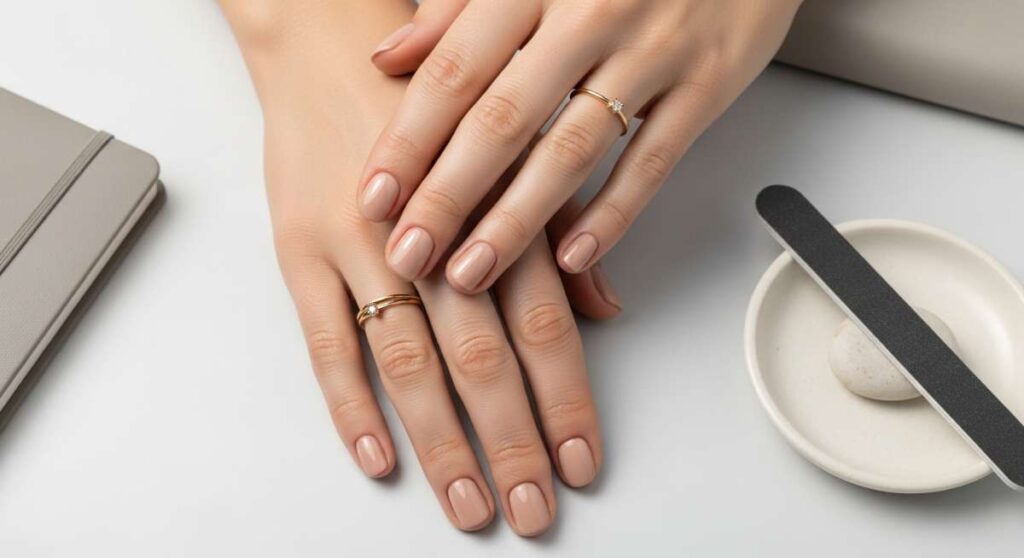
The Quiet Luxury Manicure: Mastering Subtle Sophistication
Hello, my loves. Pour yourself a warm cup of jasmine tea and settle in. Today, we’re talking about that beautiful, whispered elegance that sits right at your fingertips. You know the feeling—the soft click of well-manicured nails against a ceramic mug, the way a clean set makes even a simple white t-shirt feel like high fashion. This is the era of ‘Quiet Luxury,’ where we trade the loud and neon for the subtle and soulful.
In this space we’ve built together, I always want you to feel like beauty isn’t a chore, but a soft embrace. Minimalist nail art isn’t about doing less; it’s about choosing better. It’s about the intentionality of a single line or the perfect shade of ‘milky tea.’ It’s a love letter to yourself that you get to read every single time you look down at your hands. Let’s dive into these gentle tutorials together, shall we?
The Sweetest Secret: Dainty Hearts
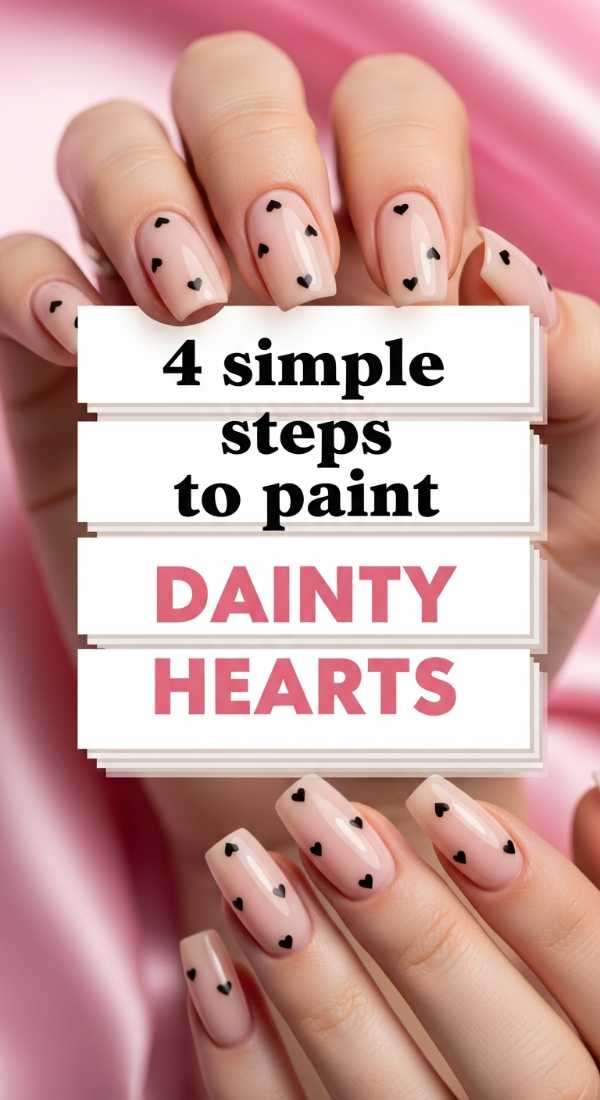
Why to love these Nails:
There is something so incredibly romantic about a tiny heart peeking out from a neutral base. It’s like a secret love letter to yourself every time you look down at your hands, adding a touch of whimsy without breaking that sophisticated silhouette we adore.
Essential Items:
- Sheer pink base coat
- Red or white gel polish
- Fine-tipped dotting tool
- Glossy top coat
How to Prepare:
- Apply two coats of your sheer base and cure under a UV lamp.
- Dip your dotting tool into the heart color and place two small dots side-by-side.
- Use a thin brush or the tip of the tool to drag the dots downward into a ‘V’ shape to form the point.
- Seal with a high-shine top coat to protect your art.
Budget Range
- Essie Skinny Dip ($9.00)
- Beetles Gel Art Liner Set ($12.00)
- Seche Vite Dry Fast Top Coat ($10.00)
Petal Soft: Spring Flowers

Why to love these Nails:
Spring is all about new beginnings, and these delicate blooms bring that garden-fresh energy right to your fingertips. They are the perfect way to welcome the sun while keeping your aesthetic light, airy, and grounded in nature.
Essential Items:
- Nude base polish
- Pastel yellow and white polish
- Small dotting tool
- Matte top coat
How to Prepare:
- Paint your base and let it dry completely to ensure a smooth canvas.
- Place a tiny yellow dot in the center of where you want your flower.
- Clean your tool and place five white dots around the center yellow dot.
- Repeat in a scattered pattern across 2-3 accent nails.
- Finish with a matte top coat for a soft, velvety petal feel.
Budget Range
- OPI Bubble Bath ($11.00)
- Sally Hansen Insta-Dri in ‘White On’ ($6.00)
- Zoya Naked Manicure Kit ($25.00)
The Classic Silhouette: Perfect Almond Tips
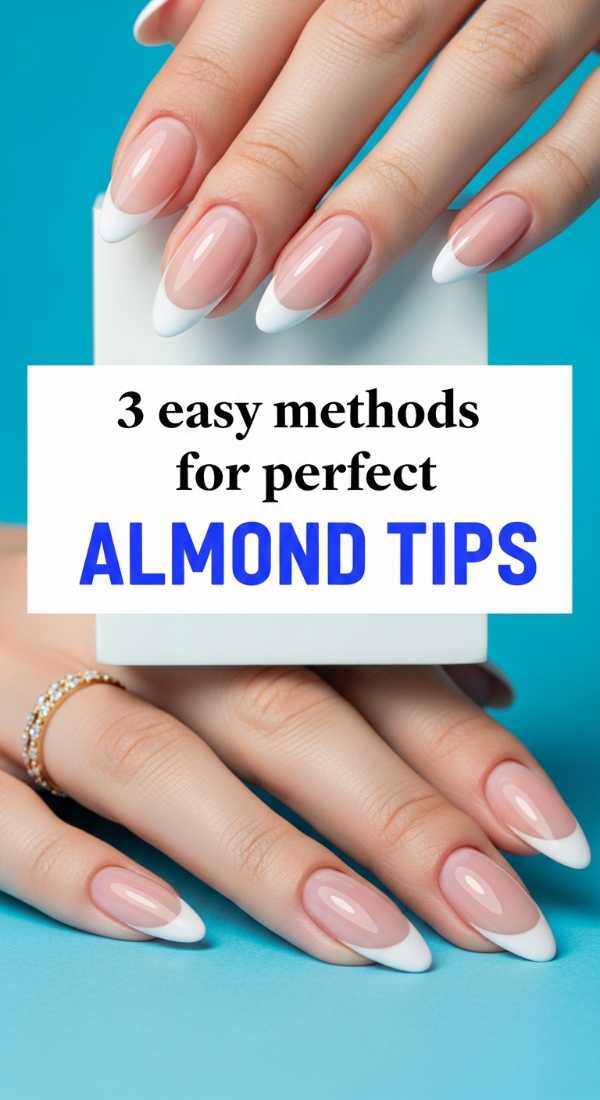
Why to love these Nails:
The almond shape is the ultimate canvas for quiet luxury. It elongates the fingers and provides a sophisticated silhouette that feels timeless. It’s the foundation for every chic look we love, from French tips to glazed chrome.
Essential Items:
- 180-grit nail file
- Buffing block
- Cuticle oil
- Strength-building base coat
How to Prepare:
- Find the center point of your free edge to act as your ‘peak’ guide.
- File at an angle from the side wall toward the center, using long, fluid strokes.
- Switch sides and repeat until the tip is rounded but tapered.
Budget Range
- Tweezerman Professional Nail File ($5.00)
- CND SolarOil ($9.00)
- Orly Bonder Base Coat ($15.00)
The Coquette Aesthetic: Viral Bow Nails
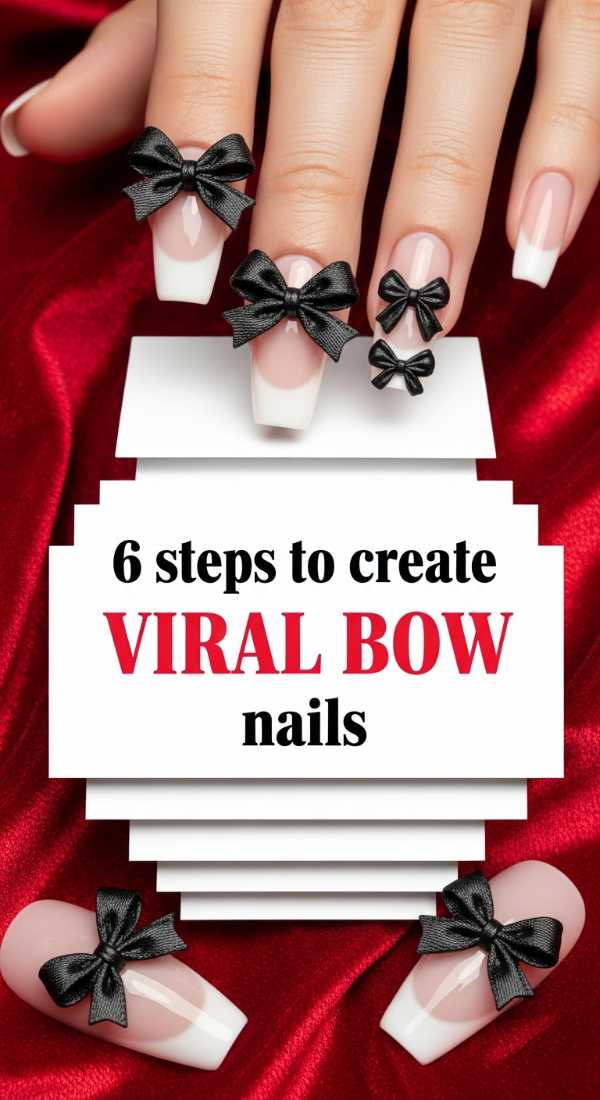
Why to love these Nails:
Bows are the moment, loves. They add a touch of playful coquette charm to a clean manicure without feeling overdone. It’s a nod to femininity that feels both vintage and modern at the exact same time.
Essential Items:
- Ultra-thin striping brush
- Soft black or silk-white polish
- Pale pink base
- Curing lamp (if using gel)
How to Prepare:
- Start with a clean, cured pink base.
- Paint two small triangles with their points touching in the center.
- Add two slightly curved lines extending downward for the ribbons.
- Place a tiny dot in the center where the triangles meet.
- Cure the design immediately to prevent spreading.
- Apply a thick ‘plumping’ top coat for a 3D effect.
Budget Range
- DND Gel Polish Duo ($14.00)
- Makartt Nail Art Brushes ($8.00)
- Gelish Harmony Top It Off ($13.00)
Library Chic: Minimalist Plaid Designs
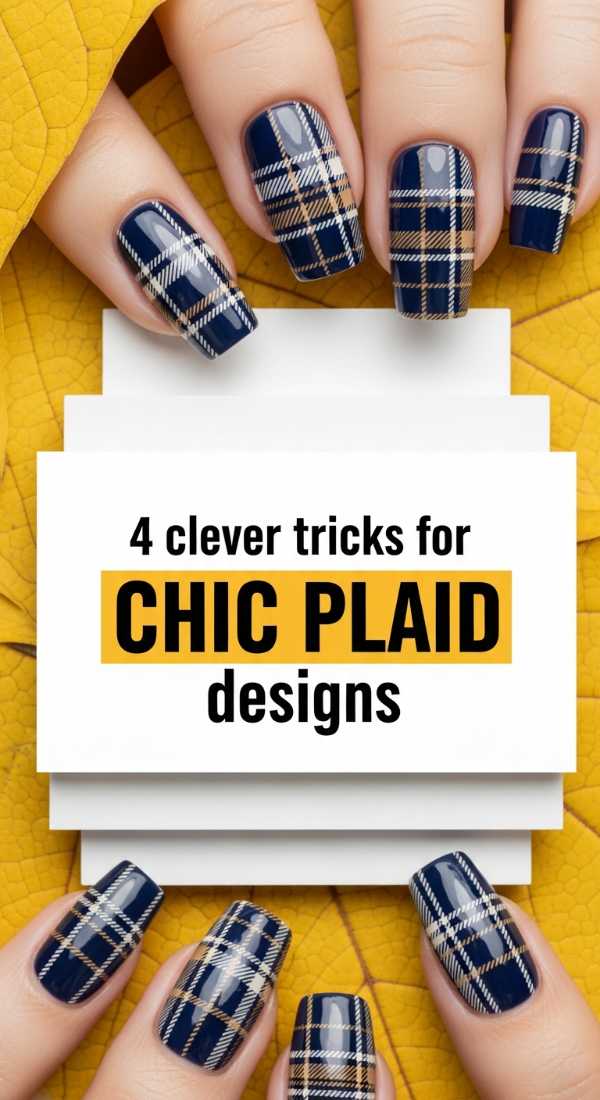
Why to love these Nails:
Plaid doesn’t have to be loud. In soft, muted tones, it’s the epitome of a chic, scholarly aesthetic that works year-round. It’s for the days when you want to feel organized, focused, and elegantly layered.
Essential Items:
- Taupe or grey base polish
- Sheer white polish
- Long striping brush
- Steady hand
How to Prepare:
- Apply your taupe base and let it dry fully.
- Draw one vertical line and one horizontal line using the sheer white.
- Add a second, thinner set of lines slightly offset from the first.
- Ensure the lines are ‘wispy’ rather than opaque for that soft, fabric-like look.
Budget Range
- Revlon Enamel in ‘Gray Suede’ ($7.00)
- Maniology Stamping Polish ($8.00)
- Kupa Ultra Gloss Top Coat ($18.00)
Morning Ritual: Coffee Latte Nails
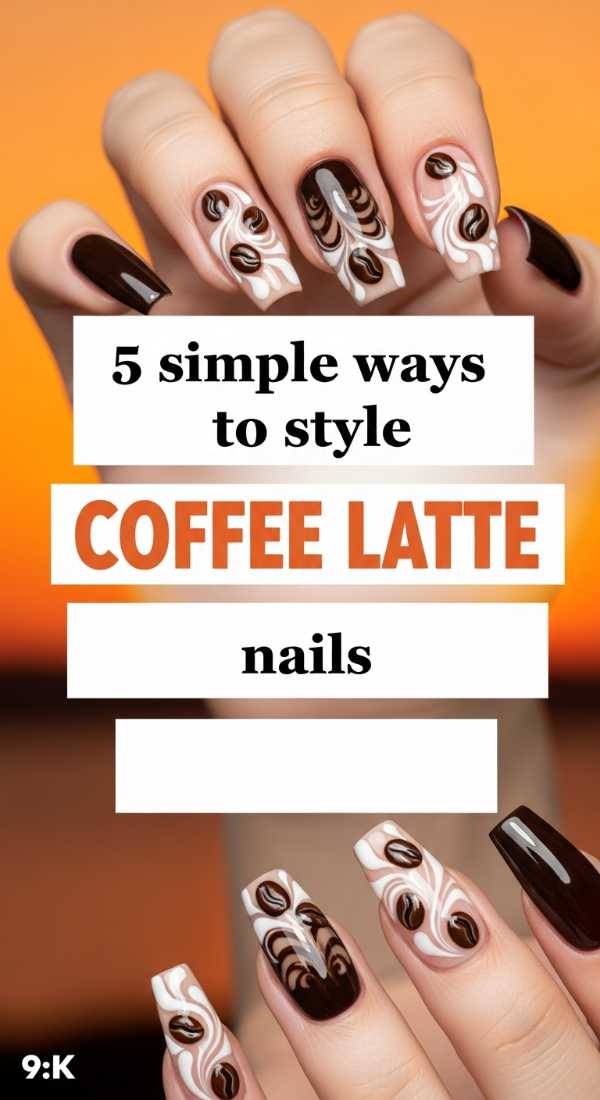
Why to love these Nails:
Coffee latte nails are the warm hug of the manicure world. Those creamy browns and milky whites are just so cozy and grounding. They pair perfectly with oversized cashmere sweaters and crisp autumn mornings.
Essential Items:
- Espresso brown polish
- Cream/beige polish
- Mixing palette (or a piece of foil)
- Detailing brush
How to Prepare:
- Apply the beige polish as your base.
- On your palette, mix a drop of brown with a drop of top coat to make it sheer.
- Swirl the sheer brown onto the nail in a marble pattern.
- Add a few dots of pure white for ‘foam’ highlights.
- Blend gently with a clean brush while still wet.
Budget Range
- Olive & June ‘JJ’ ($9.00)
- Cirque Colors ‘Coffee Talk’ ($12.50)
- Holler and Glow Mixing Palette ($5.00)
Cloud-Walking: Pastel Gradients
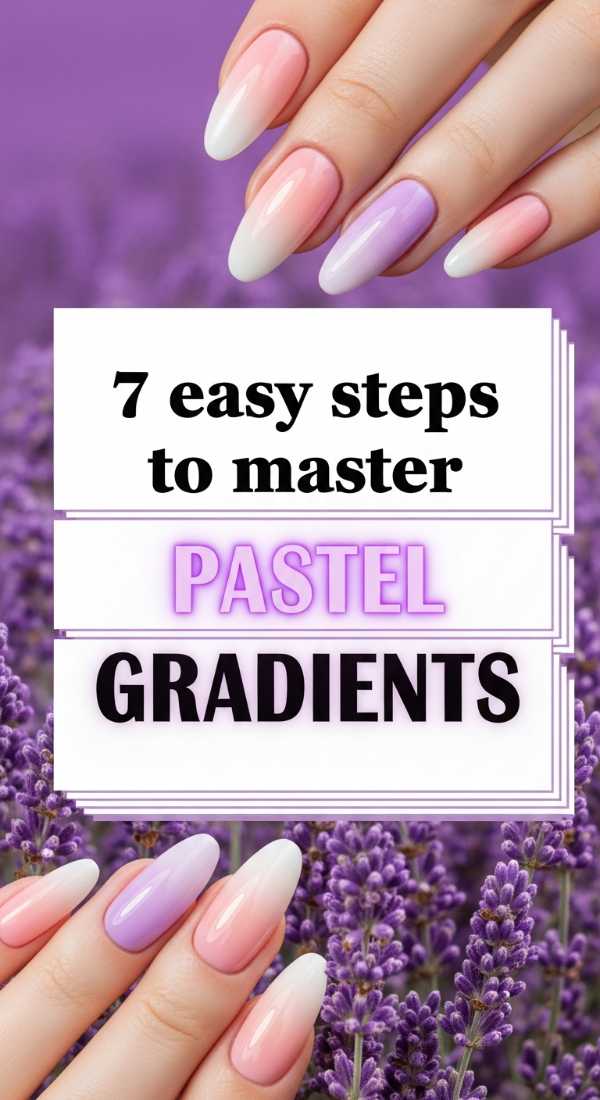
Why to love these Nails:
A pastel gradient is like a sunrise on your nails. It’s soft, ethereal, and perfect for when you want color but need it to stay subtle. It feels like walking on a cloud—gentle, peaceful, and absolutely dreamy.
Essential Items:
- Lavender polish
- Mint green polish
- Makeup sponge
- Liquid latex (for easy cleanup)
How to Prepare:
- Paint your nails white or a very pale nude to help the pastels pop.
- Apply liquid latex around the skin of your nail.
- Paint stripes of lavender and mint onto the makeup sponge.
- Dab the sponge onto the nail several times until blended.
- Peel off the latex.
- Apply top coat while the polish is slightly tacky to smooth the gradient.
- Clean up the edges with an acetone-dipped brush.
Budget Range
- Holo Taco ‘Milky White’ ($11.00)
- Essie ‘Mint Candy Apple’ ($9.00)
- Latex Barrier by Bliss Kiss ($12.00)
The Power of Less: Negative Space Art
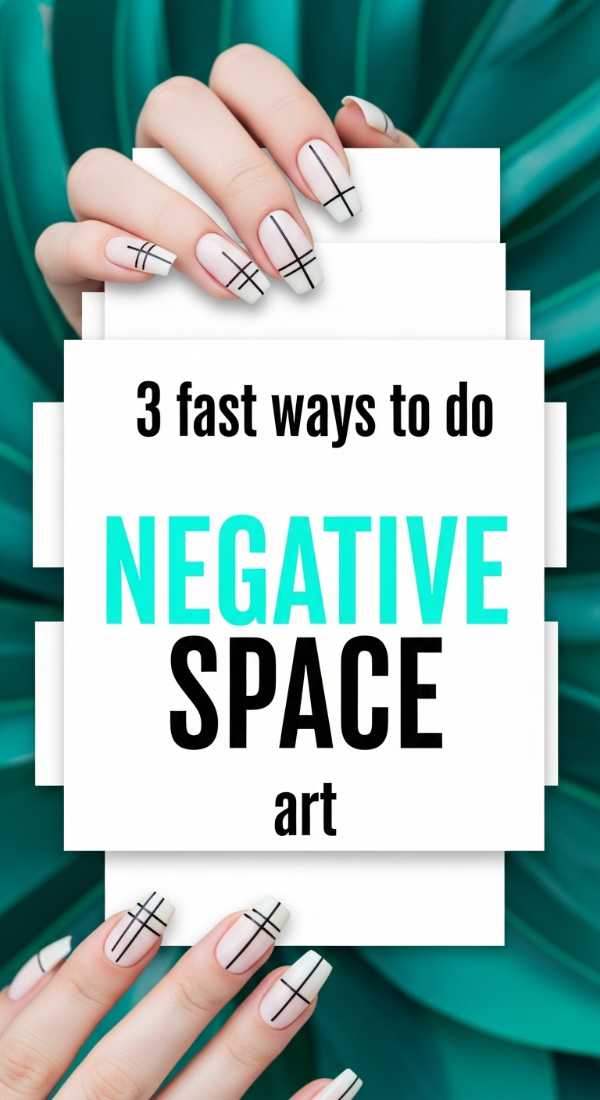
Why to love these Nails:
Negative space is the secret weapon of minimalists. By letting your natural nail shine through, you create a look that is modern and edgy yet incredibly clean. It’s for the woman who finds beauty in the gaps and the silences.
Essential Items:
- Nail striping tape
- Gold or silver metallic polish
- Clear base coat
- Precision tweezers
How to Prepare:
- Apply a clear, nourishing base coat.
- Place a strip of tape horizontally across the middle of your nail.
- Paint only the top half of the nail with your metallic polish.
- Remove the tape immediately while the polish is wet for a crisp line.
Budget Range
- Modelones Metallic Liner Gel ($7.00)
- Amazon Basics Striping Tape ($4.00)
- Nails Inc. Back to Life Recovery Treatment ($15.00)
Glazed Glow: Almond Chrome Nails
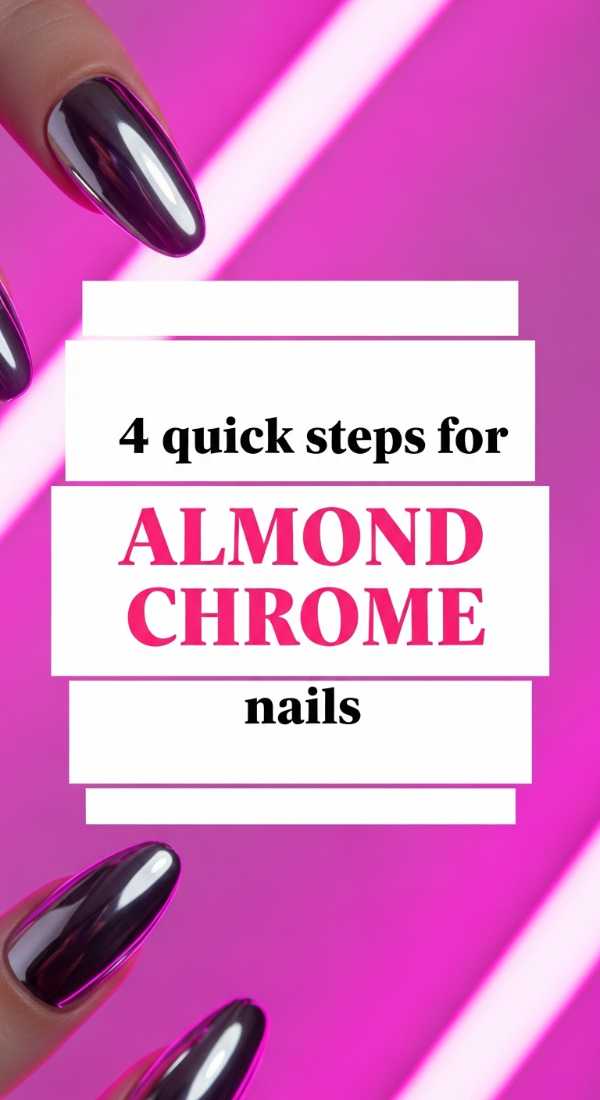
Why to love these Nails:
Almond chrome is for when you want that ‘clean girl’ aesthetic with just a hint of futuristic glow. It’s glazed, gorgeous, and effortless. It catches the light in the most enchanting way, like pearls reflecting off the ocean.
Essential Items:
- Milky white gel polish
- Pearlescent chrome powder
- Sponge applicator
- No-wipe top coat
How to Prepare:
- Apply and cure two coats of milky white gel.
- Apply a no-wipe top coat and cure for 30 seconds (keep it slightly ‘grabby’).
- Buff the chrome powder into the nail using the sponge applicator.
- Dust off excess and seal with a final layer of top coat.
Budget Range
- Daily Charme Pearl Chrome Powder ($16.00)
- Kiara Sky Non-Wipe Top Coat ($15.00)
- Gelish ‘Arctic Freeze’ ($14.00)
The Foundation: 5 Steps to Design Prep

Why to love these Nails:
Before we paint our dreams, we have to prepare the canvas. Good prep is the difference between a manicure that lasts a day and one that lasts weeks. It’s the most important part of the ritual—the quiet moment of care for yourself.
Essential Items:
- Glass nail file
- Wooden cuticle pusher
- Dehydrator or rubbing alcohol
- Lint-free wipes
How to Prepare:
- Gently push back cuticles after a warm shower when the skin is soft.
- Shape the free edge with a glass file to prevent splitting.
- Buff the surface lightly to remove any natural oils.
- Wipe each nail thoroughly with rubbing alcohol.
- Apply a thin, even layer of primer or base coat.
Budget Range
- Mont Bleu Glass Nail File ($10.00)
- Flowery Birchwood Sticks ($5.00)
- Mia Secret Nail Prep & Dehydrator ($12.00)
Embracing Your Inner Glow
Loves, I hope these tutorials inspire you to take a little extra time for yourself this week. Whether you choose the tiny hearts or the glazed chrome, remember that the most beautiful thing you can wear is your own confidence and peace. Your hands do so much work—they hold tea, they type emails, they hug your favorite people—so why not treat them to a little quiet luxury? You deserve to feel refined, right down to your fingertips.