
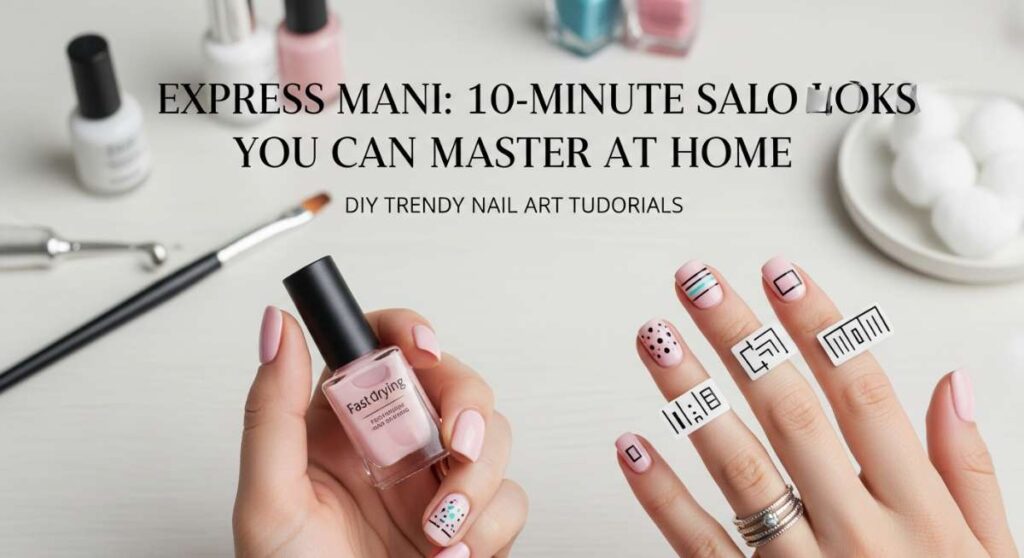
Express Mani: 10-Minute Salon Looks You Can Master at Home
Hello, my loves. Pull up a chair, grab a steaming mug of tea, and let’s talk about that little slice of sanctuary we call ‘me-time.’ There is something so incredibly soul-soothing about looking down at your hands and seeing a burst of color or a delicate design that reminds you of your own creativity. I know life gets chaotic, and finding an hour to sit in a salon chair can feel like a mountain to climb, but you deserve that soft, polished feeling every single day.
In this little corner of the internet today, I’m sharing my favorite secrets for achieving that professional, ‘just-stepped-out-of-the-salon’ look in just ten minutes. Think of this as a cloud-soft embrace for your spirit—a way to romanticize your routine without the stress. We are keeping things simple, achievable, and oh-so-dreamy.
4 Simple Steps to Paint Heart Nails
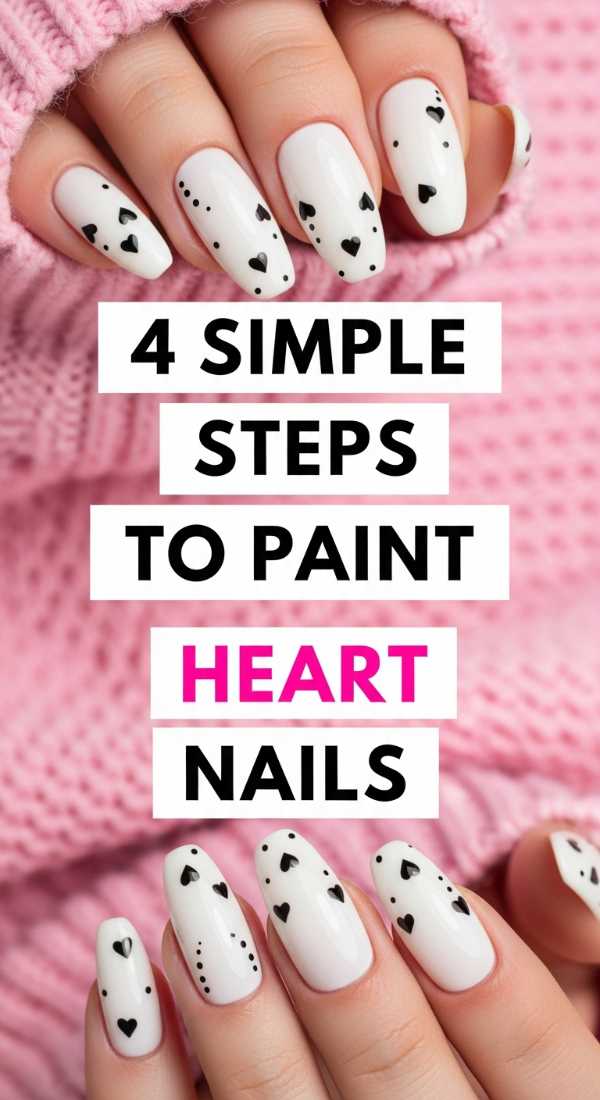
Why to love these Nails:
These sweet little hearts are like a love letter to yourself. They add a touch of whimsy and warmth to your day, reminding you to be gentle with your heart while you navigate the world.
Essential Items:
- Soft pink base polish
- Deep red or creamy white accent polish
- A simple toothpick or a small dotting tool
- Clear high-shine top coat
How to Prepare:
- Apply two thin coats of your base color and let them dry until tacky.
- Place two small dots of the accent color side-by-side where you want the heart to sit.
- Using your toothpick, drag the polish from the center of each dot downward to meet in a ‘V’ shape.
- Once dry, seal with a top coat to protect your little symbols of love.
Budget Range
- Essie Ballet Slippers ($10)
- Sally Hansen Insta-Dri Red ($6)
- Wooden Toothpicks ($1)
Apply 3 Coats for Perfect French Tips
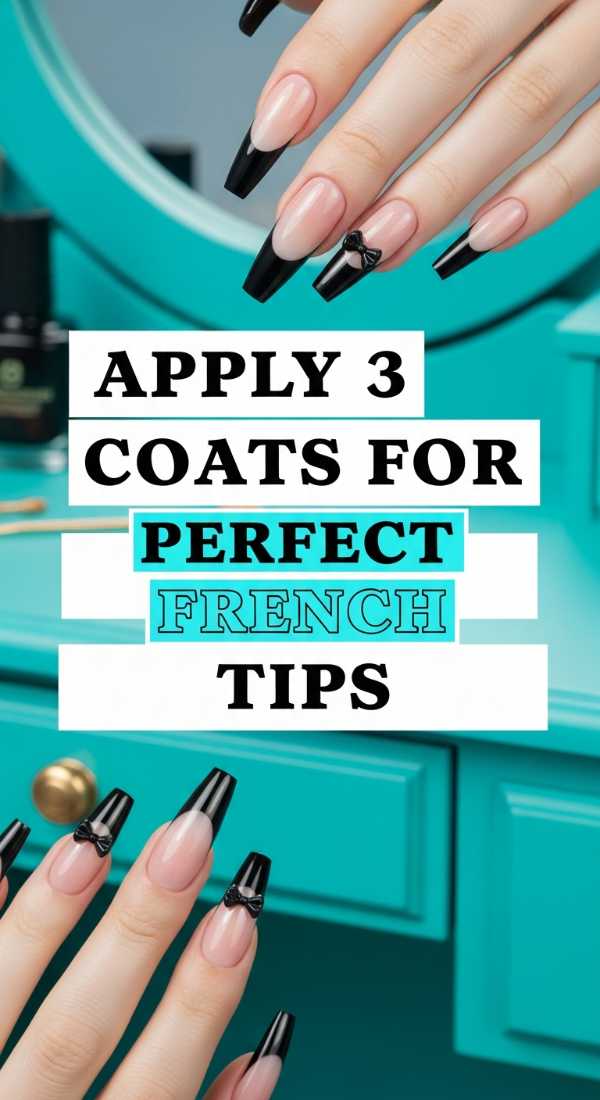
Why to love these Nails:
The classic French tip is the ultimate symbol of timeless elegance. By using a specific three-coat layering technique, we achieve a depth and ‘squishiness’ that looks exactly like a professional gel application.
Essential Items:
- Sheer nude or milky pink polish
- Opaque white polish
- French tip guide stickers (optional)
How to Prepare:
- Apply one thin coat of your sheer base and let it dry completely.
- Paint your white tips carefully; if you aren’t confident, use a sticker guide for a crisp edge.
- Apply the second and third coats of your sheer base *over* the entire nail, including the tip, to soften the white and create that seamless, natural glow.
Budget Range
- Zoya Naked Manicure ($12)
- Orly White Tips ($10)
- Manicure Guide Strips ($4)
Design 5 Spring Flowers in 10 Minutes
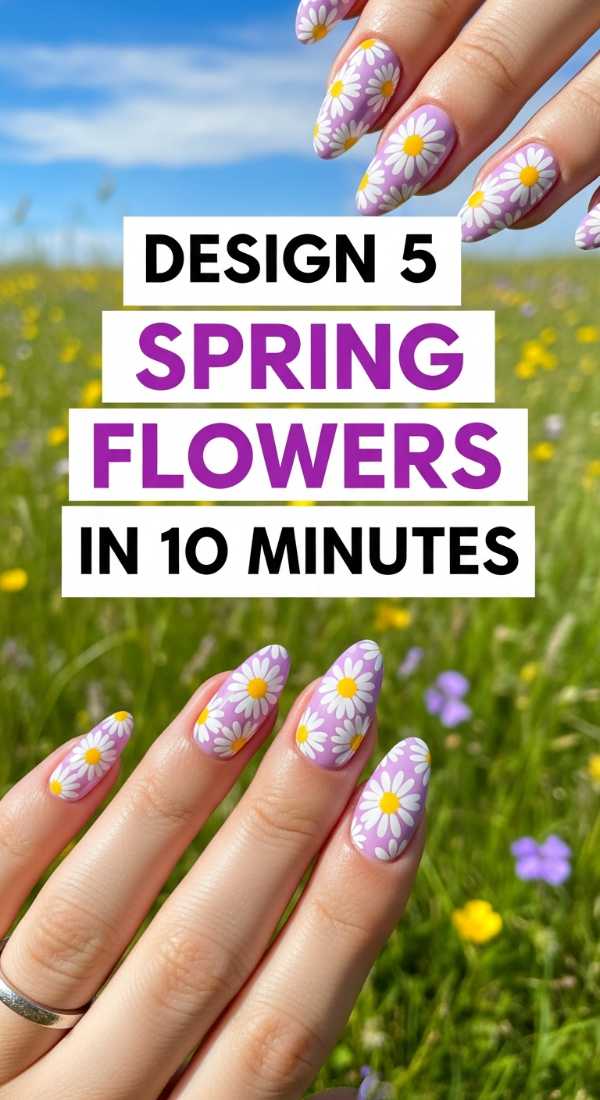
Why to love these Nails:
Spring is all about renewal, and what better way to celebrate than with a garden at your fingertips? These tiny daisies are incredibly forgiving and bring a sense of fresh air to your look.
Essential Items:
- Pastel yellow polish for the centers
- Crisp white polish for petals
- A bobby pin or dotting tool
How to Prepare:
- Dot a tiny yellow circle in the center of where you want each flower to live.
- Clean your tool and dip it into the white polish.
- Place five small dots around the yellow center to create the petals.
- Repeat across different nails for a scattered wildflower effect.
Budget Range
- OPI It’s a Girl ($11)
- Holo Taco Not Milky White ($13)
- Standard Bobby Pins ($2)
Create 2 Stunning Matte Almond Nail Looks
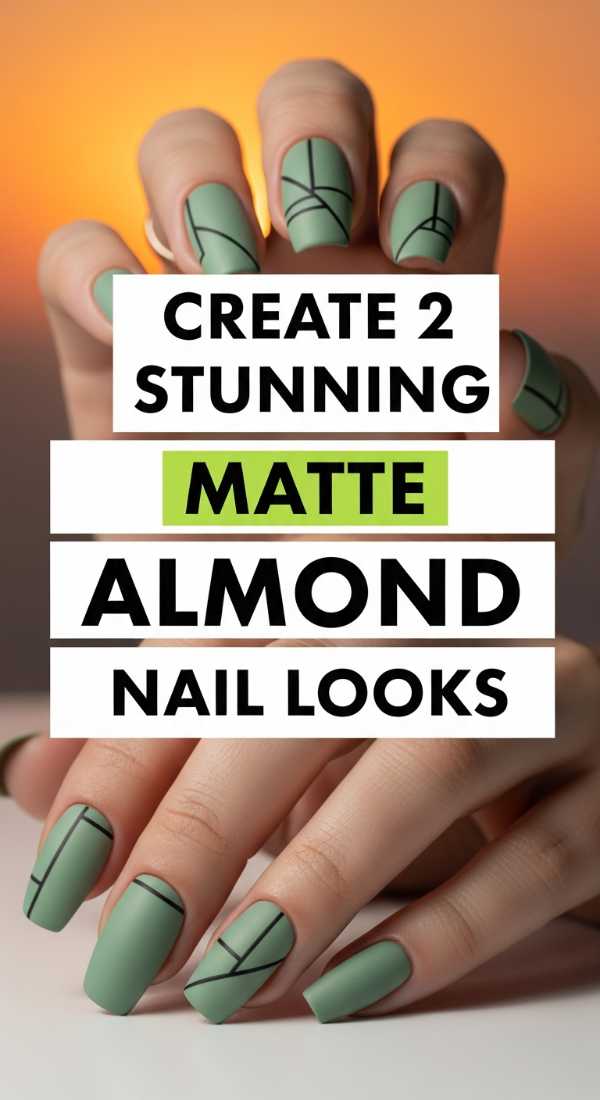
Why to love these Nails:
There is something so sophisticated about a matte finish on an almond-shaped nail. It’s modern, edgy yet soft, and feels like velvet against your skin.
Essential Items:
- Deep mauve or charcoal polish
- High-quality matte top coat
- Almond-shaped nail file
How to Prepare:
- File your nails into a soft almond point, ensuring the edges are smooth and symmetrical.
- Apply two even coats of your chosen moody hue.
- Finish with a dedicated matte top coat, ensuring you cap the free edge to prevent shine-through later.
Budget Range
- Revlon Matte Top Coat ($6)
- Olive & June ‘JJ’ ($9)
- Glass Nail File ($8)
Get 4 Pastel Spring Patterns in Minutes
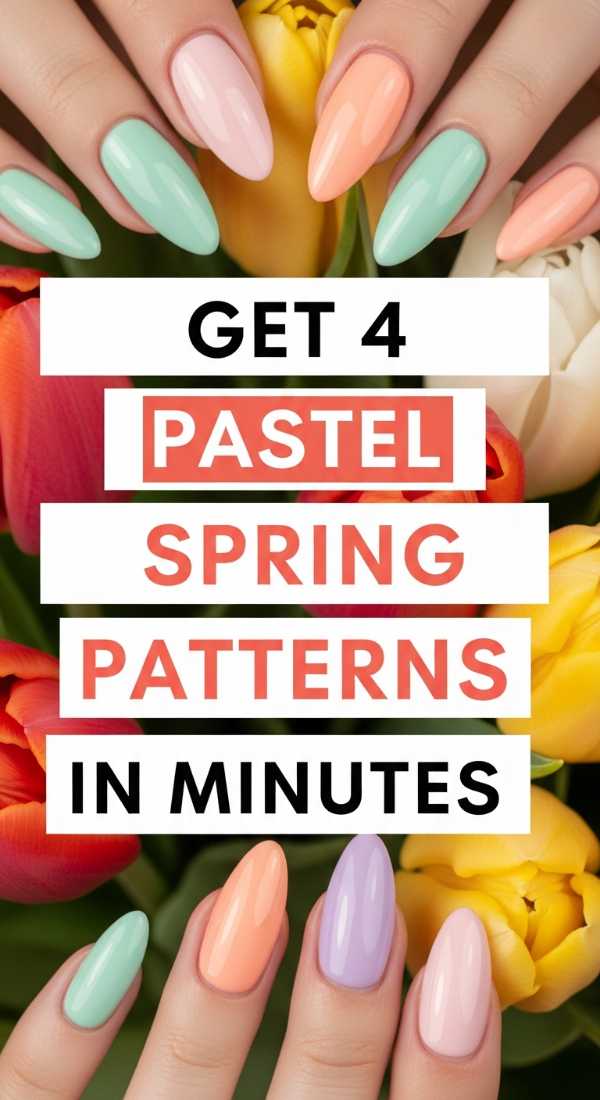
Why to love these Nails:
Why choose one color when you can have a palette of spring dreams? Mixing patterns like checkers and swirls in soft pastels creates a joyful, curated look that feels like a sunshine-filled afternoon.
Essential Items:
- A set of pastel polishes (mint, lilac, lemon, peach)
- A fine-liner nail brush
How to Prepare:
- On the thumb and ring finger, paint simple alternating pastel squares for a soft checkerboard.
- On the other nails, use the fine-liner to draw organic, wavy ‘swirl’ lines.
- Keep the strokes light and airy to maintain that cloud-like aesthetic.
Budget Range
- Lights Lacquer Pastel Bundle ($50)
- Detail Paint Brushes ($7)
Master 3 Minimalist Lines for Chic Nails
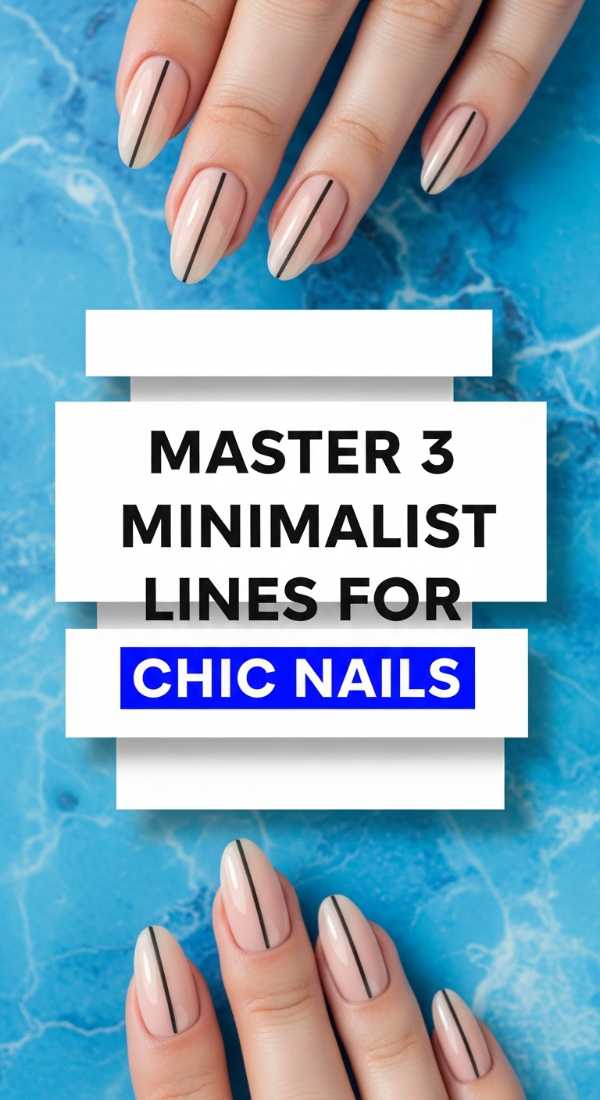
Why to love these Nails:
Minimalism is the ultimate form of self-assurance. A single, intentional line can be more striking than a full glitter nail, offering a clean and modern vibe for my loves who prefer ‘quiet luxury.’
Essential Items:
- Nude base polish
- Black or Navy precision polish
- Striping tape
How to Prepare:
- Paint a clean nude base and let it dry fully.
- Place a strip of tape vertically down the center or horizontally across the base.
- Paint over the tape edge with your dark color and peel immediately for a razor-sharp line.
Budget Range
- CND Vinylux Nude ($11)
- Nail Art Striping Tape ($5)
Follow 6 Steps for Flawless Almond Ombre
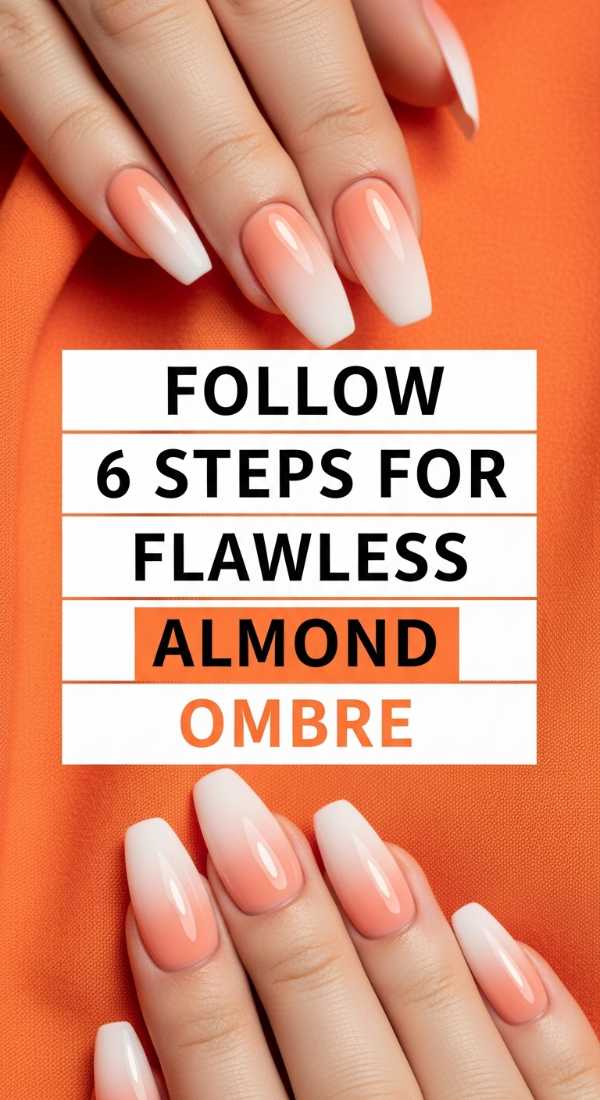
Why to love these Nails:
The ombre effect is like a sunset fading across the sky. It elongates the fingers beautifully, especially on an almond shape, creating a graceful and feminine silhouette.
Essential Items:
- Make-up sponge
- Two coordinating shades (e.g., light blue and white)
- Liquid latex (for easy cleanup)
How to Prepare:
- Apply liquid latex around your cuticles to catch any mess.
- Paint your base color (the lighter shade) and let dry.
- Apply both colors in horizontal stripes onto the makeup sponge.
- Dab the sponge onto the nail, moving it slightly up and down to blend.
- Repeat for a second layer of depth.
- Peel the latex and apply a glossy top coat to smooth the gradient.
Budget Range
- Wedge Makeup Sponges ($3)
- Maniology Liquid Latex ($9)
Draw 2 Easy Butterflies for Spring Nails
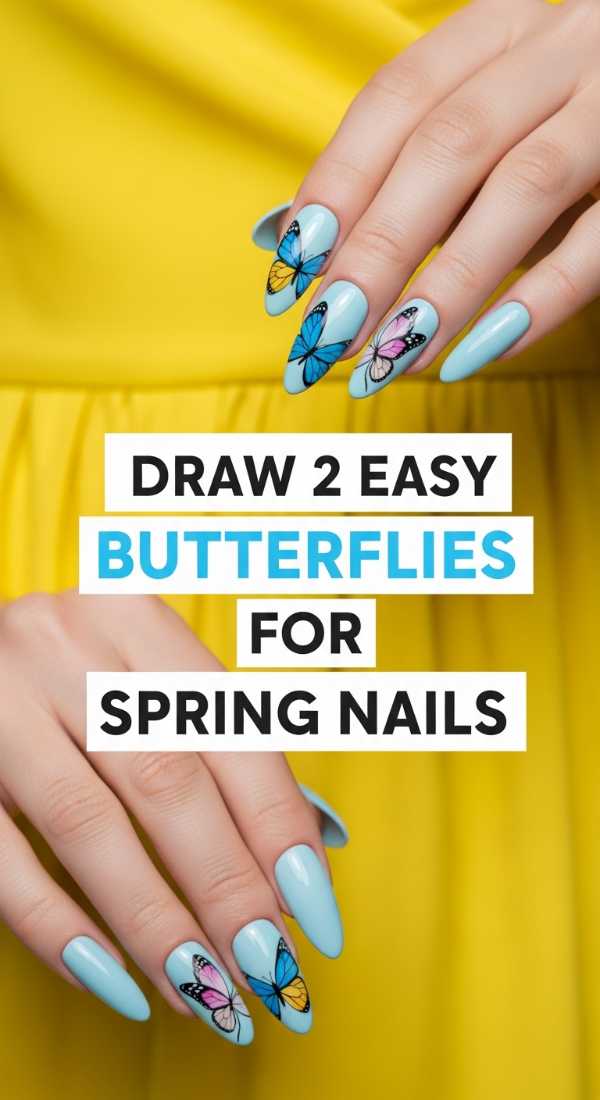
Why to love these Nails:
Butterflies represent transformation and beauty. Adding just two small butterfly accents to your manicure makes it feel custom and artistic without needing hours of work.
Essential Items:
- Iridescent base polish
- Black fine-liner polish
- Small gold gems (optional)
How to Prepare:
- Draw two small ‘B’ shapes back-to-back using your fine-liner brush.
- Add two tiny lines at the top for the antennae.
- Once dry, you can place a tiny gem in the center for a bit of sparkle.
Budget Range
- Sinful Colors Iridescent ($4)
- Nail Art Rhinestones ($6)
Add 1 Gold Leaf Touch for Elegant Nails

Why to love these Nails:
Gold leaf is the secret weapon of the home manicurist. It looks incredibly expensive and intricate, yet it is arguably the easiest way to add a touch of royal elegance to a simple neutral base.
Essential Items:
- Cream colored polish
- Pot of imitation gold leaf flakes
- Tweezers
How to Prepare:
- Apply your cream base and wait until it is about 80% dry (still slightly ‘grabby’).
- Use tweezers to pick up tiny fragments of gold leaf and press them onto the corner of the nail.
- Gently press down with your fingertip to flatten, then seal with a thick top coat.
Budget Range
- Gold Leaf Flakes ($7)
- China Glaze ‘Cream’ ($8)
Mix 3 Colors for Luxury Marble Almond Nails
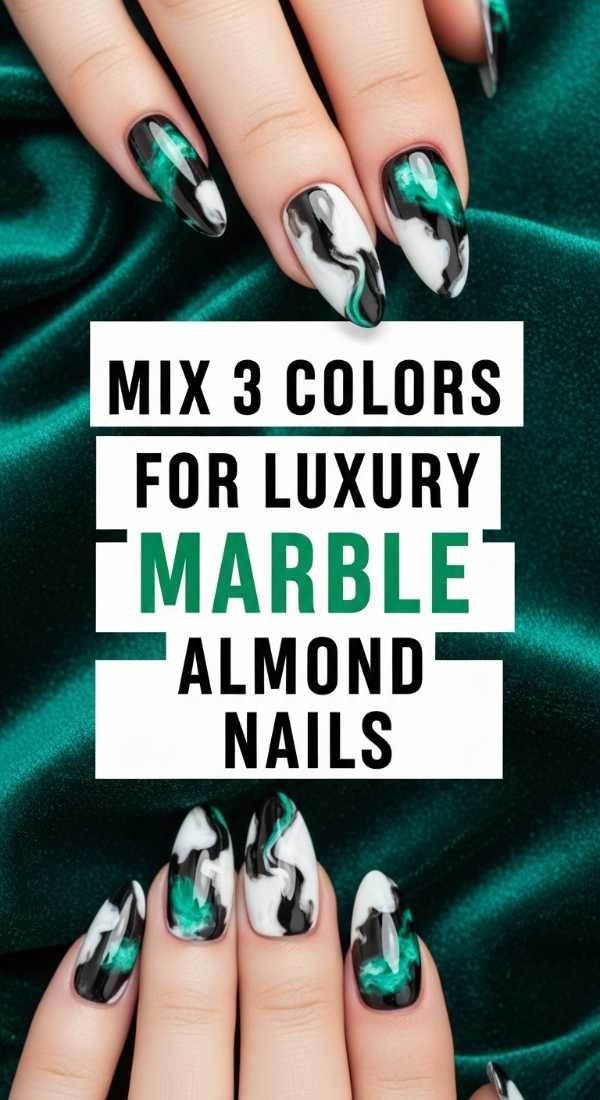
Why to love these Nails:
Marble nails are for the dreamers. By swirling three colors together, you create a unique, organic pattern that mimics natural stone, making each nail a tiny work of abstract art.
Essential Items:
- White, grey, and clear polish
- Small piece of plastic wrap
How to Prepare:
- Apply dots of white and grey polish onto the nail while the base is still wet.
- Crumple a small piece of plastic wrap and lightly ‘blot’ the colors together.
- Add a drop of clear polish to help the colors bleed and swirl naturally.
Budget Range
- Essie Blanc ($10)
- OPI ‘Alpine Snow’ ($11)
- Kitchen Plastic Wrap ($3)
A Soft Wrap-Up to Our Session
There you have it, my darlings. Ten ways to treat yourself to a little bit of luxury without ever leaving your sanctuary. Remember, it’s not about perfection; it’s about the joy of the process and the way you feel when you look at your beautiful hands. Take that ten minutes for yourself tonight—you’ve earned it. Sending you so much love and light until our next chat.
Frequently Asked Questions
How do I make my home manicure last longer?
Always start by dehydrating your nail bed with a bit of rubbing alcohol to remove oils, and never skip the top coat! Capping the edge of the nail with polish is the secret to preventing chips.
What if I have short nails?
All of these designs look stunning on short nails! Just scale down the size of your hearts or flowers. Minimalist lines, in particular, look incredibly chic on shorter lengths.
Is it okay to use regular polish instead of gel?
Absolutely. While gel lasts longer, regular polish is much gentler on your natural nails and allows you to change your look more often to match your mood!