

The Lazy Girl’s Guide to a Viral Simple Snack Board
We’ve all been there: you’re scrolling through social media, and your feed is suddenly filled with these impossible, gravity-defying food boards that look like they belong in a museum. But let’s be real—sometimes we just want the aesthetic without the eight hours of prep work. This guide is for the girls who want the ‘wow’ factor while staying in their favorite loungewear, focusing on high-impact, low-stress elements that come together to create a viral masterpiece.
The secret to a truly viral snack board isn’t just about buying expensive cheese; it’s about the textures, the colors, and those little homemade touches that make people ask, ‘Wait, you made this?’ We are going to dive into ten elevated elements that will transform a basic platter into a gourmet experience, all while keeping that effortless, human touch we love. Grab a glass of wine, clear your counter, and let’s build something beautiful together.
How to make better pasta salad?

Why we love this
Imagine a bowl where every rotini spiral is a vessel for zesty vinaigrette, paired with the sharp bite of red onion and the creamy richness of feta cheese that melts slightly against the warmth of the pasta. This isn’t your grandma’s bland deli salad; it’s a vibrant, textural journey that smells of fresh oregano and sun-ripened tomatoes. The way the acidic dressing cuts through the starch creates a refreshing palate cleanser that keeps you coming back for just one more forkful.
Ingredients
- 1 lb Rotini or Fusilli pasta
- 1/2 cup Kalamata olives, pitted and halved
- 1 cup Cherry tomatoes, quartered
- 1/2 cup English cucumber, diced
- 1/4 cup Red onion, finely minced
- 4 oz Feta cheese, crumbled
- Homemade vinaigrette (olive oil, red wine vinegar, dried oregano, garlic salt)
How to make it
- Bring a large pot of heavily salted water to a rolling boil—it should taste like the sea to properly season the pasta from the inside out.
- Cook the pasta until it is ‘al dente,’ which usually means one minute less than the package instructions; it should have a firm bite and not be mushy.
- Drain the pasta and immediately toss it with two tablespoons of the dressing while it is still steaming; this allows the pasta to absorb the flavor as it cools.
- Place the pasta in an ice bath or the refrigerator for 20 minutes to stop the cooking process completely.
- Once cooled, fold in your fresh vegetables and feta cheese gently to avoid bruising the herbs or mashing the cheese.
- Add the remaining dressing and toss thoroughly, letting it sit for at least an hour before serving so the flavors can marry into a cohesive, tangy profile.
How to make crispy chicken?

Why we love this
There is something deeply satisfying about the audible crunch of a perfectly fried piece of golden-brown chicken that gives way to a succulent, steaming interior. The aroma of toasted flour and smoked paprika fills the kitchen, evoking memories of summer picnics and cozy nights. It’s the ultimate comfort food that adds a heavy, savory anchor to your snack board, contrasting beautifully with lighter fruits and vegetables.
Ingredients
- 1 lb Chicken breast tenders or bite-sized thighs
- 2 cups All-purpose flour
- 1/2 cup Cornstarch (for extra crunch)
- 1 cup Buttermilk
- 1 tbsp Smoked paprika, 1 tsp Garlic powder, 1 tsp Onion powder
- Neutral oil for frying (Canola or Vegetable)
- Flaky sea salt for finishing
How to make it
- Submerge your chicken pieces in buttermilk seasoned with salt and pepper for at least 30 minutes to tenderize the proteins.
- In a wide shallow bowl, whisk together the flour, cornstarch, and spices until the mixture is uniform in color.
- Dredge each piece of chicken in the flour, press down firmly to ensure a thick coating, then dip back into the buttermilk and back into the flour for a ‘double-breaded’ crust.
- Heat your oil in a heavy-bottomed skillet to exactly 350°F; use a thermometer to ensure the oil isn’t too hot (which burns the outside) or too cold (which makes it greasy).
- Fry the chicken in small batches, avoiding overcrowding the pan, for about 4-5 minutes per side until the crust is a deep golden brown and the internal temp reaches 165°F.
- Drain on a wire cooling rack rather than paper towels to keep the bottom from getting soggy, and immediately hit them with a pinch of flaky sea salt.
How to make perfect sandwiches?

Why we love this
A perfect sandwich is a structural masterpiece, balancing the soft, pillowy give of artisanal bread with the crisp, watery snap of bibb lettuce and the savory depth of thin-sliced meats. The scent of toasted sourdough mixed with a hint of spicy dijonnaise is intoxicating and immediately appetizing. It feels like a complete meal held in your hand, offering a symphony of textures that range from creamy to crunchy in every single bite.
Ingredients
- Artisanal Sourdough or Ciabatta bread
- High-quality deli meats (Prosciutto, Roast Turkey)
- Provolone or Sharp Cheddar slices
- Bibb lettuce or Arugula
- Heirloom tomato, thinly sliced
- Condiments: Pesto, Mayo, or Spicy Brown Mustard
How to make it
- Lightly toast your bread slices with a brush of olive oil on a griddle until the edges are golden and the center is still slightly soft.
- Apply your moisture barrier: spread mayo or pesto from edge to edge on both slices of bread to prevent the juices from the vegetables from soaking into the crumb.
- Layer your meat in ‘ribbons’ rather than flat sheets; folding the meat creates air pockets that make the sandwich feel lighter and more professional.
- Place the cheese directly on the meat, then follow with the lettuce and tomato to keep the greens from wilting against the warm bread.
- Season your tomato slices with a tiny pinch of salt and pepper before closing the sandwich—this small step significantly boosts the overall flavor.
- Slice diagonally with a serrated knife in one smooth motion to keep the layers intact and presentable for the board.
How to make creamy potatoes?

Why we love this
Silky, buttery, and cloud-like, these potatoes are the ultimate comfort food that melts on your tongue with a hint of roasted garlic and heavy cream. They provide a warm, decadent base that pairs perfectly with the crunchier elements of a snack board. The texture should be so smooth it almost looks like whipped frosting, smelling of rich dairy and earthy, salt-roasted skins.
Ingredients
- 2 lbs Yukon Gold potatoes
- 1/2 cup Unsalted butter, room temperature
- 1/2 cup Heavy cream or Half-and-Half
- 3 cloves Roasted garlic, mashed
- Salt and White pepper to taste
- Fresh chives for garnish
How to make it
- Peel and cut potatoes into uniform 1-inch cubes to ensure they cook at the same rate.
- Start the potatoes in a pot of cold, salted water; starting with hot water cooks the outside too fast, leaving the inside hard and grainy.
- Boil until the potatoes are fork-tender, which means a fork slides in and out with zero resistance.
- Drain thoroughly and let the potatoes sit in the hot pot for 2 minutes to allow excess steam to evaporate—this is the secret to non-watery mash.
- Use a potato ricer or food mill for a perfectly smooth, lump-free texture; avoiding a food processor is key as it makes the starch ‘gummy.’
- Gently fold in your warmed cream, butter, and garlic, stirring until just incorporated; over-mixing will ruin the delicate, fluffy structure.
How to make summer salads?

Why we love this
A summer salad is a celebration of the season’s bounty, bursting with the sweetness of stone fruits, the coolness of fresh mint, and the earthy crunch of toasted nuts. It brings a necessary brightness to the board, looking like a confetti of greens, purples, and reds. The aroma is purely garden-fresh, reminding you of sunny afternoons and refreshing breezes with every crisp, light bite.
Ingredients
- 4 cups Spring mix or Arugula
- 1 cup Sliced peaches or Strawberries
- 1/4 cup Toasted walnuts or Candied pecans
- 2 oz Goat cheese, crumbled
- Honey-Balsamic vinaigrette
- Fresh mint leaves, torn
How to make it
- Wash your greens in ice-cold water and dry them thoroughly using a salad spinner; water on the leaves will prevent the dressing from sticking.
- Toast your nuts in a dry pan over medium heat for 3-5 minutes until they become fragrant and slightly darkened, then let them cool completely.
- Whisk your vinaigrette in a small bowl until emulsified (thick and combined) rather than separated.
- Place the greens in a large bowl and drizzle the dressing around the edges, tossing lightly with your hands to ensure every leaf is coated without being weighed down.
- Top with your fruit, cheese, and nuts just seconds before serving to maintain the structural integrity and prevent the cheese from staining the greens.
- Finish with a sprinkle of freshly torn mint for an aromatic pop that hits the nose before the first bite.
How to make mini quiches?
Why we love this
Bite-sized and elegant, these mini quiches feature a buttery, flaky crust that shatters under the weight of a silky, savory egg custard. They are the perfect ‘grab-and-go’ item for a board, smelling of baked pastry and melted Gruyère. The contrast between the firm, golden exterior and the soft, wobbly center makes them feel incredibly luxurious and sophisticated for such a small dish.
Ingredients
- 1 package Refrigerated pie crust or Puff pastry
- 4 large Eggs
- 1/2 cup Heavy cream
- 1/2 cup Shredded Gruyère or Swiss cheese
- 1/4 cup Sautéed spinach, squeezed dry
- Nutmeg, Salt, and Pepper
How to make it
- Use a round cookie cutter to cut circles out of your dough and press them into a greased mini-muffin tin, ensuring the dough reaches the top of each cup.
- Pre-bake the shells at 375°F for 5 minutes (blind baking) to prevent the bottom from becoming soggy once the custard is added.
- In a pitcher, whisk the eggs and cream together with a pinch of nutmeg; the nutmeg enhances the savory notes of the cheese and eggs.
- Place a small pinch of cheese and spinach into the bottom of each shell, then pour the egg mixture over the top, leaving a tiny bit of space at the rim.
- Bake at 350°F for 15-18 minutes or until the centers are set and the tops are just starting to turn a pale golden color.
- Allow them to cool in the tin for 5 minutes so they firm up enough to be popped out without breaking.
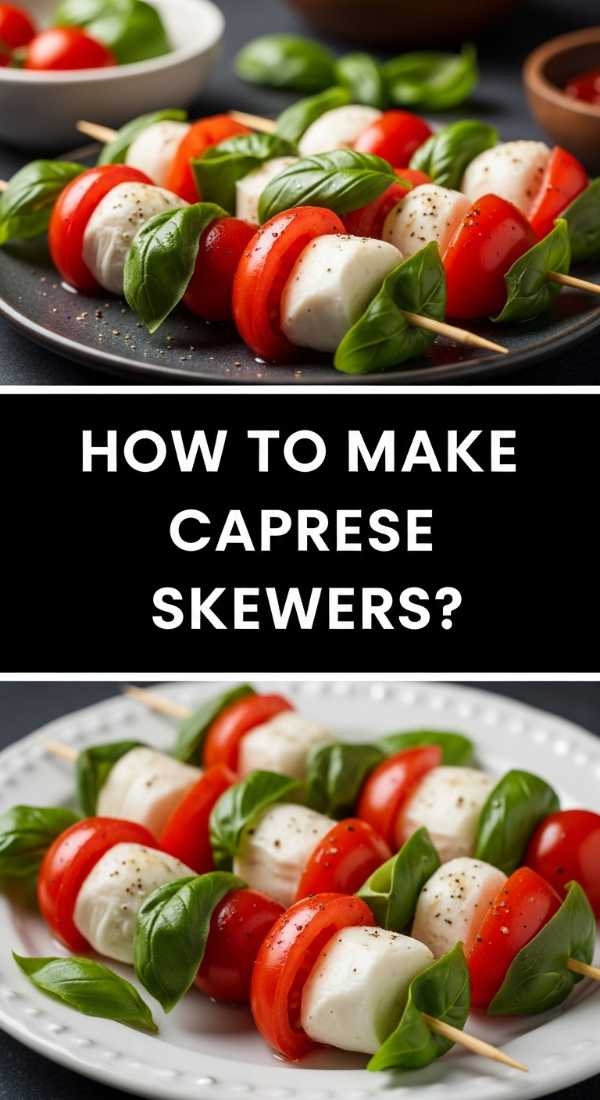
How to make caprese skewers?

Why we love this
Simple yet sophisticated, these skewers capture the essence of Italian summer with the aromatic scent of fresh basil and the milky richness of mozzarella. They are a visual delight on any board, providing a pop of bright red and deep green. The balsamic glaze adds a sticky, sweet-and-sour finish that perfectly balances the creamy cheese and juicy tomato.
Ingredients
- 1 pint Grape or Cherry tomatoes
- 1 container Small Mozzarella pearls (Bocconcini)
- 1 bunch Fresh Basil leaves
- Balsamic glaze (reduced balsamic vinegar)
- Extra virgin olive oil and Sea salt
How to make it
- Pat the mozzarella pearls dry with a paper towel; if they are too wet, the balsamic glaze will slide right off.
- Marinate the cheese pearls in a small bowl with olive oil, salt, and a pinch of dried oregano for 10 minutes to infuse flavor.
- Assemble the skewer by sliding on a tomato, followed by a folded basil leaf, and then the mozzarella ball.
- Repeat the pattern once more if your skewers are long, or keep it to one set for a ‘mini’ look.
- Arrange them on the board in a fan shape to create visual interest and movement.
- Just before guests arrive, drizzle the balsamic glaze in a zig-zag motion over the skewers for a professional, ‘viral’ finish.
How to make fresh tarts?

Why we love this
A fresh fruit tart is a jewel box of seasonal flavors, where a crisp, shortcrust pastry meets a velvety vanilla bean cream and a crown of vibrant, glistening berries. The aroma is a mix of buttery dough and sweet, floral fruit. It provides a light, sugary finish to the board that feels fancy but is surprisingly easy to pull off with the right technique.
Ingredients
- 1 pre-baked Shortbread tart shell
- 1 cup Pastry cream (or vanilla pudding mixed with whipped cream)
- Assorted fresh berries (Raspberries, Blueberries, Kiwi)
- 1/4 cup Apricot preserves (for the glaze)
- Fresh mint for garnish
How to make it
- Ensure your tart shell is completely cooled before filling; a warm shell will melt the cream and become unpleasantly soft.
- Spread the pastry cream in an even layer across the bottom of the shell using an offset spatula for a perfectly flat surface.
- Arrange the fruit in concentric circles starting from the outside edge, overlapping slightly to cover all the cream.
- Heat the apricot preserves in the microwave for 15 seconds, then strain out any lumps to create a clear liquid.
- Brush the warm preserve liquid gently over the fruit using a pastry brush; this gives the tart that professional ‘bakery glow’ and keeps the fruit fresh.
- Chill in the refrigerator for at least 30 minutes to set the glaze and cream before slicing into wedges.
How to make tasty wraps?

Why we love this
Wraps are the unsung heroes of the snack board, offering a portable explosion of flavors ranging from zesty hummus to savory chicken. They provide a satisfying chew and a clean way to eat a variety of ingredients without needing a plate. The smell of fresh flour tortillas and garden vegetables makes them feel wholesome and substantial, bridging the gap between a snack and a meal.
Ingredients
- Large Flour tortillas (room temperature)
- Cream cheese or Hummus spread
- Thinly sliced Deli meat or Smoked salmon
- Shredded carrots and Spinach
- Alfalfa sprouts for crunch
How to make it
- Warm the tortilla on a dry skillet for 10 seconds per side; this makes the fibers pliable so the tortilla won’t crack when you roll it.
- Spread your ‘glue’ (cream cheese or hummus) over the entire surface, leaving a half-inch border at the very top.
- Place your greens and proteins in a horizontal line in the lower third of the tortilla, being careful not to overfill.
- Fold the left and right sides in toward the center by about two inches, then begin rolling from the bottom up, tucking the ingredients tightly as you go.
- Place the wrap seam-side down for 1 minute to ‘seal’ the edge before cutting.
- Slice into 1-inch ‘pinwheels’ to show off the colorful spiral interior, which looks stunning when grouped together on the board.
How to make moist cakes?
[IMAGE_10]
Why we love this
There is nothing more disappointing than a dry cake, but a truly moist cake offers a tender, velvet-like crumb that practically dissolves in your mouth. The fragrance of vanilla and browned butter is the ultimate scent of hospitality. On a snack board, a moist cake (especially when cut into cubes) acts as a decadent sponge for any fruit juices or creams nearby, making it a versatile dessert element.
Ingredients
- 1.5 cups All-purpose flour
- 1 cup Granulated sugar
- 1/2 cup Sour cream or Greek yogurt (the secret to moisture)
- 1/2 cup Vegetable oil
- 2 large Eggs, room temperature
- 1 tsp Baking powder and a pinch of salt
How to make it
- Whisk your dry ingredients together in one bowl and your wet ingredients (including the sour cream) in another until fully combined.
- Slowly fold the dry ingredients into the wet, stopping the moment no flour streaks remain; over-mixing develops gluten, which leads to a tough, dry cake.
- Bake at 325°F instead of 350°F; a slightly lower temperature for a longer time prevents the edges from drying out before the center is done.
- Test the cake with a toothpick; it should come out with a few moist crumbs attached, not completely clean (which indicates it’s starting to overbake).
- While the cake is cooling, brush a very thin layer of simple syrup (equal parts sugar and water) over the top to lock in the internal moisture.
- Let the cake cool completely in the pan to allow the structure to set before slicing into bite-sized squares for the board.
Conclusion
Building a viral snack board doesn’t require a culinary degree—just a little bit of ‘lazy girl’ strategy and a focus on high-quality, flavorful components. By mastering these ten elements, you’re creating more than just a meal; you’re creating an experience that looks as good as it tastes. Remember, the best boards are the ones shared with good friends and even better conversation. So, take these tips, make them your own, and don’t forget to take a picture before everyone digs in!