
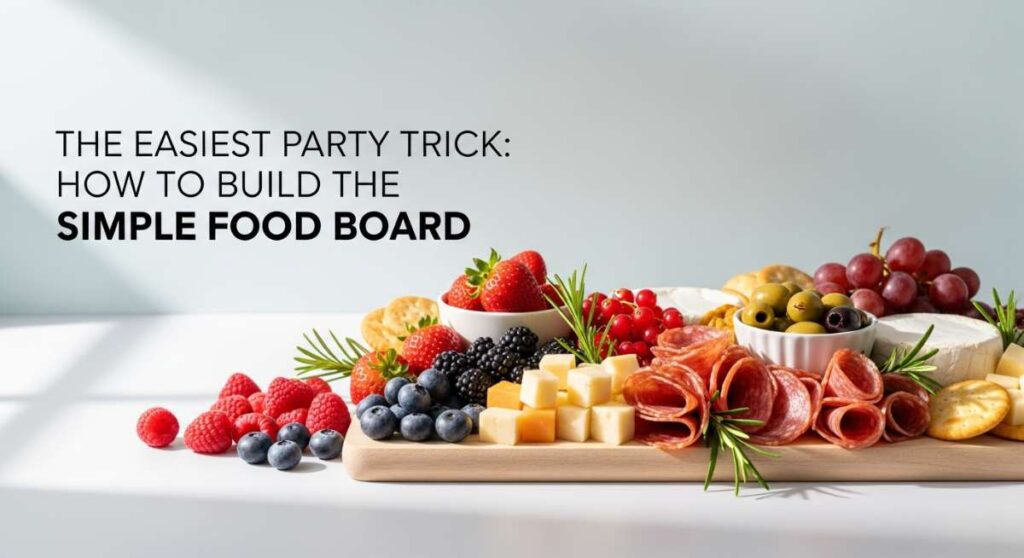
The Easiest Party Trick: How to Build the Viral Simple Food Board
There is a specific kind of magic that happens when you set a massive, overflowing board of delicious food in the center of a crowded table. I used to spend hours stressing over individual plated courses, only to find myself stuck in the kitchen while my guests laughed and shared stories in the other room. Everything changed when I embraced the ‘Viral Simple Food Board’—a chaotic, beautiful, and utterly delicious way to host that turns dinner into an interactive experience. It’s not just about the food; it’s about the collective gasp when you set the tray down and the way hands reach across the table to share a bit of everything.
This concept is the ultimate hosting hack because it celebrates variety and textures without the pretension of a formal dinner. Imagine the aroma of sizzling steak mingling with the citrusy zest of fresh tacos and the comforting warmth of garlic-infused pasta. It creates a visual feast that is inherently social, inviting everyone to build their own perfect plate. Whether you are hosting a casual Friday night hangout or a more celebratory gathering, these components are designed to look spectacular together while being remarkably easy to prep ahead of time.
The secret to a viral-worthy board is the mix of proteins and starches, all cooked to perfection with vibrant colors and contrasting flavors. From the crunch of golden-brown chicken to the flaky tenderness of honey-glazed salmon, each element on this list is a superstar in its own right. Let’s dive into the ten essential components that will make your Simple Food Board the talk of the neighborhood.
How to make crispy chicken?

Why we love this
There is something fundamentally comforting about the sound of a perfect crunch as you bite into a piece of golden-brown chicken. This isn’t just fried food; it’s a sensory experience where the outer shell shatters to reveal succulent, steam-rising meat that has been seasoned to perfection. The aroma of toasted flour and savory spices fills the kitchen, creating an instant craving that only a platter of these crispy delights can satisfy. It provides the essential texture for our food board, offering a satisfying snap that pairs beautifully with softer sides.
Ingredients
- 2 lbs chicken breast or thighs, cut into bite-sized pieces
- 2 cups all-purpose flour
- 1 tbsp garlic powder
- 1 tbsp paprika
- 1 tsp cayenne pepper
- Salt and black pepper to taste
- 2 cups buttermilk
- Vegetable oil for frying
How to make it
- Begin by marinating your chicken pieces in buttermilk for at least 30 minutes; this ensures the meat remains juicy and the breading has something to cling to.
- In a large shallow bowl, whisk together the flour, garlic powder, paprika, cayenne, salt, and pepper until the spices are evenly distributed.
- Heat about 2 inches of vegetable oil in a heavy-bottomed skillet or Dutch oven over medium-high heat until it reaches 350°F (175°C). You can test this by dropping a pinch of flour in; if it sizzles immediately, you’re ready.
- Dredge each piece of chicken from the buttermilk into the flour mixture, pressing firmly to ensure a thick, craggy coating.
- Carefully lower the chicken into the hot oil in batches, being careful not to overcrowd the pan which would drop the temperature and lead to greasy chicken.
- Fry for 5-7 minutes, turning once, until the coating is a deep golden brown and the internal temperature reaches 165°F. Drain on a wire rack to keep the bottom from getting soggy.
How to make summer tacos?
Why we love this
Summer tacos bring a vibrant explosion of color and brightness to the board, acting as the perfect palate cleanser between heavier items. We love the way the zingy lime juice cuts through the richness of the proteins, while the cool crunch of fresh slaw provides a refreshing counterpoint to the heat of the grill. Eating these feels like a celebration of sunshine, with every bite offering a harmony of zesty, spicy, and fresh flavors that dance across the tongue. They are visually stunning with their bright purples, greens, and reds, making the board look professionally styled.
Ingredients
- Small corn or flour tortillas
- 1 lb grilled white fish or shrimp
- 2 cups shredded red cabbage
- 1/2 cup fresh cilantro, chopped
- 1 avocado, sliced
- 1/2 cup sour cream mixed with lime juice
- Pickled red onions
How to make it
- Start by preparing your cabbage slaw: toss the shredded cabbage with a splash of lime juice and a pinch of salt, letting it sit for 10 minutes to soften slightly.
- Warm your tortillas directly over a low gas flame for about 10 seconds per side until they show slight char marks and become pliable; keep them wrapped in a clean towel.
- Season your protein (fish or shrimp) with cumin and chili powder, then sear in a hot pan with a drizzle of oil for 2-3 minutes per side until just opaque and slightly charred.
- Spread a small dollop of the lime-sour cream mixture onto the center of each warm tortilla.
- Layer on a generous portion of the protein, followed by the cabbage slaw, a slice of avocado, and a sprinkle of fresh cilantro.
- Top with pickled red onions for an extra acidic punch and arrange them in a tight row on your board to prevent them from tipping over.
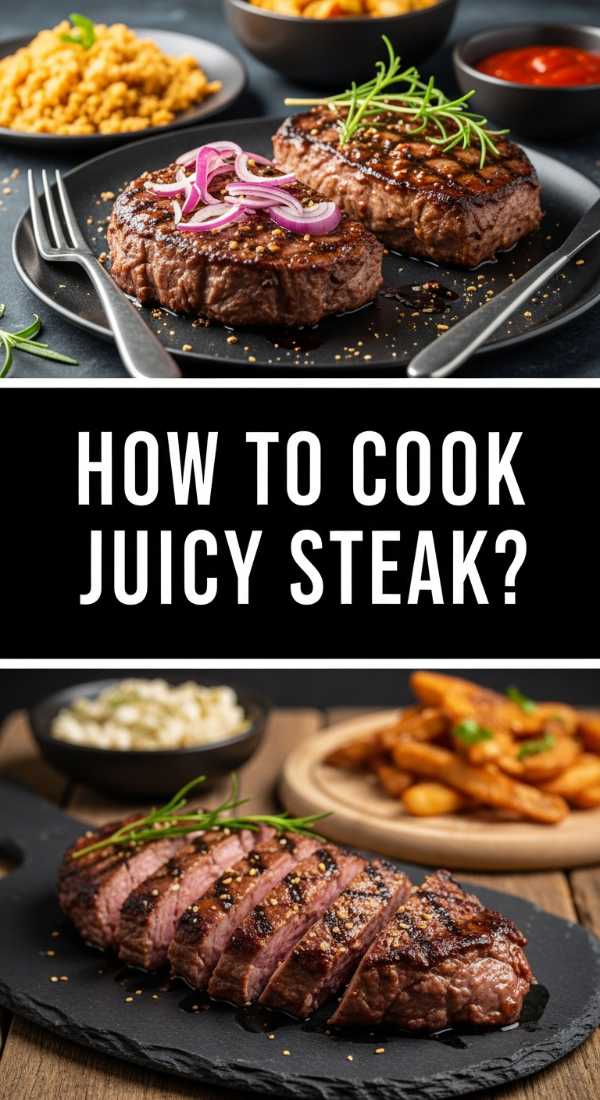
How to cook juicy steak?
Why we love this
A perfectly cooked steak is the undisputed king of any food board, offering a rich, umami-packed experience that feels incredibly indulgent. The deep mahogany crust from a proper sear hides a tender, rosy-pink interior that practically melts in your mouth, releasing savory juices with every bite. The aroma of browned butter, garlic, and thyme basting the meat is enough to bring everyone to the kitchen before the board is even assembled. It adds a level of sophistication and heartiness that grounds the more whimsical elements of the meal.
Ingredients
- 2 thick-cut Ribeye or New York Strip steaks
- 3 tbsp unsalted butter
- 4 cloves garlic, smashed
- 3 sprigs of fresh thyme or rosemary
- Coarse kosher salt and cracked black pepper
- High-smoke point oil (like avocado oil)
How to make it
- Remove the steaks from the refrigerator 30 minutes before cooking to bring them to room temperature; this is crucial for an even cook.
- Pat the steaks extremely dry with paper towels—moisture is the enemy of a good crust—and season very generously with salt and pepper on all sides.
- Heat a cast-iron skillet over high heat until it is screaming hot and starting to lightly smoke; add a tablespoon of oil.
- Place the steaks in the pan and sear undisturbed for 3-4 minutes until a thick, dark crust has formed. Flip the steaks.
- Immediately add the butter, smashed garlic, and herbs to the pan; as the butter melts and foams, use a large spoon to continuously pour the flavored butter over the steaks for the final 3 minutes of cooking.
- Remove the steaks when they reach 130°F for medium-rare and let them rest on a cutting board for at least 10 minutes before slicing against the grain to ensure the juices stay inside the meat.
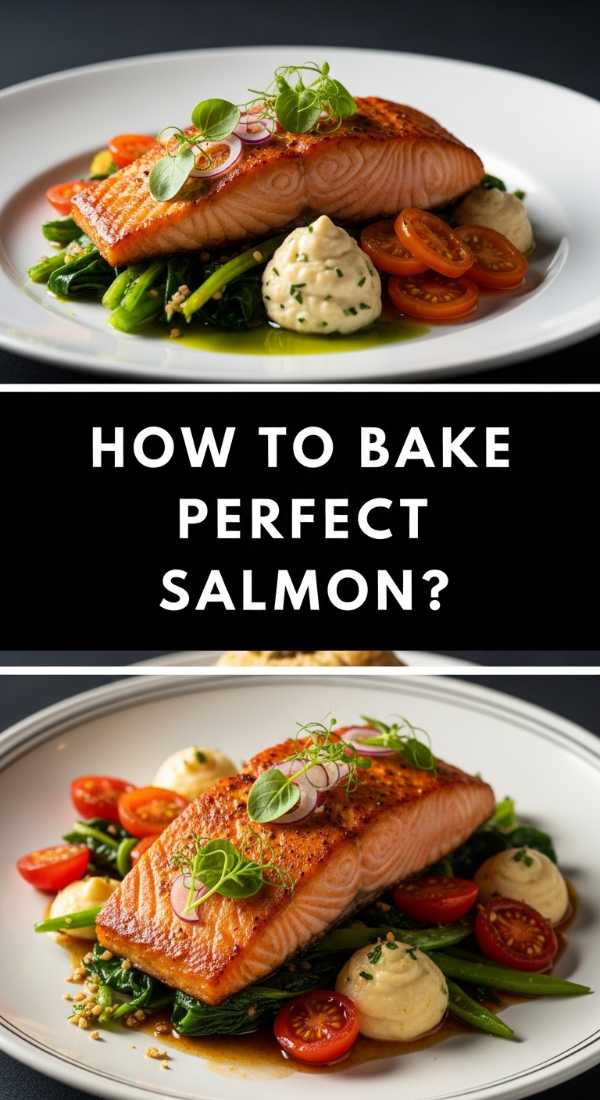
How to bake perfect salmon?
Why we love this
Baking salmon to perfection results in a texture so buttery and delicate that it flakes apart at the mere suggestion of a fork. We love how the natural richness of the fish is enhanced by a bright citrus glaze, creating a balance of flavors that feels both healthy and decadent. The surface of the salmon takes on a beautiful opaque sheen, while the interior remains moist and tender, offering a sophisticated alternative to the heavier meats on the board. Its vibrant pink hue adds a stunning pop of color that makes the entire spread look curated and fresh.
Ingredients
- 1 large side of salmon (about 2 lbs)
- 2 tbsp olive oil
- 1 lemon, thinly sliced
- 3 cloves garlic, minced
- 1 tsp dried dill or fresh parsley
- Salt and pepper
- 1 tbsp honey
How to make it
- Preheat your oven to 400°F (200°C) and line a large baking sheet with parchment paper or foil for easy cleanup.
- Place the salmon fillet on the sheet and pat the surface dry; whisk together the olive oil, honey, minced garlic, salt, and pepper in a small bowl.
- Brush the honey-garlic mixture evenly over the top of the salmon, ensuring the entire surface is coated for maximum flavor absorption.
- Lay the thin lemon slices across the top of the fillet; these will release juice during baking and keep the fish moist while providing a beautiful garnish.
- Bake for 12-15 minutes, depending on the thickness of the fillet. The salmon is done when it is opaque throughout and flakes easily with a fork in the thickest part.
- For a professional finish, turn the broiler on for the last 60 seconds to slightly caramelize the honey and brown the lemon edges, then sprinkle with fresh herbs before serving.
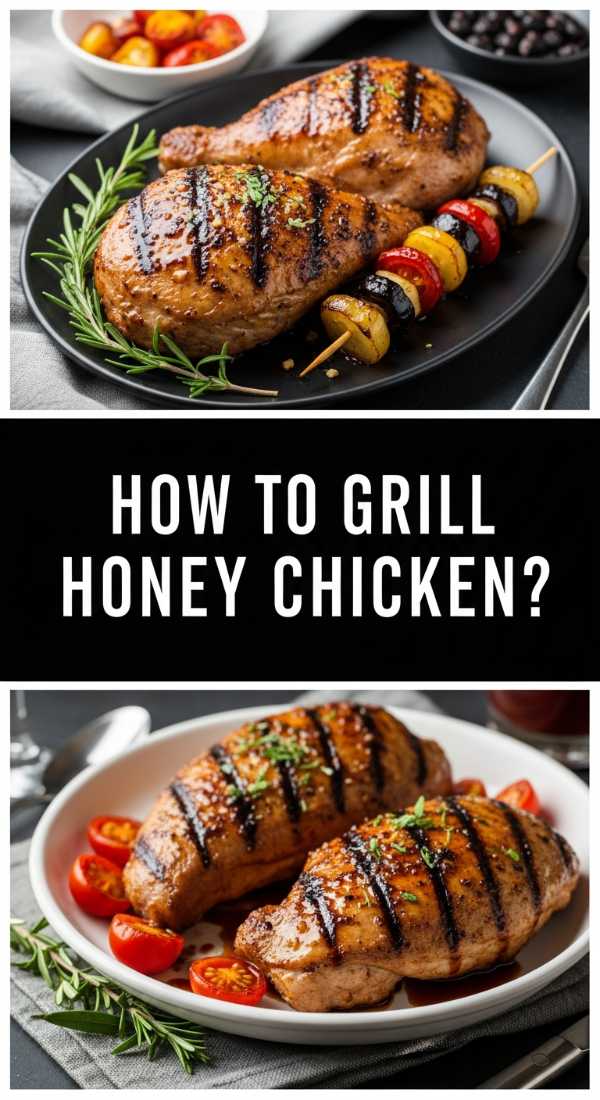
How to grill honey chicken?

Why we love this
Honey-grilled chicken is the ultimate crowd-pleaser, striking that irresistible balance between smoky char and sticky-sweet glaze. The heat of the grill caramelizes the sugars in the honey, creating a glossy, deep-amber coating that clings to every crevice of the meat. As you pull it from the grates, the sweet aroma of honey and charred wood smoke is intoxicating, promising a bite that is both succulent and intensely flavorful. It brings a rustic, outdoor energy to the board that makes everything feel like a casual summer celebration, regardless of the season.
Ingredients
- 1.5 lbs chicken thighs, boneless and skinless
- 1/4 cup honey
- 2 tbsp soy sauce
- 1 tbsp Dijon mustard
- 1 tbsp apple cider vinegar
- 2 cloves garlic, minced
- 1/2 tsp red pepper flakes
How to make it
- Whisk together the honey, soy sauce, mustard, vinegar, garlic, and red pepper flakes in a bowl to create a marinade; reserve 1/4 cup of this mixture for later.
- Place the chicken thighs in a zip-top bag with the remaining marinade and refrigerate for at least 1 hour, allowing the acids to tenderize the meat and the sugars to penetrate.
- Preheat your grill to medium-high heat (about 400°F) and lightly oil the grates to prevent sticking.
- Place the chicken on the grill and cook for 5-6 minutes per side. Avoid moving them too much early on so they develop those signature dark grill marks.
- During the last 2 minutes of cooking, brush the reserved marinade over the chicken to create a thick, glossy lacquer.
- Ensure the internal temperature hits 165°F, then remove and let the chicken rest for 5 minutes so the glaze sets into a sticky, delicious coating before adding to your board.
How to make bacon burgers?
Why we love this
There is no denying the magnetic pull of a bacon burger—the combination of savory beef, melted cheese, and salty, cured bacon is the definition of comfort food. We love the contrast between the soft, toasted brioche bun and the crispy, shattered edges of the bacon strips. When placed on a board, mini versions of these (sliders) allow guests to enjoy the full burger experience without filling up too quickly, making them a high-impact addition. The visual of melting cheese cascading down the side of a juicy patty is the ultimate ‘viral’ food moment that everyone wants to capture.
Ingredients
- 1 lb ground beef (80/20 blend for juiciness)
- 6 strips of thick-cut bacon
- Mini brioche buns (sliders)
- Cheddar cheese slices
- Garlic aioli or mayo
- Salt and pepper
How to make it
- Cook the bacon in a cold skillet over medium heat, turning occasionally, until it is perfectly crisp; drain on paper towels and cut each strip in half.
- Form the ground beef into small, uniform patties that are slightly wider than your slider buns, as they will shrink during cooking. Press a small dimple in the center of each to prevent bulging.
- Season the patties heavily with salt and pepper right before they hit the pan; heat a skillet over high heat with a tiny bit of oil.
- Sear the patties for 3 minutes per side to develop a dark crust; in the final minute, place a square of cheddar cheese on each and cover the pan for 30 seconds to melt it.
- Toast the buns in the residual bacon fat in the pan until the edges are golden and crisp.
- Assemble by spreading aioli on the bun, adding the patty, and topping with two half-strips of bacon, then secure with a toothpick for easy grabbing from the board.
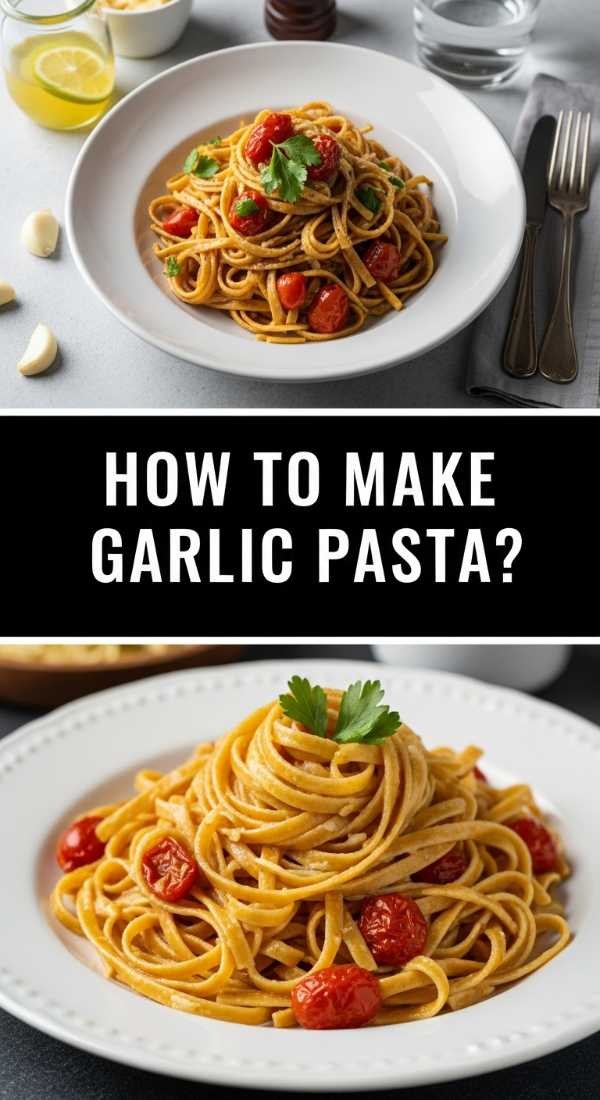
How to make garlic pasta?
Why we love this
Garlic pasta is the silky, aromatic glue that holds the entire food board together, providing a comforting starch that soaks up all the other flavors. We love the simplicity of it—the way thin strands of pasta are coated in a shimmering emulsion of olive oil, golden toasted garlic, and salty pasta water. The aroma is classic and inviting, filling the room with a scent that signals a truly home-cooked meal. It adds a sophisticated, Mediterranean flair to the spread and serves as a perfect bed for the steak or chicken components.
Ingredients
- 1/2 lb spaghetti or linguine
- 1/4 cup extra virgin olive oil
- 6 cloves garlic, very thinly sliced
- 1/2 tsp red pepper flakes
- 1/2 cup grated Parmesan cheese
- Fresh parsley, chopped
- Salt and black pepper
How to make it
- Bring a large pot of heavily salted water to a boil and cook the pasta until it is just shy of al dente (usually 1-2 minutes less than the package directions).
- While the pasta cooks, add the olive oil and sliced garlic to a cold skillet, then turn the heat to medium-low. This allows the garlic to infuse the oil as it heats up without burning.
- Cook the garlic slowly until it is a pale golden color; add the red pepper flakes and a splash of the boiling pasta water to the skillet to stop the garlic from browning further.
- Use tongs to transfer the pasta directly from the pot into the skillet, bringing some of that starchy water with it.
- Toss vigorously over medium heat, adding more pasta water as needed, until a glossy sauce forms that coats every strand.
- Remove from heat, stir in the Parmesan and parsley, and serve in small, swirl-shaped nests on your board for a beautiful presentation.
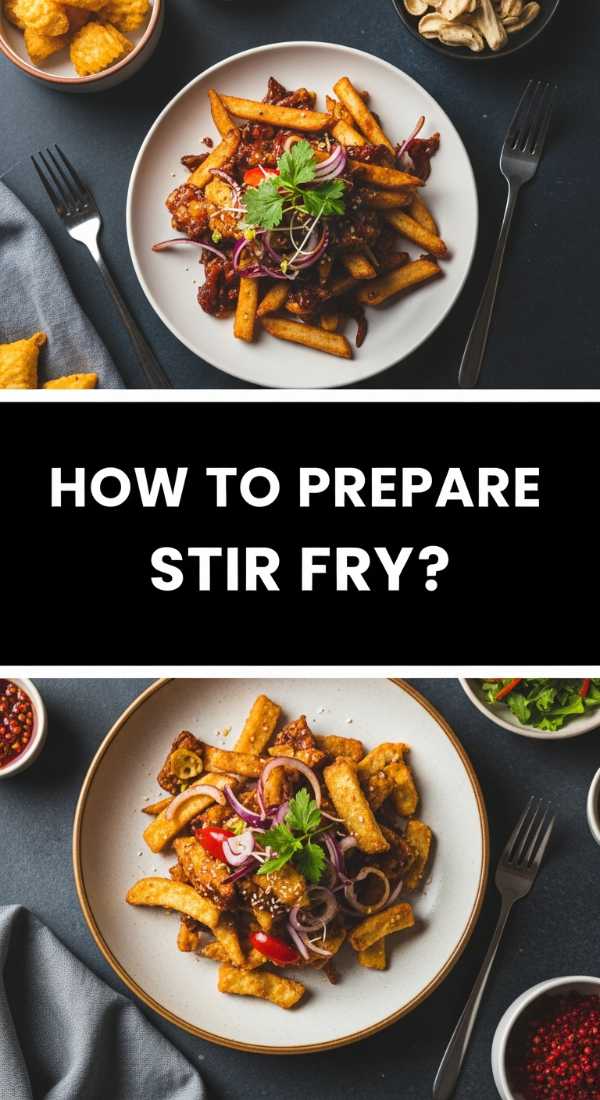
How to prepare stir fry?

Why we love this
Stir fry brings a much-needed hit of ‘wok hei’ or ‘breath of the wok’ to the board, offering crisp-tender vegetables coated in a savory, umami-rich sauce. We love the rapid-fire nature of this dish, where high heat preserves the vibrant colors of bell peppers and broccoli while adding a slight char to the edges. It’s a fantastic way to introduce different shapes and textures, from the snap of sugar peas to the softness of sautéed mushrooms. The glossy dark sauce provides a beautiful visual contrast to the lighter elements, making the entire board look more diverse and appetizing.
Ingredients
- 2 cups mixed vegetables (bell peppers, broccoli, snap peas, carrots)
- 1 tbsp ginger, minced
- 2 cloves garlic, minced
- 2 tbsp soy sauce
- 1 tbsp oyster sauce
- 1 tsp sesame oil
- 1 tbsp cornstarch mixed with 2 tbsp water
How to make it
- Prepare all your vegetables by cutting them into uniform, bite-sized pieces; stir-frying happens fast, so you need everything ready by the stove.
- Heat a wok or large skillet over high heat until a drop of water flicked onto the surface evaporates instantly. Add a high-heat oil.
- Toss in the harder vegetables first (like carrots and broccoli) and stir constantly for 2 minutes.
- Add the softer vegetables (peppers, peas), garlic, and ginger, and continue to stir-fry for another 2 minutes until they are bright and slightly softened but still have a ‘snap.’
- Pour in the soy sauce, oyster sauce, and sesame oil, tossing quickly to coat every vegetable.
- Add the cornstarch slurry and stir for 30 seconds until the sauce thickens into a clear, shiny glaze that clings to the vegetables, then remove immediately from the heat to prevent overcooking.
How to make potato wedges?
Why we love this
Potato wedges are the ultimate structural element of a food board, acting as sturdy, seasoned pillars that guests can easily grab and dip. We love the contrast between the thick, salty crust—seasoned with herbs and spices—and the fluffy, cloud-like interior of the potato. They feel more substantial and rustic than standard fries, providing a satisfying weight to the meal that keeps everyone full. The golden-orange hue from the paprika and the flecks of dried herbs make them look like gems scattered across the board, especially when paired with a side of creamy dipping sauce.
Ingredients
- 4 large Russet potatoes
- 1/4 cup olive oil
- 1 tsp garlic powder
- 1 tsp onion powder
- 1 tsp smoked paprika
- 1 tsp dried oregano
- Salt and pepper
How to make it
- Preheat your oven to 425°F (220°C) and lightly grease two large baking sheets.
- Scrub the potatoes clean and cut each one in half lengthwise, then cut each half into 3 or 4 uniform wedges.
- In a large bowl, toss the wedges with the olive oil and all the spices until every surface is thoroughly and evenly coated.
- Arrange the wedges on the baking sheets in a single layer, ensuring they are not touching; if they are too close, they will steam instead of crisping.
- Bake for 30-35 minutes, turning the wedges halfway through the cooking time to ensure they get golden and crispy on both sides.
- The wedges are done when the skins are blistered and the insides are tender when pierced with a fork; sprinkle with a final touch of sea salt as soon as they come out of the oven.
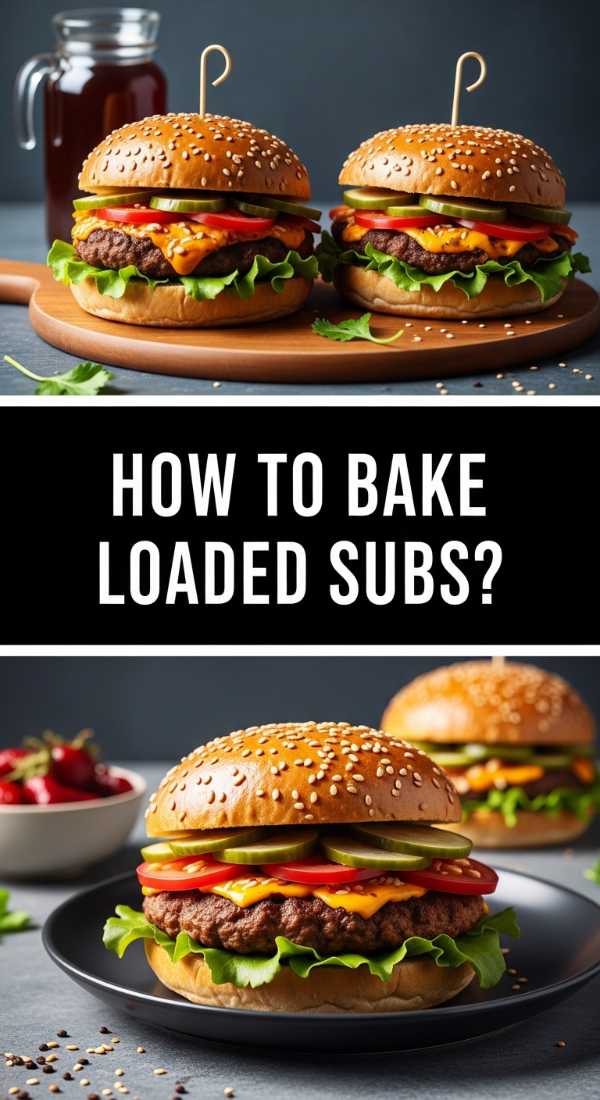
How to bake loaded subs?
[IMAGE_10]
Why we love this
Loaded subs are the ‘wow’ factor that rounds out the board, offering a warm, melty, and incredibly hearty option that feels like a hug in a bun. We love the way the bread toasted in the oven becomes crackly on the outside while remaining soft enough to absorb the flavors of melted cheese and savory fillings. It’s a symphony of textures—the crunch of the crust, the pull of the cheese, and the richness of the meats inside. Serving these sliced into sections makes them approachable and allows everyone to see the beautiful layers of ingredients packed within.
Ingredients
- 4 sub rolls or one long baguette
- 1/2 lb deli meats (Italian mix or roast beef)
- 8 slices provolone or mozzarella cheese
- 1/4 cup banana peppers or jalapeños
- 1/2 cup shredded lettuce
- Italian herb vinaigrette
How to make it
- Slice your sub rolls open but leave them attached at the back like a hinge; lay them flat on a baking sheet.
- Layer the bottom of each roll with a generous amount of deli meats, folding them slightly to create height and air pockets for better heat circulation.
- Top the meat with the cheese slices, ensuring the cheese covers the edges of the bread to create a protective, melty seal.
- Bake in a 375°F (190°C) oven for about 8-10 minutes, or until the cheese is bubbling and starting to brown and the bread is toasted.
- Remove from the oven and immediately top with the cold ingredients: the shredded lettuce, peppers, and a heavy drizzle of Italian vinaigrette.
- Close the subs, press down slightly, and slice them into 3-inch sections before nestling them into a corner of your board.
Why the Simple Food Board Works
Building a board like this is about more than just filling a tray; it’s about creating a landscape of flavors that encourages exploration. When you combine the crunch of the chicken, the silkiness of the pasta, and the freshness of the tacos, you provide something for every palate and every mood. The best part? This style of serving removes the pressure of the ‘perfect plate’ and replaces it with the joy of discovery. So, grab your largest platter, fire up the stove, and get ready to host the easiest, most impressive dinner party of your life.
Frequently Asked Questions
How do I keep the food warm on the board?
The best trick is to use a wooden board, which retains less heat than metal but doesn’t pull heat away from the food as fast as stone. You can also warm your board in a low oven (if it’s oven-safe) before assembly, or simply time your ‘hot’ items to finish last and place them on the board right before serving.
Can I make these components ahead of time?
Absolutely! Most of the prep—chopping veggies, marinating meats, and making sauces—can be done the day before. The pasta and fries are best made fresh, but the chicken and steak can be prepped and just cooked right before the guests arrive.
How much food should I prepare per person?
A good rule of thumb for a food board is to aim for about 6-8 ounces of protein total per person, plus a handful of each starch. Since there is so much variety, people tend to take smaller portions of more items, so you don’t need a full serving of every single dish for every guest.