

Why Everyone is Obsessed with This Simple Food Board Trend
There is something incredibly magical about walking into a room and seeing a sprawling, colorful food board laid out on the table. It’s not just about the food; it’s about the instant feeling of connection it creates. We’ve all been there—hovering over a beautiful spread with friends, glass of wine in hand, picking at little bites while the conversation flows effortlessly. It’s a return to a more communal, tactile way of eating that feels both indulgent and wonderfully grounded.
Lately, the ‘Simple Food Board’ has evolved from just cheese and crackers into a full-blown culinary canvas. Whether you are hosting a backyard BBQ or an intimate indoor dinner, the board is the ultimate host’s secret weapon. It allows you to showcase various techniques—from smoky meats to delicate pastries—all in one visual feast. It’s about the joy of variety and the beauty of presentation, proving that you don’t need a formal five-course meal to make an impression that lasts.
HOW TO GRILL SMOKY RIBS?

Why we love this
There is nothing quite like the primal satisfaction of a rack of ribs that has been kissed by woodsmoke and slow-cooked to absolute perfection. The aroma of hickory and charcoal clinging to the sticky, caramelized glaze is enough to make anyone’s mouth water instantly. As you pull a rib away from the stack, the meat should resist just enough before yielding into a tender, succulent bite that balances sweet, salty, and deeply smoky notes. It is a messy, hands-on experience that embodies the soul of summer gatherings and rustic outdoor dining.
Ingredients
- 2 racks of Baby Back Ribs
- Dry rub (brown sugar, paprika, garlic powder, onion powder, cayenne)
- 1 cup Apple cider vinegar (for spritzing)
- 2 cups Hickory or Oak wood chips
- Your favorite BBQ sauce
How to make it
- Begin by removing the silver skin from the back of the ribs using a dull knife and a paper towel for grip; this ensures the smoke and rub penetrate the meat.
- Apply a generous coating of your dry rub on all sides, pressing it firmly into the flesh, and let the ribs sit at room temperature for about 30 minutes while you prep the grill.
- Prepare your grill for indirect cooking by piling charcoal on one side and placing a water pan on the other; aim for a steady temperature of 225°F to 250°F.
- Add your soaked wood chips to the coals and place the ribs on the cool side of the grill, bone-side down, closing the lid to trap the smoke.
- Smoke the ribs for three hours, spritzing them with apple cider vinegar every 45 minutes to keep the surface moist and build a beautiful mahogany bark.
- Wrap the ribs tightly in heavy-duty aluminum foil with a splash of apple juice or cider vinegar and return them to the grill for another two hours to tenderize.
- Unwrap the ribs, brush them with a thick layer of BBQ sauce, and place them directly over the hot coals for 5-10 minutes, flipping once, until the sauce is bubbly and slightly charred.
HOW TO MAKE REFRESHING SALADS?
Why we love this
A truly refreshing salad acts as the vibrant heartbeat of any food board, providing a necessary ‘crunch’ and a burst of acidity that cleanses the palate between richer bites. Imagine the sound of crisp romaine and snap peas breaking under your fork, tossed with the brightness of freshly squeezed lemon and the cooling touch of mint or basil. It’s a sensory explosion of garden-fresh scents and vivid greens that makes you feel energized and light, even in the heat of the afternoon. The contrast of textures—from creamy avocado to toasted nuts—creates a complex eating experience in every mouthful.
Ingredients
- Mixed baby greens and arugula
- Thinly sliced Persian cucumbers
- Heirloom cherry tomatoes, halved
- Feta cheese crumbles
- Toasted pine nuts
- Vinaigrette: Olive oil, lemon juice, Dijon mustard, honey, and sea salt
How to make it
- Wash your greens in ice-cold water and use a salad spinner to dry them completely; moisture is the enemy of a crisp salad as it prevents the dressing from adhering.
- In a small glass jar, combine 3 parts extra virgin olive oil with 1 part fresh lemon juice, a teaspoon of Dijon mustard for emulsification, and a drizzle of honey for balance.
- Shake the jar vigorously until the dressing is thick and creamy, then season with flaky sea salt and freshly cracked black pepper to taste.
- In a large chilled bowl, toss the dry greens with half of the dressing using your hands or large tongs to ensure every leaf is lightly lacquered but not drenched.
- Add the sliced cucumbers and halved tomatoes, then gently toss again to distribute the vegetables evenly without bruising the delicate greens.
- Plate the salad onto your board and top with the feta cheese and toasted pine nuts right before serving to maintain the textural contrast.
- Finish with a final crack of black pepper and a few torn mint leaves for an extra layer of aromatic freshness.
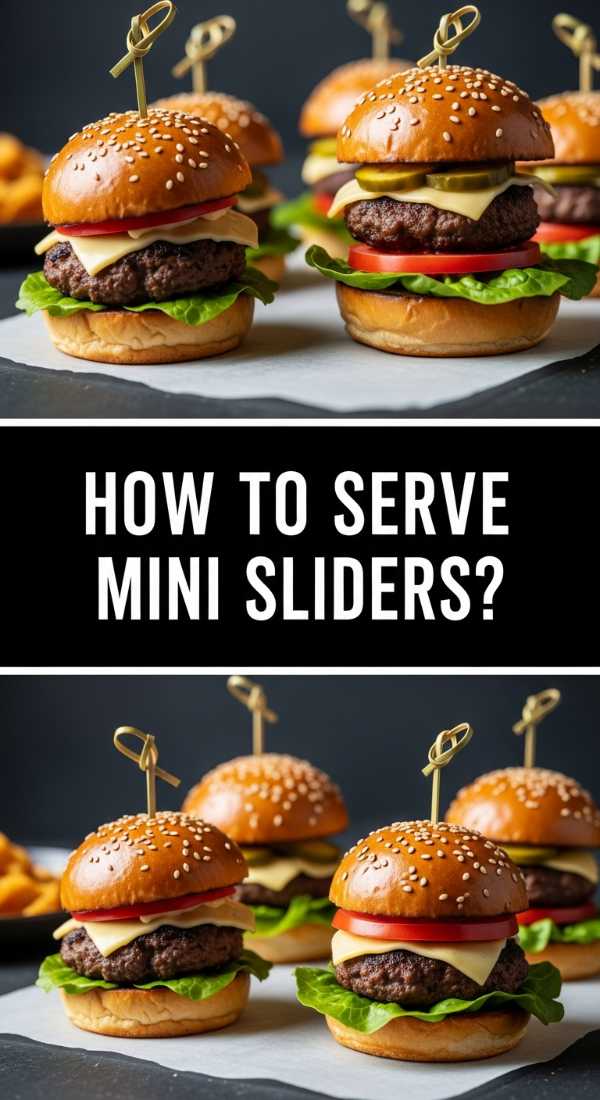
HOW TO SERVE MINI SLIDERS?

Why we love this
Mini sliders are the quintessential party food because they pack all the savory, cheesy goodness of a full burger into a cute, manageable package. There is something so inviting about a row of glossy brioche buns, toasted to a golden brown and oozing with melted cheddar. The scent of searing beef and caramelized onions wafting from the board is an instant crowd-pleaser, promising a juicy, flavor-dense experience in just three or four bites. They are playful, satisfying, and the perfect size to leave room for everything else on the spread.
Ingredients
- 1 lb Ground chuck (80/20 fat ratio)
- 12 Mini brioche slider buns
- Sharp cheddar cheese slices, cut into quarters
- Caramelized onions (onions sautéed in butter and sugar)
- Pickle chips
- Slider sauce (mayo, ketchup, relish)
How to make it
- Portion your ground beef into 2-ounce balls and flatten them into patties that are slightly wider than your buns, as they will shrink during the cooking process.
- Heat a heavy cast-iron skillet over medium-high heat until it is smoking slightly; season the patties generously with salt and pepper only right before they hit the pan.
- Place the patties in the hot skillet and press down firmly with a spatula to create a crust; sear for 2-3 minutes until a deep brown ‘smash’ crust forms.
- Flip the patties and immediately place a quarter-slice of cheddar cheese on each, then cover the pan with a lid for 30 seconds to facilitate a perfect, gooey melt.
- Slice your brioche buns and toast them face-down in the residual beef fat or a little butter until the edges are golden and crispy.
- Spread your slider sauce on the bottom bun, place the cheesy patty on top, and follow with a spoonful of warm caramelized onions and a single pickle chip.
- Secure the top bun with a bamboo skewer to keep the layers aligned while you transfer them to your serving board.
HOW TO COOK JUICY STEAK?

Why we love this
A perfectly cooked steak is the undisputed king of the food board, offering a rich, umami-heavy anchor that commands attention. The sight of a thick Ribeye or New York Strip, sliced against the grain to reveal a warm, pink center, is enough to stop any guest in their tracks. It’s all about that incredible Maillard reaction on the crust—a salty, peppery, butter-basted exterior that crunches slightly before melting into the tender, iron-rich interior. Each slice, drizzled with its own resting juices and a touch of garlic butter, feels like the ultimate culinary luxury.
Ingredients
- 2 Thick-cut Ribeye or Filet Mignon steaks
- Kosher salt and coarse black pepper
- 3 tbsp Unsalted butter
- 4 cloves Garlic, smashed
- Fresh rosemary and thyme sprigs
How to make it
- Take your steaks out of the refrigerator at least 45 minutes before cooking to bring them to room temperature; this ensures even cooking from edge to center.
- Pat the steaks extremely dry with paper towels; any surface moisture will create steam and prevent that signature dark, crusty sear.
- Preheat a heavy stainless steel or cast-iron pan over high heat until it’s screaming hot, then add a high-smoke-point oil like grapeseed or avocado oil.
- Season the steaks heavily with salt and pepper and place them in the pan, searing for about 3 minutes on the first side without moving them to build the crust.
- Flip the steaks, then immediately add the butter, smashed garlic, and herb sprigs to the pan as the second side sears.
- Tilt the pan so the melting butter pools with the herbs and garlic, and use a large spoon to continuously baste the hot aromatic butter over the steaks for the final 2-3 minutes.
- Remove the steaks when they reach 130°F for medium-rare and let them rest on a cutting board for a full 10 minutes to allow the fibers to relax and the juices to redistribute.
HOW TO BAKE PETIT FOURS?

Why we love this
Petit fours are the crown jewels of the dessert section, bringing a sense of elegance and refined sweetness to your board. These tiny, layered cakes are as much about the visual artistry as they are about the flavor, with their perfectly smooth poured fondant and delicate floral decorations. When you bite into one, you experience a harmonious blend of light, airy sponge, tart fruit jam, and a sweet, melt-in-your-mouth glaze. They feel like a sophisticated indulgence, a miniature celebration of pastry craft that looks almost too beautiful to eat.
Ingredients
- Firm Almond Sponge Cake (baked in a sheet)
- Apricot or Raspberry jam (strained)
- Marzipan sheet (optional)
- Poured Fondant glaze (confectioners’ sugar, corn syrup, water, vanilla)
- Food coloring and edible flowers for decoration
How to make it
- Bake a thin almond sponge cake and let it cool completely; once cool, slice the cake horizontally into two or three very thin layers.
- Spread a thin, even layer of strained jam between the cake layers, stacking them carefully to ensure the top remains perfectly level.
- If using marzipan, roll it out thinly and place it on the very top layer; then, place a weighted tray on top of the cake and refrigerate for 2 hours to compress the layers.
- Use a very sharp, hot knife to trim the edges of the cake and then cut it into precise 1-inch squares or rectangles, wiping the knife between every single cut.
- Set the cake squares on a wire cooling rack placed over a parchment-lined sheet pan to catch the excess glaze.
- Heat your poured fondant glaze to approximately 100°F (it should be fluid but thick enough to coat a spoon) and carefully pour it over the cakes until they are fully covered.
- Allow the glaze to set for 15 minutes before using a piping bag or edible flowers to add tiny, intricate designs to the top of each individual square.
HOW TO ROAST CAMPFIRE KEBABS?

Why we love this
Kebabs bring a rustic, adventurous spirit to the table, evoking memories of starlit nights and the crackle of an open flame. The beauty of the kebab lies in the charred, slightly blackened edges of the vegetables contrasting with the juicy, marinated cubes of meat. There is a specific aroma that comes from fat dripping onto hot coals and rising back up as flavorful smoke that is simply irreplaceable. It’s a fun, interactive way to eat, sliding charred peppers and tender beef off a stick, enjoying the charred sweetness and the savory spice in one go.
Ingredients
- Sirloin steak or Chicken thighs, cut into 1-inch cubes
- Bell peppers, red onion, and zucchini chunks
- Marinade: Olive oil, soy sauce, lemon juice, smoked paprika, and oregano
- Wooden or metal skewers
How to make it
- Whisk together your marinade ingredients and toss with the meat cubes in a bowl, allowing them to marinate for at least 2 hours (or overnight for chicken) to break down the fibers.
- If using wooden skewers, soak them in water for at least 30 minutes to prevent them from catching fire on the grill or over the campfire.
- Thread the meat and vegetables onto the skewers, alternating colors and ensuring you don’t pack them too tightly; air needs to circulate between pieces for even browning.
- Preheat your grill to medium-high heat or prepare a campfire with a grate once the flames have died down to hot, glowing red embers.
- Lightly oil the grill grates and place the kebabs down; let them sear for 3-4 minutes on the first side until they release easily from the grate.
- Rotate the kebabs a quarter turn every few minutes, totaling about 10-12 minutes, until the meat is cooked through and the vegetables have charred, softened edges.
- Remove from heat and let them rest for 5 minutes, then give them a final squeeze of fresh lemon juice before arranging them on your board.
HOW TO PREPARE BONE BROTH?

Why we love this
While bone broth might seem like an unusual addition to a food board, serving it in small, warmed ceramic cups provides a deeply nourishing and comforting element. It is the ultimate ‘liquid gold’—a rich, savory elixir with a depth of flavor that only comes from hours of patient simmering. The steam carries the scent of roasted marrow, bay leaves, and peppercorns, offering a soothing pause between the more solid components of the meal. It’s warm, viscous, and packed with umami, acting as a gentle hug for the digestive system and a sophisticated palate cleanser.
Ingredients
- 4 lbs Beef marrow and knuckle bones
- 2 Carrots, 2 Celery stalks, 1 Onion (chopped)
- 2 tbsp Apple cider vinegar
- Bay leaves, peppercorns, and fresh thyme
- 12-14 cups Water
How to make it
- Preheat your oven to 450°F and roast the bones on a baking sheet for 30 minutes until they are deep brown and fragrant; this step is crucial for color and flavor depth.
- Place the roasted bones into a large stockpot or slow cooker, making sure to scrape all the browned bits and fat from the baking sheet into the pot as well.
- Add the vegetables, herbs, and apple cider vinegar; the vinegar helps extract the minerals and collagen from the bones during the long simmer.
- Cover everything with cold water and bring to a very slow boil, then immediately reduce the heat to the lowest possible setting.
- Simmer the broth for at least 12 hours (and up to 24 for beef), occasionally skimming any gray foam or impurities that rise to the surface.
- Once finished, strain the liquid through a fine-mesh sieve or cheesecloth into a clean pot, discarding the solids.
- Season with salt only at the very end, and serve warm in small mugs or shooters as a savory, sipping accompaniment to your food board.
HOW TO FRY CRISPY CHICKEN?

Why we love this
Fried chicken is the ultimate ‘star’ of any viral food board because of that unmistakable, earth-shattering crunch. The sound of that first bite into a perfectly golden, craggy crust followed by the release of steam and juice from the tender meat is pure culinary theater. It’s a dish that appeals to our most basic cravings for salt, fat, and spice, all wrapped up in a textured coating that holds its own even as it sits on the board. Whether paired with a spicy honey drizzle or a cooling dip, it brings a sense of joyful, unpretentious indulgence to the spread.
Ingredients
- Chicken thighs or drumsticks
- Buttermilk and hot sauce (for the brine)
- All-purpose flour and cornstarch (for the dredge)
- Spices: Paprika, garlic powder, onion powder, cayenne, salt, and pepper
- Neutral oil for frying (Peanut or Canola)
How to make it
- Submerge your chicken pieces in a mixture of buttermilk and hot sauce, refrigerating for at least 4 hours to tenderize the meat and infuse it with moisture.
- In a large bowl, whisk together the flour, cornstarch (the secret to extra crunch), and a generous amount of your spice blend.
- Remove a piece of chicken from the buttermilk, let the excess drip off, and dredge it thoroughly in the flour mixture, pressing the flour into the skin to create nooks and crannies.
- Place the breaded chicken on a wire rack for 15 minutes before frying; this helps the coating set and prevents it from falling off in the oil.
- Heat 2 inches of oil in a heavy Dutch oven to exactly 350°F; use a thermometer to maintain this temperature throughout the process.
- Fry the chicken in batches, being careful not to overcrowd the pot, for 12-15 minutes until the internal temperature reaches 165°F and the exterior is deep golden brown.
- Drain the chicken on a clean wire rack (not paper towels, which cause sogginess) and sprinkle with a touch more salt while still hot and glistening.
HOW TO STEAM TENDER VEGETABLES?

Why we love this
Steamed vegetables provide the essential balance of color and vitality that every board needs to look truly professional. When done correctly, they aren’t mushy or bland; they are vibrant, snappy, and singing with their own natural sweetness. Imagine bright green asparagus tips or tender broccolini stalks, glistening with a light sheen of lemon-infused olive oil and a sprinkle of sea salt. They offer a clean, refreshing break from the richer fried or roasted items, ensuring that the meal feels complete and healthy without sacrificing any of the visual appeal.
Ingredients
- Broccolini, Asparagus, or Baby Carrots
- Fresh lemon wedges
- Extra virgin olive oil
- Flaky sea salt
- Ice water bath (for shocking)
How to make it
- Trim the woody ends off your vegetables and cut them into uniform sizes so they cook at exactly the same rate.
- Bring about an inch of water to a boil in a pot equipped with a steamer basket, ensuring the water does not touch the bottom of the basket.
- Place the vegetables in the basket in a single layer, cover tightly with a lid, and steam for just 3-5 minutes until they are bright in color and ‘fork-tender.’
- Immediately remove the vegetables and plunge them into an ice water bath for 30 seconds; this ‘shocks’ them, stopping the cooking process and locking in that vivid green color.
- Drain the vegetables thoroughly and pat them dry with a clean kitchen towel so the oil and seasonings don’t slide off.
- Just before serving, toss the vegetables in a bowl with a drizzle of high-quality olive oil and a squeeze of fresh lemon juice.
- Arrange them neatly on the board and finish with a sprinkle of flaky sea salt and perhaps some lemon zest for an extra pop of color.
HOW TO MAKE SAVORY TARTLETS?
[IMAGE_10]
Why we love this
Savory tartlets are like little edible sculptures, offering a sophisticated blend of buttery, flaky pastry and rich, creamy fillings. There is something so satisfying about the way the delicate crust shatters upon impact, revealing a savory custard or a jammy onion filling tucked inside. They are the perfect ‘one-handed’ food, making them an ideal candidate for a board where guests are mingling. The scent of baking pastry and melting Gruyère or goat cheese creates an air of French bistro elegance, making even the simplest gathering feel like a special occasion.
Ingredients
- Pre-made puff pastry or shortcrust dough
- Filling: Sautéed mushrooms, caramelized onions, or spinach
- Custard: 2 eggs whisked with 1/2 cup heavy cream
- Cheese: Gruyère, Fontina, or Goat cheese
- Fresh thyme leaves
How to make it
- Preheat your oven to 400°F and lightly grease a mini muffin tin or small tartlet molds with butter.
- Roll out your pastry dough thinly and use a round cookie cutter to cut circles that are slightly larger than your molds, then press the dough gently into the tins.
- Prick the bottom of the dough with a fork and ‘blind bake’ the shells for 5-7 minutes until they are just starting to set but haven’t browned yet.
- Place a small spoonful of your sautéed vegetables (ensure they are dry and not oily) into the bottom of each par-baked shell.
- Pour a small amount of the egg and cream custard over the filling, leaving a little room at the top to prevent the tartlets from overflowing.
- Top each tartlet with a pinch of shredded cheese and a few fresh thyme leaves for an aromatic finish.
- Bake for another 10-12 minutes until the pastry is golden and puffed, and the custard center is set and slightly jiggly; allow them to cool for 5 minutes before popping them out of the tin.
The Art of the Board
Building a food board is more than just a culinary task; it is an act of creativity and hospitality. By combining these different techniques—from the slow-smoked ribs to the delicate tartlets—you create a landscape of flavors that invites your guests to explore and enjoy at their own pace. Remember, the best boards are the ones that reflect your personality, so don’t be afraid to mix and match these subtopics to suit your crowd. Now, grab your largest wooden platter and start creating!