

The Ultimate Viral Food Board That’s Taking Over the Internet
There is something truly magical about the way food can bring us together, especially when it is presented as a vibrant, communal masterpiece. Lately, my social media feeds have been overflowing with the ‘Viral Simple Food Board’ trend, and I couldn’t resist jumping in. It’s more than just a platter; it’s an invitation to slow down, celebrate life’s big milestones, and savor the seasonal flavors that make this time of year so special.
Whether you are hosting a backyard graduation party or simply want to treat your family to a weekend brunch that feels like a five-star event, these elements are designed to wow. From the tart, nostalgic scent of simmering rhubarb to the zesty brightness of homemade pesto, we are building a board that balances sweet, savory, and everything in between. Let’s dive into how you can create this internet-famous spread right in your own kitchen.
How to style graduation cakes?
Why we love this
A graduation cake isn’t just a dessert; it is a centerpiece of achievement that demands a touch of elegance and whimsy. We love this approach because it moves away from the stiff, supermarket look and leans into a textured, organic aesthetic that feels deeply personal. Imagine the soft, velvet crumb of a vanilla sponge enveloped in a cloud-like Swiss meringue buttercream that catches the light. The addition of fresh, edible flowers and delicate gold leaf creates a sophisticated shimmer that mirrors the bright future of the guest of honor.
Ingredients
- Tiered sponge cake (pre-baked and chilled)
- Swiss meringue buttercream
- Fresh edible flowers (pansies, violas, or rose petals)
- Gold leaf flakes
- Acrylic or cardstock graduation cap toppers
- Offset spatula and bench scraper
How to make it
- Begin with a chilled cake to ensure stability. Apply a thin crumb coat of buttercream using an offset spatula to seal in any loose crumbs, then refrigerate for 30 minutes until firm.
- Apply a generous second layer of buttercream. For a ‘rustic-chic’ look, use the tip of your spatula to create horizontal ridges or soft swirls around the sides while rotating your cake turntable slowly and steadily.
- Gently press edible flowers into the frosting near the base of the cake, gradually thinning them out as you move upward to create a ‘meadow’ effect.
- Use a pair of tweezers to carefully apply small flecks of gold leaf to the edges of the swirls, giving the cake a luxurious, celebratory glow.
- Insert the graduation cap topper at a slight angle on the top tier to add height and a focal point that ties the theme together.
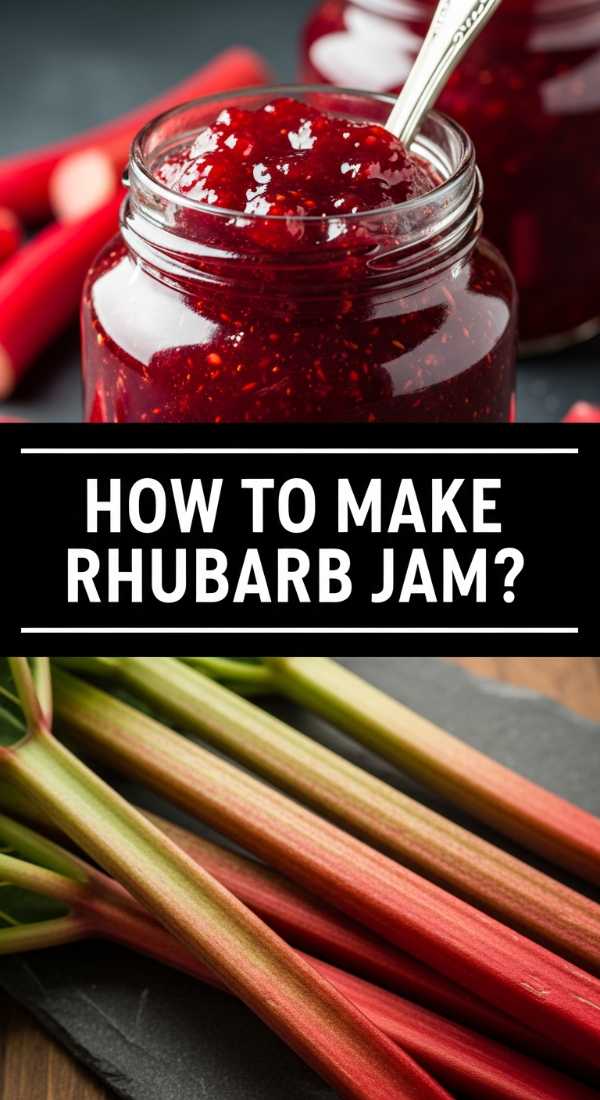
How to make rhubarb jam?

Why we love this
Rhubarb jam is the essence of spring captured in a jar, offering a brilliant, jewel-toned pink hue that brightens any breakfast board. The aroma while it simmers is intoxicating—a blend of tart, earthy stalks and sweet, caramelizing sugar that fills the whole house with warmth. The texture is thick and luscious, with just enough fruit structure to provide a satisfying mouthfeel against a crisp piece of sourdough. It’s a nostalgic flavor that feels both sophisticated and comforting at the same time.
Ingredients
- 4 cups chopped fresh rhubarb (1-inch pieces)
- 1.5 cups granulated sugar
- 1 tablespoon fresh lemon juice
- 1 teaspoon lemon zest
- 1/2 teaspoon vanilla bean paste
- Pinch of salt
How to make it
- In a large, heavy-bottomed saucepan, combine the chopped rhubarb and sugar. Let it sit at room temperature for about 30 to 60 minutes; this allows the sugar to macerate the fruit, drawing out the natural juices.
- Place the pan over medium heat and bring the mixture to a gentle boil, stirring frequently with a wooden spoon to prevent the sugar from scorching on the bottom.
- Add the lemon juice, zest, and a pinch of salt. Reduce the heat to medium-low and simmer for 20-25 minutes. You will notice the rhubarb breaking down into soft ribbons and the liquid thickening into a glossy syrup.
- To test for doneness, place a small spoonful on a chilled plate; if it wrinkles when you push it with your finger, it’s ready. Stir in the vanilla bean paste at the very end to preserve its delicate aroma.
- Carefully ladle the hot jam into sterilized glass jars, leaving a quarter-inch of headspace. Let cool completely before sealing and storing in the refrigerator.
How to decorate graduation cupcakes?
Why we love this
Cupcakes are the ultimate party food because they are perfectly portioned and offer endless opportunities for creative storytelling. These graduation-themed treats are a delight for the eyes, featuring miniature mortarboards that look almost too cute to eat. The contrast between the dark chocolate ‘caps’ and the silky white frosting creates a striking visual that pops on any food board. Each bite is a harmonious mix of rich cocoa and sweet cream, making them a guaranteed crowd-pleaser for guests of all ages.
Ingredients
- Baked chocolate cupcakes
- Vanilla bean frosting
- Ghirardelli chocolate squares
- Mini Reese’s peanut butter cups
- M&Ms or small chocolate pearls
- Fruit leather or sour belts (for tassels)
How to make it
- Pipe a tall, sturdy swirl of vanilla frosting onto each cooled cupcake using a large round piping tip. The frosting acts as the ‘glue’ for your graduation cap.
- Unwrap the mini peanut butter cups and place them upside down on top of the frosting swirl to serve as the base of the hat.
- Apply a tiny dot of frosting to the center of the peanut butter cup and press a chocolate square firmly on top, ensuring it sits level.
- Cut thin, 1-inch strips of fruit leather or sour belts to act as the tassel. Use another tiny dab of frosting to attach one end to the center of the chocolate square.
- Finish by placing a single M&M or chocolate pearl over the end of the tassel in the center of the square to mimic the button on a real graduation cap.
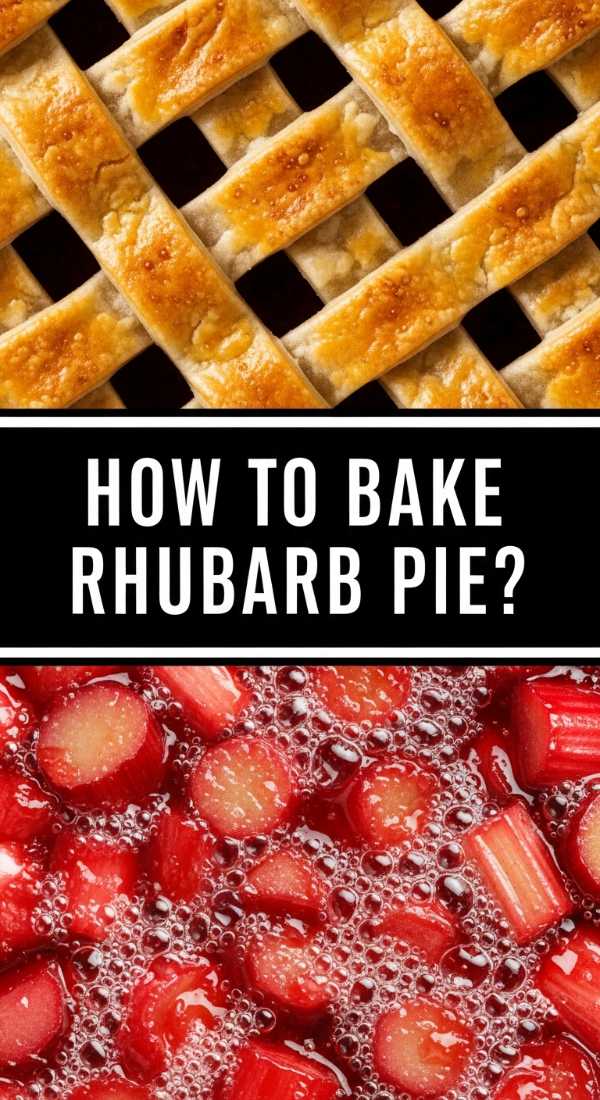
How to bake rhubarb pie?
Why we love this
There is nothing quite like a slice of homemade rhubarb pie, with its flaky, buttery crust and that signature tart-sweet filling that dances on the tongue. As it bakes, the rhubarb releases its juices, creating a thick, crimson syrup that bubbles through the lattice crust, signaling that it’s time to eat. The aroma of toasted butter and baking fruit is the ultimate comfort, evoking memories of sunny afternoons and family gatherings. It’s a rustic, beautiful addition to our viral board that adds a necessary heartiness.
Ingredients
- Double pie crust (homemade or store-bought)
- 5 cups sliced rhubarb (1/2 inch thick)
- 1 1/4 cups granulated sugar
- 1/4 cup cornstarch
- 1 teaspoon cinnamon
- 1 tablespoon cold butter (cubed)
- 1 egg (for egg wash)
- Coarse sparkling sugar
How to make it
- Preheat your oven to 400°F (200°C). Roll out your bottom crust and fit it into a 9-inch pie plate, trimming the edges so they hang slightly over.
- In a large bowl, toss the sliced rhubarb with the sugar, cornstarch, and cinnamon until every piece is evenly coated. This mixture will look dry at first but will become syrupy as it sits.
- Pour the filling into the prepared pie crust and dot the top with the small cubes of cold butter to add extra richness and shine to the filling.
- Roll out the second crust and cut into strips to create a lattice top. Weave the strips over the filling, then crimp the edges of the top and bottom crusts together to seal.
- Brush the crust with a beaten egg and sprinkle generously with coarse sugar. Bake for 20 minutes, then reduce the heat to 350°F and bake for another 35-45 minutes until the crust is deep golden brown and the juices are thick and bubbling.
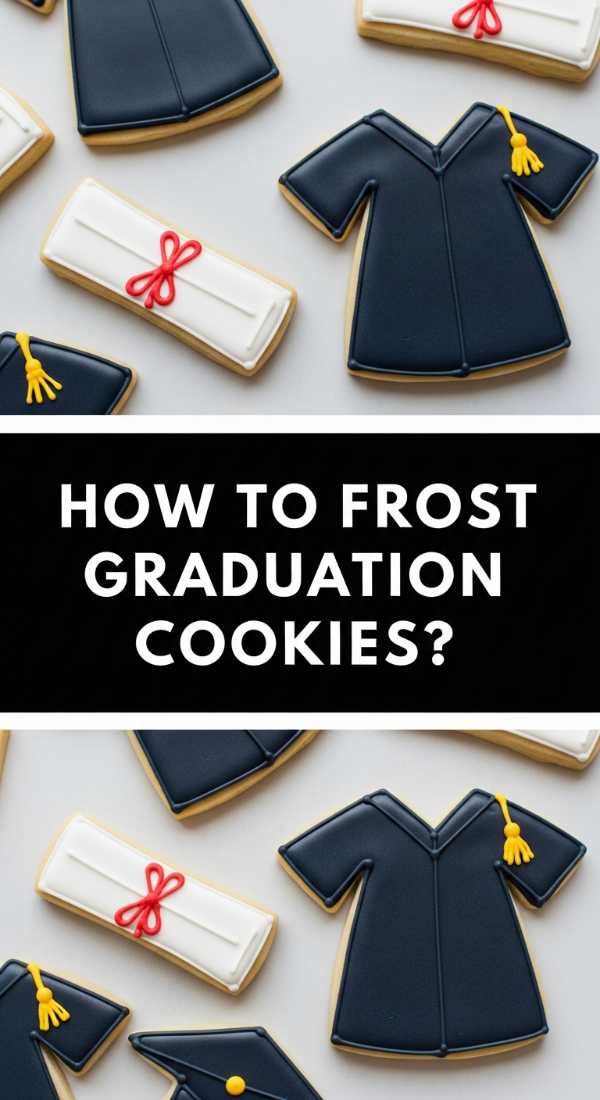
How to frost graduation cookies?
Why we love this
Frosted cookies are like tiny canvases, and for a graduation board, they allow for high-impact personalization. We love the smooth, satin finish of royal icing which creates a professional look that is surprisingly easy to achieve at home. The ‘diploma’ cookies, tied with a little ribbon of icing, bring an element of narrative to the board that guests will obsess over. The snap of the sugar cookie combined with the sweet melt-away texture of the icing provides a classic, nostalgic snack that rounds out the dessert portion of our spread.
Ingredients
- Sugar cookies (cut into rectangles and circles)
- Royal icing (stiff and flood consistency)
- Food coloring (school colors)
- Piping bags and small round tips
- Edible ink markers (optional)
How to make it
- Outline your rectangular ‘diploma’ cookies with stiff-consistency white icing. Once the border is set, ‘flood’ the center with a thinner consistency icing, using a toothpick to pop any bubbles.
- For the circular cookies, repeat the outline and flood process using a base color. Let these dry completely—at least 4-6 hours or overnight—before adding details.
- Once the base is dry, use your stiff icing in a contrasting color to pipe a thin line across the diploma cookies to represent the ribbon. Add a small ‘bow’ detail in the center.
- Use an edible ink marker or a very fine piping tip to write the graduation year or the word ‘Done!’ on the round cookies for a fun, personalized touch.
- Allow the detailed icing to set for at least an hour before arranging them on your food board so they don’t smudge.
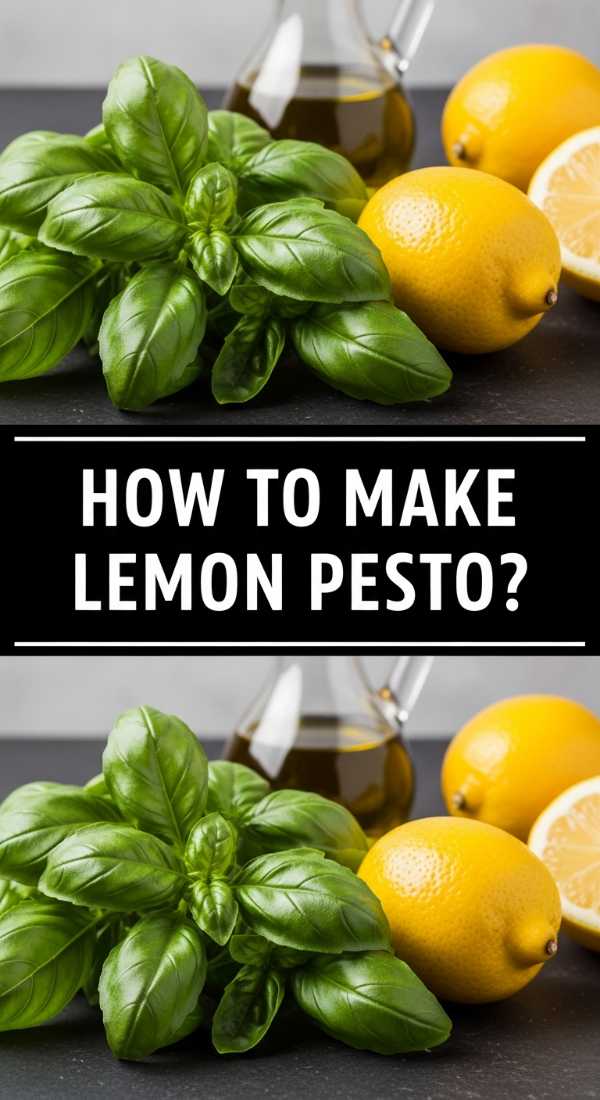
How to make lemon pesto?
Why we love this
Lemon pesto is the savory bright spot that cuts through the richness of our board, offering a zesty, herbaceous punch that awakens the palate. The fragrance of fresh basil combined with the sharp, citrusy spray of lemon zest is incredibly refreshing. It’s vibrant green, adding a pop of color that makes the board look alive and fresh. This isn’t just a sauce; it’s a versatile spread that works perfectly on crackers, drizzled over fresh mozzarella, or even as a dip for seasonal vegetables.
Ingredients
- 2 cups fresh basil leaves (packed)
- 1/2 cup grated Parmesan cheese
- 1/3 cup toasted pine nuts or walnuts
- 2 cloves garlic (minced)
- 1/2 cup high-quality extra virgin olive oil
- Zest and juice of 1 large lemon
- 1/2 teaspoon sea salt
How to make it
- Place the toasted nuts and garlic in a food processor. Pulse a few times until they are coarsely chopped but not yet a paste.
- Add the fresh basil leaves, lemon zest, and Parmesan cheese. Pulse again until the mixture is finely chopped and well combined.
- While the processor is running on low, slowly drizzle in the olive oil in a steady stream. This creates an emulsion, ensuring your pesto is creamy and smooth rather than oily.
- Stop the processor and stir in the lemon juice and sea salt by hand. This preserves the brightness of the lemon flavor and allows you to adjust the seasoning to your preference.
- Transfer to a small serving bowl. If not using immediately, pour a thin layer of olive oil over the top to prevent oxidation and keep that brilliant green color.
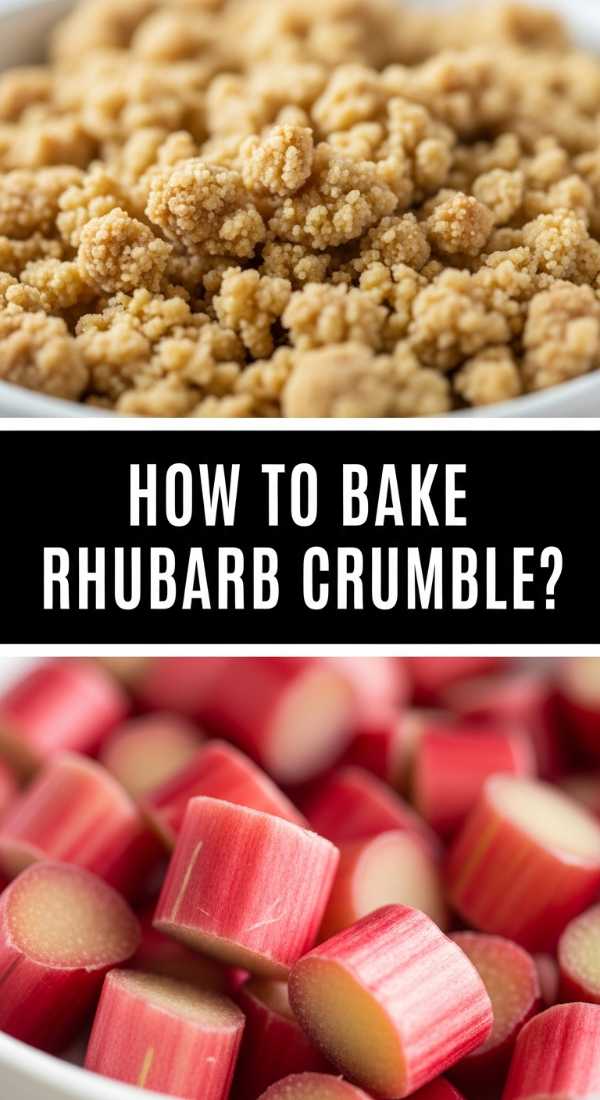
How to bake rhubarb crumble?

Why we love this
If a pie feels too formal, the rhubarb crumble is its laid-back, equally delicious cousin. We love the textural play here: the bottom layer is soft, jammy, and tart, while the top is a craggy, golden-brown landscape of buttery oats and brown sugar. When it comes out of the oven, the smell of toasted oats and cinnamon is absolutely hypnotic. It’s best served warm, providing a cozy contrast to the cooler elements on the board, and it practically begs for a dollop of whipped cream or a scoop of vanilla bean ice cream.
Ingredients
- 4 cups chopped rhubarb
- 1/2 cup granulated sugar
- 1 tablespoon flour
- Topping: 1 cup rolled oats, 1 cup flour, 1 cup brown sugar, 1/2 cup cold salted butter (cubed), 1 tsp cinnamon
How to make it
- Preheat your oven to 375°F (190°C). In a square baking dish, toss the rhubarb with the granulated sugar and 1 tablespoon of flour to help thicken the juices as it bakes.
- In a separate bowl, prepare the crumble topping by mixing the oats, flour, brown sugar, and cinnamon.
- Add the cold, cubed butter to the dry ingredients. Use your fingers or a pastry cutter to work the butter in until the mixture looks like coarse crumbs with some pea-sized chunks of butter remaining.
- Spread the crumble mixture evenly over the rhubarb. Don’t press it down; you want it to remain light and airy so it crisps up properly.
- Bake for 35-40 minutes. The top should be a deep golden brown, and the rhubarb should be bubbling up around the edges. Let it rest for 10 minutes before serving to allow the juices to set.
How to brew fun coffee?
Why we love this
Every great food board needs a beverage component, and a ‘fun’ coffee bar is the ultimate way to keep the energy high. We love this because it turns a daily routine into an interactive experience. Picture a glass of iced coffee with distinct layers: rich, dark espresso at the bottom, a splash of creamy milk in the middle, and a thick, velvety layer of flavored cold foam on top. It’s visually stunning and incredibly customizable, allowing every guest to feel like their own barista while adding a modern, ‘aesthetic’ vibe to your gathering.
Ingredients
- Strong brewed coffee or espresso (chilled)
- Milk of choice (oat milk works great for foam)
- Vanilla or lavender syrup
- Ice cubes
- Heavy cream (for cold foam)
- Cocoa powder or cinnamon for dusting
How to make it
- Start by filling a tall glass with large ice cubes. Pour in your chilled coffee or espresso until the glass is about two-thirds full.
- In a separate small jar or frother, combine 2 tablespoons of heavy cream, 1 tablespoon of milk, and a pump of your favorite syrup. Use a handheld milk frother for about 30 seconds until it doubles in volume and becomes a thick foam.
- Slowly pour your milk of choice over the coffee, leaving about an inch of space at the top of the glass.
- Spoon the flavored cold foam over the top. Because of the density differences, the foam will sit beautifully on top of the milk.
- Finish with a light dusting of cocoa powder or cinnamon through a stencil for a professional look that mirrors the viral coffee shop trends.
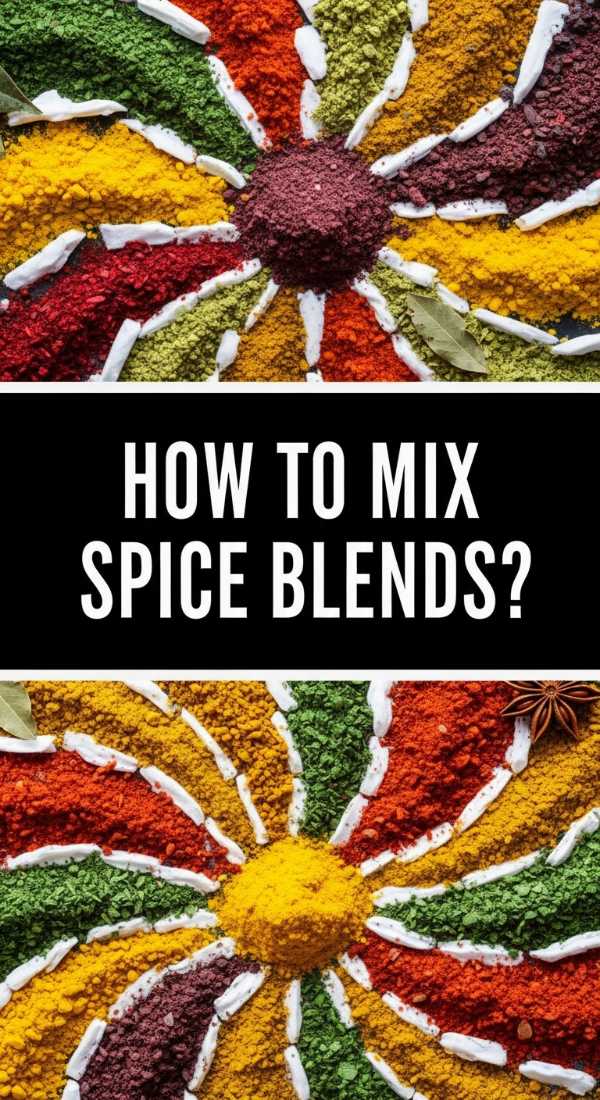
How to mix spice blends?
Why we love this
Making your own spice blends is a total game-changer for the home cook, adding a layer of depth and ‘secret ingredient’ flair to your board. The aroma of freshly mixed spices—smoky paprika, earthy cumin, and sharp black pepper—is far more potent than anything pre-packaged. We love this because it allows you to control the salt and heat levels perfectly. Sprinkled over the savory elements of your board, these blends create a cohesive flavor profile that ties the whole meal together with a professional touch.
Ingredients
- 2 tbsp Smoked Paprika
- 1 tbsp Garlic Powder
- 1 tbsp Onion Powder
- 1 tsp Dried Oregano
- 1 tsp Cayenne Pepper (optional for heat)
- 2 tsp Sea Salt
- 1 tsp Cracked Black Pepper
How to make it
- Ensure all your individual spices are fresh; if they’ve been in the pantry for over a year, they may have lost their aromatic oils.
- In a small glass bowl, whisk together all the ingredients. Using a whisk helps break up any clumps in the garlic or onion powder, ensuring a uniform flavor in every pinch.
- Taste a tiny amount of the blend. This is your chance to adjust—add more smoked paprika for depth, or more cayenne if you want a lingering heat.
- Transfer the blend to a small, airtight glass jar. Label it clearly with the date and the name of the blend (like ‘Signature Board Rub’).
- Keep the jar on your food board with a small wooden spoon, encouraging guests to sprinkle a little extra flavor over their savory bites or cheeses.
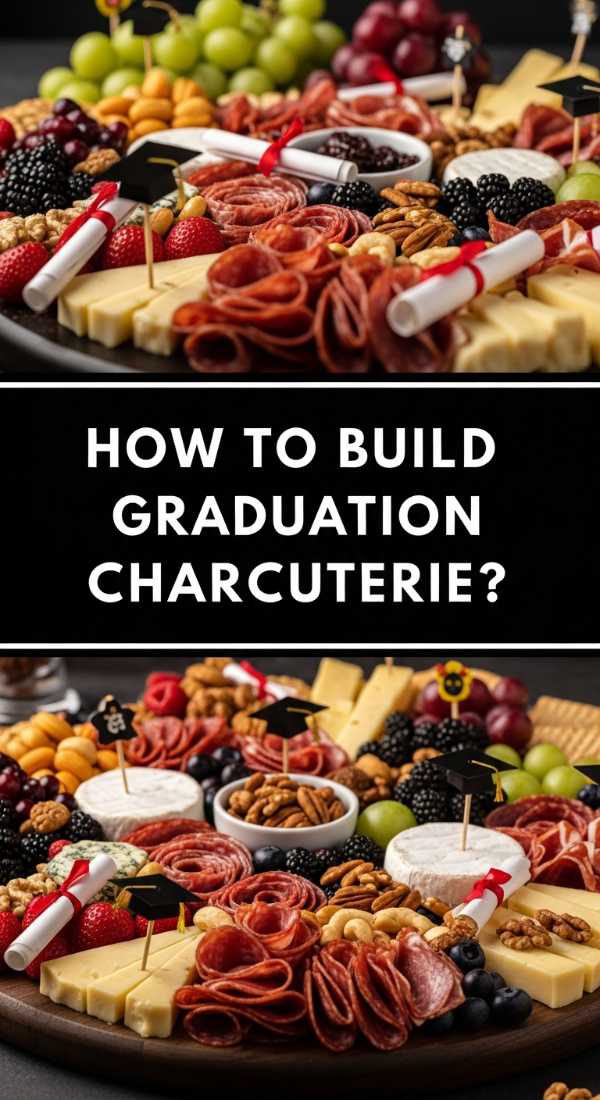
How to build graduation charcuterie?
[IMAGE_10]
Why we love this
The graduation charcuterie board is the grand finale—the place where all our hard work comes together in a stunning, edible landscape. We love the organized chaos of a well-built board: the way the creamy cheeses nestle against the tart rhubarb jam, and how the bright lemon pesto sits next to savory meats and crisp crackers. It’s an interactive feast that encourages guests to graze and mingle. The visual appeal is undeniable, with various heights, colors, and textures making it the ultimate ‘Instagrammable’ moment of any celebration.
Ingredients
- Assorted cheeses (Brie, Sharp Cheddar, Goat Cheese)
- Cured meats (Prosciutto, Salami)
- Fresh fruits (Grapes, Berries)
- The homemade Rhubarb Jam and Lemon Pesto
- Crackers and sliced baguette
- Nuts and olives for filling gaps
- Graduation cookies and cupcakes for the ‘sweet’ corner
How to make it
- Start with your largest items to anchor the board. Place small bowls of rhubarb jam and lemon pesto in diagonal corners to draw the eye across the spread.
- Add your cheeses next. For the Brie, cut a small wedge out to show the creamy interior; for the Cheddar, cut into rustic cubes to add height.
- Fold the meats into ‘roses’ or ribbons and tuck them tightly around the cheese and bowls. This ‘crowding’ technique makes the board look abundant and professional.
- Fill in the large remaining spaces with piles of crackers and baguette slices, following a curved path through the center of the board.
- Finally, use the small items—the nuts, olives, and fresh berries—to fill every single tiny gap. Add your graduation cupcakes and cookies to one side to create a clear transition from savory to sweet.
The Final Flourish
Creating a viral-worthy food board is all about the balance of flavors and the love you put into the details. From the first simmer of the rhubarb jam to the final dusting of spice on your charcuterie, these steps transform a simple meal into an unforgettable celebration. Whether you’re honoring a graduate or just celebrating the arrival of spring, this board is sure to be the star of the show. Happy hosting!