

5 Minutes to Viral: The Ultimate Simple Snack Board Hack
There is a specific kind of magic that happens when you set a beautifully arranged board on the table. Whether it’s a spread of sweets for a graduation or a rustic rhubarb-themed brunch, it’s about creating a moment where everyone feels invited to lean in and help themselves. I remember the first time I hosted a big summer bash; I was so stressed about individual plates, but then I realized: people just want to connect over beautiful, simple food that feels curated but approachable.
The secret to going viral isn’t just about the food; it’s about the aesthetic and the ease. When you arrange a variety of textures and colors, you’re not just making a meal—you’re crafting an experience that demands to be photographed and shared. Today, we are diving into ten distinct ways to elevate your hosting game, from the zing of fresh rhubarb to the sophistication of an Italian dinner party, all centered around that effortless ‘board’ philosophy.
How to design graduation cakes?
Why we love this
Graduation marks a threshold of new beginnings, and a custom cake is the centerpiece of that celebration. We love the way the smooth buttercream acts as a canvas for the graduate’s journey, accented by the deep, rich scent of vanilla bean and the satisfying crunch of decorative pearls. There is something profoundly nostalgic about slicing into a cake that mirrors the school colors, bringing back memories of late-night study sessions and the sweet anticipation of the future while the kitchen fills with the aroma of sugar and joy.
Ingredients
- Triple-layered sponge cake (chilled)
- Stiff-peak vanilla buttercream
- Gel food coloring (school colors)
- Edible gold leaf or luster dust
- Fondant for the mortarboard cap
- Thin licorice or fondant for the tassel
How to make it
- Begin by crumb-coating your chilled cake layers with a thin layer of buttercream to lock in moisture and prevent crumbs from ruining your finish; use an offset spatula for a smooth, professional surface.
- Divide your remaining buttercream into bowls and mix in gel food coloring slowly to achieve the exact school shades, ensuring you mix thoroughly to avoid streaks of pigment.
- Apply the final layer of frosting using a bench scraper held at a 45-degree angle against the rotating cake stand, applying even pressure to create sharp, crisp edges that look stunning in photos.
- Roll out black fondant to approximately 1/4 inch thickness, cut a 4×4 inch square and a small cylinder to assemble the graduation cap, then let it dry for 2 hours so it holds its shape on top of the cake.
- Finish by applying edible gold leaf accents around the base and draping the handmade tassel over the cap, ensuring the placement is intentional for a balanced, sophisticated aesthetic.
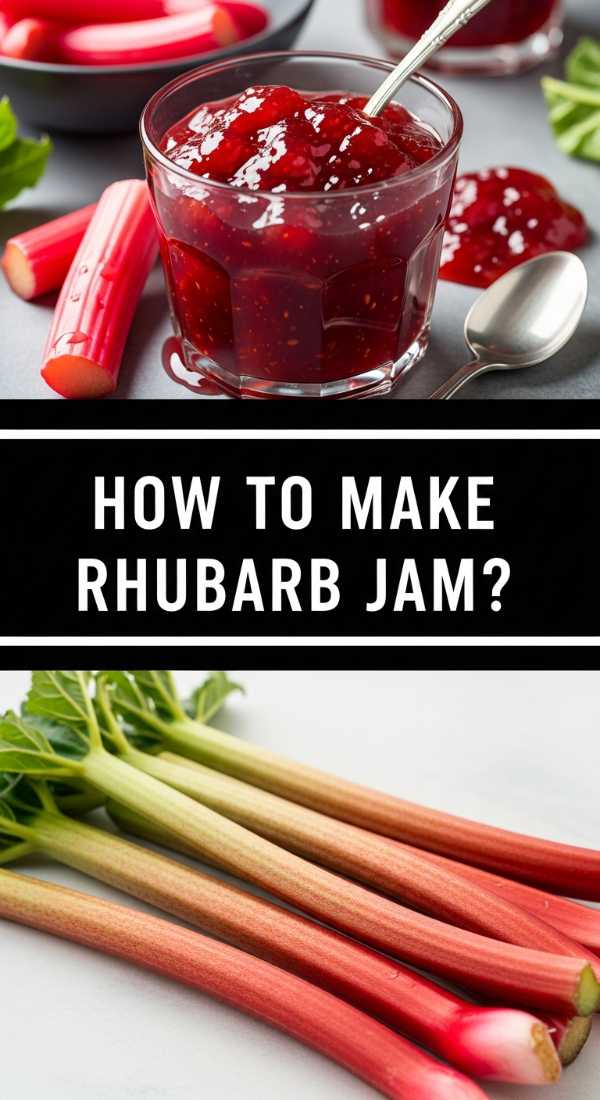
How to make rhubarb jam?

Why we love this
Rhubarb jam is the ultimate embodiment of springtime captured in a jar, offering a tart complexity that cuts through the sweetness of a morning pastry. The vibrant, ruby-red hue is visually striking, and as it simmers on the stove, it fills the home with a sharp, botanical fragrance that is both refreshing and comforting. We love the thick, glossy texture that spreads effortlessly, providing a burst of acidity that wakes up the palate and pairs perfectly with a thick smear of salted butter on toasted brioche.
Ingredients
- 4 cups fresh rhubarb, chopped into 1/2 inch pieces
- 2 cups granulated sugar
- 1 tablespoon fresh lemon juice
- 1 teaspoon lemon zest
- 1/2 teaspoon pure vanilla bean paste
How to make it
- In a large, heavy-bottomed pot, combine the chopped rhubarb and sugar, stirring well to ensure every piece is coated; let this sit for 30 minutes at room temperature to macerate and release the natural juices.
- Place the pot over medium-high heat and bring the mixture to a rolling boil, stirring constantly with a wooden spoon to prevent the sugar from scorching on the bottom of the pan.
- Reduce the heat to medium and stir in the lemon juice and zest, which provides the necessary pectin and acidity to help the jam set properly while maintaining its bright color.
- Simmer the mixture for 15 to 20 minutes, skimming off any foam that rises to the surface; you will know it is ready when the jam coats the back of a spoon and the rhubarb has broken down into a thick, translucent syrup.
- Perform the ‘plate test’ by placing a small spoonful on a chilled saucer; if the jam wrinkles when pushed with your finger, it has reached the setting point and can be transferred into sterilized glass jars for sealing.
How to style graduation cupcakes?
Why we love this
Cupcakes offer a playful and portable alternative to a traditional cake, making them the perfect addition to a viral-worthy dessert board. We love the versatility of styling each individual treat, creating a miniature gallery of edible art that celebrates the graduate’s achievement. The sight of piped swirls of frosting topped with tiny chocolate graduation caps creates an instant sense of whimsy and celebration, while the aroma of freshly baked cake provides a comforting backdrop to the party atmosphere.
Ingredients
- Batch of baked cupcakes
- Swiss meringue buttercream
- Chocolate squares (Ghirardelli style)
- Chocolate-covered candies (M&Ms or similar)
- Sour rope candy for tassels
- Gold star sprinkles
How to make it
- Fit a piping bag with a large open star tip (like the 1M) and pipe high, vertical swirls of buttercream onto each cooled cupcake, starting from the outside edge and moving inward for a classic bakery look.
- Create the graduation caps by using a small dab of frosting to secure a flat chocolate square onto the top of an upside-down chocolate-covered candy, creating a tiered hat effect.
- Carefully cut the sour rope candy into 1-inch strips and fray the ends with a clean pair of kitchen shears to mimic the texture of a real graduation tassel.
- Attach the tassel to the center of the chocolate square using a tiny dot of melted chocolate or icing, and top it with a single gold sprinkle to hide the attachment point.
- Arrange the finished cupcakes on a tiered stand or a large wooden board, spacing them evenly and filling the gaps with gold star sprinkles to create a cohesive and festive dessert display.
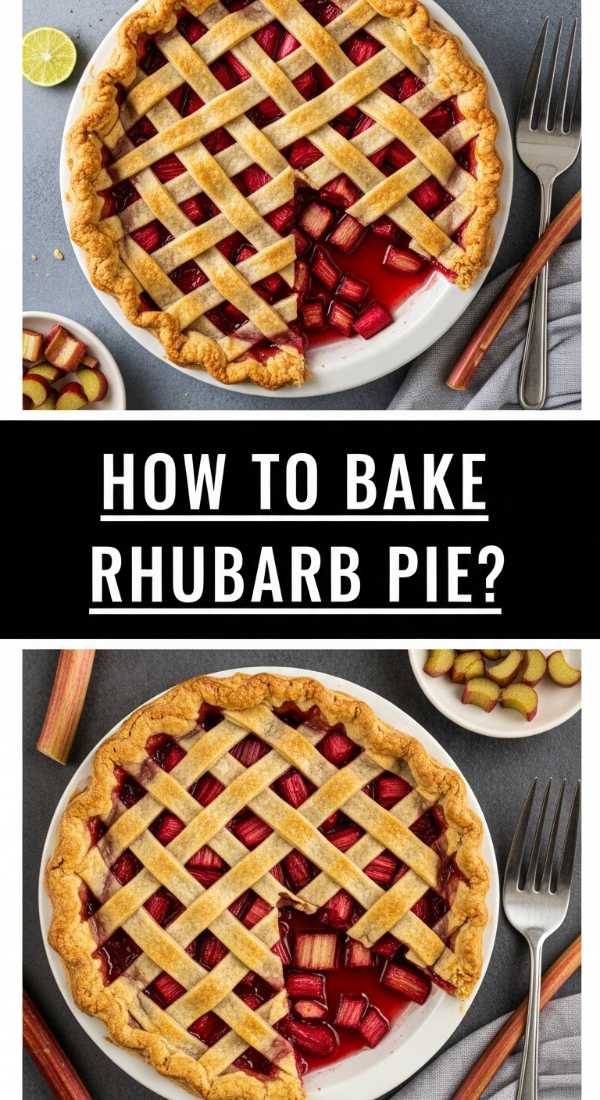
How to bake rhubarb pie?

Why we love this
A rhubarb pie is a masterpiece of rustic baking, featuring a flaky, golden-brown crust that hides a molten center of tangy fruit. The contrast between the buttery, savory pastry and the sharp, punchy flavor of the rhubarb is nothing short of addictive, especially when served warm with a scoop of melting vanilla bean ice cream. We love the visual appeal of a lattice crust, which allows the vibrant pink juices to bubble through, promising a sensory experience that is both crunchy and silky in every bite.
Ingredients
- Double pie crust (homemade or store-bought)
- 5 cups sliced rhubarb
- 1 1/4 cups sugar
- 1/4 cup cornstarch
- 1 tablespoon cold butter, cubed
- 1 egg wash (1 egg beaten with 1 tbsp water)
How to make it
- Preheat your oven to 400°F (200°C) and roll out your bottom crust, draping it over a 9-inch pie plate and trimming the edges to leave a 1-inch overhang for crimping.
- In a large bowl, toss the sliced rhubarb with sugar and cornstarch until the fruit is thoroughly coated; the cornstarch is vital for thickening the juices so the pie isn’t runny.
- Pour the rhubarb mixture into the prepared pie shell and dot the top with the small cubes of cold butter to add a rich, silky mouthfeel to the filling as it bakes.
- Roll out the second piece of dough and cut into 1-inch strips, weaving them over the filling to create a classic lattice pattern, then crimp the edges firmly to seal the juices inside.
- Brush the entire top of the lattice with the egg wash and bake for 45 to 50 minutes until the crust is a deep golden brown and the filling is bubbling thick and slow in the center.
How to decorate summer cookies?
Why we love this
Summer cookies are like little bites of sunshine, bursting with bright colors and citrusy flavors that evoke memories of beach days and garden parties. We love the creative freedom of using royal icing to transform a simple sugar cookie into a slice of watermelon, a blooming sunflower, or a refreshing glass of lemonade. The smooth, matte finish of the icing provides a satisfying snap when you bite into it, revealing a soft, buttery cookie underneath that melts in your mouth.
Ingredients
- Sugar cookies (cut into summer shapes)
- Royal icing (flood and piping consistency)
- Gel food colors (pink, green, yellow, white)
- Fine-tip edible markers
- Sanding sugar
How to make it
- Prepare your royal icing and divide it into separate bowls, tinting them with vibrant gel colors and adjusting the consistency with drops of water until it reaches a 15-second ‘flood’ state.
- Outline the edge of your cooled cookies with the slightly thicker piping-consistency icing to create a dam that will hold the thinner flood icing in place.
- Fill the center of the cookies with the flood icing, using a toothpick or scribe tool to pop any air bubbles and pull the icing into the corners for a perfectly smooth surface.
- For a ‘wet-on-wet’ technique, immediately drop dots of a contrasting color into the wet icing to create patterns like polka dots or stripes that dry flat and seamless.
- Let the cookies dry for at least 12 hours in a cool, dry place before using edible markers to add fine details like seeds on a watermelon or petals on a flower for a professional finish.
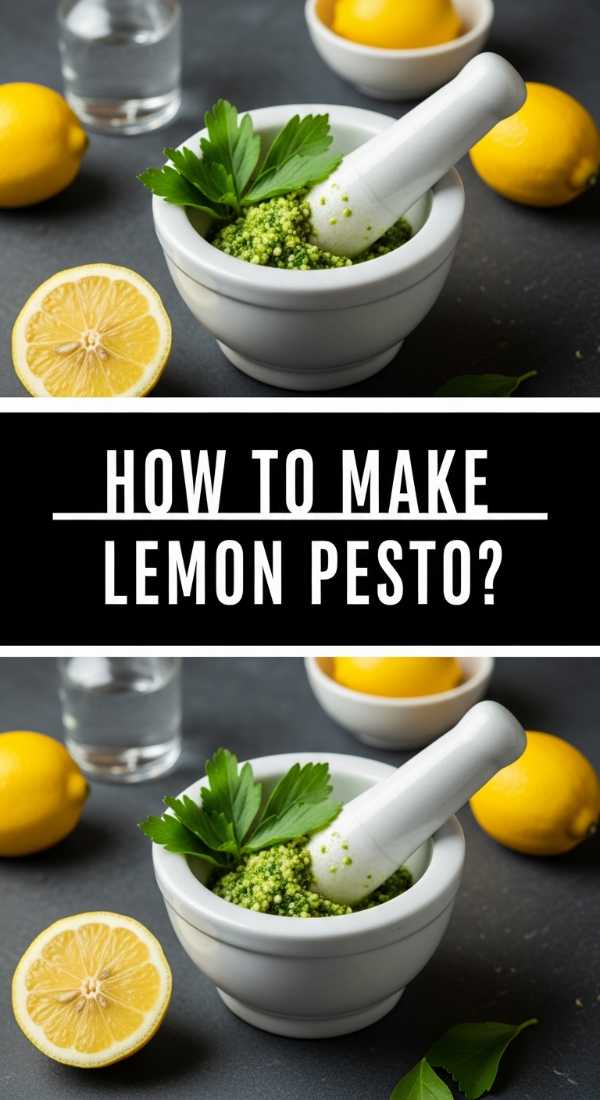
How to make lemon pesto?

Why we love this
Lemon pesto is a vibrant, modern twist on the classic Genovese sauce, offering an explosion of Mediterranean brightness that elevates any dish it touches. The aroma of freshly slapped basil combined with the sharp, essential oils of lemon zest creates an olfactory experience that is incredibly invigorating. We love the way the creamy pine nuts and salty Parmesan cheese balance the citrus, resulting in a textured, neon-green sauce that looks stunning drizzled over a board of roasted vegetables or toasted crostini.
Ingredients
- 2 cups packed fresh basil leaves
- 1/2 cup extra virgin olive oil
- 1/3 cup pine nuts (toasted)
- 1/2 cup grated Parmesan cheese
- Zest and juice of 2 organic lemons
- 2 cloves garlic, smashed
How to make it
- Start by lightly toasting your pine nuts in a dry skillet over medium-low heat for 3-5 minutes until they are golden and fragrant; this releases the oils and prevents a raw, bitter taste.
- In a food processor, pulse the garlic, toasted pine nuts, and lemon zest until they form a coarse paste, ensuring you don’t overprocess into a complete liquid at this stage.
- Add the fresh basil leaves and half of the olive oil, then pulse again in short bursts to maintain a slightly chunky, rustic texture that feels artisanal and homemade.
- With the processor running on low, slowly stream in the remaining olive oil and lemon juice to create an emulsified sauce that is bright green and glossy.
- Stir in the grated Parmesan cheese by hand at the very end to preserve the texture of the cheese, and season with sea salt and cracked black pepper to taste.
How to bake funny cakes?

Why we love this
Funny cakes are all about breaking the rules of traditional baking to bring a sense of humor and personality to the table. Whether it’s an ‘ugly’ sweater cake or a cake designed to look like a giant cheeseburger, we love the way these creations act as an immediate icebreaker and conversation starter. The joy of a funny cake lies in the surprise—the moment guests realize that the ‘spaghetti’ they are looking at is actually piped buttercream and the ‘meatballs’ are chocolate truffles.
Ingredients
- Standard cake layers (flavor of choice)
- Large batch of vanilla buttercream
- Fondant for sculpting small details
- Food coloring in various shades
- Unique ‘props’ like straws or candy accents
How to make it
- Select a theme that involves an everyday object and sketch a basic plan of how to layer your cake rounds to mimic that specific shape, using a serrated knife to carve the chilled cake.
- Apply a generous crumb coat to your carved shape and freeze for 20 minutes to create a rock-solid foundation for the more complex decorating steps.
- Use a grass tip (Wilton 233) to pipe ‘hair’ or ‘shag’ textures, or a round tip to create ‘noodles,’ moving your hand in quick, erratic motions to give the cake a lifelike, messy appearance.
- Sculpt small details like eyes, buttons, or tiny food items out of fondant, using a small amount of water as glue to attach them to the buttercream surface.
- Add a ‘punny’ message on the cake board using a fine-tip piping bag, ensuring the text is slightly wonky to match the humorous and lighthearted nature of the cake design.
How to bake rhubarb scones?

Why we love this
Rhubarb scones are the quintessential tea-time treat, boasting a crumbly, buttery exterior that gives way to a soft, tender heart studded with tart fruit. We love the way the bits of rhubarb soften during baking, creating little pockets of jam-like intensity that contrast with the rich, dairy notes of the cream-based dough. The scent of butter browning in the oven combined with the fruity steam rising from a fresh scone is enough to make anyone feel like they’ve been transported to a cozy English cottage.
Ingredients
- 3 cups all-purpose flour
- 1/2 cup granulated sugar
- 1 tablespoon baking powder
- 1/2 cup cold unsalted butter, grated
- 1 cup fresh rhubarb, finely diced
- 1 cup heavy cream (plus extra for brushing)
How to make it
- Whisk together the dry ingredients in a large bowl, then use a pastry cutter or your fingertips to work the cold, grated butter into the flour until the mixture resembles coarse breadcrumbs.
- Gently fold in the finely diced rhubarb, ensuring each piece is coated in flour; this prevents the fruit from sinking or clumping together in the final bake.
- Make a well in the center and pour in the heavy cream, stirring with a fork just until a shaggy dough forms—be careful not to overwork it, as this will lead to a tough scone.
- Turn the dough onto a floured surface, pat it into a 1-inch thick disc, and cut it into 8 wedges using a sharp knife or a bench scraper to ensure clean edges that will rise tall.
- Place the wedges on a parchment-lined sheet, brush the tops with a little extra cream, and bake at 400°F (200°C) for 18-22 minutes until the edges are golden and the centers feel firm to the touch.
How to host italian dinner?

Why we love this
Hosting an Italian dinner is less about a recipe and more about a philosophy of slow living and communal joy. We love the long, lingering courses that start with a vibrant antipasto board and end with strong espresso, all fueled by laughter and flowing wine. The table becomes a sanctuary where the aroma of garlic, olive oil, and fresh oregano creates an atmosphere of warmth that makes every guest feel like part of the family, regardless of their heritage.
Ingredients
- Selection of cured meats (Prosciutto, Salami)
- Artisanal cheeses (Pecorino, Gorgonzola)
- High-quality pasta and San Marzano tomatoes
- Fresh focaccia bread
- Multiple bottles of Chianti or Pinot Grigio
How to make it
- Start with the ‘Aperitivo’ hour, serving light snacks and sparkling wine to allow guests to transition from their day into the evening’s festivities in a relaxed manner.
- Prepare a large ‘Antipasto’ board featuring various textures—crunchy breadsticks, silky meats, and briny olives—to stimulate the appetite without filling everyone up too quickly.
- For the ‘Primo’ course, serve a simple but perfect pasta dish, ensuring the sauce is emulsified with a splash of starchy pasta water for that authentic, restaurant-quality silkiness.
- Focus on the ‘Contorno’ (side dishes), like bitter greens sautéed in garlic or roasted peppers, which provide a necessary counterpoint to the richness of the main courses.
- Dim the lights, light several unscented candles, and put on a curated playlist of Italian jazz or classic opera to create an immersive sensory environment that encourages long conversations.
How to make coffee drinks?
[IMAGE_10]
Why we love this
There is a meditative quality to the ritual of making a perfect coffee drink, from the rhythmic sound of the grinder to the sight of creamy milk swirling into dark espresso. We love how a well-crafted latte or macchiato feels like a warm hug in a mug, offering a complex profile of toasted nuts, chocolate, and caramel. The tactile sensation of holding a warm glass and the visual appeal of a perfectly layered iced coffee make it the ultimate finishing touch for any viral brunch board.
Ingredients
- Freshly roasted coffee beans
- Filtered water
- Whole milk or oat milk
- House-made syrups (vanilla or lavender)
- Ice cubes (for cold drinks)
How to make it
- Begin by grinding your beans to the specific coarseness required for your method—fine for espresso, medium for drip, or coarse for French press—to ensure optimal flavor extraction.
- For a classic latte, pull a double shot of espresso (about 2 ounces) into a pre-warmed cup, looking for a rich, golden ‘crema’ on the surface as a sign of quality.
- Steam your milk using a steam wand held just below the surface to create ‘microfoam,’ which should have the glossy appearance of wet paint rather than large, soapy bubbles.
- Slowly pour the steamed milk into the espresso, starting high to allow the milk to go under the crema, then lowering the pitcher close to the surface to create latte art or a thick foam cap.
- For iced versions, fill a tall glass with ice first, add your syrup and milk, and then pour the espresso over the top to create a beautiful gradient effect that looks stunning on camera.
Wrapping Up the Viral Vibe
Whether you are celebrating a graduation, embracing the tart snap of rhubarb season, or simply gathering friends for an Italian-inspired evening, the key to a viral-worthy lifestyle is intentionality. By focusing on sensory details—the scent of lemon pesto, the texture of a flaky pie crust, and the warmth of a coffee drink—you create moments that resonate far beyond a screen. Now, go grab your favorite board and start building something beautiful!