
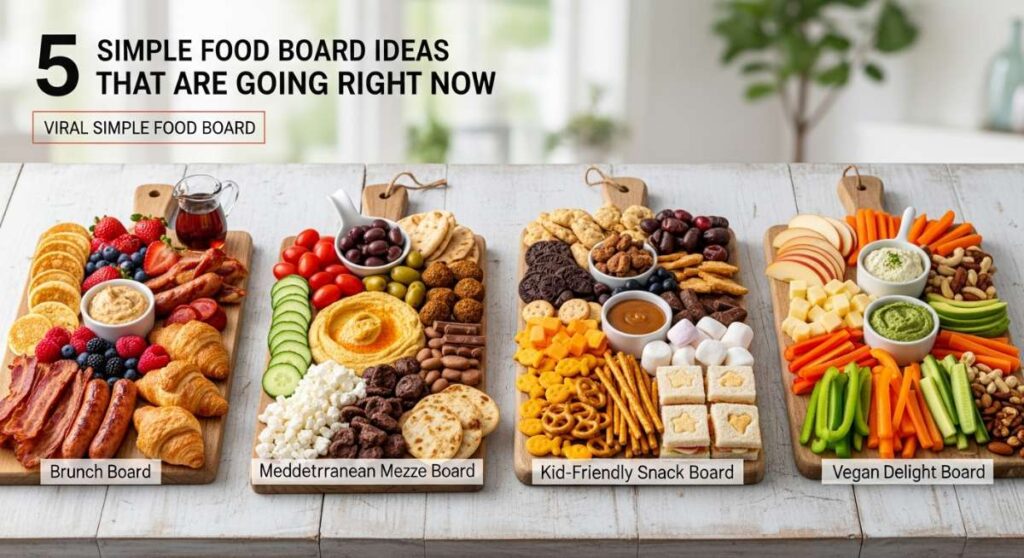
There is something truly magical about the way food brings us together, especially during these fleeting moments of transition like graduation season or the first blush of summer. I remember sitting on my sun-drenched porch last year, realizing that the best memories aren’t just made by the conversation, but by the shared experience of reaching for a beautiful platter of treats. It’s about that collective ‘oh wow’ when a board hits the table, sparking joy before the first bite is even taken.
Lately, my social feeds have been exploding with a new wave of food boards that move beyond just cheese and crackers. We are seeing themed spreads that celebrate specific ingredients and milestones with a touch of whimsy and a whole lot of heart. Whether you are hosting a graduate who is ready to take on the world or simply soaking up the tart sweetness of rhubarb season, these viral board components are designed to make your hosting duties feel like a creative escape rather than a chore.
How to design graduation cakes?
Why we love this
A graduation cake is more than just a dessert; it is a centerpiece of achievement that captures years of hard work in a single, sweet display. We love this because it allows for such personal storytelling, using sleek fondant, edible gold leaf, and school colors to create a sophisticated focal point. Imagine the soft, velvety crumb of a vanilla bean sponge paired with a silky Swiss meringue buttercream that melts on the tongue, creating a luxurious mouthfeel that feels as celebratory as the occasion itself.
Ingredients
- Three layers of baked sponge cake (chilled)
- Swiss meringue buttercream
- Gel food coloring (school colors)
- Edible gold leaf or luster dust
- Fondant for graduation cap topper
- Dowels for structural support
How to make it
- Begin by leveling your chilled cake layers with a serrated knife to ensure a perfectly flat surface, which prevents leaning.
- Apply a thin ‘crumb coat’ of buttercream over the entire cake to lock in moisture and stray crumbs, then refrigerate for 30 minutes until firm to the touch.
- Mix your gel coloring into the remaining buttercream, achieving a vibrant hue that matches the graduate’s school spirit.
- Apply a thick final layer of frosting using an offset spatula, then use a bench scraper held at a 45-degree angle against the turntable to create a professional, smooth finish.
- Roll out black fondant to 1/4 inch thickness to cut a square for the mortarboard and a small circle for the base, letting them dry slightly before assembling on top of the cake.
- Finish by delicately applying gold leaf with a dry brush to the edges for a touch of viral-worthy elegance.
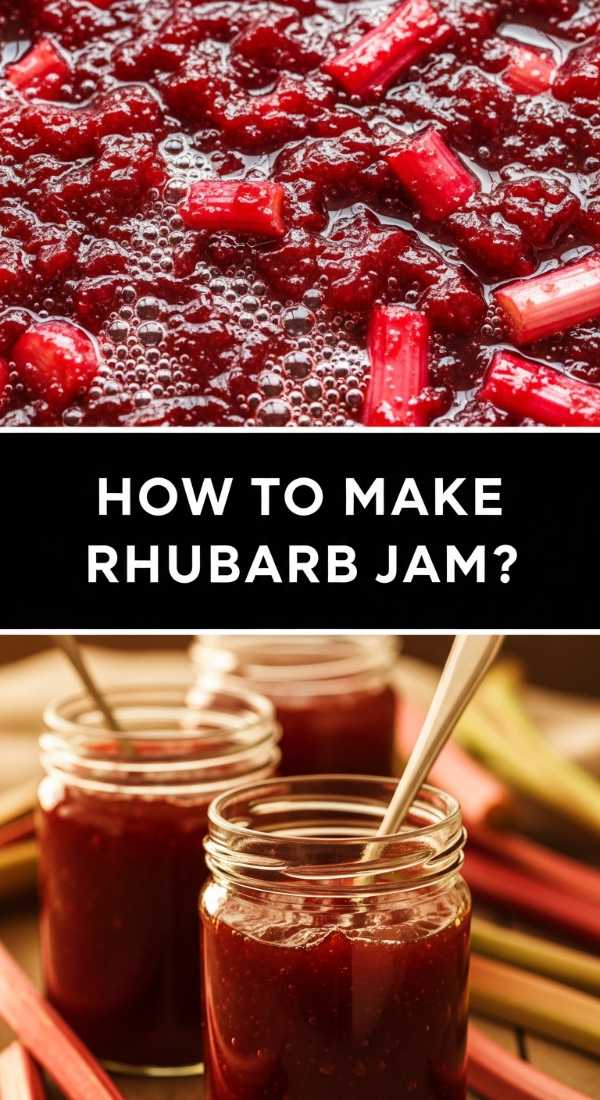
How to make rhubarb jam?
Why we love this
Rhubarb jam is the ultimate ‘garden in a jar,’ offering a bright, electric pink hue that looks stunning on any breakfast board. The texture is a delightful balance of soft, jammy fruit and a slight floral resistance, filling the kitchen with an aroma that is both tartly nostalgic and refreshingly sharp. We love how the zingy acidity of the rhubarb cuts through the sweetness of the sugar, creating a spread that wakes up the palate and pairs perfectly with buttery brioche or sharp cheddar cheese.
Ingredients
- 4 cups fresh rhubarb, chopped into 1/2 inch pieces
- 2 cups granulated sugar
- 1 tablespoon lemon juice
- 1 teaspoon lemon zest
- Optional: 1 teaspoon vanilla bean paste
How to make it
- Combine the chopped rhubarb and sugar in a heavy-bottomed stainless steel pot, stirring well to coat the fruit thoroughly.
- Let the mixture sit at room temperature for about 2 hours; this maceration process draws out the natural juices and creates a syrup without adding water.
- Place the pot over medium-high heat and bring the mixture to a rolling boil, stirring constantly with a wooden spoon to prevent scorching on the bottom.
- Add the lemon juice and zest, then reduce the heat to medium; continue simmering for 15-20 minutes as the mixture thickens and the rhubarb breaks down into a pulpy consistency.
- Perform the ‘wrinkle test’ by placing a small spoonful of jam on a chilled plate; if it wrinkles when pushed with a finger, it has reached the setting point.
- Stir in vanilla bean paste if using, then ladle the hot jam into sterilized jars, leaving a quarter-inch of headspace before sealing.
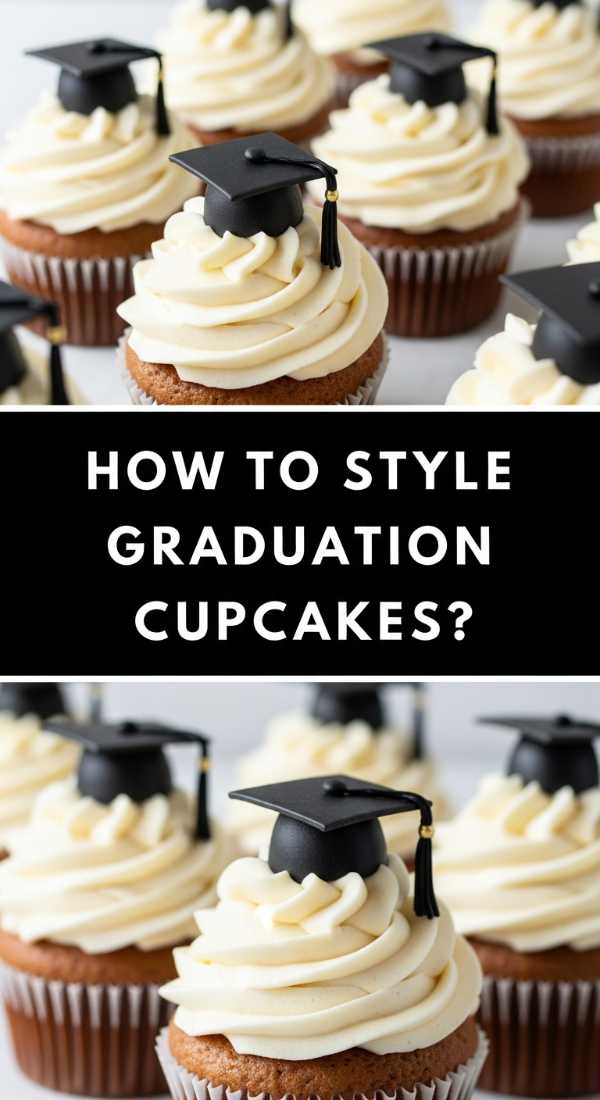
How to style graduation cupcakes?
Why we love this
Cupcakes are the perfect finger food for a board because they offer individual portions with maximum decorative impact. Styling them for a graduation means playing with heights and textures, using piped swirls that mimic the movement of a tassel. There is something so satisfying about the contrast between a moist, dark chocolate base and a cloud-like swirl of frosting that holds its shape perfectly, topped with a miniature chocolate ‘cap’ that adds a playful, crunchy element to every bite.
Ingredients
- 24 pre-baked cupcakes
- Stiff buttercream frosting
- Chocolate squares (Ghirardelli works well)
- Miniature peanut butter cups
- Sour belt candy or licorice for tassels
- M&Ms for the cap button
How to make it
- Fit a large piping bag with a 1M open star tip and fill it with frosting, ensuring there are no air pockets by squeezing a small amount out first.
- Pipe a tall, three-tier swirl onto each cupcake by starting at the outer edge and moving inward in a circular motion, maintaining steady pressure.
- To create the graduation caps, place a mini peanut butter cup upside down on the frosting swirl to act as the base.
- Apply a small dot of melted chocolate to the top of the peanut butter cup and press a chocolate square firmly onto it to create the mortarboard.
- Cut a thin strip of sour belt candy or licorice, fray the end slightly with scissors to look like a tassel, and attach it to the center of the square with another dot of chocolate.
- Place an M&M on top of the tassel’s starting point to hide the connection and complete the professional look.
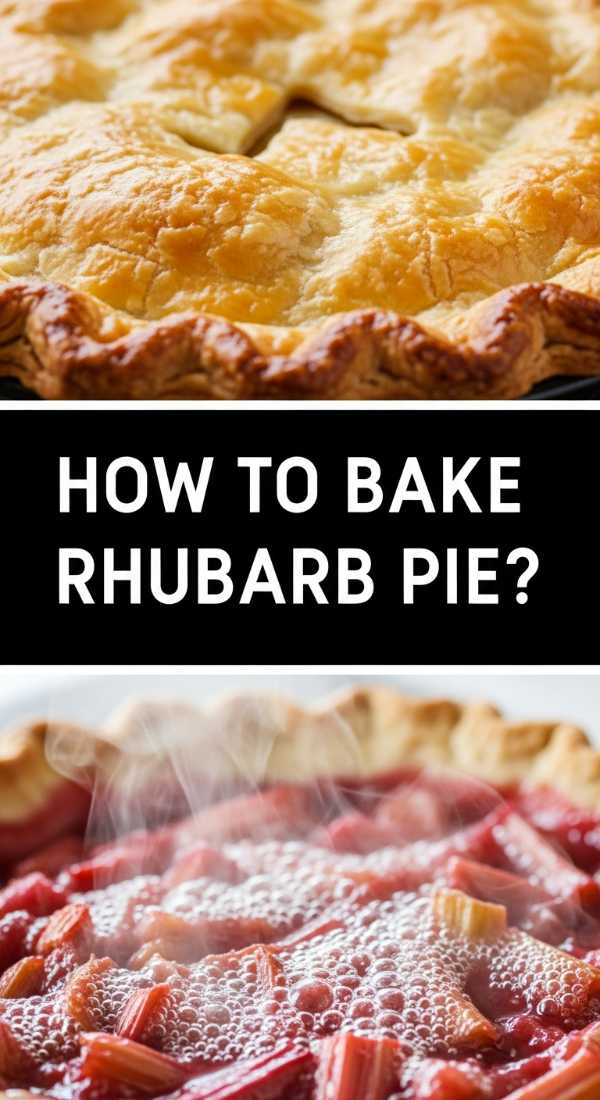
How to bake rhubarb pie?
Why we love this
A rhubarb pie is the crown jewel of early summer baking, boasting a flaky, golden-brown crust that shatters beautifully when sliced. The filling is a ruby-red masterpiece of syrupy tartness that pools slightly on the plate, releasing a warm, comforting scent of butter and baked fruit. We love the rustic elegance of a lattice crust, which allows the vibrant pink filling to peek through, promising a flavor profile that is unapologetically bold and perfectly balanced between sweet and sour.
Ingredients
- Double pie crust (chilled)
- 5 cups rhubarb, cut into 1/2 inch slices
- 1 1/4 cups sugar
- 1/4 cup cornstarch
- 1/2 teaspoon cinnamon
- 1 tablespoon cold butter, cubed
- 1 egg (for egg wash)
How to make it
- Roll out the bottom crust on a lightly floured surface until it is about 12 inches in diameter, then gently drape it into a 9-inch pie plate without stretching the dough.
- In a large bowl, toss the rhubarb with sugar, cornstarch, and cinnamon until every piece is evenly coated; the cornstarch is vital for thickening the juices during the bake.
- Pour the filling into the prepared bottom crust and dot the top with the small cubes of cold butter to add richness to the sauce.
- Roll out the second crust and cut into 1-inch strips to create a lattice top, weaving them over and under to create a sturdy, breathable lid.
- Crimp the edges of the dough together to seal, then brush the entire top with a whisked egg and a sprinkle of coarse sugar for a professional shimmer.
- Bake at 400°F (200°C) for 20 minutes, then reduce heat to 350°F (175°C) and bake for another 35-40 minutes until the crust is deep golden and the filling bubbles thick and slow.
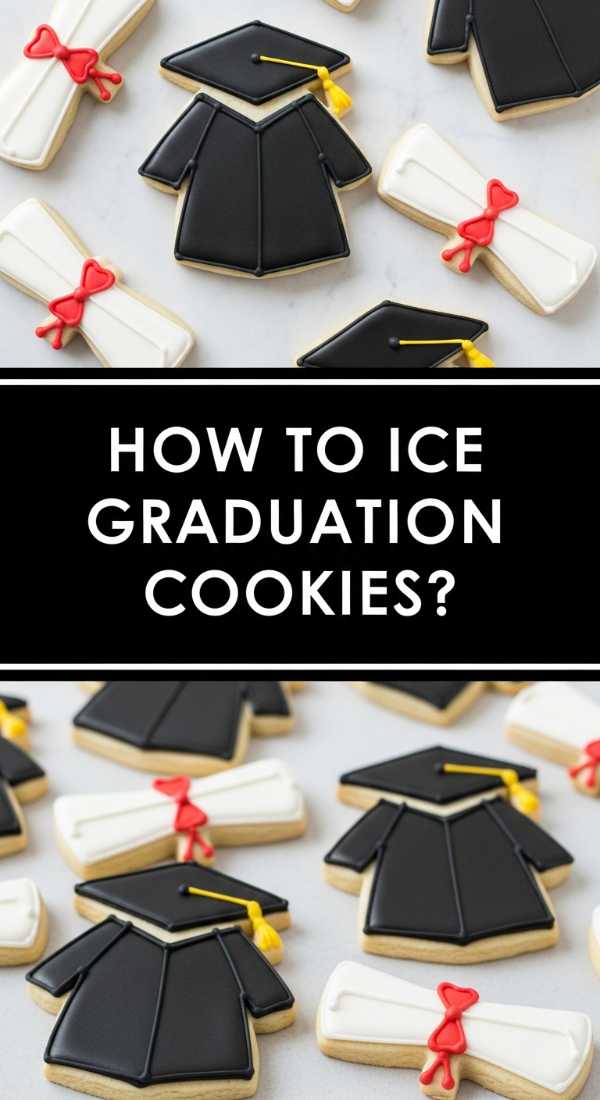
How to ice graduation cookies?
Why we love this
Icing graduation cookies is a meditative process that results in edible art that guests almost feel guilty eating—until they taste the soft, buttery shortbread underneath. We love the crisp, clean lines of royal icing and the way a ‘flood’ technique creates a smooth, glass-like finish that is perfect for writing names or graduation years. The slight snap of the dried icing gives way to a tender cookie, making them a tactile and visual delight that adds a personalized touch to any party board.
Ingredients
- Baked sugar cookies in graduation shapes (caps, diplomas, gowns)
- Royal icing (stiff and flooding consistencies)
- Fine-tip piping bags
- Scribe tool or toothpick
- Food coloring gels
How to make it
- Divide your royal icing into two batches: one ‘piping’ consistency (like toothpaste) and one ‘flood’ consistency (like honey).
- Using the piping consistency and a small round tip, outline the border of your cookie; this acts as a dam to hold the thinner icing in place.
- Wait about 5 minutes for the border to set, then use the flood consistency to fill the center of the cookie, starting from the edges and working inward.
- Use a scribe tool or toothpick to pop any tiny air bubbles and to gently push the icing into the corners for a seamless finish.
- Allow the base layer to dry completely for at least 6-8 hours or overnight in a cool, dry place until the surface is hard.
- Once dry, use the stiff piping icing to add details like the year, graduation tassels, or school emblems on top of the flooded base for a 3D effect.
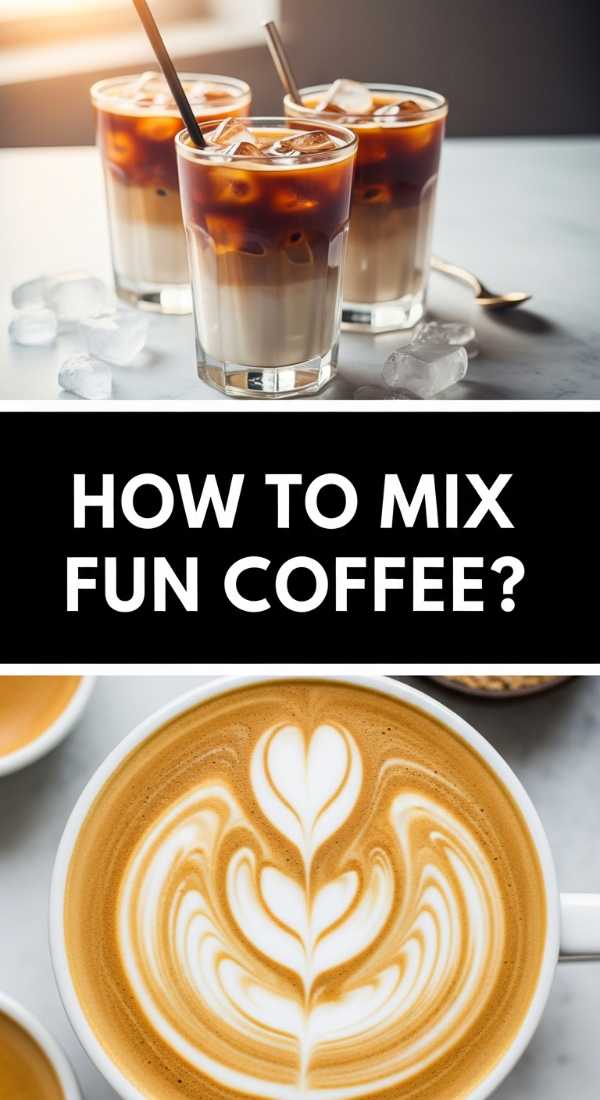
How to mix fun coffee?
Why we love this
Fun coffee isn’t just a caffeine fix; it’s a sensory ritual that turns a morning routine into a viral café experience at home. We love the visual layers of a well-mixed coffee drink—the dark intensity of espresso sinking into creamy, frothed milk, topped with a cloud of foam or a drizzle of caramel. The aroma of freshly ground beans mixed with sweet syrups creates an inviting atmosphere, while the cold, refreshing clink of ice cubes makes it the perfect accompaniment to a brunch board.
Ingredients
- 2 shots of hot espresso or 1/2 cup cold brew concentrate
- 1 cup milk of choice (oat milk is great for foam)
- 2 tablespoons flavored syrup (lavender, vanilla, or salted caramel)
- Ice cubes
- Optional: Whipped cream or cocoa powder for dusting
How to make it
- Start by drizzling your flavored syrup down the inside walls of a tall glass, rotating the glass to create artistic streaks that will look beautiful once the liquid is added.
- Fill the glass to the brim with large, clear ice cubes; the ice acts as a structural element to help maintain the distinct layers of the drink.
- Pour your cold milk over the ice until the glass is three-quarters full, leaving space for the coffee to settle on top.
- Slowly pour your espresso or cold brew concentrate over the back of a spoon into the glass; the spoon breaks the fall of the liquid, allowing the coffee to sit elegantly on top of the milk.
- For a ‘fun’ finish, froth a small amount of milk separately using a handheld whisk until it reaches a thick, velvety texture, and dollop it on top.
- Garnish with a dusting of cocoa powder or a sprig of mint to elevate the presentation to professional barista standards.
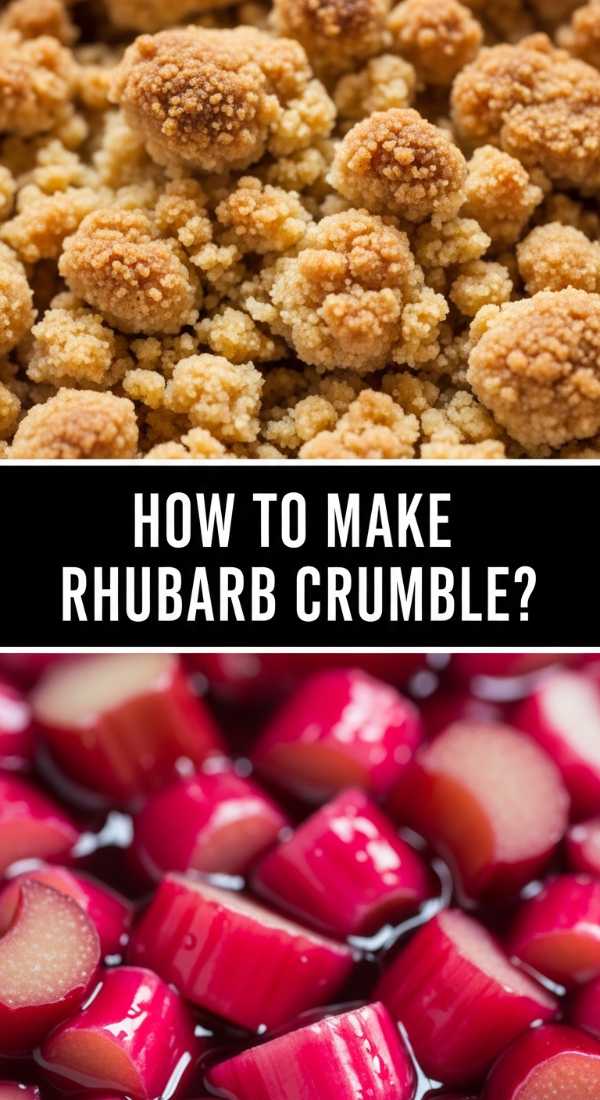
How to make rhubarb crumble?
Why we love this
Rhubarb crumble is the definition of ‘comfort in a bowl,’ offering a spectacular contrast between the tart, molten fruit and the crunchy, buttery oat topping. We love the way the rhubarb juices bubble up around the edges, caramelizing into a chewy, sweet crust that is highly addictive. The scent of toasted oats and cinnamon wafting through the house is enough to bring everyone to the kitchen, and when served warm with a scoop of cold vanilla bean ice cream, it creates a temperature-play that is pure bliss.
Ingredients
- 6 cups rhubarb, sliced into 1-inch chunks
- 3/4 cup sugar
- 2 tablespoons flour (for the filling)
- 1 cup rolled oats
- 1 cup brown sugar
- 1 cup all-purpose flour (for the topping)
- 1/2 cup cold butter, cubed
- 1 teaspoon cinnamon
How to make it
- Preheat your oven to 375°F (190°C) and lightly grease a 9×9 inch baking dish with butter to ensure the fruit doesn’t stick to the sides.
- Toss the rhubarb with the granulated sugar and the 2 tablespoons of flour in the baking dish, spreading it out into an even layer that will cook uniformly.
- In a separate bowl, combine the oats, brown sugar, 1 cup of flour, and cinnamon; stir together so the spices are well-distributed before adding the fat.
- Add the cold, cubed butter to the oat mixture and use a pastry cutter or your fingertips to rub the butter into the dry ingredients until it resembles coarse, pea-sized crumbs.
- Sprinkle the crumble topping generously over the rhubarb, making sure not to pack it down; a loose topping allows for more surface area to crisp up in the heat.
- Bake for 35-45 minutes until the topping is a deep golden brown and you see the vibrant pink rhubarb juices bubbling vigorously through the oats.
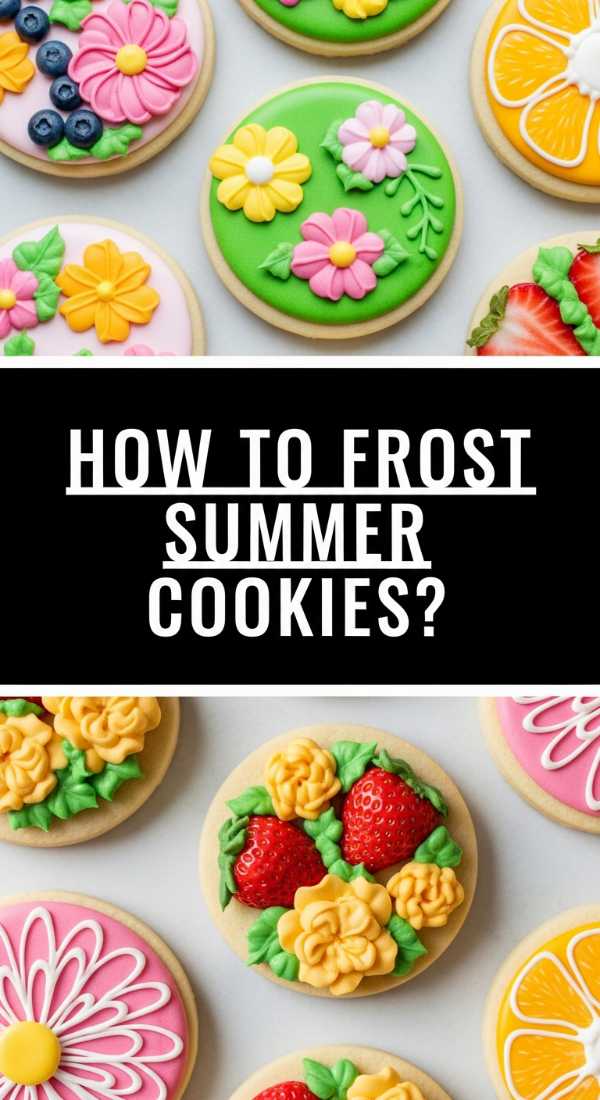
How to frost summer cookies?

Why we love this
Summer cookies should look as bright and sunny as a day at the beach, and we love frosting them with zesty, citrus-infused glazes or light-as-air whipped buttercreams. The texture of a summer cookie should be light, perhaps with a hint of lemon or lime, topped with a frosting that feels cool and refreshing rather than heavy. Vibrant colors like coral, turquoise, and sun-yellow bring a viral aesthetic to the board, making the cookies look like tiny edible bursts of sunshine that are perfect for outdoor gatherings.
Ingredients
- Sugar cookies (lemon or almond flavored)
- Buttercream or royal icing
- Gel food colors (bright summer palette)
- Fresh citrus zest
- Decorative sprinkles or sanding sugar
How to make it
- Ensure your cookies are completely cool to the touch before you begin; even a hint of warmth will cause your frosting to melt and slide off the edges.
- Whip your buttercream on high speed for at least 5 minutes until it becomes incredibly light and pale, which gives it a ‘whipped’ summer feel.
- Fold in fresh lemon or lime zest at the very end to provide tiny pops of flavor and a beautiful speckled appearance to the frosting.
- Use a small palette knife to apply a ‘swirl and swoop’ motion on the cookie, creating texture that catches the light and gives the cookie a handmade, artisanal look.
- If using royal icing, use a wet-on-wet technique by adding dots of a different color to the wet base and dragging a toothpick through them to create summer ‘beach ball’ or ‘floral’ patterns.
- Finish with a light sprinkle of sanding sugar to mimic the sparkle of sun on water, then let them set in a cool area before arranging on your board.
How to craft graduation treats?
Why we love this
Crafting graduation treats is about turning simple snacks into symbols of success, and we love the sheer creativity involved in these bite-sized wonders. From ‘diploma’ Swiss rolls tied with ribbons to ‘smartie’ jars, these treats add a narrative layer to your food board that honors the graduate’s journey. The mix of salty and sweet elements—like white chocolate-covered pretzels decorated in school colors—provides a snackable variety that keeps guests grazing and celebrating all afternoon long.
Ingredients
- Pretzel rods
- White chocolate wafers
- Colored candy melts
- Fruit roll-ups or ribbons
- Swiss cake rolls
- Mini chocolate bars
How to make it
- To make ‘Diplomas,’ take a Swiss cake roll or a tightly rolled white cookie and tie a thin piece of red ribbon or a strip of fruit roll-up around the center in a bow.
- For ‘Graduation Wands,’ melt white chocolate in a tall glass in 30-second intervals in the microwave, stirring until perfectly smooth and glossy.
- Dip pretzel rods halfway into the melted chocolate, shaking off the excess with a gentle tap against the glass, and place on parchment paper.
- Immediately drizzle with melted candy melts in school colors while the white chocolate is still wet to create a marbled, viral-style effect.
- Create ‘Books’ by taking mini chocolate bars and using a tiny bit of icing to attach a small square of fondant or a cracker to the top, labeling them with ‘Class of 2024’.
- Arrange these treats on the board in clusters, using graduation-themed confetti or cap decorations to fill the gaps for a cohesive, celebratory look.
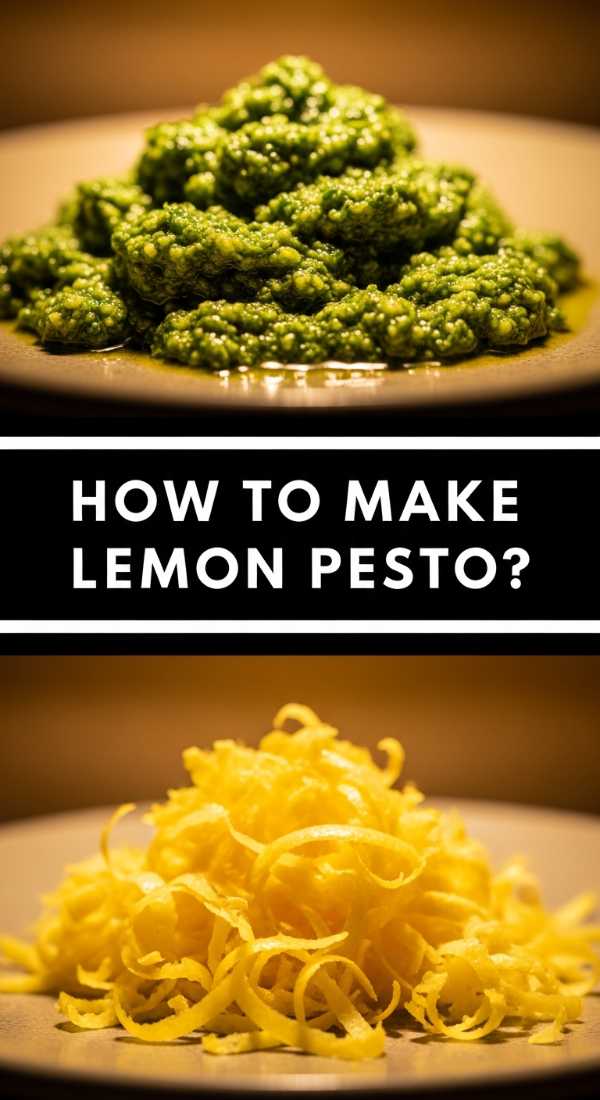
How to make lemon pesto?
[IMAGE_10]
Why we love this
Lemon pesto is a vibrant, modern twist on the classic Genovese sauce, offering a zesty punch that is absolutely divine when drizzled over a summer grazing board. We love the way the bright citrus essential oils from the zest interact with the peppery bite of fresh basil and the creamy richness of pine nuts. It’s an aromatic explosion that feels light and sophisticated, turning a simple plate of roasted vegetables or toasted crostini into a gourmet experience that tastes exactly like a Mediterranean summer.
Ingredients
- 2 cups fresh basil leaves (packed)
- 1/2 cup freshly grated Parmesan cheese
- 1/3 cup pine nuts (toasted)
- 2 cloves garlic
- Zest of 2 large lemons
- 3 tablespoons fresh lemon juice
- 1/2 cup high-quality extra virgin olive oil
- Pinch of sea salt and black pepper
How to make it
- Begin by toasting your pine nuts in a dry pan over low heat for 3-5 minutes, shaking the pan constantly until they are golden and fragrant; this step is crucial for a deep, nutty flavor.
- Place the basil, toasted pine nuts, garlic, and lemon zest into a food processor; pulse several times until the ingredients are coarsely chopped but not yet a paste.
- Add the Parmesan cheese and lemon juice, then pulse again to incorporate, ensuring you don’t over-process the basil, which can make it bitter.
- With the processor running on its lowest setting, slowly drizzle in the extra virgin olive oil in a thin, steady stream to emulsify the sauce into a smooth, vibrant green consistency.
- Taste the pesto and season with sea salt and freshly cracked black pepper, adjusting the lemon juice if you prefer an even sharper citrus profile.
- Transfer to a bowl and top with a thin layer of olive oil to prevent oxidation, then serve as a dip on your board alongside crusty bread and fresh mozzarella.
Conclusion
Creating a viral-worthy food board is truly about embracing the season and the milestones that make life sweet. Whether you’re crafting graduation caps out of chocolate or stirring a pot of bright pink rhubarb jam, the effort you put into these details transforms a simple meal into a celebration. I hope these ideas inspire you to clear off your largest platter, gather your favorite ingredients, and invite your loved ones over to share in the joy of a beautifully curated spread.
Frequently Asked Questions
Below are some of the most common questions about creating these viral food board elements to help you host like a pro.