

There is something truly magical about the way food brings people together, especially when it’s presented with a bit of artistic flair. Lately, my kitchen has become a laboratory of color and texture as I’ve been experimenting with the ‘Viral Simple Food Board’ concept. It’s more than just a trend; it’s a way to turn an ordinary afternoon into a celebration of flavors, where every dip, snack, and treat tells a story of craftsmanship and care.
I remember the first time I set out a board for my family—it wasn’t just the food they loved, but the way it sparked conversation and slowed down the pace of our busy lives. Whether you are celebrating a massive milestone like a graduation or simply trying to make a Tuesday lunch more exciting for a toddler, these ideas are designed to be approachable yet stunning. This post is my love letter to those small, beautiful moments spent around the table.
How to decorate graduation cakes?
Why we love this
A graduation cake is more than just dessert; it is a centerpiece of achievement and a sweet transition into a new chapter of life. We love the way smooth, silken buttercream serves as a blank canvas for sophisticated accents like edible gold leaf and velvet-textured fondant tassels. The aroma of rich vanilla bean and whipped sugar fills the air, creating an atmosphere of pure joy as you slice through layers of moist, tender sponge that melts effortlessly on the tongue, leaving a trail of celebratory sweetness.
Ingredients
- Triple-layered baked sponge cake
- Swiss meringue buttercream
- Black and gold food coloring gels
- Edible gold leaf flakes
- Fondant for modeling tassels and caps
- Offset spatula and piping bags
How to make it
- Begin by applying a ‘crumb coat’—a thin layer of frosting—to your chilled cake layers using an offset spatula to trap any loose crumbs, then refrigerate for 30 minutes until firm.
- Prepare your final coat of buttercream, ensuring it is at a perfectly spreadable room temperature; apply it generously and use a bench scraper held at a 45-degree angle against the rotating cake stand to achieve a glass-smooth finish.
- Dye a small portion of fondant to match the graduate’s school colors, then roll it out thinly to cut a square ‘mortarboard’ top and thin strips for a tassel, using a dab of water to adhere the pieces together.
- Carefully apply edible gold leaf using a dry, clean brush, pressing it lightly into the frosting in a scattered, organic pattern to create a high-end, shimmer effect that catches the light.
- Pipe delicate borders or ‘beads’ around the base using a small round tip, maintaining steady pressure to ensure each dot is uniform in size and placement.
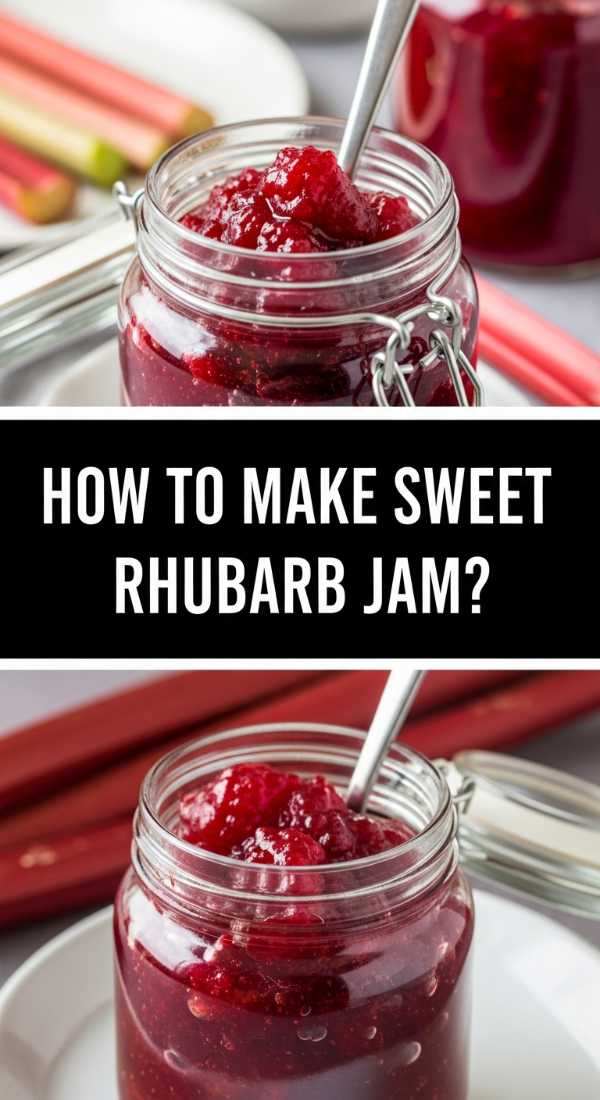
How to make sweet rhubarb jam?

Why we love this
Rhubarb jam is the essence of early summer captured in a jar, offering a striking ruby-red hue that looks like liquid jewels under the morning sun. The flavor is a sophisticated dance between the aggressive tartness of the stalks and the mellow, rounded sweetness of pure cane sugar. As it simmers, the house fills with a nostalgic, fruity aroma that is both bright and comforting, resulting in a thick, spreadable preserve that provides a satisfying, slightly fibrous texture against a piece of crusty, buttered sourdough.
Ingredients
- 4 cups fresh rhubarb, chopped into 1/2 inch pieces
- 2 cups granulated sugar
- 1 tablespoon fresh lemon juice
- 1 teaspoon vanilla bean paste
- A pinch of sea salt
How to make it
- In a large, heavy-bottomed pot, toss the chopped rhubarb with the sugar and let it macerate for at least two hours until the fruit has released its natural juices and created a syrupy base.
- Place the pot over medium heat and stir constantly until the sugar has completely dissolved and the mixture begins to reach a gentle, bubbling simmer.
- Increase the heat slightly to maintain a rolling boil, skimming off any foam that rises to the surface with a metal spoon to ensure a clear, bright final jam.
- Test for the ‘setting point’ by placing a small spoonful on a chilled plate; if the jam wrinkles when pushed with your finger after 30 seconds, it has reached the proper consistency of roughly 220°F (104°C).
- Stir in the lemon juice, vanilla paste, and salt at the very end to preserve their bright flavor profiles before ladling the hot jam into sterilized glass jars.
How to style graduation cupcakes?
Why we love this
Cupcakes offer a delightful, individualized way to celebrate, and styling them for a graduation adds a touch of whimsy to the dessert board. We love the contrast of a perfectly domed, dark chocolate cupcake against a towering swirl of ivory frosting that looks like a soft, fluffy cloud. The tactile satisfaction of peeling back a greaseproof liner to reveal a moist, decadent crumb, topped with a miniature chocolate ‘cap,’ makes these treats as fun to look at as they are to devour in two bites of pure bliss.
Ingredients
- Freshly baked cupcakes in liners
- Stiff-peak buttercream frosting
- Square chocolate pieces (Ghirardelli or similar)
- Sour belt candies or fruit leather (for tassels)
- Small chocolate truffles or Reese’s cups (for the cap base)
How to make it
- Fit a piping bag with a large open star tip and pipe a high, concentric swirl of frosting onto each cupcake, starting from the outer edge and moving inward and upward for height.
- Place a small chocolate truffle upside down in the center of the frosting swirl to act as the base of the graduation cap, pressing down gently so it stays secure.
- Apply a tiny dot of melted chocolate to the top of the truffle and press a flat chocolate square firmly onto it, ensuring it sits level and mimics a mortarboard.
- Cut very thin strips of your sour belt candy and use a tiny dab of frosting to attach it to the center of the chocolate square, letting the ‘tassel’ hang over the edge.
- Finish by dusting the entire board of cupcakes with a fine mist of edible glitter for a magical, celebratory sparkle that looks incredible in photos.
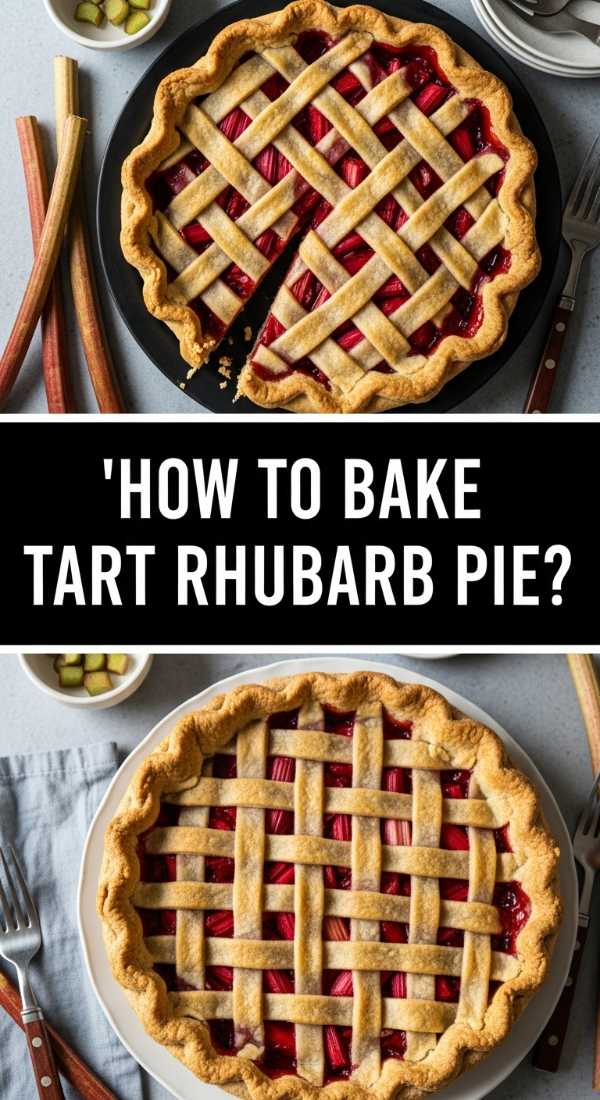
How to bake tart rhubarb pie?

Why we love this
There is nothing quite like the rustic elegance of a rhubarb pie cooling on a wire rack, its golden-brown lattice crust offering a preview of the bubbling, magenta filling within. We love the way the buttery, flaky pastry shatters upon the first bite, immediately followed by the bold, zesty punch of the rhubarb that wakes up the palate. The aroma is a heady mix of toasted flour and cooked fruit, creating a sensory experience that feels like a warm hug from a grandmother’s kitchen, yet remains vibrantly modern in its sharp flavor profile.
Ingredients
- Double pie crust (homemade or store-bought)
- 5 cups sliced rhubarb
- 1 1/4 cups sugar
- 1/4 cup cornstarch
- 1/2 teaspoon ground ginger
- Egg wash and coarse sanding sugar
How to make it
- Roll out your bottom crust and drape it over a 9-inch pie plate, trimming the edges and chilling it while you prepare the fruit to prevent the butter from melting.
- In a large bowl, whisk the sugar, cornstarch, and ginger together before tossing with the rhubarb slices to ensure every piece is evenly coated for a consistent thicken during baking.
- Pour the fruit mixture into the prepared shell and dot with small bits of butter to add richness and a glossy sheen to the internal juices.
- Create a lattice top by cutting the second crust into 1-inch strips and weaving them over the fruit, سپس crimping the edges tightly to seal the juices inside.
- Brush the lattice with an egg wash (one egg beaten with a splash of milk) and sprinkle generously with sanding sugar before baking at 400°F (200°C) for 20 minutes, then reducing to 375°F (190°C) for another 35-40 minutes until the filling is thick and bubbling.
How to create crunchy candy asmr?
Why we love this
The trend of crunchy candy ASMR is all about the auditory and visual satisfaction of shattering thin, glass-like sugar shells. We love the mesmerizing clarity of the candy coating that makes fruit look like it has been preserved in crystal, and the incredibly loud, sharp ‘snap’ that echoes when you take a bite. It is a multisensory treat where the icy coldness of the frozen fruit meets the brittle, warm sweetness of the sugar, creating a rhythmic crunching experience that is addictive to watch and even more fun to recreate at home.
Ingredients
- 2 cups granulated sugar
- 1 cup water
- 1/2 cup light corn syrup
- Fresh strawberries or grapes (dried thoroughly)
- Ice water bath
How to make it
- Combine the sugar, water, and corn syrup in a small saucepan over medium-high heat, stirring only until the sugar dissolves to avoid crystallization on the sides of the pan.
- Clip a candy thermometer to the side of the pot and boil the mixture without stirring until it reaches exactly 300°F (149°C), which is the ‘hard crack’ stage.
- While the sugar boils, ensure your fruit is completely dry and skewered on bamboo sticks; any moisture will cause the candy coating to slide off or become sticky.
- Once the temperature is reached, remove the pot from heat and quickly dip each fruit skewer into the syrup, twirling it to create a thin, even coat before immediately plunging it into an ice water bath for 5 seconds.
- Place the hardened candy on parchment paper and let it set for a minute; it should sound like glass tapping against a table when finished, ready for that perfect ASMR crunch.
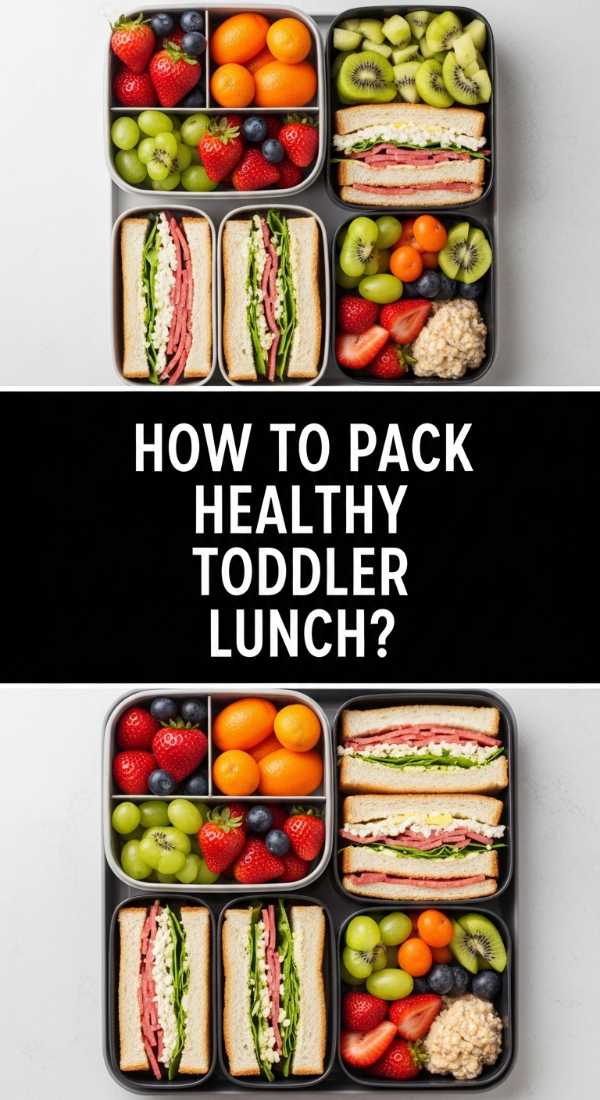
How to pack healthy toddler lunch?
Why we love this
Packing a healthy toddler lunch is about creating a rainbow on a plate that excites a child’s natural curiosity while nourishing their growing bodies. We love the organization of a bento-style box where crisp cucumber slices sit next to bright orange cheddar cubes and soft, pillowy whole-grain bread. The variety of textures—from the snap of a sugar pea to the creaminess of a hummus dip—keeps mealtime engaging, ensuring that little fingers are busy exploring nutrient-dense foods that provide steady energy for an afternoon of play.
Ingredients
- Whole grain bread or wraps
- Lean protein (turkey, tofu, or hard-boiled eggs)
- Colorful vegetables (bell peppers, carrots, cucumbers)
- Seasonal fruit (berries, melon, or apple slices)
- A healthy dip (hummus or Greek yogurt)
How to make it
- Use fun-shaped sandwich cutters to turn boring bread and protein into stars, hearts, or dinosaurs, which significantly increases the ‘cool factor’ for picky eaters.
- Slice vegetables into thin ‘matchsticks’ or use a small crinkle cutter to create ridged textures that are easy for small hands to grip and fun for them to chew.
- Place the dip in a leak-proof central container and surround it with the ‘dippers’ to prevent the rest of the lunch from getting soggy or messy during transport.
- Ensure fruits like grapes or cherry tomatoes are sliced lengthwise into quarters to eliminate choking hazards while maintaining their vibrant, appealing colors.
- Add a ‘surprise’ element like a few yogurt-covered raisins or a single whole-grain cracker with a smiley face drawn in edible ink to create a positive emotional connection to healthy eating.
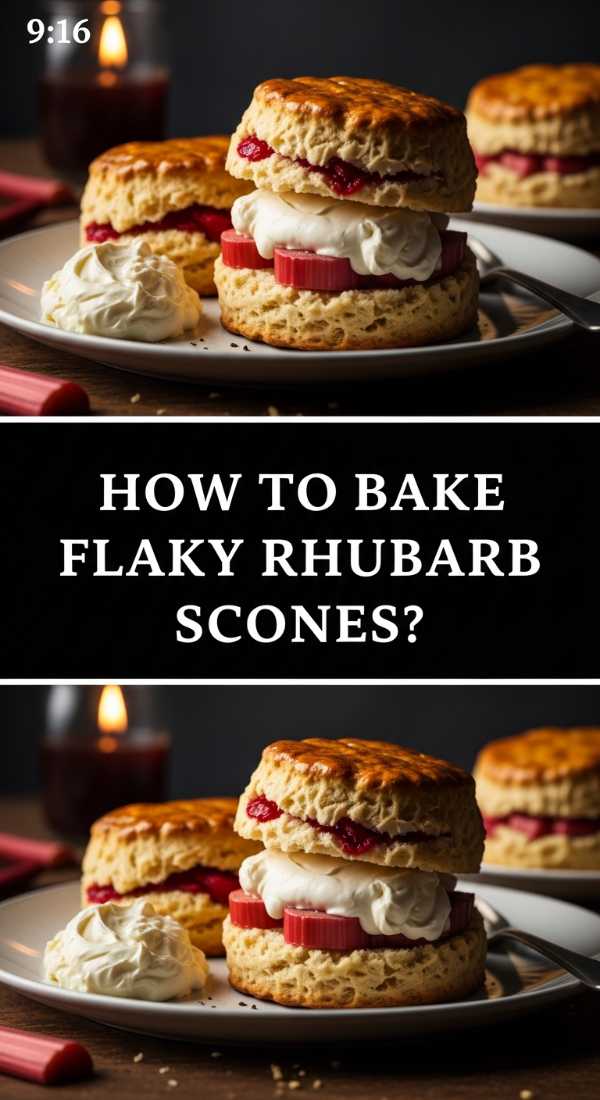
How to bake flaky rhubarb scones?

Why we love this
Rhubarb scones are the ultimate morning indulgence, boasting a tender, buttery crumb that practically melts in your mouth while the tart bits of fruit provide a refreshing zing. We love the rustic, craggy edges that turn deep golden and crunchy in the oven, contrasted by the soft, steaming center that smells of sweet cream and citrus zest. Topped with a drizzle of vanilla glaze, these scones offer a sophisticated balance of flavors that makes a simple cup of Earl Grey feel like a royal high tea experience in your own sunlit breakfast nook.
Ingredients
- 2 cups all-purpose flour
- 1/3 cup sugar
- 1 tablespoon baking powder
- 1/2 cup cold salted butter, grated
- 1 cup fresh rhubarb, finely diced
- 2/3 cup heavy cream (plus extra for brushing)
How to make it
- Whisk the dry ingredients together in a large bowl, then use your fingertips or a pastry cutter to work the grated, ice-cold butter into the flour until the mixture resembles coarse meal with pea-sized lumps.
- Gently fold in the finely diced rhubarb, ensuring the pieces are coated in flour so they don’t clump together or sink to the bottom of the scones.
- Pour in the heavy cream and stir with a fork just until the dough begins to come together; do not overmix, as this develops gluten and results in a tough, bread-like scone.
- Turn the shaggy dough onto a floured surface, pat it into a 1-inch thick circle, and cut into 8 wedges using a sharp knife or bench scraper to ensure clean edges that allow for maximum rise.
- Brush the tops with extra cream, sprinkle with coarse sugar, and bake at 400°F (200°C) for 18-22 minutes until the tops are golden and the rhubarb is tender and jammy.
How to design graduation sugar cookies?
Why we love this
Designing graduation sugar cookies is an exercise in edible art that allows you to personalize a celebration down to the very last crumb. We love the satisfying smoothness of royal icing as it floods a cookie, creating a porcelain-like finish that is perfect for intricate detailing. The snap of the firm icing followed by the buttery, soft-baked cookie underneath is a textural delight, and the ability to customize colors and add names makes these cookies a cherished keepsake for graduates and guests alike, often becoming the most photographed item on the dessert board.
Ingredients
- Classic vanilla sugar cookies (chilled and flat)
- Royal icing (stiff and flooding consistencies)
- Gel food colors
- Fine-tipped piping bags
- Scribe tool or toothpick
How to make it
- Outline your cookies with a ‘stiff’ consistency icing to create a dam, then immediately fill the center with ‘flooding’ consistency icing to create a seamless, flat surface.
- Use a scribe tool to pop any tiny air bubbles and gently nudge the icing into the corners for a perfectly professional, edge-to-edge look.
- Let the base layer dry completely (usually 6-12 hours) before adding details like a ‘Class of 2024’ script or a graduation cap silhouette with stiff icing to create a 3D effect.
- For a ‘marbled’ look, drop small dots of a secondary color into the wet flood icing and drag a toothpick through them in a swirling motion before the icing sets.
- Add final flourishes like ‘tassels’ made of tiny piped lines or metallic edible paint accents once the top layer of detail is fully dry to the touch.
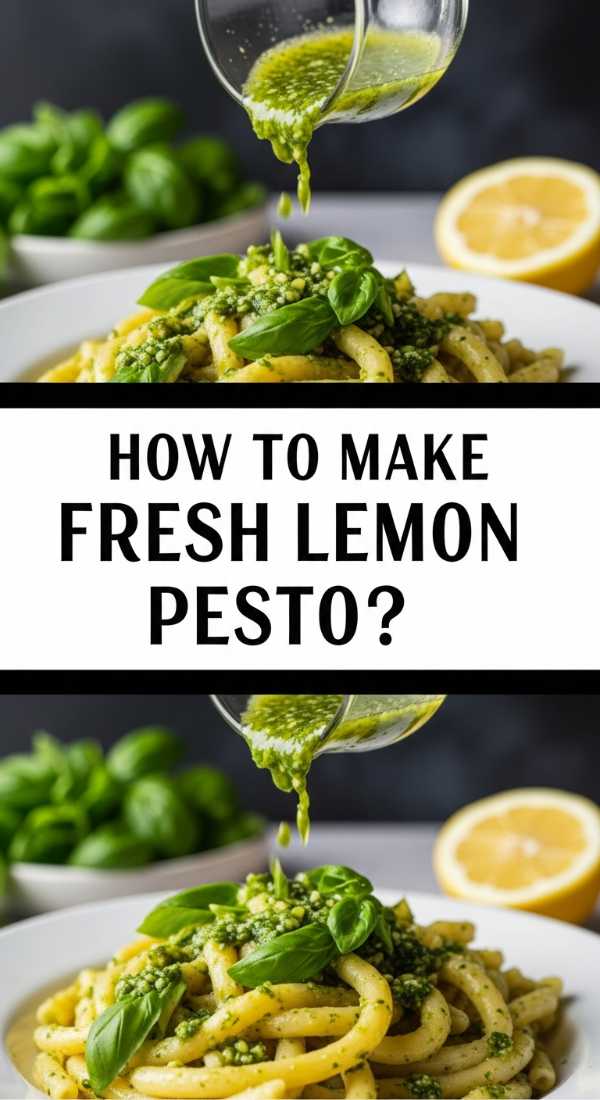
How to make fresh lemon pesto?
Why we love this
Lemon pesto is a vibrant, sunshine-filled twist on the classic basil version, offering a zesty acidity that cuts through the richness of pasta or roasted vegetables. We love the bright, herbaceous aroma of freshly slapped basil leaves combined with the sharp, clean scent of lemon zest that fills the kitchen as you blend. It has a beautiful, speckled green appearance and a complex flavor profile where the nuttiness of toasted pine nuts meets the salty punch of Parmesan, all brightened by a citrus finish that lingers delightfully on the tongue.
Ingredients
- 2 cups fresh basil leaves, packed
- 1/2 cup extra virgin olive oil
- 1/3 cup pine nuts, lightly toasted
- 1/2 cup grated Parmesan cheese
- Zest and juice of 1 large lemon
- 2 cloves garlic, smashed
How to make it
- Start by lightly toasting your pine nuts in a dry skillet over low heat until they are fragrant and golden; this step is crucial for adding a deep, nutty base to the pesto.
- Pulse the garlic, toasted pine nuts, and lemon zest in a food processor until they are finely minced but not yet a paste.
- Add the fresh basil leaves and lemon juice, then pulse again while slowly drizzling in the olive oil in a steady stream to emulsify the sauce and keep the color a vibrant, bright green.
- Once the desired consistency is reached—either chunky or smooth depending on your preference—transfer to a bowl and fold in the grated Parmesan by hand to maintain some texture.
- Taste and adjust with a pinch of sea salt or more lemon juice, and serve immediately or store with a thin layer of oil on top to prevent oxidation and browning.
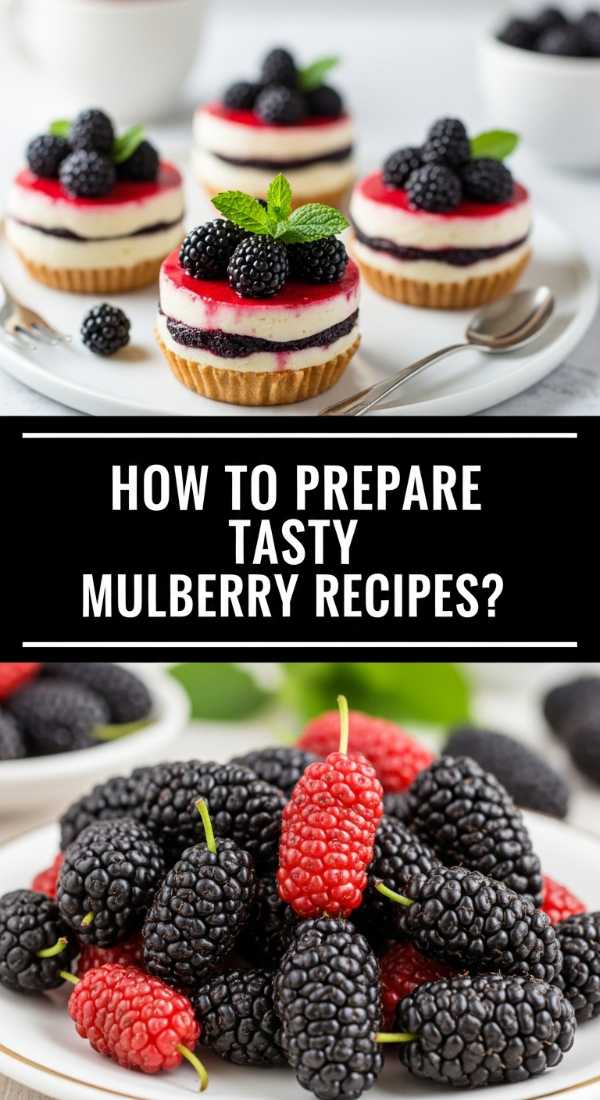
How to prepare tasty mulberry recipes?
[IMAGE_10]
Why we love this
Mulberries are the hidden gems of the foraging world, offering a deep, earthy sweetness that is far more complex than a standard blackberry. We love the way their juice stains everything a beautiful, royal purple, hinting at the intense antioxidant-rich flavor within. Whether tossed into a rustic galette or simmered into a decadent syrup for pancakes, mulberries provide a tender, melt-in-your-mouth texture that feels like a true summer luxury, bringing a sense of wild, natural wonder to any food board or dessert spread.
Ingredients
- 3 cups fresh mulberries, rinsed and stems removed
- 1/2 cup sugar (adjust based on fruit sweetness)
- 1 teaspoon lemon zest
- 1/2 teaspoon ground cinnamon
- Cornstarch (if baking into a tart or pie)
How to make it
- Carefully remove the tiny green stems from the mulberries using a pair of clean kitchen shears; while edible, removing them creates a much more refined and pleasant texture in your final dish.
- To make a simple mulberry compote, simmer the berries with sugar and lemon zest over medium-low heat for 10-15 minutes until the fruit collapses and the liquid thickens into a rich syrup.
- If using in a muffin or scone, toss the fresh berries in a small amount of flour before folding them into the batter to prevent them from bleeding too much color into the dough.
- For a mulberry salad, pair the fresh, raw berries with a sharp goat cheese, toasted walnuts, and a balsamic glaze to contrast their deep sweetness with savory, creamy notes.
- Always store mulberries in a single layer on a paper towel-lined plate in the refrigerator, as they are incredibly delicate and will crush under their own weight if piled too high.
Conclusion: The Art of the Board
Creating a viral-worthy food board is less about perfection and more about the passion you pour into each component. From the sharp tang of a rhubarb scone to the celebratory glitter on a graduation cupcake, these recipes are designed to delight the senses and bring people together. I hope these ideas inspire you to clear off your counter, grab a beautiful wooden board, and start crafting your own edible masterpiece. Remember, the best ingredient is always the love you share with those gathered around the table.
Frequently Asked Questions
Find answers to common questions about styling and preparing your food board components below.