
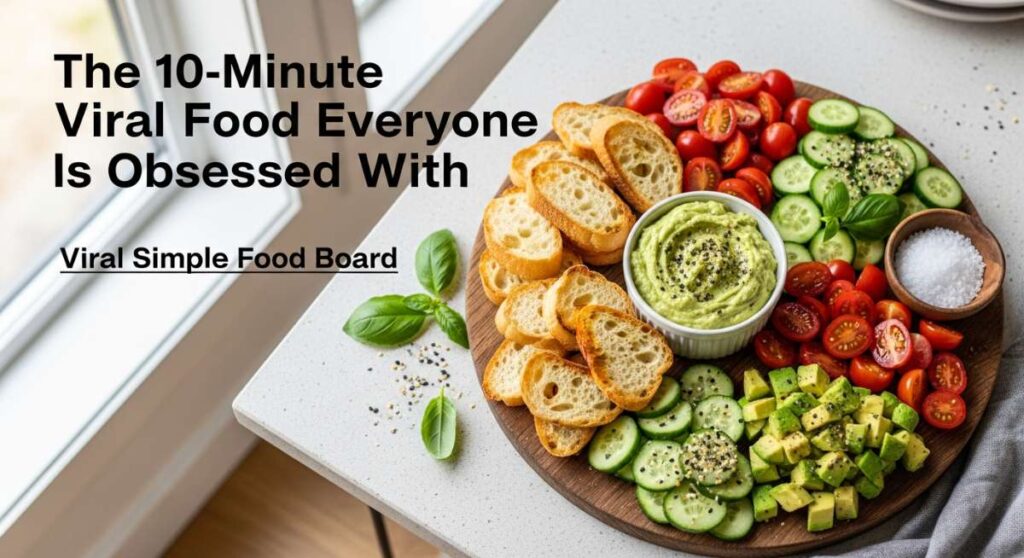
The 10-Minute Viral Food Board Everyone is Obsessed With
There is something almost magical about the way food brings us together, especially when it’s served in a way that feels abundant, colorful, and completely effortless. I remember the first time I set out a massive wooden board filled with different textures and aromas; the room immediately filled with a different kind of energy, one of shared excitement and genuine connection. It’s not just about eating; it’s about the ritual of picking, dipping, and savoring every little bite while the sun sets outside the kitchen window.
The secret to the viral success of these food boards isn’t just the aesthetic—though let’s be real, they look incredible on camera—it’s the variety of comfort food classics reimagined for sharing. From the sizzle of garlic shrimp to the earthy warmth of a slow-cooked stew, these components create a tapestry of flavors that hit every craving. Today, I’m sharing the ultimate guide to the ten components that will make your next food board the talk of the town, ensuring every guest leaves with a full heart and a satisfied palate.
How to cook tender stew?

Why we love this
There is nothing quite like the deep, soul-warming aroma of a beef stew that has been simmering for hours, filling every corner of the house with notes of red wine, thyme, and roasted root vegetables. When you pull a piece of beef apart with just a fork, feeling the effortless release of the fibers, you know you’ve achieved peak comfort. Each bite is a velvety explosion of savory umami, with the carrots having absorbed the rich juices until they are candy-sweet and perfectly soft. It is the ultimate anchor for any food board, offering a grounded, rustic heartiness that feels like a warm hug on a cold evening.
Ingredients
- 2 lbs beef chuck, cut into 1.5-inch cubes
- 2 tbsp vegetable oil
- 1 large onion, chopped
- 3 cloves garlic, minced
- 2 cups beef broth
- 1 cup dry red wine
- 3 large carrots, sliced
- 2 sprigs fresh thyme
- Salt and pepper to taste
How to make it
- Pat the beef cubes completely dry with paper towels; this is crucial for a proper sear and prevents steaming.
- Heat oil in a heavy-bottomed Dutch oven over medium-high heat until it just begins to shimmer and smoke.
- Sear the beef in batches, ensuring not to crowd the pan, until a deep brown crust forms on all sides (about 3-4 minutes per side). Remove and set aside.
- Lower heat to medium and add onions, scraping the brown bits (fond) from the bottom of the pan until onions are translucent.
- Add garlic for 60 seconds until fragrant, then deglaze the pan with the red wine, letting it reduce by half.
- Return beef to the pot, add broth, carrots, and thyme, then cover and simmer on the lowest heat setting for 2.5 to 3 hours until the meat is fork-tender.
How to make garlic shrimp?

Why we love this
Garlic shrimp brings an immediate sense of elegance and seaside freshness to your spread, offering a bright contrast to heavier meats. The sight of pink, plump shrimp glistening in a pool of golden, bubbly garlic butter is enough to make anyone’s mouth water instantly. As you take a bite, the initial snap of the shrimp gives way to a tender, juicy center, followed by a punch of citrusy lemon and the spicy kick of red pepper flakes. It’s a fast-paced flavor profile that dances on the tongue, leaving behind a lingering warmth that makes you reach for just one more piece every single time.
Ingredients
- 1 lb large shrimp, peeled and deveined
- 4 tbsp unsalted butter
- 5 cloves garlic, thinly sliced
- 1/2 tsp red pepper flakes
- Fresh parsley, chopped
- 1 lemon, juiced and zested
- Kosher salt
How to make it
- Ensure shrimp are fully thawed and patted dry to ensure they sear rather than boil in their own moisture.
- In a large skillet over medium heat, melt the butter until it starts to foam slightly, but do not let it brown.
- Add the sliced garlic and red pepper flakes, swirling the pan for about 2 minutes until the garlic is golden and the butter is infused.
- Increase heat to medium-high and add the shrimp in a single layer; cook for 2 minutes without moving them to develop a slight golden edge.
- Flip the shrimp and cook for another 1-2 minutes until they turn opaque and form a tight “C” shape, which indicates perfect doneness.
- Remove from heat immediately, stir in the lemon juice, zest, and parsley, tossing well to coat every shrimp in the aromatic butter.
How to crisp smashed potatoes?
Why we love this
Smashed potatoes are the ultimate texture play, combining the fluffy, cloud-like interior of a baked potato with the jagged, ultra-crunchy edges of a French fry. There is something incredibly satisfying about the tactile nature of these potatoes, especially when they are seasoned with flaky sea salt that catches in every nook and cranny. When you bite into one, the loud crunch is followed by a buttery, melt-in-your-mouth center that feels decadent and rustic all at once. They are the perfect vessel for dipping into sauces, making them an essential, interactive element for a viral food board.
Ingredients
- 1.5 lbs baby yellow or red potatoes
- 1/4 cup extra virgin olive oil
- 1 tsp garlic powder
- 1 tsp dried rosemary, crushed
- Flaky sea salt and cracked black pepper
How to make it
- Place potatoes in a large pot of salted water, bring to a boil, and cook for 15-20 minutes until they are easily pierced with a fork.
- Drain the potatoes and let them steam dry for 5 minutes; removing excess moisture is the secret to maximum crispiness.
- Preheat your oven to 425°F (220°C) and generously grease a large rimmed baking sheet with olive oil.
- Place potatoes on the sheet and use the bottom of a heavy glass or a potato masher to gently press down until they are about 1/2 inch thick but still held together.
- Drizzle with more oil and sprinkle with garlic powder, rosemary, salt, and pepper.
- Roast for 25-30 minutes, flipping halfway through, until the edges are deep golden brown and visibly shattered-glass crispy.
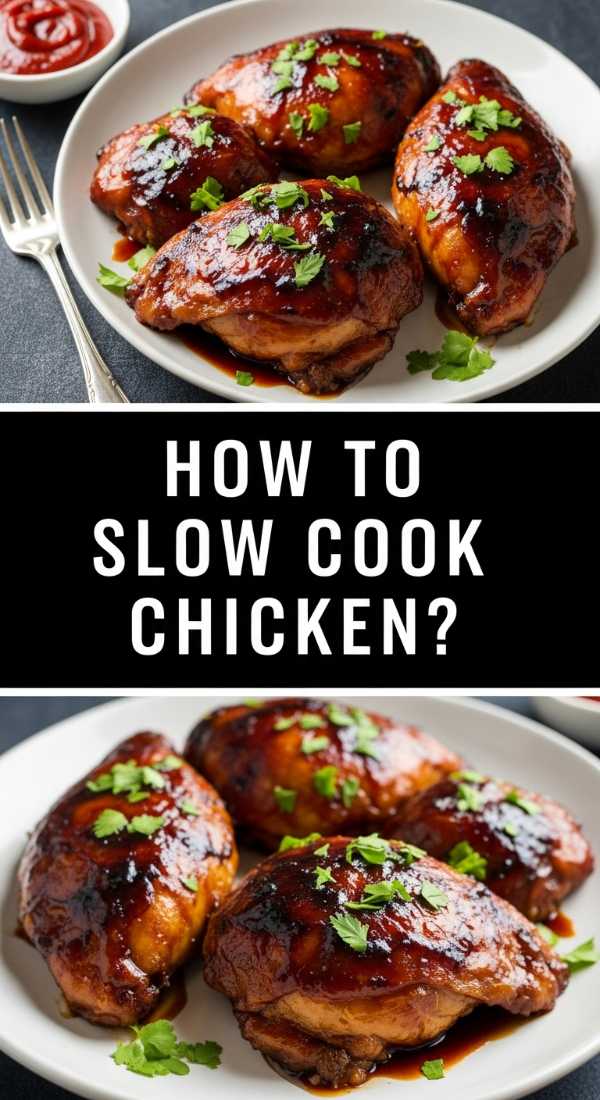
How to slow cook chicken?

Why we love this
Slow-cooked chicken is the epitome of versatility, offering a mild yet deeply savory base that absorbs the flavors of whatever it is cooked with. The texture is so delicate that it practically shreds itself at the mere suggestion of a fork, making it ideal for piling onto crackers or crusty bread on your board. There is a clean, honest quality to the flavor—steeped in herbs like sage and rosemary—that provides a soothing balance to the spicier components of your spread. It’s the kind of protein that feels light yet filling, ensuring that your board has something for everyone, from the adventurous eater to the comfort seeker.
Ingredients
- 2 lbs boneless, skinless chicken thighs
- 1/2 cup chicken stock
- 1 onion, sliced thinly
- 2 tsp smoked paprika
- 1 tsp dried oregano
- 2 cloves garlic, smashed
How to make it
- Season the chicken thighs generously on both sides with salt, pepper, paprika, and oregano.
- Place the sliced onions and smashed garlic at the bottom of the slow cooker to act as a flavorful trivet for the meat.
- Lay the chicken thighs over the onions and pour the chicken stock around the edges (don’t pour over the meat to keep the seasoning intact).
- Set the slow cooker to “Low” and cook for 6 to 7 hours; avoid using the “High” setting as it can tighten the muscle fibers and make the chicken rubbery.
- Once the time is up, the chicken should register 165°F internally and shred easily; remove the meat and let it rest for 10 minutes before shredding.
- For extra flavor, toss the shredded meat with a splash of the remaining cooking liquid from the pot.
How to make creamy pasta?

Why we love this
A small bowl of creamy pasta tucked into a food board adds a luxurious, indulgent touch that makes the meal feel like a true feast. The way the silky, parmesan-laden sauce clings to every curve of the noodle ensures a perfect ratio of pasta to cream in every single mouthful. It carries a delicate scent of nutmeg and aged cheese that invites you to slow down and savor the richness. This isn’t just food; it’s a sensory experience where the warmth of the bowl and the smoothness of the sauce provide a comforting anchor to the diverse flavors surrounding it.
Ingredients
- 8 oz short pasta (like penne or rigatoni)
- 1 cup heavy cream
- 1/2 cup freshly grated Parmesan cheese
- 2 tbsp unsalted butter
- 1/4 tsp ground nutmeg
- 1/2 cup reserved pasta water
How to make it
- Boil the pasta in a large pot of heavily salted water until it is “al dente” (usually 1-2 minutes less than the package instructions).
- Before draining, reserve at least one cup of the starchy pasta water; this is the key to an emulsified, non-greasy sauce.
- In a wide skillet, melt the butter over medium heat and stir in the heavy cream and nutmeg, bringing it to a very gentle simmer.
- Add the cooked pasta directly into the cream mixture, then sprinkle the Parmesan cheese over the top.
- Vigorously stir the pasta while adding small splashes of the reserved pasta water; the starch will bond the fat and liquid into a glossy, thick sauce.
- Continue stirring for 2 minutes until the sauce coats the back of a spoon, then serve immediately while piping hot.
How to grill perfect cheese?

Why we love this
Grilled cheese is the ultimate nostalgia food, but when done perfectly, it becomes a gourmet centerpiece with a sophisticated crunch. The contrast between the buttery, mahogany-gold crust and the thick, lava-like flow of melted sharp cheddar is a visual and textural masterpiece. There is a specific sound—a sharp, clean crackle—when you slice into it that promises a symphony of salty, toasted flavors. It adds a playful, finger-food element to the board that bridges the gap between sophisticated appetizers and pure, unadulterated comfort.
Ingredients
- 4 slices of thick-cut sourdough bread
- 1.5 cups shredded sharp cheddar or gruyère
- 2 tbsp mayonnaise (for the crust)
- 1 tbsp salted butter
How to make it
- Spread a thin, even layer of mayonnaise on the outside of each bread slice; mayo has a higher smoke point than butter and yields a more even, golden crust.
- Preheat a non-stick or cast-iron skillet over medium-low heat; patience is key to melting the cheese without burning the bread.
- Place one slice of bread mayo-side down in the pan and pile the cheese high, covering it with the second slice of bread (mayo-side up).
- Cover the skillet with a lid for 2-3 minutes; the trapped steam will ensure the cheese is fully melted and gooey.
- Remove the lid, flip the sandwich carefully, and cook for another 2-3 minutes uncovered until the bottom is perfectly toasted.
- Let the sandwich sit for 60 seconds before slicing into triangles; this allows the cheese to set slightly so it doesn’t all run out immediately.
How to braise pork shoulders?

Why we love this
Braised pork shoulder is a lesson in patience rewarded, resulting in meat that is so tender it possesses a succulent, almost buttery quality. The long cooking process breaks down the tough connective tissues into a rich, savory gelatin that coats every strand of meat in a glossy sheen. It smells of woodsmoke, cider vinegar, and brown sugar, offering a complex profile that is both sweet and deeply savory. Served in small mounds on your board, it provides a hearty, rustic elegance that pairs beautifully with pickles and sharp cheeses, creating a balanced flavor profile that guests will keep coming back to.
Ingredients
- 3 lb pork shoulder, cut into large chunks
- 1 cup apple cider
- 2 tbsp brown sugar
- 1 tbsp chili powder
- 1 tbsp apple cider vinegar
- 1 onion, quartered
How to make it
- Rub the pork chunks with a mixture of brown sugar, chili powder, salt, and pepper, pressing the spices into the meat.
- In a large pot, sear the pork on high heat until all sides are darkened and caramelized; this Maillard reaction is essential for deep flavor.
- Add the onions, apple cider, and vinegar, ensuring the liquid comes about halfway up the sides of the meat.
- Cover tightly and place in a 300°F (150°C) oven for 3.5 to 4 hours, or until the meat offers no resistance when poked with a knife.
- Remove the meat from the liquid and let it rest; meanwhile, boil the remaining liquid on the stove to reduce it into a thick glaze.
- Shred the pork into large, chunky pieces and drizzle the reduced glaze over the top before serving on the board.
How to sear buttery salmon?

Why we love this
Seared salmon adds a vibrant pop of color and a healthy, sophisticated flair to any board, standing out with its beautiful coral hues and glistening finish. The skin should be as thin and crisp as a potato chip, providing a sharp textural contrast to the delicate, fatty flakes of the fish that melt on your tongue like butter. It carries the clean, ozonic scent of the sea, elevated by the aromatic richness of browning butter and fresh herbs. It’s a lighter protein option that feels incredibly high-end, making the entire board feel like a curated dining experience rather than just a snack tray.
Ingredients
- 2 salmon fillets (6 oz each), skin on
- 2 tbsp high-smoke point oil (like grapeseed)
- 2 tbsp unsalted butter
- 2 sprigs fresh thyme
- 1/2 lemon
How to make it
- Take the salmon out of the fridge 20 minutes before cooking to bring it to room temperature; this ensures the center cooks through without the outside burning.
- Use a sharp knife to gently score the skin and pat it extremely dry; moisture is the enemy of a crispy sear.
- Heat oil in a stainless steel or cast-iron skillet over medium-high heat until it begins to shimmer.
- Place salmon skin-side down and press firmly with a spatula for 30 seconds to prevent the skin from curling.
- Cook for 4-5 minutes without moving until the skin is golden and releases easily from the pan; flip and add butter and thyme.
- Baste the skin with the melting butter for 1 minute, then remove from heat. The salmon should be medium-rare in the center (125°F) for the best texture.
How to make loaded nachos?

Why we love this
Nachos are the ultimate crowd-pleaser, bringing a festive, high-energy vibe to the food board with their towers of cheese and colorful toppings. There is a deep satisfaction in finding that one “perfect chip”—the one that is heavy with melted cheese, spicy jalapeños, and cool dollops of sour cream. The smell of toasted corn and melting dairy is intoxicating, signaling to everyone that it’s time to dig in and get messy. They provide a crunchy, spicy, and creamy multidimensional experience that acts as the perfect social glue for a group of hungry friends.
Ingredients
- 1 large bag of thick-cut tortilla chips
- 2 cups shredded Mexican blend cheese
- 1 can black beans, rinsed
- 1/4 cup pickled jalapeños
- Fresh cilantro and scallions for garnish
- 1/2 cup pico de gallo
How to make it
- Preheat your oven to 400°F (200°C) and line a baking sheet with parchment paper to prevent sticking.
- Lay half the chips in an even layer and top with half the cheese and beans; layering is vital so you don’t end up with dry chips at the bottom.
- Add the remaining chips and top with the rest of the cheese, beans, and the jalapeños.
- Bake for 8-10 minutes, watching closely until the cheese is bubbling and just starting to brown at the edges.
- Immediately after removing from the oven, top with cold ingredients like pico de gallo, fresh cilantro, and scallions.
- Serve with side bowls of guacamole and sour cream so the chips stay crunchy on the board for as long as possible.
How to simmer hearty chili?
[IMAGE_10]
Why we love this
A thick, slow-simmered chili brings an earthy, spicy depth to the board that is impossible to resist, especially when topped with a sharp, cooling hit of green onions. The texture is chunky and rich, with the beans having softened into the sauce to create a consistency that is almost like a savory jam. It carries a complex aroma of cumin, smoked chilies, and roasted tomatoes that lingers pleasantly, inviting second and third helpings. As a dip or a standalone bowl, it provides a bold, masculine contrast to the more delicate elements of the spread, grounding the entire meal in tradition and warmth.
Ingredients
- 1 lb ground beef or turkey
- 1 can kidney beans, drained
- 1 can crushed tomatoes (28 oz)
- 2 tbsp chili powder
- 1 tbsp ground cumin
- 1 bell pepper, diced
How to make it
- In a large pot over medium-high heat, brown the meat until no pink remains, breaking it into small crumbles with a wooden spoon.
- Drain the excess fat from the pot, leaving about a tablespoon for flavor.
- Add the diced bell peppers and cook for 5 minutes until soft, then stir in the chili powder and cumin, letting them “bloom” in the heat for 1 minute.
- Pour in the crushed tomatoes and the beans, stirring well to combine all the spices.
- Reduce the heat to low and let the chili simmer uncovered for at least 45 minutes; this allows the liquid to reduce and the flavors to concentrate.
- Taste and adjust seasoning with salt and a pinch of sugar if the tomatoes are too acidic before transferring to a serving bowl.
Conclusion
Building the perfect viral food board is less about following strict rules and more about embracing the joy of variety and the warmth of sharing a meal. Whether you’re crisping up potatoes or perfecting your salmon sear, each element brings its own story and texture to the table. I hope these recipes inspire you to clear off your biggest board, gather your favorite people, and create a spread that tastes even better than it looks. Happy hosting!
FAQ Section
What kind of board should I use?
A large wooden cutting board or a dedicated marble pastry slab works best. Just ensure it is food-safe and large enough to hold multiple small bowls and heaps of finger foods.
How do I keep the hot items warm?
Pre-warm your serving bowls in a low oven before filling them. You can also stagger the placement of items, bringing the hot dishes out last right as guests are ready to eat.
Can I make these components ahead of time?
Absolutely! The stew, chili, and braised pork actually taste better the next day. Simply reheat them gently on the stove before assembling your board.