

We’ve all been there—the doorbell is about to ring, your friends are hungry, and you want to serve something that looks like it belongs on a high-end magazine cover without spending five hours in the kitchen. There is a specific kind of magic in the ‘viral food board’ trend; it’s about more than just food; it’s about the art of gathering and the joy of sharing small, flavorful bites that spark conversation. I remember the first time I set out a massive, colorful spread; the room immediately filled with laughter and the sound of forks clinking, proving that simple ingredients, when presented with love, are always the showstopper.
Today, I am sharing my ultimate guide to creating a viral-worthy spread that combines savory, sweet, and everything in between. Whether you are hosting a summer backyard bash or a cozy indoor dinner, these ten components are the building blocks of a meal your guests will be photographing before they even take a bite. Let’s dive into the recipes that will turn your kitchen into the most popular spot on the block.
How to Grill Honey Chicken?

Why we love this
There is nothing quite like the smoky, charred aroma of chicken hitting a hot grill, especially when it is lacquered in a sticky, golden honey glaze. The contrast between the crispy, slightly burnt edges of the skin and the tender, juice-filled meat inside creates a symphony of textures that dance on the tongue. As the honey caramelizes over the open flame, it develops a deep, rich sweetness that balances perfectly with savory garlic and a hint of salt. It’s the kind of dish that makes you want to lick your fingers and reach for a second helping immediately.
Ingredients
- 2 lbs chicken thighs (bone-in, skin-on for maximum flavor)
- 1/2 cup organic honey
- 3 cloves garlic, minced
- 2 tbsp soy sauce
- 1 tbsp apple cider vinegar
- 1 tsp smoked paprika
- Salt and pepper to taste
How to make it
- Begin by whisking together the honey, minced garlic, soy sauce, apple cider vinegar, and smoked paprika in a small bowl until the glaze is smooth and fully emulsified.
- Pat the chicken thighs completely dry with paper towels; this is crucial for achieving a crispy skin rather than steaming the meat. Season generously with salt and pepper.
- Preheat your grill to medium-high heat (about 375°F to 400°F). Lightly oil the grates using a folded paper towel dipped in vegetable oil held with tongs to prevent sticking.
- Place the chicken skin-side down on the grates. Sear for 5-7 minutes without moving them to develop a deep golden-brown crust and clear grill marks.
- Flip the chicken and begin brushing the honey glaze onto the cooked side. Close the grill lid and cook for another 10-15 minutes, flipping and glazing every 5 minutes.
- Use an instant-read thermometer to check for a visual cue of doneness; the chicken is ready when it reaches an internal temperature of 165°F (74°C) and the juices run clear.
How to Bake Strawberry Cake?

Why we love this
Baking a strawberry cake feels like capturing the very essence of a sunny afternoon in a single, fluffy slice. The aroma of roasting berries wafts through the house, creating an inviting atmosphere that promises a sweet, nostalgic treat. Every bite is infused with the delicate, floral sweetness of real fruit, paired with a moist crumb that practically melts in your mouth. It’s a vibrant, pink-hued celebration of summer that looks stunning on any dessert board, offering a fresh alternative to heavy chocolate desserts.
Ingredients
- 2 1/2 cups all-purpose flour
- 1 1/2 cups granulated sugar
- 1 cup fresh strawberry puree
- 1/2 cup unsalted butter, softened
- 2 large eggs
- 1 tsp vanilla extract
- 1/2 cup whole milk
- 1 tbsp baking powder
How to make it
- Preheat your oven to 350°F (175°C) and grease a 9-inch round cake pan or line it with parchment paper to ensure easy removal after baking.
- In a large mixing bowl, cream the softened butter and sugar together using an electric mixer on medium-high speed for 3-4 minutes until the mixture is pale and fluffy.
- Add the eggs one at a time, beating well after each addition, then stir in the vanilla extract and the fresh strawberry puree until the color is consistent.
- In a separate bowl, whisk together the flour and baking powder. Gradually add the dry ingredients to the wet ingredients, alternating with the milk, starting and ending with the flour mixture.
- Pour the batter into the prepared pan and smooth the top with a spatula. Bake for 30-35 minutes, or until a toothpick inserted into the center comes out clean or with just a few moist crumbs.
- Allow the cake to cool in the pan for 10 minutes before transferring it to a wire rack to cool completely; this prevents the structure from collapsing.
How to Make Pasta Salad?
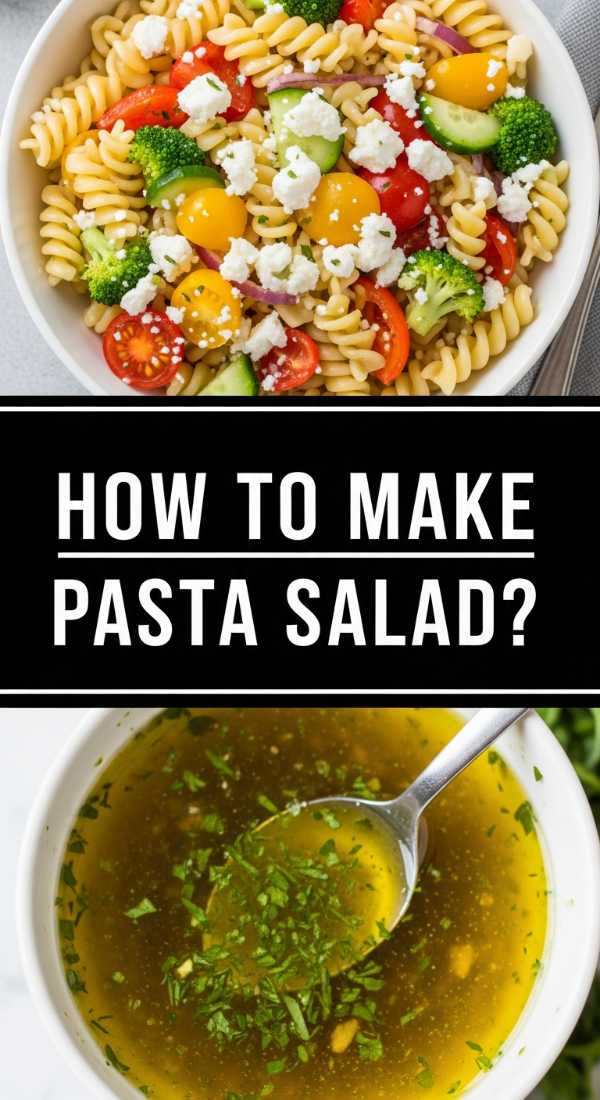
Why we love this
Pasta salad is the ultimate versatile companion for any food board, providing a zesty and refreshing crunch that cuts through richer flavors. We love the way the rotini spirals catch the tangy vinaigrette, ensuring every forkful is a burst of herbaceous and acidic delight. The mixture of crisp bell peppers, salty olives, and creamy feta cheese creates a complex flavor profile that satisfies every craving. It’s a colorful, vibrant dish that stays fresh for hours, making it the perfect low-stress addition to a long afternoon of grazing.
Ingredients
- 1 lb rotini or fusilli pasta
- 1 cup cherry tomatoes, halved
- 1 cucumber, diced
- 1/2 red onion, finely chopped
- 1/2 cup kalamata olives
- 1/2 cup crumbled feta cheese
- 1/2 cup Italian vinaigrette dressing
- Fresh parsley for garnish
How to make it
- Bring a large pot of heavily salted water to a rolling boil. Cook the pasta according to the package instructions, but aim for ‘al dente’—usually 1 minute less than the box suggests—so it holds its shape.
- Drain the pasta and immediately rinse it under cold running water. This stops the cooking process and removes excess starch, preventing the pasta from becoming gummy.
- In a very large mixing bowl, combine the cooled pasta with the cherry tomatoes, cucumber, red onion, and olives.
- Drizzle the Italian vinaigrette over the mixture and toss thoroughly with large spoons to ensure every piece of pasta is coated in the dressing.
- Gently fold in the crumbled feta cheese and chopped parsley. Be careful not to over-mix, as you want the feta to remain in distinct, creamy chunks.
- For the best flavor, cover the bowl and refrigerate for at least 30 minutes before serving, allowing the pasta to absorb the seasonings and the flavors to marry.
How to Roast Green Asparagus?

Why we love this
Roasting asparagus transforms a humble vegetable into a sophisticated, tender-crisp delicacy that feels truly indulgent. The high heat of the oven browns the delicate tips, creating a nutty, toasted flavor that perfectly complements the earthy sweetness of the stalks. A simple finish of lemon juice and parmesan adds a bright, savory pop that elevates the entire board. It’s a quick, healthy, and visually elegant side dish that adds a beautiful pop of green to your spread, looking just as good as it tastes.
Ingredients
- 1 bunch fresh green asparagus
- 2 tbsp extra virgin olive oil
- 2 cloves garlic, minced
- 1/2 lemon (for juice and zest)
- 1/4 cup grated parmesan cheese
- Salt and cracked black pepper
How to make it
- Preheat your oven to 400°F (204°C). Prepare a large rimmed baking sheet by lining it with parchment paper for easy cleanup and to prevent the garlic from burning on the metal.
- Wash the asparagus and trim off the woody, fibrous ends. A professional tip: bend a single stalk until it snaps naturally—that’s where the tender part begins; use that as a guide to cut the rest of the bunch.
- Lay the stalks in a single layer on the baking sheet. Drizzle with olive oil and sprinkle with minced garlic, salt, and pepper. Toss with your hands to coat each spear evenly.
- Spread them out so they are not touching; crowding will cause them to steam rather than roast and crisp up.
- Roast for 12-15 minutes depending on the thickness of the spears. You are looking for a tender center and slightly charred, crispy tips.
- Remove from the oven and immediately zest the lemon over the hot stalks, followed by a squeeze of fresh juice and a generous dusting of parmesan cheese.
How to Mix Refreshing Mocktails?

Why we love this
A beautifully crafted mocktail is the secret ingredient to making any gathering feel like a high-end event. There is something so sophisticated about the fizz of sparkling water hitting fresh fruit and muddled herbs, creating a drink that is as visually stunning as it is delicious. We love the way the bright citrus notes wake up the palate, offering a refreshing, non-alcoholic option that doesn’t compromise on complexity or style. It’s a cooling, bubbly treat that feels like a party in a glass, complete with vibrant garnishes that make everyone feel included.
Ingredients
- 1 cup sparkling mineral water or club soda
- 1/4 cup fresh lime juice
- 2 tbsp agave nectar or simple syrup
- Handful of fresh mint leaves
- 1/2 cup fresh raspberries or blueberries
- Ice cubes
How to make it
- In a sturdy glass or a cocktail shaker, place the fresh mint leaves and the berries. Use a muddler or the back of a wooden spoon to gently press down, releasing the juices and essential oils.
- Add the fresh lime juice and the agave nectar to the fruit and mint mixture. Stir vigorously for 10 seconds to dissolve the sweetener into the juice.
- Fill a tall glass with fresh ice cubes. If you want a clearer drink, double-strain the fruit mixture into the glass; for a rustic look, pour the whole mixture (fruit bits and all) over the ice.
- Top the glass with cold sparkling water, pouring slowly to maintain the carbonation and create a beautiful layered effect with the fruit juice at the bottom.
- Garnish with an extra sprig of mint and a few whole berries on top. Stir gently with a long spoon right before drinking to combine the flavors.
How to Cook Creamy Soup?

Why we love this
Creamy soup is the ultimate culinary hug, offering a velvety texture that coats the spoon and warms the soul with every sip. The process of slowly simmering aromatics like onions and garlic creates a deep, savory foundation that makes the final dish taste incredibly complex. We love how a simple splash of cream or a knob of butter transforms a vegetable base into a rich, luxurious experience that feels like pure comfort. It’s the perfect anchor for a food board, especially when served in small espresso cups for easy dipping with crusty bread.
Ingredients
- 4 cups vegetable or chicken broth
- 2 cups cauliflower or potatoes, chopped
- 1 medium onion, diced
- 2 cloves garlic, minced
- 1/2 cup heavy cream
- 2 tbsp butter
- 1 tsp dried thyme
- Salt and white pepper
How to make it
- In a large Dutch oven or heavy-bottomed pot, melt the butter over medium heat. Add the diced onion and sauté for 5-7 minutes until translucent and soft, but not browned.
- Add the minced garlic and dried thyme, stirring for 1 minute until the fragrance is released. Be careful not to burn the garlic, as it will turn the soup bitter.
- Add the chopped vegetables (cauliflower or potatoes) and pour in the broth. Bring the mixture to a boil, then immediately reduce the heat to low.
- Simmer uncovered for 15-20 minutes, or until the vegetables are completely fork-tender and starting to fall apart.
- Use an immersion blender to puree the soup directly in the pot until it is completely smooth. Alternatively, transfer to a traditional blender in batches, taking care with the hot liquid.
- Stir in the heavy cream and season with salt and white pepper. Heat through for another 2 minutes on low—do not let it boil after adding the cream to prevent curdling.
How to Make Strawberry Dessert?

Why we love this
This strawberry dessert is the definition of effortless elegance, focusing on the natural sweetness of the fruit enhanced by a cloud-like cream. We love the textural contrast between the macerated, syrupy berries and the crisp, buttery base of a shortbread or meringue. It feels light and airy, providing a sweet finish that doesn’t weigh you down after a meal of savory treats. The bright red hue of the strawberries adds a romantic, viral-worthy aesthetic to your table that is guaranteed to get everyone reaching for their spoons.
Ingredients
- 2 cups fresh strawberries, sliced
- 2 tbsp granulated sugar
- 1 cup heavy whipping cream
- 1 tsp vanilla bean paste
- 1 tbsp powdered sugar
- Individual shortbread cookies or meringue nests
How to make it
- Place the sliced strawberries in a medium bowl and sprinkle with 2 tablespoons of granulated sugar. Stir gently and let them sit at room temperature for at least 30 minutes to macerate; this draws out the natural juices to create a syrup.
- In a chilled metal bowl, combine the heavy whipping cream, vanilla bean paste, and powdered sugar.
- Using a hand mixer or whisk, beat the cream on high speed until stiff peaks form. Stiff peaks mean the cream holds its shape when the beaters are lifted.
- To assemble, place a shortbread cookie or meringue nest on a small plate. Spoon a generous amount of the macerated strawberries and their syrup over the base.
- Top with a large dollop of the whipped vanilla cream and garnish with a tiny mint leaf or a dusting of lemon zest for a professional finish.
- Serve immediately to ensure the base remains crisp while the cream is cold and fresh.
How to Make Hamburger Casserole?

Why we love this
Hamburger casserole is a nostalgic masterpiece that brings the hearty, satisfying flavors of a classic cheeseburger into a shareable, oven-baked format. We love the way the melted cheddar cheese blankets the savory ground beef and pasta, creating a gooey, decadent texture that defines comfort food. Every bite is a balance of rich meat, tangy tomato sauce, and tender noodles, making it a crowd favorite for guests of all ages. It’s a robust addition to a food board that provides a warm, filling element amidst the lighter snacks and appetizers.
Ingredients
- 1 lb lean ground beef
- 1/2 onion, chopped
- 2 cups elbow macaroni, cooked
- 1 can (15 oz) tomato sauce
- 1 tsp garlic powder
- 2 cups shredded sharp cheddar cheese
- 1/2 tsp dried oregano
How to make it
- Preheat your oven to 375°F (190°C) and lightly grease a 9×13 inch baking dish.
- In a large skillet over medium-high heat, brown the ground beef and chopped onion together. Break the meat apart with a spatula so there are no large chunks. Drain the excess fat thoroughly.
- Stir in the tomato sauce, garlic powder, and dried oregano. Let the meat sauce simmer on low for 5 minutes to allow the spices to fully hydrate and flavor the beef.
- Combine the cooked macaroni and the meat sauce in the prepared baking dish. Toss them together until the pasta is evenly coated in the sauce.
- Sprinkle the shredded cheddar cheese in an even layer over the top, covering the pasta completely to prevent the noodles from drying out in the oven.
- Bake for 20 minutes, or until the cheese is bubbling and slightly golden brown around the edges. Let it rest for 5 minutes before serving so the sauce sets slightly.
How to Cook Summer Pasta?
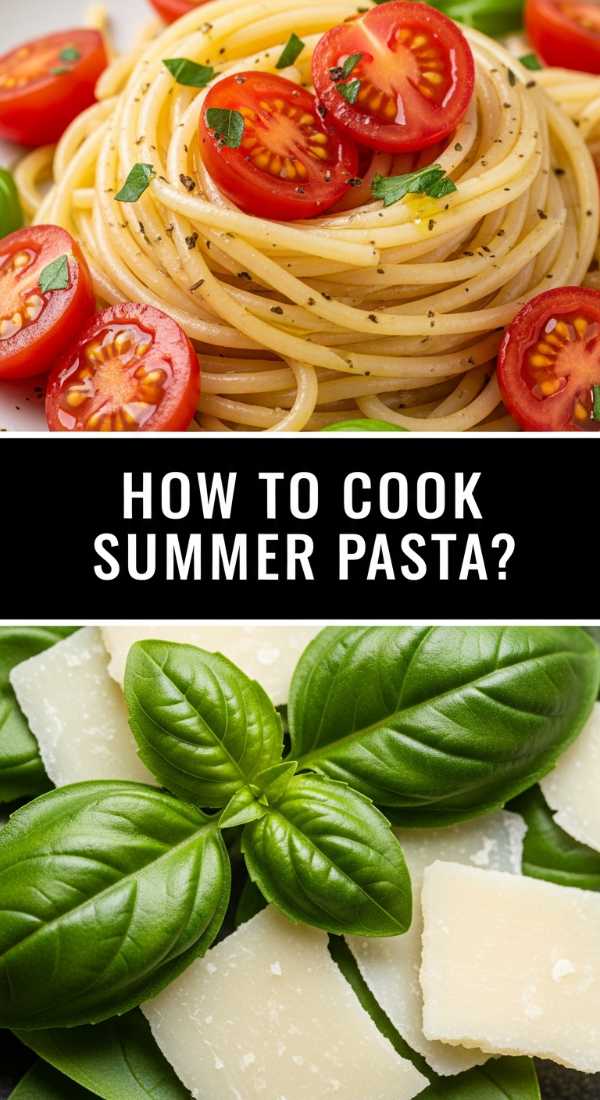
Why we love this
Summer pasta is a celebration of the garden, using minimal ingredients to create a dish that is bursting with sunshine and fresh flavor. We love the simplicity of a light olive oil sauce infused with garlic and chili flakes, which allows the sweetness of sun-ripened tomatoes and fragrant basil to take center stage. The pasta remains light and silky, never heavy, making it an ideal choice for outdoor dining on a warm evening. It is a beautiful, rustic dish that brings a touch of the Mediterranean to your viral food board with almost no effort.
Ingredients
- 12 oz spaghetti or linguine
- 1/4 cup extra virgin olive oil
- 3 cloves garlic, thinly sliced
- 1 pint cherry tomatoes, halved
- 1/2 cup fresh basil leaves, torn
- 1/4 tsp red pepper flakes
- Freshly grated pecorino cheese
How to make it
- Cook the pasta in a large pot of boiling salted water until just al dente. Reserve 1/2 cup of the starchy pasta water before draining—this is the secret to a silky sauce.
- In a wide skillet, heat the olive oil over medium-low heat. Add the thinly sliced garlic and red pepper flakes. Cook for 2-3 minutes until the garlic is soft and fragrant but not browned; browned garlic becomes bitter.
- Add the halved cherry tomatoes to the skillet and increase the heat to medium. Sauté for 4-5 minutes until the tomatoes start to burst and release their juices, creating a light sauce.
- Add the cooked pasta and the reserved pasta water to the skillet. Toss vigorously with tongs for 1-2 minutes until the water and oil emulsify into a glossy coating.
- Remove from heat and stir in the torn basil leaves. The residual heat will wilt them just enough to release their aroma without turning them black.
- Serve immediately with a generous dusting of pecorino cheese and an extra drizzle of cold olive oil on top.
How to Use Sourdough Discard?

Why we love this
Using sourdough discard is a brilliant way to add a sophisticated, tangy depth of flavor to your board while practicing zero-waste cooking. We love the complex, fermented notes it brings to simple crackers or flatbreads, offering a savory crunch that pairs perfectly with soft cheeses and dips. It’s incredibly satisfying to transform something that would otherwise be tossed away into a gourmet component of your meal. The resulting texture is uniquely crisp and bubbly, with a rustic charm that screams ‘homemade’ and adds an artisan touch to your viral presentation.
Ingredients
- 1 cup sourdough discard (unfed)
- 1/4 cup all-purpose flour (if needed for consistency)
- 2 tbsp melted butter or olive oil
- 1/2 tsp sea salt
- 1 tbsp dried herbs (rosemary or za’atar)
- Flaky salt for topping
How to make it
- Preheat your oven to 325°F (165°C). Line a large baking sheet with a silicone mat or a piece of high-quality parchment paper.
- In a medium bowl, mix the sourdough discard with the melted butter and dried herbs. The consistency should be like thick pancake batter; if it is too runny, whisk in a tablespoon of flour at a time.
- Pour the mixture onto the center of the baking sheet. Use an offset spatula to spread it as thin as possible—ideally about 1/16th of an inch. The thinner it is, the crispier the result will be.
- Sprinkle the top with flaky sea salt. Bake for 10 minutes, then remove from the oven briefly.
- Use a pizza cutter or a sharp knife to score the partially baked dough into squares or rectangles. This ensures clean breaks once fully baked.
- Return to the oven for another 20-25 minutes, or until the crackers are completely dry and golden brown. Let them cool completely on the pan to reach maximum crunch before breaking them along the score lines.
The Final Board: Bringing it All Together
Creating a viral food board isn’t just about the individual recipes; it’s about the composition. Start by placing your larger items—the hamburger casserole dish and the bowl of pasta salad—on your board or table first to act as anchors. Then, fill in the gaps with the grilled honey chicken, the roasted asparagus spears, and the sourdough crackers. Intersperse the sweet strawberry cake slices and dessert cups throughout for a mix of colors. Finish by placing your refreshing mocktails nearby and watch as your guests marvel at the feast you’ve created in record time. Happy hosting!