
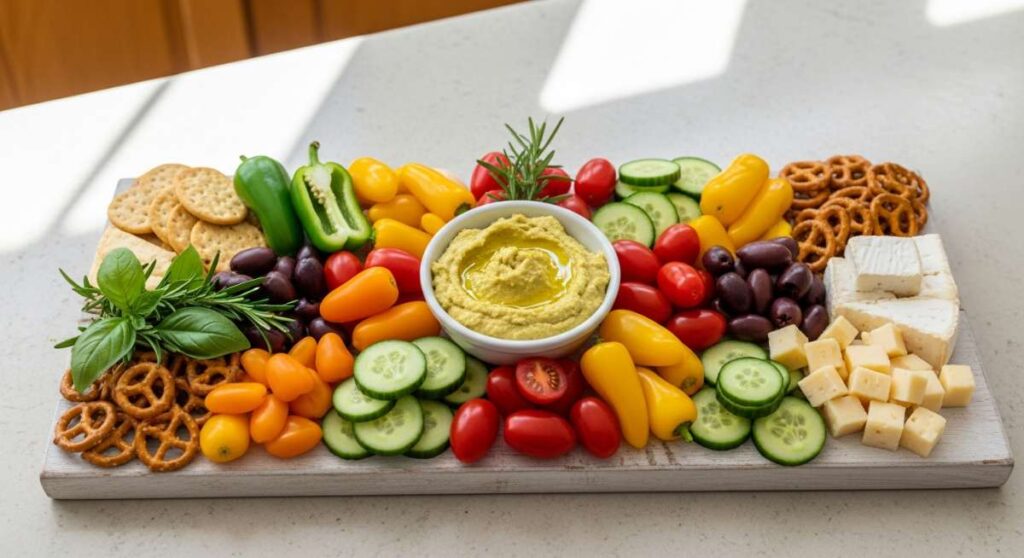
The 5-Minute Food Board That’s Taking Over the Internet
Is it just me, or does the 5:00 PM rush feel like a marathon you didn’t train for? We’ve all been there: staring into the fridge, exhausted from a long day, wondering how to feed the family something that doesn’t come out of a cardboard box. That’s exactly why this ‘Viral Simple Food Board’ concept has completely changed my life. It’s not just about the food; it’s about the ritual of bringing everyone together around a board filled with warm, comforting, and incredibly easy-to-make staples.
This isn’t your average charcuterie board. Instead of cold meats and hard cheeses, we are filling this board with ‘the greats’—those quick, reliable recipes that hit the spot every single time. It’s about textures, aromas, and that ‘home-cooked’ feeling without the five-hour kitchen shift. Whether you are hosting friends or just trying to survive a Tuesday, these elements are the building blocks of a meal that feels like a big, warm hug.
How to make quick chicken

Why we love this
There is nothing quite like the golden-brown crust of a perfectly seared piece of chicken, releasing that savory, mouth-watering aroma that fills the entire house in minutes. When you bite into it, the exterior provides a slight crunch that gives way to an incredibly tender and juicy center, seasoned just enough to make your taste buds dance. It’s the ultimate protein anchor for any board, offering a clean, satisfying flavor that pairs beautifully with everything from spicy dips to creamy pastas, making it a versatile hero of the weeknight kitchen.
Ingredients
- 2 boneless, skinless chicken breasts
- 2 tablespoons olive oil
- 1 teaspoon garlic powder
- 1 teaspoon smoked paprika
- Salt and cracked black pepper to taste
- Fresh parsley for garnish
How to make it
- Begin by patting the chicken breasts completely dry with paper towels; this is the secret to achieving that coveted golden sear rather than steaming the meat.
- Place the chicken on a cutting board and slice them horizontally into even cutlets, or use a meat mallet to pound them to a uniform half-inch thickness so they cook evenly throughout.
- In a small bowl, whisk together the garlic powder, smoked paprika, salt, and pepper, then generously coat both sides of the chicken, pressing the spices into the meat.
- Heat the olive oil in a large stainless steel or cast-iron skillet over medium-high heat until the oil is shimmering and just starting to show a faint wisp of smoke.
- Carefully lay the chicken in the pan, ensuring they aren’t crowded; let them sear undisturbed for 5-6 minutes until a deep golden-brown crust forms and they naturally release from the pan.
- Flip the chicken and cook for another 4-5 minutes, or until the internal temperature reaches 165°F (74°C) on a meat thermometer.
- Remove the chicken from the pan and let it rest on a cutting board for at least 5 minutes to allow the juices to redistribute before slicing it into strips for your board.
How to cook creamy pasta

Why we love this
Imagine a bowl of pasta where every single strand is cloaked in a velvet-smooth, buttery sauce that smells of toasted garlic and aged Parmesan cheese. The texture is pure luxury—rich, thick, and clingy—creating a comforting mouthfeel that feels indulgent yet remarkably simple to achieve. As you twirl your fork, the steam carries the scent of fresh herbs and cream, promising a bite that is both deeply savory and gently soul-warming, making it the perfect centerpiece for a communal food board.
Ingredients
- 12 oz fettuccine or penne pasta
- 1 cup heavy cream
- 1/2 cup unsalted butter
- 1 cup freshly grated Parmesan cheese
- 3 cloves garlic, minced
- Salt and pepper to taste
- Reserved pasta water
How to make it
- Bring a large pot of heavily salted water to a rolling boil—it should taste like the sea—and cook your pasta according to the package directions until it is just ‘al dente’.
- Before draining the pasta, carefully scoop out at least 1 cup of the starchy pasta water; this liquid gold is essential for emulsifying your sauce later.
- In a deep skillet or saucepan, melt the butter over medium heat until it begins to foam, then add the minced garlic and sauté for about 60 seconds until it is fragrant but not browned.
- Slowly pour in the heavy cream, whisking constantly as it comes to a gentle simmer, and let it reduce slightly for 2-3 minutes until it begins to thicken.
- Turn the heat to low and whisk in the grated Parmesan cheese one handful at a time, ensuring each batch is fully melted and smooth before adding the next to avoid clumps.
- Add the cooked pasta directly into the sauce and toss vigorously with tongs, splashing in the reserved pasta water a little at a time until the sauce is glossy and coats every noodle perfectly.
- Season with a final pinch of salt and plenty of freshly cracked black pepper before sliding it onto your board.
How to make taco soup

Why we love this
Taco soup is like a vibrant explosion of color and flavor, bringing a festive, smoky warmth to your table with almost zero effort. The aroma of cumin, chili powder, and fire-roasted tomatoes creates an inviting atmosphere, while the combination of hearty beans and tender corn provides a delightful variety of textures in every spoonful. It’s a thick, stew-like soup that feels incredibly nourishing, especially when topped with cool avocado or crunchy chips, making it a crowd-favorite that disappears faster than you can serve it.
Ingredients
- 1 lb ground beef or turkey
- 1 onion, diced
- 1 can (15 oz) black beans, drained and rinsed
- 1 can (15 oz) kidney beans, drained and rinsed
- 1 can (15 oz) corn, drained
- 1 can (14 oz) fire-roasted diced tomatoes
- 1 packet taco seasoning
- 2 cups beef or vegetable broth
How to make it
- In a large Dutch oven or heavy-bottomed pot, brown the ground meat over medium-high heat, breaking it into small crumbles with a wooden spoon until no pink remains.
- Add the diced onions to the pot with the meat and sauté for 4-5 minutes until the onions are translucent and have picked up the savory flavors from the browning meat.
- Drain any excess grease from the pot to ensure the soup remains flavorful but not oily.
- Stir in the taco seasoning, tossing it with the meat and onions for about a minute to toast the spices and release their essential oils.
- Pour in the black beans, kidney beans, corn, diced tomatoes (with their juices), and the broth, stirring everything together until well combined.
- Bring the mixture to a boil, then reduce the heat to low and let it simmer uncovered for 20-25 minutes, which allows the flavors to meld and the liquid to thicken into a rich consistency.
- Taste and adjust seasonings, then serve in small bowls on your food board with plenty of lime wedges and cilantro for a fresh finish.
How to air fry potatoes

Why we love this
These air-fried potatoes are the epitome of the perfect side dish, boasting an incredible shatter-crisp exterior while remaining light, fluffy, and pillowy on the inside. The hot circulating air creates a beautiful mahogany crust that traps in the moisture, while the scent of roasted garlic and rosemary wafts through the kitchen. They have that addictive salty crunch of a deep-fried potato but with a much cleaner, lighter finish, making them the ultimate finger food to scatter across a viral food board for easy snacking.
Ingredients
- 1.5 lbs Yukon Gold or Russet potatoes, cubed
- 2 tablespoons avocado oil (high smoke point)
- 1 teaspoon garlic powder
- 1 teaspoon dried rosemary or thyme
- 1/2 teaspoon sea salt
- 1/2 teaspoon paprika
How to make it
- Cut your potatoes into uniform 1-inch cubes; keeping the sizes consistent is the most important factor in ensuring they all finish cooking at the exact same time.
- Place the cubes in a large bowl of cold water and soak them for 20 minutes to remove excess starch, then drain and pat them incredibly dry with a clean kitchen towel.
- In a clean dry bowl, toss the potatoes with the avocado oil, garlic powder, herbs, salt, and paprika until every single edge is well-coated in oil and spice.
- Preheat your air fryer to 400°F (200°C) for at least 3 minutes to ensure the basket is hot when the potatoes hit the surface.
- Arrange the potatoes in the air fryer basket in a single layer; if you have too many, cook them in two batches to ensure the air can circulate freely around each piece.
- Air fry for 15-20 minutes, pausing every 5 minutes to give the basket a vigorous shake to ensure even browning on all sides.
- The potatoes are done when they are deep golden brown and feel firm to the touch; serve them immediately while they are at their maximum level of crispness.
How to slow cook beef
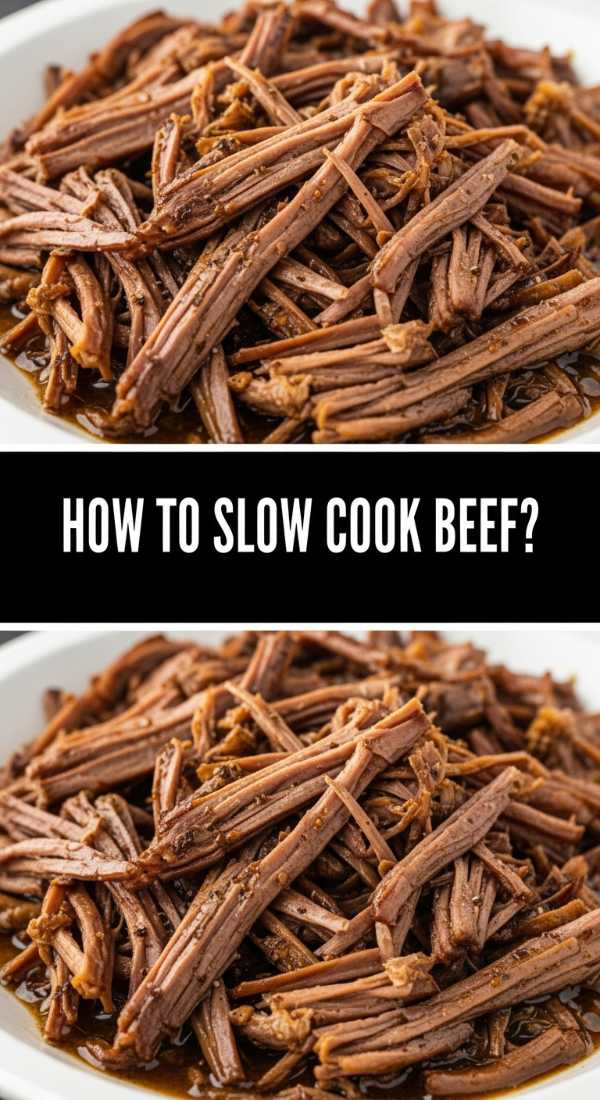
Why we love this
There is a specific kind of magic that happens when beef is allowed to simmer low and slow for hours, transforming tough fibers into succulent, melt-in-your-mouth shreds of pure joy. The kitchen becomes filled with a rich, heady aroma of red wine, onions, and beef stock that signals a truly special meal is on the way. Each forkful is intensely savory and dripping with a concentrated gravy that is deep in color and flavor, providing a rustic, sophisticated element to your food board that feels like it took all day to prepare.
Ingredients
- 3 lb beef chuck roast, cut into large chunks
- 1 cup beef broth
- 1/2 cup dry red wine (optional)
- 2 tablespoons tomato paste
- 4 cloves garlic, smashed
- 2 sprigs fresh rosemary
- Salt and pepper
How to make it
- Generously season the beef chunks with salt and pepper on all sides, ensuring the seasoning is pressed firmly into the meat.
- For the best flavor, sear the beef in a hot skillet with a splash of oil for 2-3 minutes per side until a dark crust forms, then transfer the meat to the slow cooker insert.
- In a small bowl, whisk together the beef broth, red wine, and tomato paste until smooth, then pour the mixture over the beef.
- Tuck the smashed garlic cloves and fresh rosemary sprigs in between the meat chunks to infuse the liquid with aromatics.
- Cover the slow cooker and set it to ‘Low’ for 8-10 hours; the low temperature is crucial for breaking down the connective tissue without drying out the meat.
- Once the time is up, the beef should fall apart easily when pressed with a fork; remove the rosemary stems and the large garlic pieces.
- Shred the beef directly in the slow cooker so it can soak up all the flavorful juices before being piled high on your serving board.
How to bake garlic bread
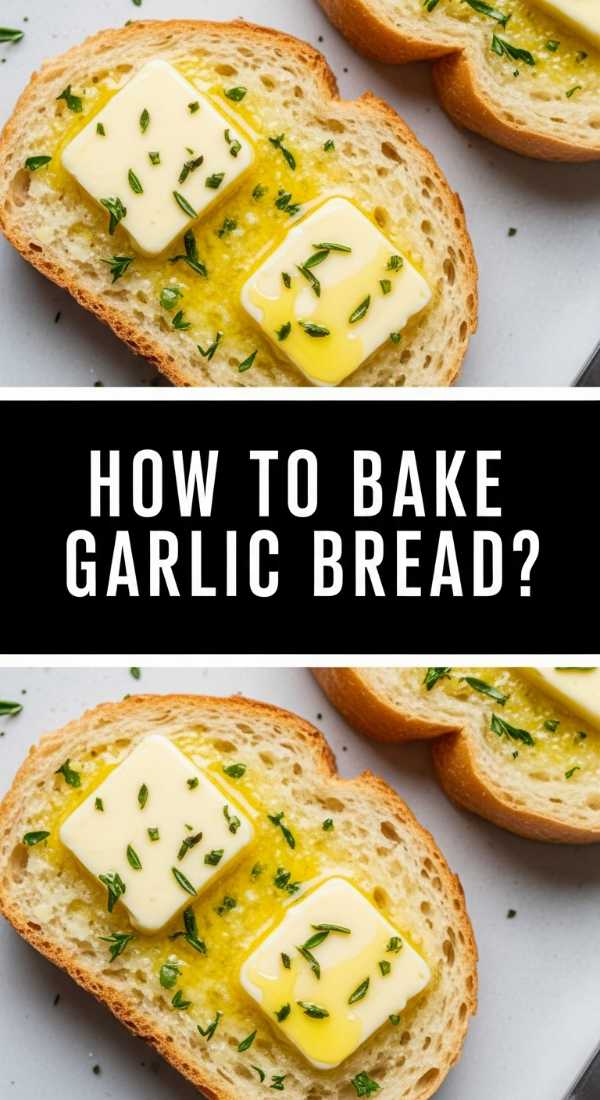
Why we love this
Baked garlic bread is the ultimate sensory experience, combining the sharp, pungent bite of fresh garlic with the creamy, salty richness of melted butter on a toasted canvas. As it bakes, the edges of the bread become incredibly crispy and golden, while the center remains soft, airy, and soaked in garlic-herb butter. The smell alone is enough to draw everyone into the kitchen, creating a sense of anticipation for that first warm, crunchy bite that balances perfectly with savory meats and saucy pastas.
Ingredients
- 1 large French baguette or Italian loaf
- 1/2 cup unsalted butter, softened
- 4 cloves garlic, finely minced
- 2 tablespoons fresh parsley, chopped
- 1/4 cup grated Parmesan cheese
- Pinch of red pepper flakes (optional)
How to make it
- Preheat your oven to 375°F (190°C) and line a large baking sheet with parchment paper for easy cleanup.
- In a medium mixing bowl, combine the softened butter, minced garlic, chopped parsley, and Parmesan cheese, mashing them together with a fork until a smooth paste forms.
- Slice the bread loaf in half lengthwise, creating two long open-faced pieces, and place them on the prepared baking sheet.
- Spread the garlic butter mixture generously over the cut sides of the bread, making sure to reach all the way to the very edges so no bite is left unseasoned.
- Place the bread in the oven and bake for 10-12 minutes until the butter is completely melted and bubbling.
- Turn the broiler on high for the last 1-2 minutes, watching very closely, until the tops are golden brown and the edges are perfectly toasted and crisp.
- Remove from the oven, let it cool for just a minute, and slice into thick diagonal batons that are easy for guests to grab from the board.
How to instant pot chicken

Why we love this
Instant Pot chicken is a total game-changer for the busy home cook, delivering impossibly tender, juicy results in a fraction of the time it takes to roast or braise. The pressure-cooking process forces moisture and seasoning deep into the fibers of the meat, resulting in a flavor profile that tastes like it’s been simmering for hours. It’s light, clean, and effortlessly shreddable, making it a fantastic high-protein addition to your board that can be seasoned in a hundred different ways to suit your mood.
Ingredients
- 1.5 lbs boneless skinless chicken thighs
- 1 cup chicken broth
- 1 teaspoon onion powder
- 1 teaspoon dried oregano
- 1/2 teaspoon salt
- 1/2 teaspoon black pepper
How to make it
- Place the chicken thighs into the inner pot of the Instant Pot, spreading them out so they are not in one giant clump.
- In a small measuring cup, whisk together the chicken broth, onion powder, oregano, salt, and pepper.
- Pour the liquid mixture over the chicken, ensuring all the pieces are somewhat moistened by the broth.
- Secure the lid of the Instant Pot and ensure the steam release valve is set to the ‘Sealing’ position.
- Select the ‘Manual’ or ‘Pressure Cook’ setting and set the timer for 10 minutes on High Pressure.
- Once the cooking cycle is complete, allow the pressure to release naturally for at least 5-10 minutes; this prevents the meat from toughening up by releasing the steam too quickly.
- Carefully turn the valve to ‘Venting’ to release any remaining steam, open the lid, and use two forks to shred the chicken directly in its own flavorful juices.
How to make sheet pan dinner
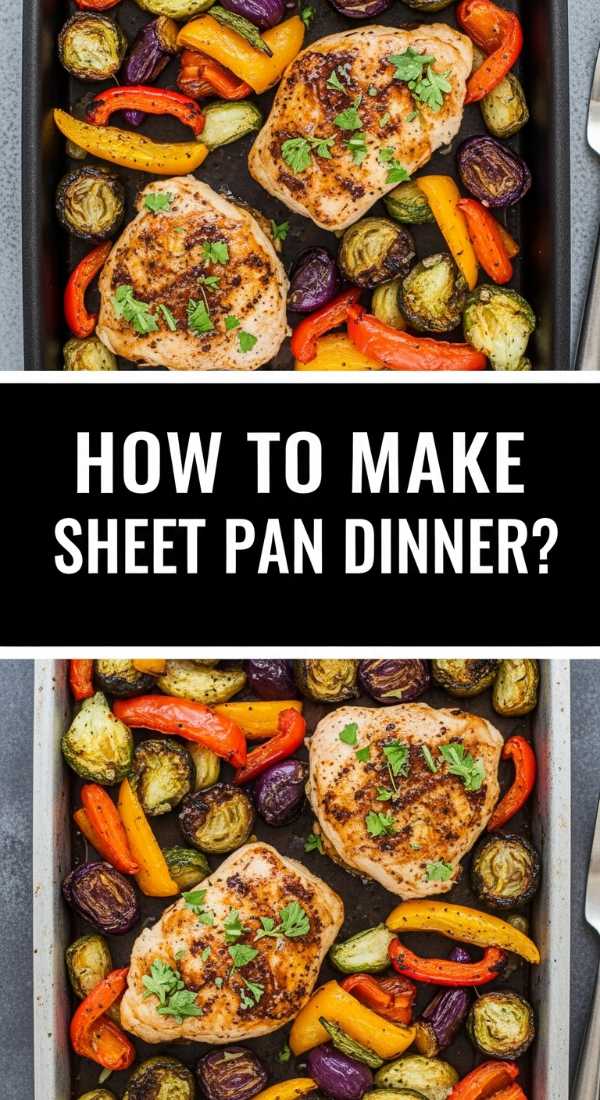
Why we love this
The beauty of a sheet pan dinner lies in the harmony of different ingredients roasting together, with their juices mingling to create a complex, caramelized flavor profile. You get the sweetness of roasted vegetables, the savory depth of charred proteins, and the ease of a meal that requires almost no cleanup. The textures range from tender-crisp to beautifully browned, and the visual appeal of a colorful array of roasted goods spread across the board is absolutely stunning, making it a feast for both the eyes and the palate.
Ingredients
- 1 lb smoked sausage, sliced into rounds
- 1 head of broccoli, cut into florets
- 1 red bell pepper, sliced
- 1 zucchini, sliced into half-moons
- 3 tablespoons olive oil
- 1 tablespoon Italian seasoning
- Salt and pepper to taste
How to make it
- Preheat your oven to 400°F (200°C) and ensure the oven rack is in the center position for even heat distribution.
- On a large, rimmed baking sheet, pile the sliced sausage, broccoli, bell peppers, and zucchini together.
- Drizzle the olive oil over the entire pile and sprinkle with the Italian seasoning, salt, and pepper.
- Use your hands or a pair of tongs to toss everything together right on the pan, ensuring every piece is lightly coated in oil and spices, then spread it out into a single, even layer.
- Roast in the oven for 20-25 minutes, pausing halfway through to flip the sausage and toss the vegetables with a spatula.
- You are looking for the sausage to be browned and the vegetables to have charred, caramelized edges while still being tender to the bite.
- Remove the pan from the oven and serve the mixture in a rustic pile on one side of your food board for a colorful, hearty component.
How to grill juicy burgers

Why we love this
There is nothing that says ‘summer’ or ‘comfort food’ quite like a juicy burger fresh off the grill, complete with those iconic char marks and a smoky aroma that is simply irresistible. When you bite into a properly grilled burger, you get a rush of savory juices and a rich, beefy flavor that is perfectly complimented by the slight bitterness of the char. It’s a tactile, messy, and deeply satisfying experience that brings a fun, casual energy to your food board, especially when surrounded by fresh toppings and soft buns.
Ingredients
- 1.5 lbs ground beef (80/20 fat content for maximum juiciness)
- 1 tablespoon Worcestershire sauce
- 1 teaspoon salt
- 1 teaspoon black pepper
- Slices of sharp cheddar cheese
- Brioche buns
How to make it
- In a large bowl, gently mix the ground beef with the Worcestershire sauce, salt, and pepper, being careful not to overwork the meat which can lead to a tough burger.
- Divide the meat into 4 or 5 equal portions and shape them into patties that are about 1 inch thick, making them slightly wider than your buns as they will shrink during cooking.
- Use your thumb to press a shallow indentation into the center of each patty; this prevents the burger from puffing up into a ball shape while on the grill.
- Preheat your grill to high heat (about 450°F) and lightly oil the grates to prevent sticking.
- Place the patties on the grill and cook for 4-5 minutes on the first side without pressing down on them—you want to keep those juices inside!
- Flip the burgers and immediately place a slice of cheese on each one, then close the grill lid and cook for another 3-4 minutes for a perfect medium doneness.
- Toast the buns on the edge of the grill for 30 seconds, then assemble the burgers and place them on the board for a show-stopping finish.
How to make lava cake

Why we love this
The lava cake is the ultimate grand finale, a decadent dessert that looks like fine dining but is surprisingly simple to master. The exterior is a light, airy chocolate sponge that hides a secret heart of warm, flowing molten chocolate that oozes out the moment your spoon breaks the surface. It is intensely rich, dark, and sweet, providing a beautiful temperature contrast between the warm cake and a scoop of cold vanilla ice cream, making it the most talked-about item on your entire food board.
Ingredients
- 6 oz high-quality semi-sweet chocolate, chopped
- 1/2 cup unsalted butter
- 2 large eggs plus 2 egg yolks
- 1/4 cup granulated sugar
- 2 tablespoons all-purpose flour
- Pinch of salt
How to make it
- Preheat your oven to 425°F (218°C) and generously grease two or three 6-ounce ramekins with butter and a dusting of cocoa powder so the cakes release easily.
- In a microwave-safe bowl, combine the chopped chocolate and butter, heating in 30-second increments and stirring in between until the mixture is completely smooth and glossy.
- In a separate medium bowl, beat the eggs, egg yolks, sugar, and salt with a whisk or electric mixer for about 2 minutes until the mixture is thick, pale, and doubled in volume.
- Gently fold the melted chocolate mixture into the egg mixture using a rubber spatula until just combined, being careful not to deflate the air you just whipped in.
- Sift the flour over the batter and fold it in very lightly until no white streaks remain.
- Divide the batter evenly between the prepared ramekins and bake for 12-14 minutes; the sides should be firm and set, but the center should still look soft and slightly jiggly.
- Let the cakes cool in the ramekins for exactly 1 minute, then carefully invert them onto your food board or individual small plates and serve immediately while the center is still molten.
The Ultimate Way to Eat
Building this 5-minute food board is about more than just convenience—it’s about creating a flexible, stress-free dining experience that caters to everyone’s favorites. By combining these quick-prep techniques, you can turn a standard dinner into a viral-worthy spread that feels curated and thoughtful. The beauty is in the variety; whether you’re dipping garlic bread into taco soup or pairing creamy pasta with seared chicken, every bite is an adventure. So grab your biggest wooden board, pick a few of these staples, and get ready to be the hero of your own kitchen!