
There is something undeniably magical about the way a shared meal brings people together. I remember the first time I set out a massive, overflowing board for a Sunday brunch with my closest friends; the room immediately filled with laughter as everyone reached for their favorite bites, customizing their plates and swapping stories. It wasn’t just about the food; it was about the communal experience of grazing, the vibrant colors, and the effortless warmth that a well-curated board brings to the table.
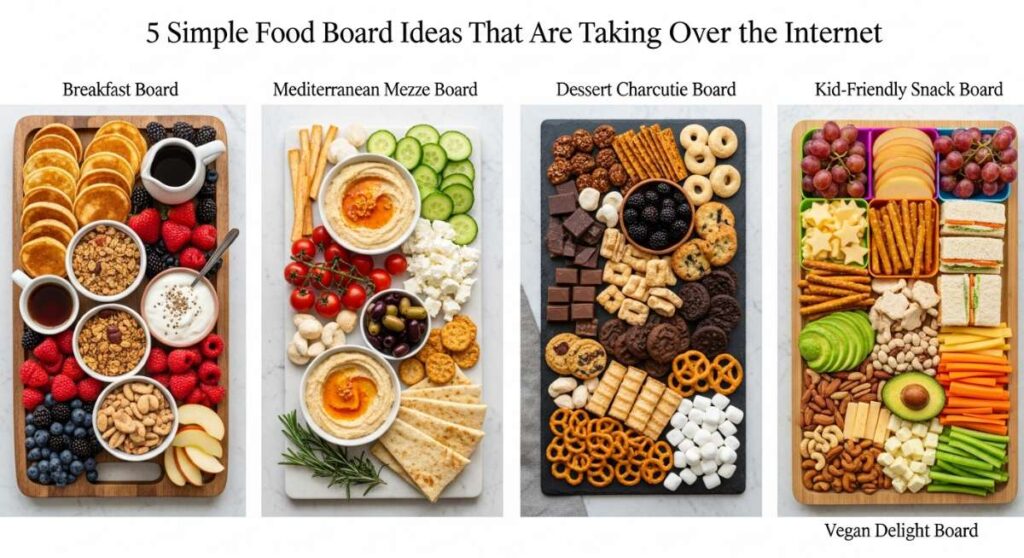
Lately, my social media feeds have been exploding with creative takes on the classic charcuterie, and it’s easy to see why. These boards take the stress out of traditional hosting by turning the meal itself into a centerpiece. Whether you are hosting a breezy garden party or a cozy indoor gathering, these five viral food board ideas are designed to impress your guests while keeping your time in the kitchen minimal and your time making memories maximal.
The Pastel Perfection: How to Bake Spring Cakes for a Dessert Board

Why we love this
This board is a literal breath of fresh air, capturing the essence of a blooming garden on a wooden platter. Imagine the aroma of light, airy sponge cakes infused with zesty lemon and delicate lavender wafting through your kitchen as they cool. When you bite into one of these mini cakes, the texture is incredibly moist and tender, perfectly balanced by a silky cream cheese frosting that melts on your tongue. Arranging these bite-sized beauties alongside fresh strawberries and edible pansies creates a visual masterpiece that feels both sophisticated and deeply comforting for a sunny afternoon.
Ingredients
- 2 cups All-purpose flour
- 1 1/2 cups Granulated sugar
- 3 Large eggs, room temperature
- 1/2 cup Unsalted butter, softened
- 1 cup Whole milk
- 2 tsp Baking powder
- 1 tbsp Lemon zest and 1 tsp culinary lavender
- Fresh berries and mint for garnish
How to make it
- Preheat your oven to 350°F (175°C) and generously grease a mini-cake or muffin tin to ensure a clean release.
- In a large mixing bowl, cream together the softened butter and sugar using an electric mixer on medium-high speed for about 3-5 minutes until the mixture is pale and fluffy.
- Add the eggs one at a time, beating well after each addition to maintain the emulsion, then stir in the lemon zest and crushed lavender.
- Sift the flour and baking powder together in a separate bowl; gradually add the dry ingredients to the butter mixture, alternating with the milk, starting and ending with the flour.
- Divide the batter evenly among the tins, filling each about two-thirds full to allow for a perfect domed rise.
- Bake for 18-22 minutes or until a toothpick inserted into the center comes out clean with just a few moist crumbs attached.
- Let the cakes cool in the pan for 10 minutes before transferring to a wire rack; once completely cold, frost with a light glaze and arrange on your board with clusters of grapes and berries.
The Ultimate Crowd-Pleaser: How to Make Rotel Dip for a Savory Platter

Why we love this
Nothing says “party” like the savory, spicy, and irresistibly creamy allure of a classic Rotel dip centered on a massive grazing board. The aroma of browned sausage and melted cheese is instantly mouth-watering, promising a rich and salty kick that pairs perfectly with crunchy, corn-based chips. As you dip a golden tortilla chip into the warm, velvety pool of cheese, you get that satisfying snap followed by the heat of diced green chilies and the heartiness of the meat. It’s a nostalgic, soul-warming dip that turns any casual get-together into an event people will be talking about for weeks.
Ingredients
- 1 lb Ground breakfast sausage or lean ground beef
- 16 oz Processed cheese (like Velveeta), cubed
- 2 cans (10 oz each) Rotel Diced Tomatoes and Green Chilies
- 1 tsp Smoked paprika
- 1/2 cup Pickled jalapeños (optional)
- Large bag of restaurant-style tortilla chips
- Assorted bell pepper strips and celery sticks
How to make it
- Set a large skillet over medium-high heat and add the ground sausage, breaking it apart with a wooden spoon into small, uniform crumbles.
- Cook the meat until it is deeply browned and no pink remains, which usually takes about 7-10 minutes; drain the excess fat thoroughly to ensure the dip isn’t greasy.
- Transfer the cooked meat into a slow cooker or a heavy-bottomed saucepan set to low heat.
- Add the cubed processed cheese and both cans of Rotel (do not drain the liquid from the cans, as this provides the necessary moisture and flavor).
- Stir the mixture frequently as the cheese melts to prevent scorching on the bottom of the pot; the goal is a perfectly smooth, lava-like consistency.
- Once fully melted and combined, stir in the smoked paprika for a hint of depth and add jalapeños if you prefer extra heat.
- Place the pot in the center of a large board and surround it with a mountain of chips, crackers, and crisp vegetable sticks for dipping.
Southern Comfort Style: How to Cook Dirty Spaghetti as a Main Event Board

Why we love this
If you haven’t tried dirty spaghetti yet, your taste buds are missing out on a symphony of umami and spice that is absolutely addictive. This dish takes the silky, slurpable texture of classic pasta and marries it with the deep, earthy flavors of a Cajun-style meat base, filled with bell peppers, onions, and savory seasonings. The smell of sautéed aromatics filling the kitchen is intoxicating, and the final result is a hearty, glistening pile of noodles that looks stunning when spread across a board. Each bite offers a complex profile—salty, slightly spicy, and incredibly rich—making it the perfect unconventional centerpiece for a family-style dinner board.
Ingredients
- 1 lb Spaghetti noodles
- 1 lb Ground beef or pork
- 1/2 lb Chicken livers, finely minced (optional, for authentic “dirty” flavor)
- 1 Green bell pepper, 1 onion, and 2 stalks celery (the Trinity), finely diced
- 3 cloves Garlic, minced
- 2 tbsp Cajun seasoning and 1 tbsp Worcestershire sauce
- Fresh parsley and green onions for garnish
How to make it
- Bring a large pot of heavily salted water to a rolling boil and cook the spaghetti according to package directions until just al dente; reserve 1 cup of pasta water before draining.
- While the pasta cooks, heat a large Dutch oven over medium heat and brown the ground meat (and minced livers if using) until fully cooked and slightly crispy.
- Add the diced bell pepper, onion, and celery to the meat, sautéing for about 5-7 minutes until the vegetables are soft and translucent.
- Stir in the minced garlic and Cajun seasoning, toasting the spices for 1 minute until fragrant, then add the Worcestershire sauce to deglaze the pan.
- Add the drained spaghetti to the pot, tossing vigorously with tongs to coat every strand in the savory meat mixture.
- If the pasta seems too dry, splash in small amounts of the reserved pasta water to create a glossy, cohesive sauce that clings to the noodles.
- Spread the spaghetti across a large, heat-safe board or long platter, topping with fresh parsley and serving alongside slices of buttered garlic bread.
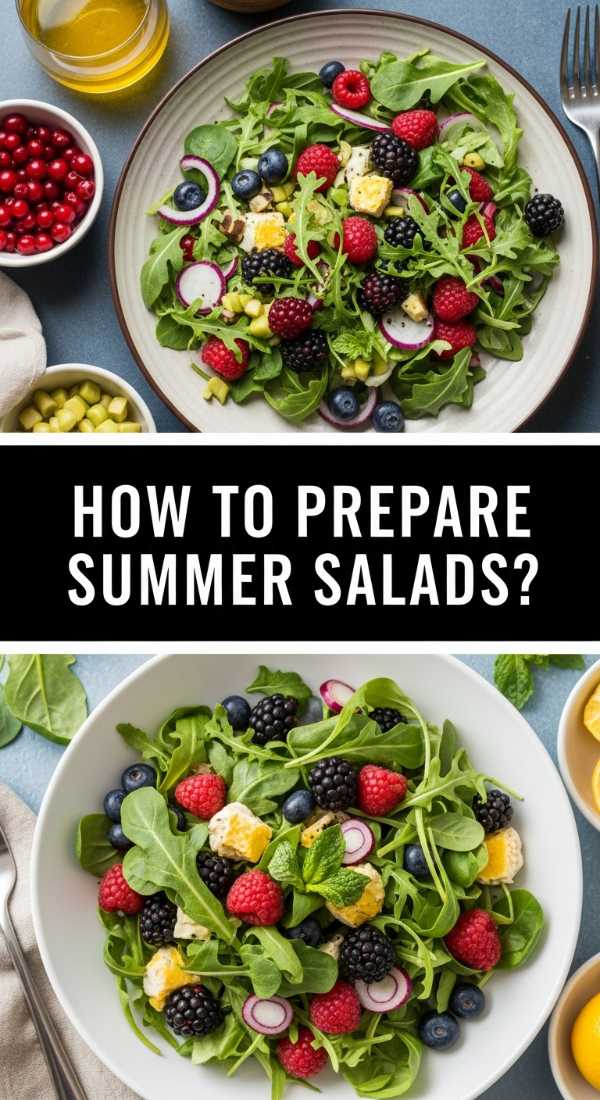
The Garden Fresh Spread: How to Prepare Summer Salads for Grazing
Why we love this
There is nothing more refreshing on a sweltering July afternoon than a board overflowing with the crisp, cooling textures of a deconstructed summer salad. This board celebrates the peak of produce, featuring juicy stone fruits, snap-fresh cucumbers, and creamy cheeses that sparkle under a light balsamic drizzle. The aroma is a mix of fresh-cut basil and the sweet scent of vine-ripened tomatoes, creating an experience that feels light yet incredibly satisfying. Eating from a salad board allows everyone to pick their favorite combinations, ensuring every forkful is a personalized explosion of summer sunshine and garden-fresh flavor.
Ingredients
- 4 cups Baby arugula or mixed field greens
- 2 Ripe peaches or nectarines, sliced
- 1 cup Heirloom cherry tomatoes, halved
- 4 oz Goat cheese or feta crumbles
- 1/2 cup Toasted walnuts or pecans
- Fresh basil leaves and a high-quality balsamic glaze
- Prosciutto ribbons for a salty contrast
How to make it
- Start by washing and thoroughly drying your greens; use a salad spinner to ensure no excess moisture remains, which would make the board soggy.
- Lay a bed of arugula across one side of the board to act as a soft base for the heavier ingredients.
- Slice the peaches into uniform wedges and arrange them in a fan pattern or small clusters to create visual movement across the platter.
- Nestle the cherry tomatoes and prosciutto ribbons into the gaps, ensuring the colors are distributed evenly for a vibrant look.
- Sprinkle the goat cheese crumbles and toasted nuts over the top just before serving to maintain their distinct textures.
- Place a small ramekin of balsamic glaze or a light lemon vinaigrette on the side rather than dressing the board directly, which keeps the greens crisp for longer.
- Garnish with whole basil leaves and a crack of fresh black pepper, serving with tongs so guests can build their own perfect salad plate.
The Flame-Kissed Feast: How to Master Grilling Recipes for a BBQ Board

Why we love this
A grilling board is the ultimate expression of backyard hospitality, bringing the rugged, smokey flavors of the fire straight to the table. The sight of perfectly charred steak and glistening chicken wings arranged with grilled vegetables is enough to make anyone’s mouth water. You get that incredible contrast between the crispy, caramelized exterior of the meat and the tender, juicy interior that only a high-heat grill can provide. The air fills with the scent of hickory smoke and charred peppers, creating a rustic and inviting atmosphere that encourages everyone to roll up their sleeves and dive in for a hearty, protein-packed meal.
Ingredients
- 1.5 lbs Skirt steak or Flank steak
- 1 lb Chicken wings or drumettes
- 3 Ears of corn, husked and halved
- 2 Large bell peppers, cut into thick strips
- Dry rub (brown sugar, garlic powder, onion powder, smoked paprika, salt)
- Chimichurri sauce or BBQ sauce for dipping
How to make it
- Preheat your grill to high heat (about 450°F) and lightly oil the grates to prevent sticking.
- Pat the meats dry with paper towels—this is the secret to getting a professional-grade sear—and apply your dry rub generously to all sides.
- Place the steak on the hottest part of the grill, searing for 3-4 minutes per side for a perfect medium-rare; once done, transfer to a cutting board to rest for at least 10 minutes.
- Arrange the chicken wings on a slightly cooler part of the grill, turning every 5 minutes until the skin is crispy and the internal temperature reaches 165°F.
- Grill the corn and peppers simultaneously, rotating them until they have beautiful char marks and have softened slightly.
- Slice the rested steak against the grain into thin strips to ensure maximum tenderness.
- Assemble the board by placing the sliced steak in the center, surrounding it with the wings and charred vegetables, and adding small bowls of chimichurri for a bright, acidic finish.
Bringing It All Together
Whether you’re opting for the sweet charm of a cake board or the smokey depth of a grilling platter, the secret to a viral-worthy food board is variety and abundance. Don’t be afraid to let items overlap and to fill every corner with garnishes like fresh herbs or nuts. These boards aren’t just meals; they are conversations waiting to happen. So, grab your favorite large platter, invite your favorite people over, and let these simple, internet-famous ideas transform your next gathering into something truly special.
Frequently Asked Questions
How do I keep the hot items warm on a food board?
To keep items like Rotel dip or grilled meats warm, use a pre-heated stone board if possible, or place small cast iron skillets directly on the wooden board. You can also keep the main supply in a slow cooker and only refill the board in small batches to ensure everything stays at a safe and delicious temperature.
What is the best way to prevent fruit from browning on a board?
For fruits like peaches or apples, a quick toss in a mixture of lemon juice and water will help prevent oxidation. Additionally, slicing the fruit right before serving and keeping it away from highly acidic items until the last minute helps maintain its fresh color and texture.