
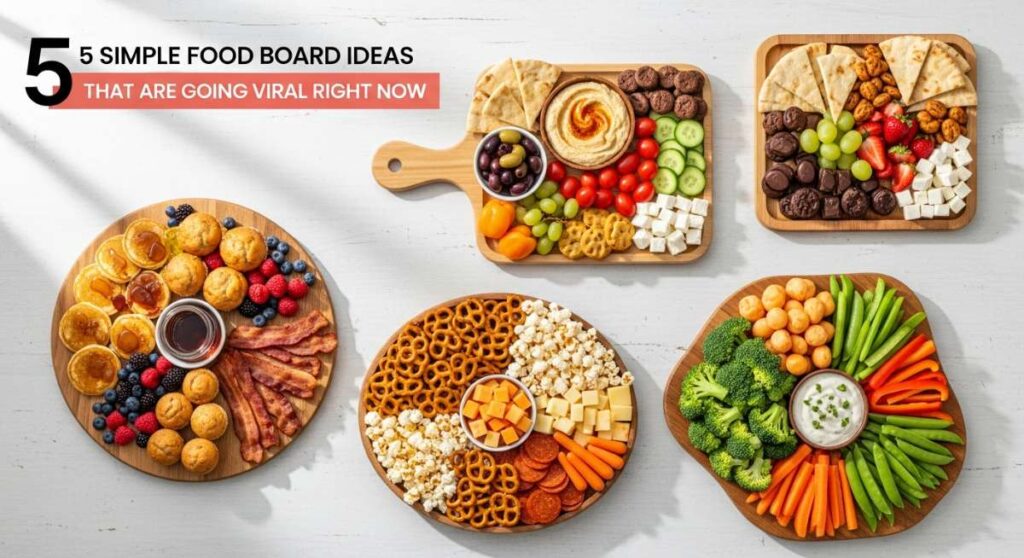
There is something undeniably magical about the art of the ‘board.’ Whether it is a lazy Sunday afternoon with family or a high-energy celebration with friends, laying out a spread of curated bites feels like an invitation to slow down and truly savor the moment. These viral food boards have taken the internet by storm because they turn simple ingredients into a visual masterpiece that tastes even better than it looks. I remember the first time I set out a grazing board for my neighbors; the room immediately filled with laughter and the sound of crackers snapping, proving that the best memories are often made around a shared plate.
Today, we are diving into five specific ways you can master this trend. From the savory depth of a perfectly styled charcuterie spread to the whimsical joy of a toddler-friendly lunch board, these ideas are designed to be approachable yet impressive. We aren’t just talking about putting food on a platter; we are exploring the textures, the aromas, and the careful techniques that transform a meal into an experience. Let’s roll up our sleeves and create something beautiful together.
The Ultimate Classic: How to Style Charcuterie Boards
Why we love this
A classic charcuterie board is a symphony of contrasting textures and flavors that dance across the palate with every bite. We adore the way a creamy, room-temperature brie melts against the sharp, salty crunch of an aged cheddar, all while the sweetness of a honey drizzle cuts through the rich, earthy aroma of cured prosciutto. There is a tactile joy in assembling these boards, feeling the weight of the marble platter and seeing the vibrant pops of color from fresh grapes and emerald-hued olives. It is the quintessential ‘viral’ food board because it encourages lingering conversations and slow, mindful snacking that feels both indulgent and deeply comforting.
Ingredients
- Assorted Cured Meats (Prosciutto, Salami, Soppressata)
- Hard and Soft Cheeses (Brie, Sharp Cheddar, Manchego, Goat Cheese)
- Fresh Fruits (Grapes, Berries, Sliced Fig)
- Crunchy Elements (Marcona Almonds, Walnut Halves, Artisanal Crackers)
- Sweet and Savory Spreads (Honeycomb, Fig Jam, Dijon Mustard)
- Garnishes (Fresh Rosemary Sprigs, Cornichons)
How to make it
- Begin by placing your ‘anchors’ on the board. These are your small bowls for jams, olives, or mustard. Position them in a triangle pattern across the board to create visual balance and structure.
- Add your cheeses next. Keep soft cheeses like Brie whole to maintain their creamy interior, but slice hard cheeses into uniform triangles or cubes. Place these near the bowls to suggest flavor pairings, ensuring they have room to breathe as they reach room temperature.
- Create ‘meat ribbons’ by folding slices of salami or prosciutto into quarters or ‘S’ shapes. Nestle these tightly against the cheeses and bowls; this prevents them from unfurling and adds a professional, voluminous look to the spread.
- Fill the largest remaining gaps with your crackers and bread. Fan them out in a curving line (often called a ‘cracker river’) to guide the eye across the board and provide a sturdy base for the other ingredients.
- Tuck in the smaller details. Use bunches of grapes to fill medium-sized holes and scatter nuts or dried fruits into the tiny crevices. This ‘over-flowing’ look is the secret to a viral-worthy board.
- Finish with a flourish of fresh herbs like rosemary or thyme to add a burst of green and a fresh, piney aroma that elevates the entire presentation.
Sweet Success: How to Decorate Graduation Cookies

Why we love this
There is nothing quite like the buttery, vanilla-scented air of a kitchen filled with freshly baked sugar cookies ready for a celebration. Decorating graduation cookies on a board is a sensory delight; the smooth, satin finish of royal icing feels incredibly satisfying to pipe, and the bright, bold colors of school spirits bring an immediate sense of pride. We love the crisp ‘snap’ of the icing when you take that first bite, followed by the soft, melt-in-your-mouth texture of the cookie underneath. It’s a creative outlet that turns a dessert into a personalized tribute, making the guest of honor feel truly seen and celebrated through edible art.
Ingredients
- Batch of Sturdy Sugar Cookies (Caps, Diplomas, and Stars)
- Royal Icing (Outline and Flood consistencies)
- Gel Food Coloring (School Colors)
- Edible Gold Luster Dust
- Fine-Tip Piping Bags and Scribes
- Silver or Gold Dragees
How to make it
- Ensure your cookies are completely cooled to room temperature before starting. If the cookies are even slightly warm, the icing will melt and run off the edges, ruining the crisp lines you are aiming for.
- Prepare your icing in two consistencies: a thick ‘outline’ icing (like toothpaste) and a thinner ‘flood’ icing (like honey). Use the thick icing to pipe a precise border around the edge of the cookie. Let this ‘dam’ set for 2-3 minutes.
- Fill the center of the cookie with the flood icing. Use a scribe tool or a toothpick to move the icing into the corners and pop any tiny air bubbles. This creates that iconic, smooth-as-glass surface seen in viral videos.
- Allow the base layer to dry for at least 6-8 hours. Patience is key here; if you pipe details onto wet icing, they will sink and blur together. The surface must be hard to the touch for a clean finish.
- Add the ‘Graduation’ details. Use a fine-tip bag to pipe tassels on the caps or ribbons on the diplomas. For an extra touch of luxury, mix a drop of vodka with gold luster dust and paint the tassels using a food-safe brush once the icing is dry.
- Arrange the finished cookies on a wooden board, layering them slightly to create depth, and scatter a few graduation-themed sprinkles or confetti in the gaps.
Picky-Eater Approved: How to Prepare Toddler Lunches
Why we love this
The toddler lunch board is a game-changer for parents, transforming the daily struggle of mealtime into a colorful, interactive playground of nutrition. We love the vibrant palette of ruby-red strawberries, bright orange cheddar shapes, and crisp green cucumbers that make the board look like a rainbow. There’s a wonderful tactile element as tiny hands reach for perfectly portioned ‘finger foods,’ exploring different textures from smooth hummus to crunchy crackers. It’s a stress-free way to introduce new flavors while empowering little ones to make their own choices, all while creating a beautiful, mess-contained centerpiece for the high chair or play table.
Ingredients
- Mini Sandwiches (cut into stars or hearts)
- Cheese Cubes or String Cheese Rounds
- Fresh Fruit (Blueberries, Raspberries, Sliced Bananas)
- Vegetable Sticks (Cucumber, Bell Pepper, Soft-Cooked Carrots)
- Protein Bites (Rolled Turkey, Hard-Boiled Egg Halves)
- A Small Dip (Hummus or Greek Yogurt)
How to make it
- Select a durable, BPA-free board or a large flat plate. Safety and stability are paramount when working with toddlers, so ensure the board won’t slide easily on the table surface.
- Use small cookie cutters to transform standard sandwiches and slices of cheese into fun shapes. Removing crusts and creating visual interest significantly increases the likelihood of a toddler trying a new food.
- Focus on ‘bite-sized’ geometry. Slice grapes vertically (never horizontally) and cut carrots into thin matchsticks to ensure everything is a safe size for small mouths, while still looking organized and intentional on the board.
- Section the board by color. Place the green veggies in one corner and the red berries in another. This color-blocking technique is highly engaging for young children and helps them identify different food groups visually.
- Place the ‘dip’ in a small, non-slip ramekin in the center. Toddlers love the sensory experience of dipping, which makes eating vegetables much more entertaining and likely to happen.
- Fill any small gaps with ‘puffed’ snacks or cereal to give the board a full, abundant look that feels like a treat rather than a chore.
Morning Bliss: How to Craft Coffee Drinks

Why we love this
A coffee drink board is the ultimate ritual for the caffeine enthusiast, turning a quick morning jolt into a luxurious sensory experience. We love the rich, roasted aroma of freshly ground beans that fills the kitchen, mingling with the sweet scent of vanilla and cinnamon. The visual of dark, velvety espresso swirling into clouds of frothed white milk is mesmerizing, and the warmth of the mug against your palms provides an instant sense of grounding. It’s about more than just the caffeine; it’s the thick, creamy micro-foam and the artisanal toppings that make you feel like a professional barista in the comfort of your own home.
Ingredients
- High-Quality Espresso Beans or Dark Roast Coffee
- Choice of Milk (Whole, Oat, or Almond)
- Flavored Syrups (Vanilla, Caramel, or Lavender)
- Toppings (Cinnamon, Cocoa Powder, Sea Salt)
- Whipped Cream (optional)
- Garnishes (Chocolate Shavings or Dried Lavender Buds)
How to make it
- Start by prepping your ‘Flavor Station’ on the board. Place your syrups in small glass dispensers and your spices in tiny bowls with miniature spoons. This keeps the process organized and aesthetically pleasing.
- Brew your base. If using an espresso machine, aim for a 25-30 second extraction to get that perfect golden ‘crema’ on top. If using a French press, ensure the water temperature is around 200°F (93°C) to avoid scorching the delicate oils in the beans.
- Steam your milk to the ‘sweet spot’—approximately 150°F (65°C). Use a frothing wand to create micro-foam; you want tiny, invisible bubbles that give the milk a wet-paint look. Gently tap the pitcher on the counter to remove any large bubbles.
- Pour the milk slowly into the center of the espresso. For a viral ‘latte art’ look, wiggle the pitcher slightly as you finish the pour to create a heart or rosette shape.
- Place the prepared coffee on the board alongside some artisanal biscuits or a small piece of dark chocolate. This pairing enhances the flavor profile of the beans.
- Finish by dusting a light coating of cinnamon or cocoa through a stencil for a professional look, and place a few fresh beans on the board for a rustic, aromatic garnish.
Flavor Infusion: How to Mix Spice Blends

Why we love this
There is a profound, earthy satisfaction in mixing your own spice blends on a wooden prep board. We love the vibrant, raw colors—the fiery orange of smoked paprika, the deep gold of turmeric, and the speckled grey of cracked peppercorns—laid out like an artist’s palette. The aroma is intoxicating, shifting from spicy and pungent to sweet and floral as you combine different elements. It feels like uncovering ancient secrets as you crush dried herbs between your fingers, releasing their concentrated oils. It’s a tactile, fragrant process that ensures your cooking is entirely unique, providing a freshness that store-bought jars simply cannot match.
Ingredients
- Whole Peppercorns and Sea Salt
- Dried Herbs (Oregano, Thyme, Rosemary)
- Ground Spices (Cumin, Smoked Paprika, Garlic Powder)
- Heat Elements (Chili Flakes, Cayenne Pepper)
- Aromatics (Dried Lemon Peel or Ginger Powder)
- Optional: Toasted Sesame Seeds
How to make it
- Clean your board thoroughly and ensure it is bone-dry. Any moisture will cause the ground spices to clump and lose their potency.
- Start with your ‘base’ spices. Measure out your salt and larger dried herbs first, placing them in distinct mounds on the board. This allows you to see the ratios before you commit to mixing.
- For maximum flavor, lightly toast whole seeds (like cumin or peppercorns) in a dry pan over medium heat for 1-2 minutes until they become fragrant. Once cooled, use a mortar and pestle to grind them coarsely before adding them to the board.
- Add your ‘accent’ spices. These are the high-intensity flavors like cayenne or smoked paprika. Add these in smaller increments, tasting (or smelling) as you go to ensure the heat doesn’t overwhelm the delicate herbs.
- Use a small whisk or a flat spoon to fold the spices together directly on the board. This ‘folding’ technique ensures an even distribution of fine powders and larger herb flakes.
- Transfer the blend into an airtight glass jar immediately. To make it ‘viral-ready,’ use a label maker or hand-calligraphed tags to identify your custom blend, and store it in a cool, dark place to preserve those volatile aromatic oils.
Conclusion: The Art of Gathering
Creating these food boards is about more than just food styling; it is about the intention we put into our gatherings. Whether you are celebrating a big milestone or just trying to make a Tuesday lunch a little more special, these boards offer a way to express creativity and care. I hope these ideas inspire you to clear off your counter, gather your favorite ingredients, and start building something delicious. Remember, the ‘perfect’ board isn’t the one that looks the most like a photograph—it’s the one that gets cleared the fastest by happy guests.
Frequently Asked Questions
How do I keep my food board fresh if I prep it in advance?
To keep your board fresh, wrap it tightly in plastic wrap and store it in the fridge. However, wait to add crunchy items like crackers or nuts until right before serving to prevent them from getting soggy. What is the best type of board to use for charcuterie?
Non-porous surfaces like marble or slate are excellent for keeping cheeses cool, while finished hardwoods like acacia or maple provide a classic, rustic look that is very durable. Can I make these boards budget-friendly?
Absolutely! Buy grains, nuts, and dried fruits in the bulk section to save money, and focus on seasonal produce which is usually cheaper and tastes better.