
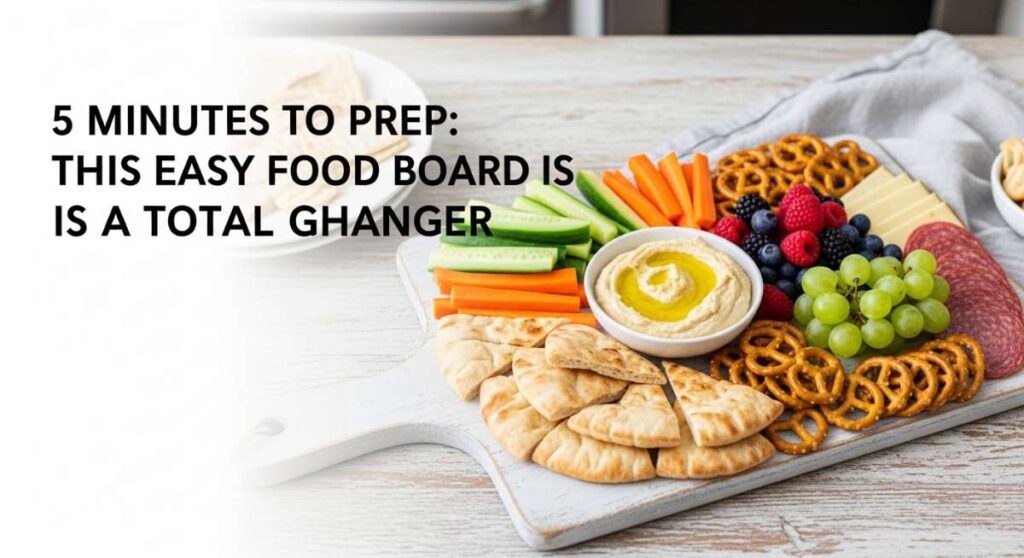
5 Minutes to Prep: This Easy Food Board Is a Total Game Changer
We’ve all been there: the sun is shining, the doorbell is about to ring, and you realize you haven’t even started the appetizers. There is a specific kind of panic that sets in when you want to be the ‘hostess with the mostess’ but life, laundry, and your inbox have other plans. I used to stress myself out trying to create complex multi-course meals, but lately, I’ve embraced the magic of the ‘food board’ lifestyle. It’s about more than just cheese and crackers; it’s about creating a communal experience that feels luxurious without stealing your entire afternoon.
The secret to a viral-worthy food board isn’t just the aesthetic—it’s the versatility. Whether you’re hosting a breezy backyard hang or a cozy spring dinner, having a handful of quick, reliable recipes that can be assembled in minutes is the ultimate game changer. Today, I’m sharing my favorite summer and spring staples that transform any ordinary platter into a feast for the senses. These are the dishes that make your guests lean in, take a photo, and ask, ‘How did you find the time?’ (Don’t worry, our secret is safe!)
How to make picnic side dishes

Why we love this
There is nothing quite like the refreshing crunch of a perfectly chilled Watermelon and Feta salad on a humid July afternoon. The contrast between the icy, sweet fruit and the creamy, salty tang of the feta creates a symphony of flavors that literally awakens your palate. Drizzled with a touch of balsamic glaze and topped with torn mint leaves, it smells like a botanical garden and tastes like pure sunshine. It’s the kind of side dish that stays crisp even in the picnic basket, making it a reliable and vibrant addition to any outdoor spread.
Ingredients
- 4 cups cubed seedless watermelon
- 1 cup crumbled high-quality Greek feta
- 1/2 cup fresh mint leaves, torn
- 2 tablespoons extra virgin olive oil
- 1 tablespoon balsamic glaze
- Flaky sea salt to taste
How to make it
- Begin by selecting a heavy, ripe watermelon; tap it to ensure a deep hollow sound which indicates high water content. Use a sharp chef’s knife to slice the melon into uniform 1-inch cubes, ensuring you remove all of the green rind and white pith.
- Place the chilled cubes into a large, wide glass bowl to prevent bruising the fruit. Gently sprinkle the crumbled feta evenly over the top, using your fingers to break up any excessively large chunks for a balanced bite.
- Wash your fresh mint under cold water and pat it completely dry with a paper towel. Instead of chopping, which can bruise the leaves and turn them bitter, gently tear the leaves by hand over the salad to release their aromatic oils.
- Whisk the extra virgin olive oil with a pinch of flaky sea salt in a small ramekin. Drizzle this mixture in a circular motion over the melon, then finish with a decorative zig-zag of thick balsamic glaze. Serve immediately or keep it on ice for maximum crispness.
How to cook spring dinner

Why we love this
Spring dinners should feel light, elegant, and full of citrusy zest, and nothing embodies that more than a pan-seared Lemon Herb Salmon. The aroma of sizzling butter infused with fresh dill and crushed garlic filling the kitchen is enough to make anyone’s mouth water instantly. The fish develops a gorgeous, golden-brown crust while remaining buttery and translucent in the center, melting away the moment it hits your tongue. It’s a sophisticated meal that feels like it belongs in a high-end bistro, yet it comes together with minimal effort and maximum flavor impact.
Ingredients
- 2 large Atlantic salmon fillets
- 1 organic lemon (sliced into rounds)
- 3 cloves garlic, smashed
- 2 tablespoons unsalted butter
- Fresh sprigs of dill and parsley
- Salt and cracked black pepper
How to make it
- Pat the salmon fillets extremely dry with paper towels; this is the most critical step to achieving a crispy skin and preventing the fish from steaming in its own moisture. Season both sides generously with kosher salt and freshly cracked black pepper.
- Heat a heavy-bottomed stainless steel or cast-iron skillet over medium-high heat for about 3 minutes. Add a tablespoon of high-smoke-point oil (like avocado oil) and wait until it shimmers and just begins to wisps of smoke appear.
- Place the salmon fillets skin-side down into the hot pan. Use a spatula to press down firmly for 10 seconds to ensure the skin makes full contact with the heat. Cook undisturbed for 4-5 minutes until the skin is crispy and the flesh has turned opaque halfway up the side.
- Flip the fillets carefully. Immediately add the butter, smashed garlic, lemon slices, and fresh herbs to the pan. As the butter foams and turns a nutty brown, use a spoon to continuously baste the salmon with the herb-infused butter for another 2 minutes. Remove from heat when the internal temperature reaches 125°F for a perfect medium.
How to make rotel dip

Why we love this
This is the ultimate comfort food that brings everyone together around the coffee table, reaching for just one more tortilla chip. The texture is velvety, molten, and perfectly gooey, with just the right amount of spicy kick from the diced green chilies. It smells like a tailgate party in the best way possible—savory sausage, melted cheese, and toasted spices. There’s something so nostalgic and satisfying about a dip that stays warm and dippable for hours, making it the MVP of any casual gathering or game night.
Ingredients
- 1 lb ground breakfast sausage
- 1 block (16 oz) Velveeta or easy-melt cheese
- 1 can (10 oz) Ro-Tel Diced Tomatoes and Green Chilies
- 1/2 cup whole milk (optional for consistency)
- Fresh cilantro for garnish
How to make it
- In a large skillet over medium heat, crumble the ground sausage using a wooden spoon or meat masher. Cook thoroughly until the meat is browned and slightly crispy, ensuring no pink remains. Carefully drain the excess fat into a heat-safe container to keep the dip from becoming oily.
- While the meat is browning, cut your cheese block into small, 1-inch cubes. Cutting the cheese into smaller pieces ensures it melts evenly and prevents scorching on the bottom of your pot.
- Transfer the browned sausage to a slow cooker or a heavy saucepan. Add the cheese cubes and the entire can of Ro-Tel (do not drain the liquid, as the tomato juice provides essential acidity and flavor).
- Heat on low, stirring frequently with a silicone spatula. If the mixture appears too thick, slowly whisk in 1/4 cup of milk at a time until you reach your desired silkiness. Once completely smooth, garnish with chopped cilantro and serve directly from the warm slow cooker.
How to make summer pasta

Why we love this
Summer pasta is all about celebrating the bounty of the garden, and this Burrata and Cherry Tomato Pasta is a masterclass in simplicity. As the tomatoes blister in the pan, they release a sweet, concentrated juice that coats the noodles in a natural, vibrant sauce. The real magic happens when you tear open the cold, creamy burrata over the hot pasta; the stracciatella center oozes out, creating a rich and luxurious texture that contrasts perfectly with the acidic tomatoes. It’s light enough for a warm evening but indulgent enough to feel like a special treat.
Ingredients
- 1 lb spaghetti or linguine
- 2 pints cherry tomatoes
- 4 cloves garlic, thinly sliced
- 1/4 cup extra virgin olive oil
- 2 balls of fresh Burrata cheese
- Handful of fresh basil leaves
- Red pepper flakes
How to make it
- Bring a large pot of heavily salted water to a rolling boil. Cook your pasta until it is ‘al dente’—usually 1-2 minutes less than the package instructions—as it will finish cooking in the sauce. Reserve 1 cup of starchy pasta water before draining.
- In a wide skillet, heat the olive oil over medium heat. Add the cherry tomatoes and cook them whole for 8-10 minutes. You want them to blister and eventually ‘pop.’ Use the back of your spoon to gently press on them to release their juices once they soften.
- Add the sliced garlic and a pinch of red pepper flakes to the tomatoes. Sauté for just 60 seconds until the garlic is fragrant and pale golden; do not let it brown or it will turn bitter.
- Toss the cooked pasta into the skillet with the tomatoes. Pour in half of the reserved pasta water and toss vigorously over medium heat. The starch will emulsify with the oil to create a glossy sauce. Plate the pasta and place a ball of Burrata in the center, tearing it open just before serving so the cream coats the noodles.
How to brew summer coffee

Why we love this
There is nothing quite as satisfying as the first sip of a DIY Vanilla Cold Foam Cold Brew on a sweltering morning. The sight of the thick, velvety white foam slowly cascading down through the dark, rich coffee is pure aesthetic bliss. It has a smooth, low-acid profile that feels incredibly refreshing, with a subtle sweetness that doesn’t overwhelm the palate. The aroma of toasted beans mixed with sweet vanilla bean is the ultimate wake-up call, providing a caffeine kick that feels like a luxury cafe experience right in your own kitchen.
Ingredients
- 1 cup coarse ground coffee
- 4 cups filtered water
- 1/4 cup heavy cream
- 2 tablespoons milk
- 1 tablespoon vanilla syrup
- Ice cubes
How to make it
- To make the cold brew concentrate, combine the coarse ground coffee and filtered water in a large mason jar. Stir gently to ensure all grounds are saturated. Cover and let it steep at room temperature for 12-15 hours, or in the fridge for up to 24 hours.
- Strain the coffee through a fine-mesh sieve lined with a paper coffee filter or cheesecloth. This ensures a crystal-clear brew without any gritty sediment. Store this concentrate in the fridge until icy cold.
- For the viral cold foam: In a small glass, combine the heavy cream, milk, and vanilla syrup. Use a handheld milk frother held at a slight angle. Froth for about 30-45 seconds until the mixture doubles in volume and reaches a thick, pourable consistency similar to melted ice cream.
- Fill a tall glass with large ice cubes. Pour the cold brew concentrate over the ice (dilute with a little water if you prefer it less strong). Slowly pour the vanilla cold foam over the top and watch the beautiful marbling effect happen before your eyes.
How to grill perfect kabobs

Why we love this
Grilling kabobs is the quintessential summer activity that fills the air with the irresistible scent of charred wood and caramelized marinade. These Honey Garlic Chicken kabobs offer a beautiful visual of vibrant peppers and onions interspersed with juicy, tender meat. The heat of the grill creates those sought-after char marks that add a smoky depth to the sweet and savory glaze. Each bite is a perfect balance of textures—from the snap of the grilled vegetables to the succulent, flavor-packed chicken that pulls effortlessly off the skewer.
Ingredients
- 1.5 lbs chicken thighs, cut into 1-inch chunks
- 2 bell peppers (any color), cut into squares
- 1 red onion, cut into wedges
- 1/4 cup honey
- 3 tablespoons soy sauce
- 2 cloves minced garlic
- Wooden or metal skewers
How to make it
- If using wooden skewers, soak them in water for at least 30 minutes prior to grilling to prevent them from catching fire. In a medium bowl, whisk together the honey, soy sauce, minced garlic, and a splash of oil to create your marinade.
- Toss the chicken chunks in half of the marinade and let them sit for at least 20 minutes. Thread the chicken and vegetables onto the skewers, alternating between meat and veg. Do not pack them too tightly; leaving a tiny bit of space allows the heat to circulate and cook everything evenly.
- Preheat your grill to medium-high heat (about 400°F). Lightly oil the grates using a rolled-up paper towel dipped in oil held with tongs. Place the kabobs on the grill and close the lid.
- Grill for 12-15 minutes, turning every 3-4 minutes to ensure even browning and charring. During the last 2 minutes of cooking, brush the remaining fresh marinade over the kabobs to create a sticky, glossy finish. Remove when the chicken reaches an internal temperature of 165°F.
How to make lemonade flavors

Why we love this
Standard lemonade is great, but a Lavender Blackberry Lemonade is a total showstopper that tastes like a sophisticated garden party. The deep, royal purple hue is absolutely stunning in a glass pitcher, looking more like a craft cocktail than a simple soft drink. The floral notes of the lavender provide a calming, aromatic undertone that perfectly complements the tartness of the fresh lemons and the earthy sweetness of the blackberries. It’s incredibly thirst-quenching and has a complex flavor profile that makes it feel much more expensive than it is to produce.
Ingredients
- 1 cup fresh lemon juice (about 6 lemons)
- 1 cup fresh blackberries
- 1/2 cup granulated sugar
- 1 teaspoon dried culinary-grade lavender
- 4 cups cold water
- Fresh mint for garnish
How to make it
- Create a lavender simple syrup by combining the sugar and 1 cup of water in a small saucepan. Add the dried lavender and bring to a gentle simmer, stirring until the sugar dissolves. Remove from heat and let it steep for 10 minutes before straining out the lavender buds.
- In a blender, pulse the fresh blackberries with a splash of water until completely liquified. Pour the puree through a fine-mesh strainer into a large pitcher to remove the seeds, resulting in a smooth, vibrant juice.
- Add the freshly squeezed lemon juice and the cooled lavender simple syrup to the blackberry juice in the pitcher. Stir well to combine the flavors.
- Add the remaining 3 cups of cold water and stir. Taste for sweetness; if you prefer it tarter, add more lemon, or more water if it’s too concentrated. Serve over plenty of ice with a sprig of mint and a few whole blackberries for a professional look.
How to bake summer desserts

Why we love this
When the temperature rises, nobody wants to keep the oven on for hours, which is why these Individual Strawberry Shortcake Jars are the ultimate summer dessert. They feature layers of macerated, ruby-red strawberries that have released their natural syrups, soaking into soft, crumbly biscuit layers. The whipped cream is airy and light, providing a cloud-like texture that balances the dense fruit. Smelling of vanilla and fresh-picked berries, these portable treats are perfect for outdoor dining because they stay contained and look incredibly charming in their little glass vessels.
Ingredients
- 1 quart fresh strawberries, sliced
- 1/4 cup sugar
- 1 package pre-baked shortcakes or biscuits
- 2 cups heavy whipping cream
- 1 teaspoon vanilla extract
- 2 tablespoons powdered sugar
How to make it
- In a medium bowl, toss the sliced strawberries with the granulated sugar. Let them sit at room temperature for at least 30 minutes; this process, called maceration, draws out the juices to create a natural strawberry sauce.
- Prepare the whipped cream by chilling a metal mixing bowl in the freezer for 10 minutes. Pour in the heavy cream, vanilla, and powdered sugar. Using a hand mixer or stand mixer, beat on high speed until stiff peaks form—be careful not to over-beat or it will turn into butter.
- Take small mason jars or clear glasses and place a layer of crumbled shortcake or biscuit at the bottom. Press down slightly so it forms a solid base.
- Spoon a generous layer of the strawberries and their syrup over the cake, then top with a large dollop of whipped cream. Repeat the layers until the jar is full, finishing with a beautiful swirl of cream and a garnish of a whole strawberry.
How to make sun tea

Why we love this
There is a nostalgic, slow-living charm to brewing tea using nothing but the power of the sun. Sun tea has a distinctively mellow, smooth flavor because the slow extraction process doesn’t release the bitter tannins that boiling water can. This Peach Hibiscus Sun Tea turns a gorgeous shade of pinkish-gold as it steeps on your porch, looking like a piece of summer decor in itself. It smells like a floral orchard and offers a clean, crisp finish that is far more refreshing than store-bought bottled teas, capturing the very essence of a lazy Sunday afternoon.
Ingredients
- 8 black or green tea bags
- 2 hibiscus tea bags (for color and tang)
- 1 gallon filtered water
- 2 ripe peaches, sliced
- Honey or agave (optional)
How to make it
- Fill a clean, one-gallon glass jar with filtered water. It is vital to use glass rather than plastic to avoid any chemical leaching from the sun’s heat.
- Place the tea bags into the water, hanging the strings over the edge of the jar and securing them with the lid. Add the sliced peaches directly into the water; the gentle heat will help the peach flavor infuse into the tea.
- Place the jar in a spot that receives direct, uninterrupted sunlight for 3 to 5 hours. Avoid leaving it out longer than 5 hours to ensure the tea remains fresh and safe to drink.
- Once the tea has reached a deep, rich color, bring the jar inside and remove the tea bags. Stir in your sweetener of choice while the tea is still slightly warm from the sun so it dissolves easily. Refrigerate immediately and serve over ice with the infused peach slices.
How to prep summer lunch
[IMAGE_10]
Why we love this
Summer lunches need to be fast, portable, and satisfying without being heavy, which is why a Chicken Caesar Wrap is a perpetual favorite. The combination of cold, crisp romaine lettuce and savory grilled chicken wrapped in a soft flour tortilla provides a satisfying crunch and a hit of protein that keeps you fueled for afternoon adventures. The creamy, garlicky Caesar dressing ties everything together with a punch of umami, while a sprinkle of parmesan adds a salty finish. It’s the kind of meal you can prep in bulk and grab as you head out to the pool or the park.
Ingredients
- 2 large flour tortillas
- 1 cup cooked chicken breast, sliced
- 2 cups chopped romaine lettuce
- 1/4 cup Caesar dressing
- 2 tablespoons shredded Parmesan cheese
- 1/4 cup croutons (crushed)
How to make it
- Start by tossing your chopped romaine, sliced chicken, and crushed croutons in a large bowl. Crushing the croutons slightly ensures you get a bit of crunch in every single bite without having large, sharp edges poking through the tortilla.
- Add the Caesar dressing and Parmesan cheese to the bowl. Toss thoroughly until every leaf and piece of chicken is evenly coated. Doing this in a bowl first ensures the flavor is distributed perfectly before it goes into the wrap.
- Lay your flour tortillas flat on a clean surface. If they are cold, microwave them for 10 seconds to make them more pliable and prevent tearing during the rolling process.
- Place the filling in a log shape in the center of the tortilla, leaving about 2 inches of space on the sides. Fold the sides inward over the filling, then roll from the bottom up, tucking the edge tightly as you go. Slice diagonally and wrap in parchment paper to keep the structure secure until lunchtime.
Conclusion
Creating a beautiful, viral-worthy food board doesn’t have to be a source of stress. By focusing on fresh, seasonal ingredients and simple assembly techniques, you can turn any gathering into a memorable event. Whether it’s the vibrant colors of a sun tea or the creamy indulgence of a burrata pasta, these recipes are designed to save you time while making a massive impact. So, grab a board, pick a few of these favorites, and enjoy the sunshine with the people you love!
Frequently Asked Questions
Q: How do I keep my food board looking fresh for hours?
A: The trick is to keep moisture-heavy items (like watermelon or dips) in their own bowls to prevent them from making crackers or bread soggy. You can also place the entire board on a bed of ice if you’re outdoors!
Q: Can I prep these items the night before?
A: Most components like the cold brew, sun tea, and marinated chicken can be prepped 24 hours in advance. However, wait to assemble salads and wraps until about an hour before serving to maintain that perfect crunch.
Q: What’s the best way to transport a food board?
A: Wrap the entire board tightly in plastic wrap, then a layer of foil. If you’re traveling far, keep the ‘wet’ ingredients in separate containers and assemble them once you arrive at your picnic spot.