
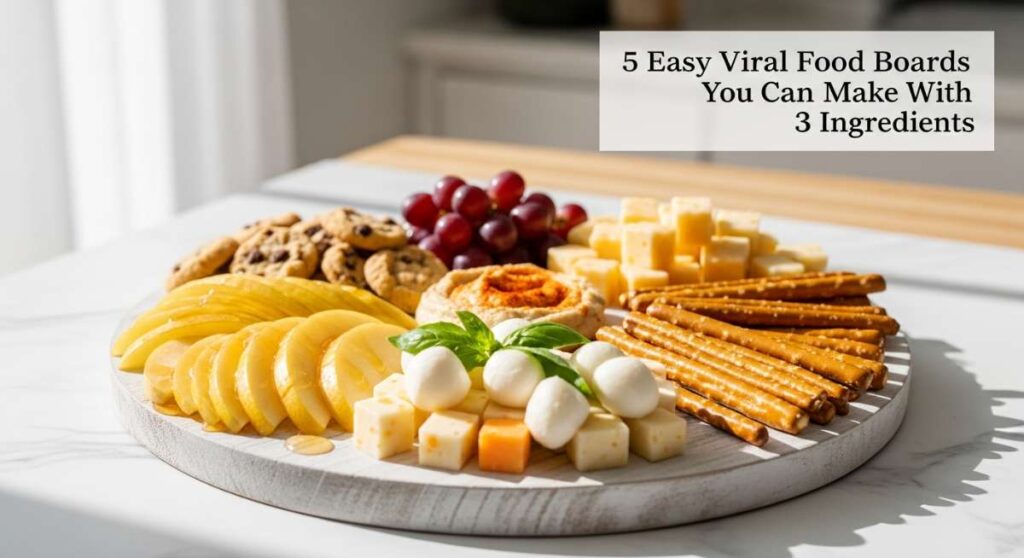
10 Easy Viral Food Boards You Can Make With 3 Ingredients
There is something undeniably magical about the way a shared meal brings people together. I remember the first time I set a massive, overflowing board on my coffee table; the room suddenly filled with laughter and the sound of friends reaching for a bite, the stress of the week simply melting away. In today’s fast-paced world, we often overcomplicate dinner, but I’ve found that the most viral-worthy moments happen when we strip things back to the basics and focus on high-quality, simple pairings.
These food boards aren’t just about eating; they are about the experience of colors, textures, and the ease of assembly. Whether you are hosting a cozy Sunday brunch or a mid-week gathering, these three-ingredient wonders prove that you don’t need a pantry full of spices to create a masterpiece. Let’s dive into these ten simple, stunning boards that will make your kitchen the heart of the home this season.
How to make spring salads?

Why we love this
Nothing captures the essence of a fresh start quite like a vibrant spring salad board. The crunch of baby greens paired with the sweetness of seasonal fruit creates a sensory explosion that smells like a dew-covered garden in the morning. When you bite into a perfectly ripe strawberry nestled against tangy goat cheese, the creamy texture balances the crispness of the leaves, leaving you feeling light, refreshed, and completely nourished. It’s the visual equivalent of a deep breath, bringing a pop of emerald green and ruby red to your dining table that feels as good as it looks.
Ingredients
- Fresh Arugula or Spring Mix
- Sliced Strawberries
- Crumble Goat Cheese
How to make it
- Begin by selecting the freshest arugula you can find; look for leaves that are vibrant green without any wilting. Wash them in ice-cold water to ensure maximum crispness and spin them completely dry. A damp leaf will make your board soggy, so take your time with this step.
- Arrange the greens as a plush bed on a wooden board, building height in the center to create a professional, voluminous look. This serves as the foundation for your other textures.
- Gently place your sliced strawberries atop the greens. For a viral look, slice them vertically so the heart shape is visible. Scatter them randomly but densely to ensure every bite has a burst of sweetness.
- Finish by crumbling the goat cheese over the top. Use your fingers to break it into varied sizes—some small dusty bits and some larger chunks—to provide a range of creamy textures. Serve immediately while the greens are at their peak turgidity.
How to cook spring chicken?

Why we love this
The aroma of lemon and thyme roasting alongside tender chicken is the ultimate comfort scent, wafting through the house and signaling a meal made with love. This board focuses on succulent, golden-brown skin and meat that pulls apart with the slightest touch of a fork. There is a beautiful rustic charm to serving chicken this way; it feels communal and hearty, yet elegant enough for a dinner party. The zestiness of the citrus cuts through the richness of the poultry, creating a balanced flavor profile that tastes like sunshine on a plate.
Ingredients
- Chicken Thighs (Bone-in, skin-on)
- Large Lemons
- Fresh Thyme Sprigs
How to make it
- Preheat your oven to 425°F (218°C). High heat is crucial for achieving that crispy, crackling skin while keeping the inside juicy. Pat the chicken thighs completely dry with paper towels; any moisture left on the skin will steam the meat rather than sear it.
- Thinly slice one lemon into rounds and place them directly on the board or roasting pan. Lay the chicken thighs on top of the lemon slices. This allows the lemon oils to infuse the meat from the bottom up while preventing the skin from sticking.
- Tuck generous sprigs of fresh thyme under and around the chicken. As the fat renders out of the chicken, it will fry the thyme, releasing an earthy, peppery aroma that permeates the entire dish.
- Roast for 35-40 minutes. You are looking for a deep golden-brown color on the skin and an internal temperature of 165°F. Let the chicken rest for at least 10 minutes before arranging it on your serving board to allow the juices to redistribute, ensuring a tender bite.
How to grill summer veggies?

Why we love this
Summer is synonymous with the smoky, charred goodness of a backyard grill, and a veggie board is the perfect way to celebrate the harvest. There is a satisfying snap to a perfectly grilled bell pepper and a tender, buttery finish to charred asparagus that feels indulgent yet healthy. The visual appeal of charred grill marks against bright orange, red, and green vegetables is enough to stop any scroll on social media. It’s a celebration of heat and earth, offering a smoky aroma that instantly triggers memories of warm evenings and outdoor laughter.
Ingredients
- Assorted Bell Peppers
- Fresh Asparagus Spears
- Balsamic Glaze
How to make it
- Heat your grill to medium-high heat, roughly 400°F. You want the grates hot enough to sear the vegetables quickly without turning them into mush. Clean the grates thoroughly to ensure those iconic, clean char lines.
- Prep your peppers by cutting them into wide, flat planks and trim the woody ends off the asparagus. Lightly coat them in a high-smoke-point oil. Don’t overdo the oil; you want them to grill, not deep-fry.
- Place the peppers skin-side down first until they begin to blister and blacken slightly. Add the asparagus perpendicular to the grill grates so they don’t fall through. Grill the asparagus for only 3-5 minutes, turning frequently until they are bright green with dark charred spots.
- Arrange the vegetables in a rainbow pattern on your board. Just before serving, drizzle the thick balsamic glaze in a zigzag pattern across the entire board. The acidity of the glaze will brighten the smoky flavors of the charred skin.
How to roast easter lamb?

Why we love this
Roasting lamb feels like a true occasion, a centerpiece that commands attention with its rich, savory fragrance and tender, blushing pink center. When prepared simply with garlic and herbs, the natural sweetness of the lamb shines through, offering a melt-in-your-mouth texture that is both sophisticated and deeply satisfying. This board brings a touch of tradition to the modern table, providing a succulent protein that pairs beautifully with the light, fresh sides of springtime. It’s the kind of dish that makes guests linger at the table, savoring every savory, herb-infused morsel.
Ingredients
- Rack of Lamb (or Lamb Chops)
- Fresh Garlic Cloves
- Dried Oregano
How to make it
- Bring your lamb to room temperature for about 30 minutes before cooking. This is a professional secret that ensures the meat cooks evenly from the edges to the center, preventing a gray outer ring.
- Create a paste by smashing the garlic cloves into a pulp and mixing it with the dried oregano. Rub this mixture vigorously into the meat, ensuring it gets into every crevice. The oregano provides an earthy crust that complements the gaminess of the lamb.
- Sear the lamb in a hot cast-iron skillet for 2-3 minutes per side until a brown crust forms. If using a rack, transfer the skillet to a 400°F oven for 12-15 minutes for medium-rare. Use a meat thermometer to hit exactly 135°F for that perfect pink center.
- Let the lamb rest for a full 10 minutes under a loose tent of foil. This is vital; cutting it too soon will cause the juices to run out, leaving the meat dry. Slice between the ribs and fan them out on the board for a stunning presentation.
How to fry spam musubi?

Why we love this
Spam Musubi is the ultimate salty-sweet comfort food that has taken the internet by storm for its iconic look and addictive flavor. The contrast between the crispy, caramelized edges of the fried ham and the soft, pillowy sushi rice is a texture lover’s dream. Wrapped in a sleek ribbon of salty seaweed, it’s a portable, snackable delight that brings a taste of the islands to your home. It’s fun to assemble and even more fun to eat, making it a guaranteed hit for any casual board-style gathering where guests can grab and go.
Ingredients
- Canned Spam
- Prepared Sushi Rice
- Nori (Seaweed) Sheets
How to make it
- Slice the Spam into even rectangular slabs, about 1/3 inch thick. In a non-stick skillet over medium heat, fry the slices without any extra oil. The fat in the meat will render out, allowing the Spam to fry in its own juices until the edges are dark brown and crispy.
- While the meat is frying, prepare your sushi rice. It should be sticky and warm. Using the empty Spam can as a mold (lined with plastic wrap), press a layer of rice firmly into the bottom to create a uniform block.
- Place a fried Spam slice on top of the rice block and press down firmly to join them. Lift the plastic wrap to remove the block from the can.
- Cut your Nori sheets into long strips. Wrap a strip around the center of the rice and Spam, sealing the edge with a tiny drop of water. Arrange the finished musubis in a neat grid on your board for a clean, viral-ready aesthetic.
How to cook creamy pasta?

Why we love this
A board dedicated to creamy pasta is the ultimate indulgence, offering a sea of silken noodles coated in a rich, velvety sauce that clings to every strand. The aroma of simmering cream and aged cheese is intoxicating, promising a warm and filling meal that feels like a hug in a bowl—or in this case, on a board. The visual of golden pasta being swirled and topped with extra cheese is incredibly satisfying, making it a favorite for food photographers and hungry families alike. It’s simple, elegant, and timelessly delicious.
Ingredients
- Fettuccine Pasta
- Heavy Cream
- Parmesan Cheese
How to make it
- Boil a large pot of heavily salted water. Cook the fettuccine until it is just ‘al dente’—firm to the bite—as it will continue to cook slightly in the sauce. Reserve half a cup of the starchy pasta water before draining.
- In a wide pan, bring the heavy cream to a gentle simmer over medium-low heat. Do not let it boil vigorously, or the cream may break. Let it reduce slightly for about 3 minutes until it coats the back of a spoon.
- Whisk in the finely grated Parmesan cheese slowly, allowing it to melt into the cream to create a smooth, lump-free sauce. Toss the cooked pasta into the pan, adding a splash of the reserved pasta water to help the sauce emulsify and stick to the noodles.
- Transfer the pasta to a large, shallow board or platter. Use a carving fork to create elegant swirls of noodles. Garnish with a final dusting of cheese and serve immediately while the sauce is perfectly glossy.
How to sear paleo steak?

Why we love this
There is nothing quite as primal and satisfying as a perfectly seared steak, its exterior dark and crusty while the inside remains tender and juicy. A steak board is a celebration of quality meat, emphasizing the deep, umami flavors that only come from a high-heat sear. The sight of a perfectly sliced ribeye, revealing its marbled, ruby-red interior, is enough to make anyone’s mouth water. It’s a high-protein, paleo-friendly option that feels like a luxury meal but requires very little prep, making it a staple for easy entertaining.
Ingredients
- Ribeye or New York Strip Steak
- Coarse Sea Salt
- Ghee (Clarified Butter)
How to make it
- Season your steak generously with coarse sea salt on all sides, including the edges, at least 45 minutes before cooking. This allows the salt to penetrate the fibers, seasoning the meat deeply and helping to create a better crust.
- Heat a heavy cast-iron skillet until it is screaming hot—you should see wisps of smoke. Add a tablespoon of ghee, which has a higher smoke point than regular butter, allowing for a more intense sear without burning.
- Place the steak in the pan and leave it undisturbed for 3-4 minutes to develop a thick, mahogany-colored crust. Flip only once and cook for another 3-4 minutes for medium-rare. Use a spoon to baste the steak with the hot ghee during the final minute of cooking.
- Remove the steak and let it rest for 8 minutes. This is non-negotiable for a juicy steak. Slice against the grain into thick strips and arrange them on the board, pouring any remaining juices from the cutting board back over the meat.
How to bake meatloaf muffins?

Why we love this
Meatloaf muffins take a nostalgic family favorite and turn it into a fun, bite-sized experience that is perfect for a food board. Each individual muffin has its own caramelized outer edge and a moist, savory center, ensuring that no one has to fight over the ‘end piece.’ The sweet and tangy glaze on top adds a beautiful shine and a punch of flavor that balances the richness of the meat. They are adorable to look at and incredibly easy to serve, making them a hit for both kids and adults who love a playful twist on a classic comfort dish.
Ingredients
- Ground Beef (80/20 mix)
- BBQ Sauce
- Large Eggs
How to make it
- Preheat your oven to 375°F (190°C) and lightly grease a standard muffin tin. In a large bowl, combine the ground beef with one egg per pound of meat. The egg acts as a binder, ensuring the muffins hold their shape without falling apart.
- Mix in half of your BBQ sauce directly into the meat. This seasons the interior and keeps the muffins incredibly moist during the baking process. Don’t overwork the meat; mix just until combined to avoid a tough texture.
- Scoop the mixture into the muffin tins, pressing down gently. Bake for 20 minutes. At this point, remove them from the oven and brush the remaining BBQ sauce generously over the tops of each muffin.
- Return to the oven for another 5-10 minutes until the glaze is tacky and bubbling, and the internal temperature reaches 160°F. Let them cool in the tin for 5 minutes before popping them out and arranging them in neat rows on your board.
How to make zucchini boats?
Why we love this
Zucchini boats are a fresh and colorful way to enjoy a low-carb meal that doesn’t skimp on flavor. The soft, roasted zucchini serves as a mild, slightly sweet vessel for bubbly melted cheese and zesty tomato sauce. There’s a wonderful contrast between the slightly firm skin of the zucchini and the gooey, stringy cheese on top. Arranged on a board, they look like a fleet of emerald ships, making for a beautiful and healthy presentation that smells like an Italian kitchen. It’s a light yet satisfying option that celebrates garden-fresh produce.
Ingredients
- Medium Zucchinis
- Marinara Sauce
- Shredded Mozzarella Cheese
How to make it
- Slice the zucchinis in half lengthwise. Use a small metal spoon to gently scrape out the seeds and a bit of the flesh, creating a hollow ‘trench’ down the center. Be careful not to go too deep; you need a sturdy base to hold the fillings.
- Place the zucchini halves on a baking sheet and roast them empty at 400°F for 10 minutes. This pre-cooking step ensures the zucchini is tender and prevents the sauce from making the vegetable too watery.
- Fill each hollowed-out center with a few spoonfuls of marinara sauce, then top with a generous layer of mozzarella cheese. Return to the oven for another 10-12 minutes.
- For a viral finish, turn on the broiler for the last 2 minutes to brown the cheese until it has golden-brown spots and is sizzling. Arrange the boats side-by-side on your board, perhaps garnished with some fresh herbs if you have them on hand.
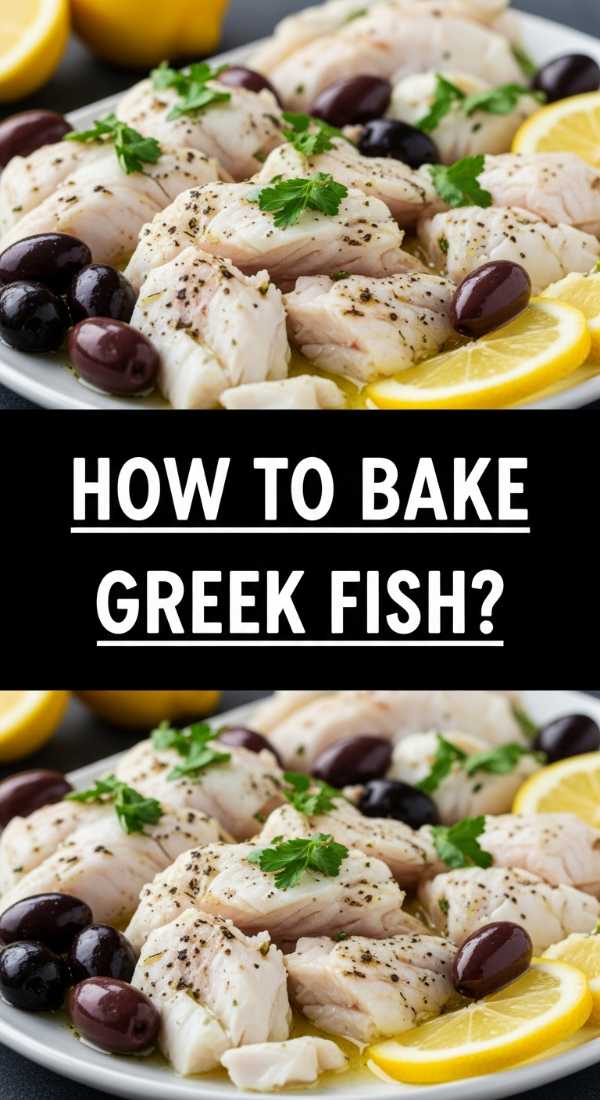
How to bake greek fish?
[IMAGE_10]
Why we love this
Baking fish with Greek-inspired flavors brings a light, Mediterranean breeze right into your dining room. The aroma of dried oregano and fresh lemon mingling with the delicate scent of white fish is clean and appetizing. This board is all about elegance and simplicity; the fish becomes flaky and tender, absorbing the citrus juices to create a bright, zesty profile. It’s a visually stunning dish that looks sophisticated but is secretly one of the easiest things to prepare, making it perfect for those who want to impress with minimal effort.
Ingredients
- White Fish Fillets (Cod or Tilapia)
- Fresh Lemons
- Dried Oregano
How to make it
- Preheat your oven to 375°F (190°C). Pat your fish fillets dry with a paper towel; this helps the oregano and lemon zest stick to the surface rather than sliding off.
- Place the fillets on a parchment-lined tray. Squeeze half a lemon over the fish and then sprinkle a generous amount of dried oregano over the top. The oregano provides a rustic, herbal crust that beautifully contrasts the white flesh of the fish.
- Thinly slice the remaining lemon and place the rounds directly on top of the fillets. This protects the delicate fish from the direct heat of the oven, keeping it moist while infusing it with even more citrus flavor.
- Bake for 12-15 minutes, depending on the thickness of the fillets. The fish is done when it is opaque and flakes easily with a fork. Carefully slide the fillets onto a serving board, keeping the roasted lemon slices on top for a beautiful, restaurant-quality presentation.
The Art of the Simple Board
As you can see, creating a viral-worthy meal doesn’t require hours in the kitchen or a long list of complicated ingredients. By focusing on three high-quality components and using proper techniques—like searing at high heat or allowing meat to rest—you can create boards that are as delicious as they are beautiful. These recipes are designed to be shared, so invite some friends over, clear off the table, and enjoy the simple pleasure of good food and great company.
Frequently Asked Questions
Got questions? We’ve got answers to help you master the art of the 3-ingredient board.