

2026 Mani Magic: The Ultimate Spring & Prom Nail Guide
Hello my loves, and welcome back to our cozy little corner of the internet. Can you feel it? There is a shift in the air, a soft, cloud-like embrace of new beginnings as we step into the 2026 spring season. It’s that magical time when the world starts to bloom, and our hearts start fluttering with the excitement of prom nights and sun-drenched afternoons.
I’ve been spending my mornings sipping lavender tea and dreaming up the most beautiful ways to adorn our fingertips this year. This season isn’t just about color; it’s about a feeling—a soft, ethereal glow that reflects the light within you. Whether you’re preparing for your big prom dance or just want to feel like a spring fairy, these designs are curated just for you, with all my love.
Trendsetting Nails 2026: Spring & Prom Edition
5 easy steps to paint lemon nails
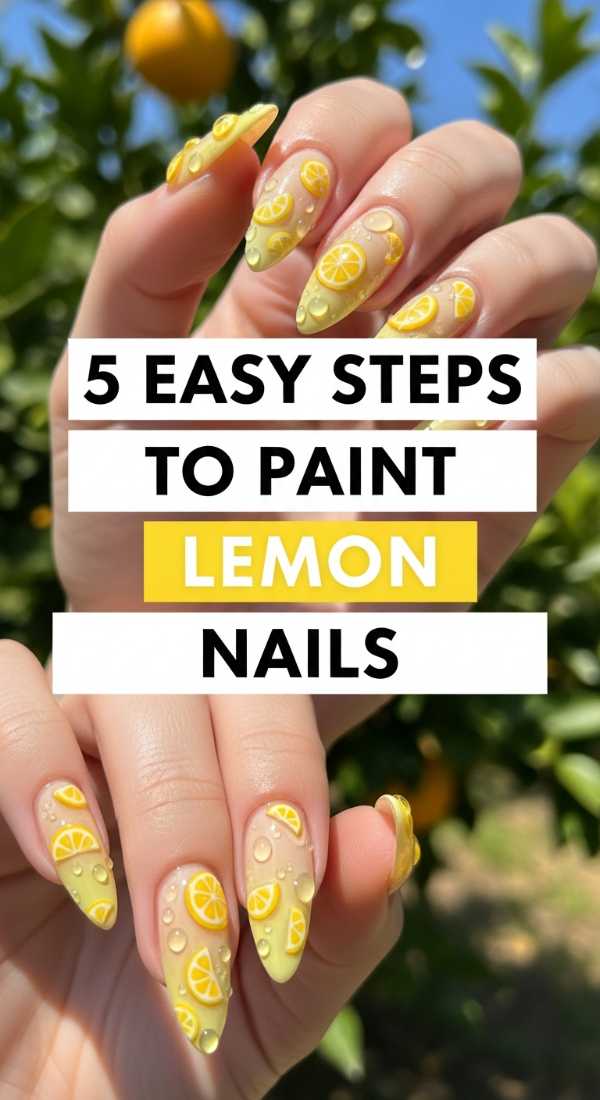
Why to love this Design:
There’s something so inherently joyful about a citrus-inspired mani. It’s like carrying a little slice of sunshine with you wherever you go. These lemon nails are zesty, fresh, and bring an instant smile to everyone who sees them—perfect for those first warm spring picnics.
Essential Elements:
- Soft pastel yellow polish
- Crisp white liner paint
- Leaf green lacquer
- Fine-tipped detailing brush
- Glossy top coat
How to Prepare:
- Apply a sheer nude base and let it dry completely.
- Use your brush to paint two small yellow ovals near the tip of the nail.
- Add a tiny white ‘v’ shape inside the yellow ovals for dimension.
- Dab two small green leaves at the top of your lemons.
- Seal the design with a high-shine top coat to make the colors pop.
Budget Range
- Essie ‘Check Your Baggage’ Yellow: $10.00
- Beetles Nail Art Liner Brushes: $7.99
- Sally Hansen Shiny Top Coat: $6.00
4 simple ways to style black prom nails

Why to love this Design:
Black is the ultimate statement for prom night. It’s sophisticated, edgy, and pairs perfectly with any gown color. In 2026, we are moving away from plain black and into textures that feel rich, moody, and undeniably chic for a night under the stars.
Essential Elements:
- Deep obsidian polish
- Matte top coat
- Silver micro-gems
- Velvet magnetic powder
How to Prepare:
- The Velvet Look: Apply magnetic black polish and use a magnet to create a soft, dimensional sheen.
- The Matte-Gloss Mix: Paint nails matte black but add a glossy French tip for a subtle contrast.
- The Constellation: Use silver gems on a plain black base to mimic a night sky.
- The Marble Edge: Swirl black and grey together for a smoky, sophisticated stone effect.
Budget Range
- OPI ‘Black Onyx’: $11.50
- Matte Finish Top Coat: $8.00
- Nail Rhinestone Kit: $9.00
3 quick techniques for red spring nails

Why to love this Design:
Red isn’t just for winter; in 2026, we’re seeing it transformed into a soft, romantic spring staple. It’s the color of cherry blossoms and early tulips. These techniques keep red feeling light, airy, and modern rather than heavy or winter-coded.
Essential Elements:
- Jelly red polish
- Floral nail decals
- Sponge for ombre
How to Prepare:
- The Jelly Bloom: Layer sheer red polish for a translucent, glass-like finish that looks like candy.
- The Petal Ombre: Sponge red polish onto the tips of a nude nail, fading it toward the cuticle.
- The Minimalist Accent: Keep four nails nude and paint one single, bold red rose on the ring finger.
Budget Range
- Cirque Colors Jelly Polish: $12.50
- Spring Floral Decal Set: $5.00
- Makeup Sponges: $3.00
6 steps to achieve tuscan nails 2000s style

Why to love this Design:
This aesthetic is all about that sun-drenched, Y2K energy. Think terracotta tiles, Mediterranean vibes, and the golden hour glow of a Tuscan summer. It’s warm, earthy, and perfectly fits the 2000s revival we are all obsessed with right now.
Essential Elements:
- Terracotta orange polish
- Gold leaf flakes
- Creamy beige base
- Dotting tool
How to Prepare:
- Apply two coats of creamy beige as your earthy foundation.
- Use the terracotta shade to paint organic, wavy swirls across the nail.
- Apply a small amount of foil glue to the centers of the swirls.
- Gently press gold leaf flakes onto the glue for a sun-kissed look.
- Use a dotting tool to add tiny white accents around the gold.
- Finish with a satin-finish top coat to keep it looking natural and rustic.
Budget Range
- Zoya ‘Abby’ Terracotta: $12.00
- Gold Leaf Flakes for Nails: $6.50
- Dotting Tool Set: $4.00
7 minutes to create a tropical nail set

Why to love this Design:
In just seven minutes, you can transport yourself to a private island. This set is all about vibrancy and life—perfect for spring break or a prom theme that’s a bit more exotic. It’s fast, fun, and makes a huge impact with very little effort.
Essential Elements:
- Neon teal and coral polish
- Hibiscus flower stickers
- Quick-dry spray
How to Prepare:
- (Min 1-2) Paint alternating nails teal and coral.
- (Min 3) While slightly tacky, place a large hibiscus sticker on the thumb and ring finger.
- (Min 4) Add small green leaf stickers around the flowers.
- (Min 5-6) Apply a thick layer of quick-dry top coat.
- (Min 7) Spritz with quick-dry spray and you’re out the door!
Budget Range
- China Glaze Neon Collection: $9.00 each
- Tropical Nail Sticker Pack: $4.00
- OPI DripDry Drops: $15.00
3 secrets for perfect butter yellow nails chrome
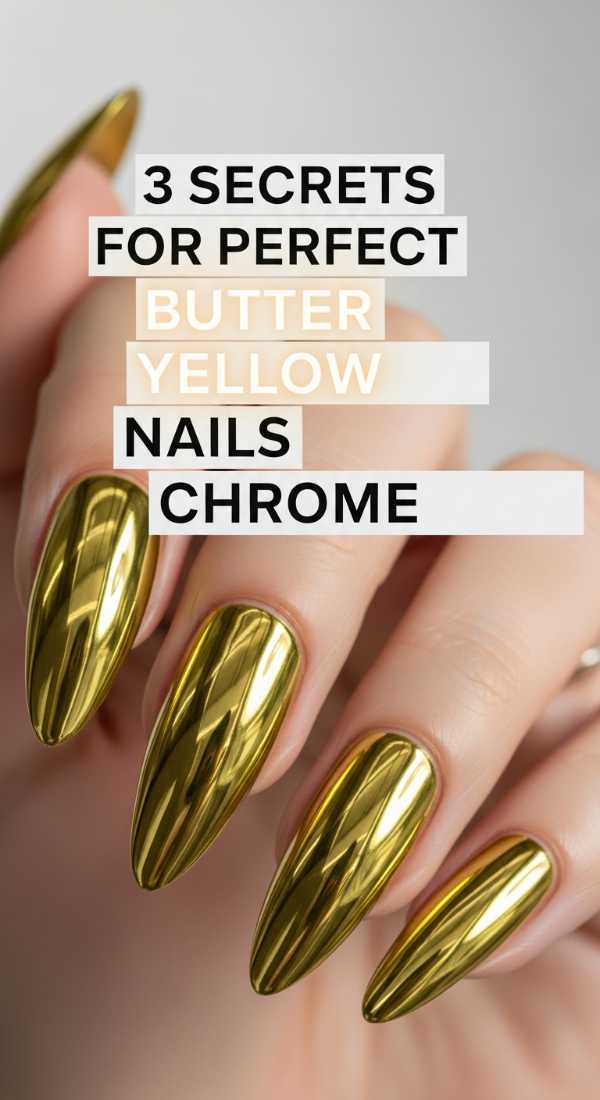
Why to love this Design:
The world is obsessed with butter yellow right now, and adding a chrome finish makes it look like liquid silk. It is the “it” color for 2026. It’s soft enough for school but glamorous enough for a prom queen.
Essential Elements:
- Soft butter yellow polish
- White or pearl chrome powder
- Non-wipe gel top coat
How to Prepare:
- The Buff Secret: Ensure the nail is perfectly buffed; chrome reveals every bump, so a smooth surface is non-negotiable.
- The Top Coat Timing: Apply a non-wipe top coat and cure it for only 30 seconds so it remains slightly ‘grabby’ for the powder.
- The Rubbing Technique: Use a silicone tool instead of an eyeshadow sponge to rub the powder in for a true mirror finish.
Budget Range
- Holler and Glow Butter Polish: $8.00
- Born Pretty Pearl Powder: $7.00
- UV Nail Lamp: $20.00
5 rules for styling gothic spring nails

Why to love this Design:
Spring doesn’t always have to be about bright pastels. Gothic spring is about the beauty of the shadows—think dark florals and Victorian lace. It’s for my loves who find magic in the moonlight and want a prom look that is uniquely mysterious.
Essential Elements:
- Deep plum or forest green base
- Matte black lace stickers
- Silver metallic liner
How to Prepare:
- Rule 1: Always balance your dark base with a delicate metallic detail to keep it ‘spring-like’.
- Rule 2: Use a matte finish on the dark color to give it a velvet, high-fashion feel.
- Rule 3: Incorporate botanical motifs (like thorns or wilted roses) to stay on-theme.
- Rule 4: Keep the nail shape almond or stiletto to enhance the gothic aesthetic.
- Rule 5: Use silver accents instead of gold for a cooler, more ethereal vibe.
Budget Range
- Revlon ‘Vixen’ Plum: $7.00
- Lace Nail Decals: $5.00
- Metallic Silver Sharpie for Nails: $3.00
4 tips to apply hot coral nails

Why to love this Design:
Hot coral is the energetic sister of pink. It’s the perfect transition shade for when the sun starts to linger longer in the sky. It looks incredible against every skin tone and brings a punch of life to any outfit.
Essential Elements:
- Neon coral lacquer
- White base coat
- Conditioning cuticle oil
How to Prepare:
- The White Base Tip: Always apply a coat of white polish first to make the neon coral truly neon.
- Thin Layers: Apply three very thin layers rather than two thick ones to avoid streaks.
- The Clean Edge: Use a small brush dipped in acetone to clean the cuticle line for a salon-perfect look.
- The Hydration Finish: Finish with cuticle oil to make the skin around the bright color look healthy and glowing.
Budget Range
- Orly ‘Put the Lime in the Coconut’ White: $10.00
- Color Club ‘High Roller’ Coral: $8.50
- SolarOil Cuticle Pen: $9.00
5 steps to match hands and toes nails

Why to love this Design:
There is a special kind of confidence that comes from a perfectly coordinated hand and toe look. In 2026, we aren’t just doing the exact same color—we are doing ‘sister’ designs that complement each other for a total head-to-toe vibe.
Essential Elements:
- Coordinating polish duo (e.g., lavender and silver)
- Toe separators
- Matching glitter accents
How to Prepare:
- Pick a primary color for your hands and a secondary color for your toes that exists in the same family.
- Use the same glitter top coat on your ring fingers and big toes to tie the look together.
- Ensure the shape is consistent—if hands are oval, keep toes neatly rounded.
- Apply the same level of shine (glossy or matte) to both to ensure they feel like a set.
- Hydrate both hands and feet with the same scented lotion for a cohesive sensory experience.
Budget Range
- Mani-Pedi Home Kit: $15.00
- Essie Gel Couture Duo: $18.50
- Exfoliating Foot Scrub: $6.00
6 ways to design lavender sparkle nails
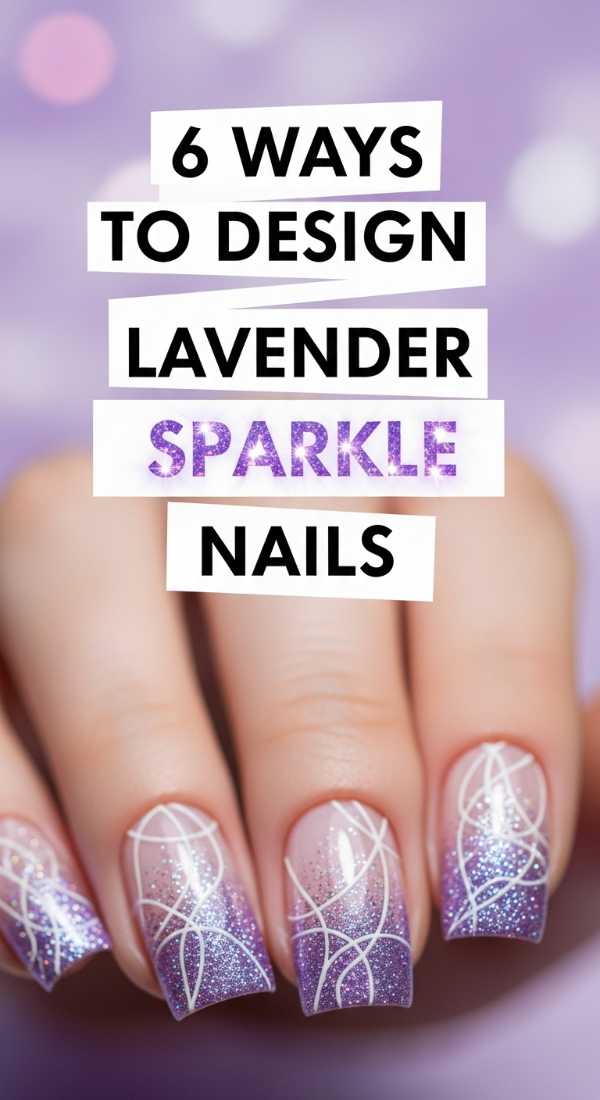
Why to love this Design:
Lavender sparkle is the definition of ethereal. It’s soft, dreamlike, and catches the light in the most magical way during a prom slow dance. It feels like wearing tiny pieces of a purple sunset on your fingers.
Essential Elements:
- Lilac cream polish
- Holographic glitter topper
- Iridescent star sequins
How to Prepare:
- The Sparkle Ombre: Apply lavender at the base and glitter only at the tips.
- The Full Disco: Layer two coats of heavy glitter over a lilac base for maximum reflection.
- The Celestial Look: Place three iridescent star sequins on each nail over a sheer lavender wash.
- The Matte Mix: Paint nails lavender and add a single vertical stripe of sparkle down the center.
- The French Sparkle: Use glitter for the tips instead of white for a modern twist.
- The Crystal Cluster: Place small lavender crystals at the cuticle of a plain sparkle nail.
Budget Range
- ILNP ‘Daydreamer’ Lavender: $12.50
- Holographic Star Sequins: $4.00
- Nail Glue for Gems: $5.00
Go Forth and Shine, My Loves
I hope these designs spark a little light in your soul as you prepare for the beautiful months ahead. Remember, your nails are just an extension of the magic you already carry within. Whether you choose the zest of a lemon or the moody depth of a gothic rose, wear it with your head held high. You are the art, my loves. I can’t wait to see which look you choose for your prom nights and spring adventures!