
Have you ever scrolled through your feed and felt that sudden spark of inspiration—the kind that makes you want to drop everything and start a weekend project? We’ve all been there, dreaming of a home that feels like a curated sanctuary rather than just a place where we store our stuff. There’s something incredibly soulful about putting your own hands to work, whether it’s planting a seed or painting a wall, to transform your living space into a reflection of your happiest self.
Lately, the internet has been buzzing with DIY hacks that promise professional results with a personal touch. But let’s be honest: not every viral trend lives up to the hype. That’s why I’ve spent the last few months testing, tweaking, and perfecting these ten home and garden projects. These aren’t just quick fixes; they are transformative upgrades that bring warmth, texture, and a sense of ‘vacation at home’ to your everyday life. Let’s dive into the projects that actually work and will make your neighbors stop and stare.
How to Create an Island Theme Backyard for Tropical Vibes
Why we love this
There is nothing quite like the sensory escape of a tropical oasis right outside your back door. We love this hack because it replaces the mundane suburban lawn with the lush, humid fragrance of jasmine and the rustle of palm fronds in the evening breeze. Imagine the feeling of warm sand between your toes or the soft glow of tiki torches reflecting off large, waxy green leaves. It transforms your backyard into a permanent vacation spot where the air feels cooler and the stresses of the day simply melt away into the sunset.
Essential Elements:
- Hardy Palm trees (like Windmill or Sago)
- Bamboo fencing or privacy screens
- String lights and citronella tiki torches
- Coarse play sand or pea gravel for a ‘beach’ zone
- Brightly colored outdoor cushions in teal and coral
- Tropical perennials like Canna Lilies and Hibiscus
How to make it
- Start by mapping out a ‘zone’ for your island escape; a corner of the yard works best to create an enclosed, private feel. Clear the grass and level the ground meticulously.
- Install bamboo fencing over existing chain-link or wood fences using heavy-duty zip ties or galvanized wire to instantly change the backdrop to a woodsy, tropical texture.
- Lay down a heavy-duty landscape fabric to prevent weeds, then pour a 3-inch layer of coarse sand or pea gravel to create a tactile ‘shoreline’ area for your lounge chairs.
- Position your large ‘anchor’ plants. Dig holes twice the width of the root ball for your palms, ensuring you use well-draining soil mixed with a bit of sand to mimic their natural habitat.
- Add ‘filler’ plants like Hibiscus or Ferns around the base of the palms to create layers of height and varied shades of green.
- String warm-toned Edison bulbs in a zig-zag pattern overhead, securing them to sturdy posts or existing trees, to mimic the golden hour glow of a beach resort.
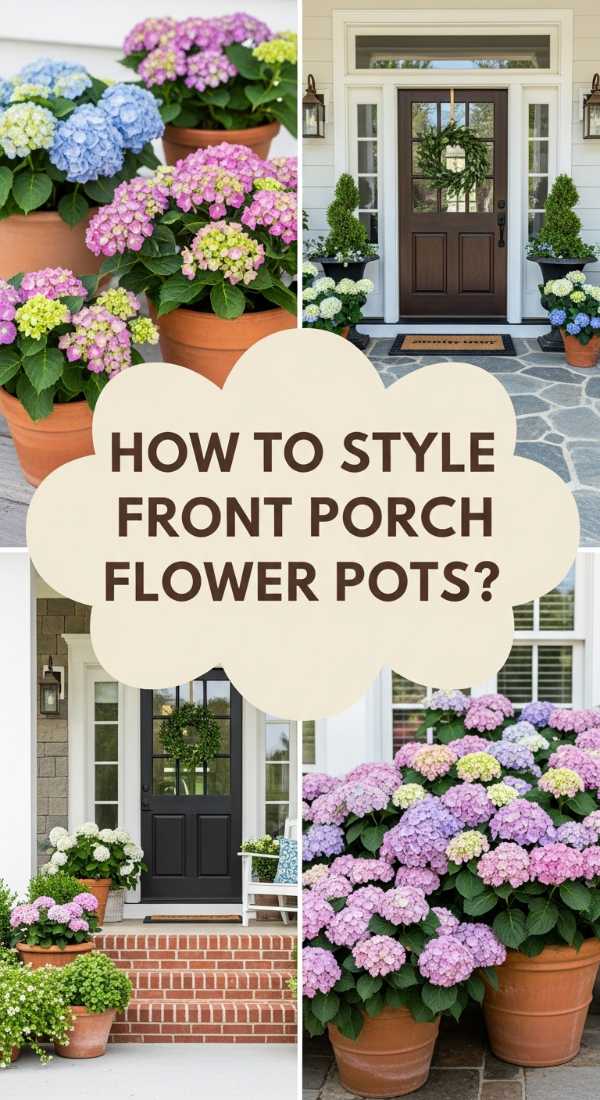
How to Style Front Porch Flower Pots for Instant Curb Appeal

Why we love this
Your front porch is the handshake of your home—it’s the first thing guests see and the first thing that welcomes you back after a long day. Styling large, intentional pots brings a burst of life and color that softens the hard lines of architecture. We adore the ‘Thriller, Filler, Spiller’ method because it creates a professional, multi-dimensional look that feels expensive and lush. The scent of fresh petunias and the sight of vibrant greens against your front door create a cheerful atmosphere that radiates hospitality and pride of ownership.
Essential Elements:
- Large, weather-resistant planters (ceramic or high-quality resin)
- Premium potting mix with slow-release fertilizer
- ‘Thriller’ plants (Dracaena, Grasses, or Canna Lilies)
- ‘Filler’ plants (Geraniums, Marigolds, or Lantana)
- ‘Spiller’ plants (Sweet Potato Vine, Creeping Jenny, or Lobelia)
How to make it
- Choose a pair of oversized pots that complement your door color; larger pots hold more moisture, which means less frequent watering for you during hot spells.
- Fill the bottom third of the pot with empty plastic water bottles or packing peanuts to reduce weight and save on expensive potting soil, then fill the rest with high-quality mix.
- Plant your ‘Thriller’ (the tallest, most dramatic plant) exactly in the center if the pot is viewed from all sides, or toward the back if it sits against a wall.
- Surround the thriller with ‘Fillers’—mid-sized flowering plants that add bulk and color. Space them about 4 inches apart to allow for growth.
- Tuck your ‘Spillers’ along the very edge of the pot, angling them slightly outward so they naturally begin to drape over the sides as they grow.
- Water deeply until liquid runs out of the drainage holes, and finish with a layer of moss or decorative pebbles to hide the soil and retain moisture.
How to Build a DIY Grill Station for Outdoor Entertaining

Why we love this
Cooking outside shouldn’t feel like a chore where you’re constantly running back and forth to the kitchen for a spatula. This DIY grill station is a game-changer because it creates a functional, ruggedly handsome ‘outdoor kitchen’ hub. We love the smell of cedar wood mingling with charcoal smoke and the tactile satisfaction of having a wide, smooth countertop for prepping burgers and resting steaks. It turns the person at the grill from a lonely cook into the centerpiece of the party, surrounded by friends and cold drinks.
Essential Elements:
- Pressure-treated 2x4s for the frame
- Cedar planks for the exterior siding
- Concrete pavers or a stainless steel sheet for the countertop
- Heavy-duty locking casters (wheels)
- S-hooks and a magnetic tool bar
- Weather-proof wood stain or sealant
How to make it
- Measure your grill’s height and width; your station should be about 36 inches high (standard counter height) and provide at least 2 feet of workspace on either side.
- Build two rectangular frames using the 2x4s and wood screws, then connect them with four vertical legs to create the skeleton of your cart.
- Attach the heavy-duty casters to the bottom of the legs while the frame is upside down; this allows you to move the station into the shade or out of the rain easily.
- Flip it over and wrap the sides in cedar planks, leaving small 1/8-inch gaps between boards for airflow and wood expansion.
- For the countertop, lay down a piece of exterior-grade plywood and top it with smooth concrete pavers or a custom-cut piece of stainless steel for a heat-resistant, easy-to-clean surface.
- Install a magnetic bar on the side for knives and several S-hooks for your tongs and brushes. Finish the wood with a deep walnut stain to protect it from the elements.
How to Design Low Maintenance Flower Beds for a Beautiful Yard
Why we love this
The dream is a garden that looks like a magazine cover but doesn’t require a full-time gardener to maintain. We love this approach because it emphasizes sustainability and the natural beauty of perennials that return year after year, getting bigger and better without extra effort. There is a deep peace in watching a well-designed bed wake up in the spring, featuring textures ranging from the soft, silvery leaves of Lamb’s Ear to the sturdy, structural stalks of Coneflowers. It’s about working with nature, not against it, giving you more time to actually sit and enjoy the view.
Essential Elements:
- Native perennial plants (specific to your hardiness zone)
- Professional-grade landscape fabric
- High-quality cedar or pine mulch
- Stone or brick edging
- Soaker hoses or drip irrigation lines
How to make it
- Define your bed’s shape using a garden hose to mark the curves; natural, flowing lines are much more visually appealing than stiff straight edges.
- Remove the grass and top 2 inches of soil, then lay down a layer of cardboard or heavy-duty landscape fabric to suffocate future weed growth.
- Cut ‘X’ shapes into the fabric where you want your plants to go. Choose native perennials like Lavender, Black-Eyed Susans, or Hostas, which are naturally resistant to local pests and weather.
- Install a soaker hose system underneath the mulch layer; this delivers water directly to the roots, reducing evaporation and preventing leaf diseases.
- Apply a thick 3-inch layer of organic mulch. This is the ‘secret sauce’ that keeps moisture in, keeps weeds out, and gives the bed a clean, finished look.
- Finish the perimeter with stone edging to keep the mulch from washing away during heavy rains and to provide a crisp line for your lawn mower to follow.
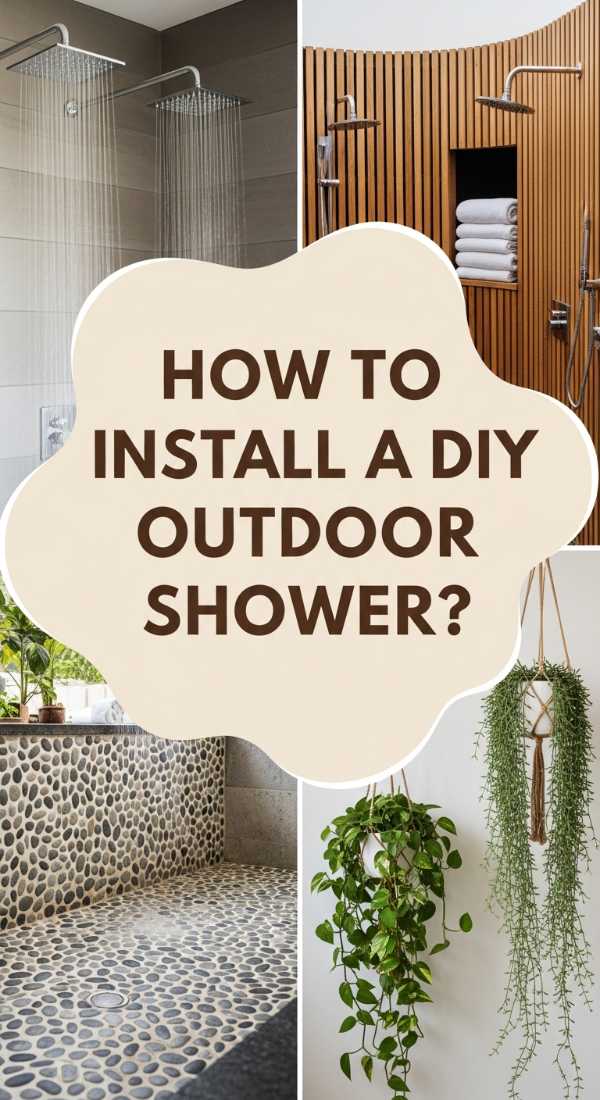
How to Install a DIY Outdoor Shower for Summer Refreshment
Why we love this
There is nothing quite as liberating or refreshing as rinsing off under the open sky after a day at the beach or working in the garden. This DIY project brings a touch of luxury ‘eco-resort’ vibes to your home. We love the feeling of cool water against warm skin, the scent of cedar wood when it gets wet, and the sound of water hitting smooth river stones. It’s a practical solution for keeping mud and sand out of the house, but it also doubles as a private sanctuary for a quick, cooling reset during the height of summer.
Essential Elements:
- Outdoor-rated shower head and valve kit
- UV-resistant PVC or copper piping
- Privacy lattice or cedar fence panels
- River stones or a slatted teak floor mat
- Garden hose adapter (for an easy ‘no-plumb’ setup)
How to make it
- Select a sunny, private spot near an outdoor water spigot. Ensure the ground has a slight slope to allow for proper drainage away from your home’s foundation.
- Build a simple three-sided privacy enclosure using cedar posts and lattice panels. Cedar is naturally rot-resistant and smells incredible when damp.
- For the flooring, dig out a 4-inch deep area and fill it with smooth river stones. This creates a natural drainage pit that prevents puddles and feels great underfoot.
- Mount the shower head to a sturdy vertical post at about 7 feet high. Use a ‘no-plumb’ kit that allows you to connect a standard garden hose directly to the shower valve.
- If using a hose, choose a black hose and leave it in the sun to naturally pre-heat the water for a lukewarm, comfortable rinse.
- Add a few waterproof hooks for towels and a small wooden bench for soap and shampoo, and you’re ready for the ultimate summer cool-down.
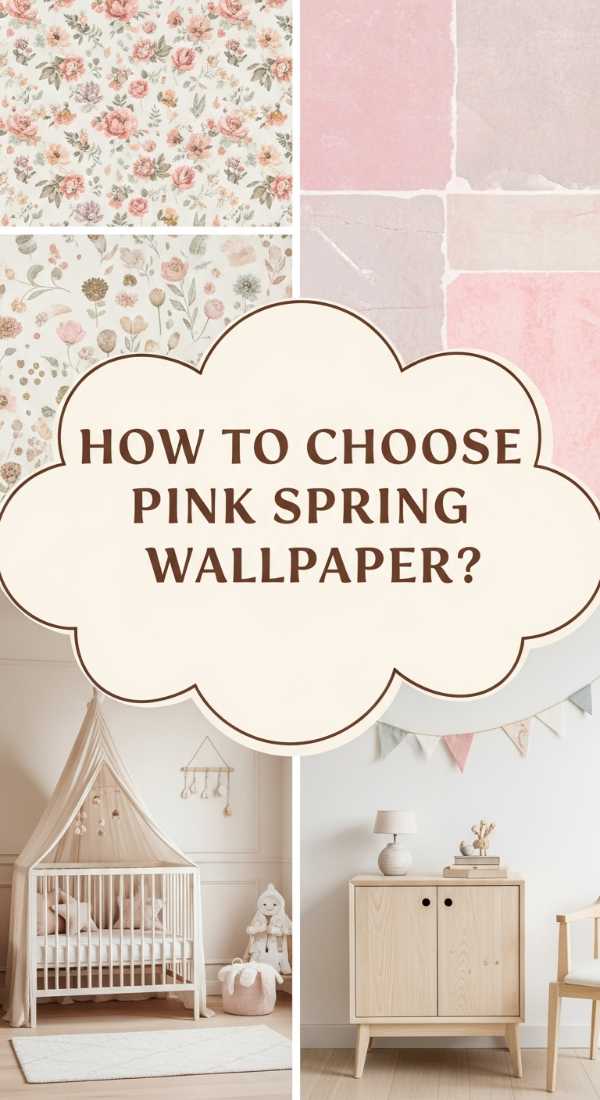
How to Choose Pink Spring Wallpaper for a Dreamy Bedroom

Why we love this
Pink isn’t just for nurseries anymore; the right shade of blush or dusty rose can make a bedroom feel like a sophisticated, high-end hotel suite. We love this hack because wallpaper adds a layer of texture and pattern that paint simply can’t match. It creates a ‘cocoon’ effect that is incredibly soothing. Imagine waking up surrounded by soft floral patterns or subtle linen-textured pinks that catch the morning light. It’s a bold way to inject personality and warmth into a room, making it feel curated, intentional, and endlessly romantic.
Essential Elements:
- Peel-and-stick or pre-pasted wallpaper
- Smoothing tool (squeegee)
- Sharp utility knife with extra blades
- Wallpaper paste (if using non-pasted)
- Level and measuring tape
How to make it
- Select a pattern with a ‘muted’ pink—think terracotta, blush, or mauve—to ensure the room feels grown-up and serene rather than overwhelming.
- Prep your walls by cleaning them with a damp cloth and removing all outlet covers. A smooth, dust-free surface is critical for the adhesive to bond correctly.
- Use a level to draw a perfectly vertical ‘plumb line’ on the wall where you will start your first strip; never assume your corners are perfectly straight!
- Align the top of the wallpaper strip with the ceiling, leaving an extra inch of overhang. Slowly peel the backing (for peel-and-stick) and smooth from the center outward.
- Use your smoothing tool to push out every air bubble. If you get a stubborn bubble, use a tiny pin to prick it and smooth the air out.
- Trim the excess at the ceiling and baseboard using a very sharp utility knife, changing the blade frequently to avoid tearing the damp or sticky paper.
How to Select Pool Stone and Tile for a Luxury Oasis
Why we love this
The right tile and stone can turn a basic backyard pool into a Mediterranean masterpiece. We love the way natural travertine stays cool underfoot even in the blistering sun, and how glass mosaic tiles shimmer like jewels under the water. The combination of earthy stone textures and the sparkling blue of the pool creates a visual harmony that is both grounded and opulent. It’s about the feeling of luxury—the smooth touch of the stone and the way the colors shift from turquoise to deep navy as the sun moves across the sky.
Essential Elements:
- Travertine or French Pattern pavers for the deck
- Glass or porcelain mosaic tiles for the waterline
- Submersible-grade thin-set and grout
- Stone sealer (slip-resistant)
- Bullnose coping stones for the pool edge
How to make it
- Choose a ‘cool’ stone like Travertine for the pool deck; its porous nature allows it to breathe, meaning it won’t burn your feet like concrete or dark slate.
- Select a waterline tile that has a bit of iridescence. Glass tiles reflect the sunlight back through the water, creating that ‘sparkle’ effect found in high-end resorts.
- Ensure your ‘coping’ (the edge of the pool) is bullnosed—meaning it has a rounded edge. This is safer for swimmers and provides a much more comfortable grip.
- When laying the deck pavers, use a ‘French Pattern’ (a mix of sizes) to create a timeless, high-end look that hides imperfections better than a standard grid.
- Use a high-quality grout with an antimicrobial agent to prevent algae growth in the joints between the tiles at the water level.
- Apply a penetrating, non-slip sealer to the stone deck once installed to protect against chlorine and salt while ensuring the surface remains safe when wet.
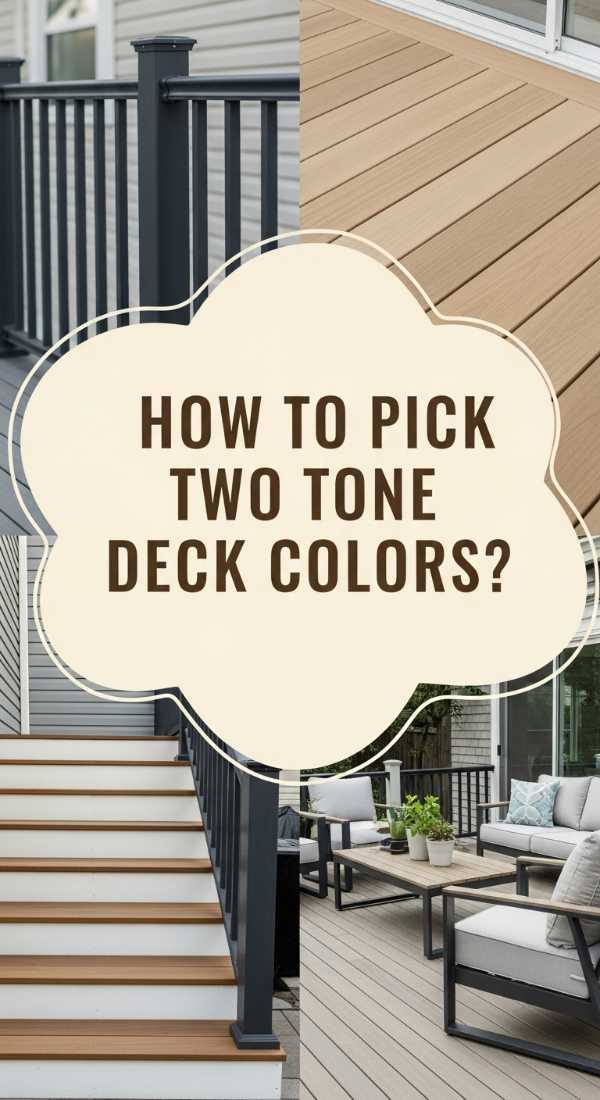
How to Pick Two Tone Deck Color Ideas for a Modern Look
Why we love this
A single-color deck can often look flat and utilitarian, but a two-tone design adds architectural depth and high-end style. We love the contrast between a dark ‘picture frame’ border and a lighter interior; it defines the space like a beautiful outdoor rug. The visual weight of the darker trim grounds the deck, while the lighter planks reflect heat and keep the main walking area comfortable. It’s a modern, sophisticated look that makes your outdoor furniture pop and gives the whole structure a custom, designer feel.
Essential Elements:
- High-quality semi-transparent or solid deck stain
- Pressure washer or deck cleaner
- Synthetic bristle brushes and rollers
- Painter’s tape (multi-surface)
- Sanding block (medium grit)
How to make it
- Deep clean your deck with a pressure washer and a specialized deck cleaner to remove old gray fibers and dirt. Let it dry completely for 48 hours.
- Lightly sand any rough spots to ensure the stain absorbs evenly. Wipe away all dust with a tack cloth before you begin.
- Apply your lighter color (the ‘main’ color) to the interior planks first. Work in long, continuous strokes to avoid lap marks where the stain overlaps.
- Once the interior is dry, carefully apply painter’s tape to the edges where the two colors will meet. Press the tape down firmly to prevent ‘bleed.’
- Apply the darker ‘accent’ color to the perimeter boards (the ‘picture frame’) and the stairs. Darker shades like Charcoal or Espresso work beautifully against Cedar or Slate Gray.
- Remove the tape while the stain is still slightly tacky for the cleanest line possible, and allow the deck to cure for at least 72 hours before moving furniture back.
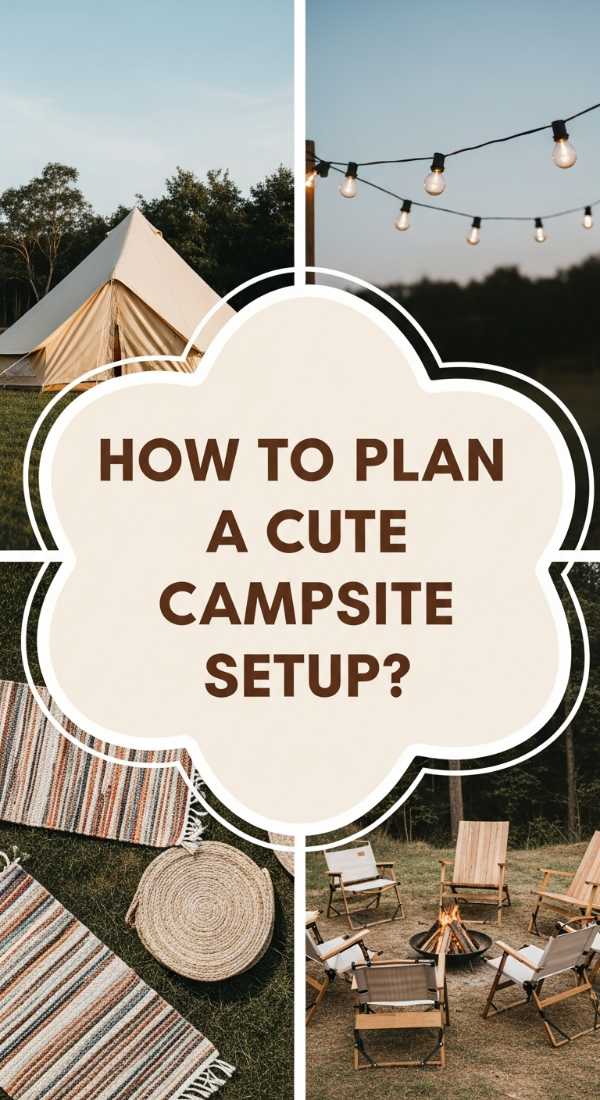
How to Plan a Cute Campsite Setup for the Ultimate Glamping Trip

Why we love this
Forget sleeping in the dirt; glamping is about bringing the comforts of a boutique hotel into the heart of the wilderness. We love this hack because it elevates the camping experience into something magical and restorative. The soft glow of fairy lights against the dark forest, the texture of a real woven rug on the tent floor, and the aroma of gourmet coffee brewed over a campfire create a sense of wonder. It’s about creating a cozy nest where you can truly disconnect from technology and reconnect with nature without sacrificing a good night’s sleep.
Essential Elements:
- Bell tent or large canvas tent
- Inflatable air mattress with a memory foam topper
- Battery-powered fairy lights and lanterns
- Outdoor rugs and floor cushions
- Portable pour-over coffee kit
- Cozy wool blankets and linen pillows
How to make it
- Choose a level campsite with natural shade. Sweep the ground clear of rocks and twigs before laying down a heavy-duty tarp under your tent to keep moisture out.
- Set up a large canvas bell tent; the high ceilings and breathable fabric make the space feel like a real room rather than a cramped sleeping bag.
- Don’t skimp on the bed. Use a high-quality air mattress, but top it with a real fitted sheet, a duvet, and a memory foam topper for a ‘cloud-like’ sleep experience.
- Layer the floor with lightweight, woven plastic rugs. These are easy to clean and provide a soft, warm surface for your feet in the chilly mornings.
- Hang warm-toned fairy lights around the interior perimeter and place battery-operated lanterns on small ‘nightstands’ (like upturned crates) for a soft, ambient glow.
- Create an outdoor ‘lounge’ just outside the tent door with two comfortable folding chairs and a small table for your morning coffee and evening stargazing.
How to Make Patriotic Wreaths for a Festive Front Door
[IMAGE_10]
Why we love this
There is a timeless pride in displaying red, white, and blue, and a handmade wreath is the perfect way to celebrate the holidays with a personal touch. We love this DIY because it combines different textures—the rustic feel of burlap, the sparkle of stars, and the crispness of striped ribbon. It creates an instant focal point that feels festive and welcoming. The best part is the versatility; you can make it as traditional or as ‘farmhouse chic’ as you like, and the finished product looks far more expensive than the store-bought versions.
Essential Elements:
- Wire wreath frame (14 or 16 inch)
- Red, white, and blue deco mesh or burlap ribbon
- Pipe cleaners (chenille stems) in matching colors
- Wooden or metal star accents
- Hot glue gun and high-temp glue sticks
How to make it
- Start by attaching your pipe cleaners to the wire frame, spacing them about 2 inches apart along the inner and outer rings. These will be your ‘anchors’ for the mesh.
- Take your blue deco mesh and create ‘poofs’ by bunching the mesh every 6 inches and securing it with the pipe cleaners on one-third of the circle (the ‘star’ section).
- Continue with alternating red and white mesh or burlap for the remaining two-thirds of the wreath to create the ‘stripes’ of the flag.
- To give it a professional ‘full’ look, go back and add ‘curls’—small 6-inch rolls of mesh—tucked into each pipe cleaner to hide the wire frame completely.
- Use a hot glue gun to attach white wooden stars onto the blue section. Arrange them in a cluster or a neat pattern depending on your style.
- Finish with a large, wired ribbon bow at the bottom or top, and use a sturdy over-the-door hanger to display your masterpiece proudly.
Conclusion: Your Dream Home is Just One DIY Away
Transforming your home and garden doesn’t require a massive renovation budget or a team of professionals; it just takes a little bit of creativity and the willingness to get your hands dirty. From the tropical rustle of an island-themed backyard to the cozy glow of a glamping tent, these projects are designed to add joy and beauty to your daily life. I hope these hacks inspire you to pick up a paintbrush, plant a flower, or hang that wallpaper you’ve been eyeing. Remember, the best homes aren’t just built—they are lovingly created, one project at a time. Happy DIY-ing!