

10 Viral Home Decor Trends That Are Taking Over Pinterest Right Now
There is something magical about the way a home evolves with the seasons, shifting from a quiet sanctuary into a vibrant space that reflects our deepest inspirations. Lately, my Pinterest feed has been an explosion of texture, color, and meaningful wall art that feels less like ‘decor’ and more like a curated collection of memories and dreams. Whether you’re sipping a lukewarm latte on a Sunday morning or coming home after a long day, the environment you surround yourself with has a profound impact on your soul’s ability to recharge and find joy.
We are moving away from the stark, sterile looks of the past and leaning heavily into ‘cluttercore’s’ more refined cousin: meaningful maximalism. This trend is all about reclaiming your walls—both indoors and out—to tell a story that is uniquely yours. From the rustic charm of nature-inspired accents to the bold, rhythmic pulses of cultural textiles, the current viral trends are all about creating a ‘feeling’ rather than just a ‘look.’ Let’s dive into the ten styles that are redefining the modern home this year.
How to Elevate Outdoor Wall Decor for a Relaxing Garden Oasis
Why we love this
There is nothing quite like the sensory symphony of a hidden garden oasis where the boundaries between nature and architecture blur. We love this trend because it transforms a standard wooden fence or stone wall into a living tapestry, filled with the cooling scent of damp moss and the gentle clinking of metallic accents in the breeze. It creates a secluded sanctuary that feels miles away from the city, wrapping you in a cocoon of emerald greens and weathered textures that invite you to breathe deeper and linger longer over your morning tea.
Essential Elements:
- Weather-resistant metal lattice or trellises
- Live vertical moss panels or creeping ivy
- Solar-powered warm glow sconces
- Terracotta wall planters with trailing succulents
- Large-scale outdoor mirrors to create the illusion of depth
How to make it
- Begin by deep-cleaning your outdoor vertical surface with a power wash to ensure no debris interferes with mounting hardware; allow at least 24 hours for the surface to dry completely.
- Map out your layout using painter’s tape on the wall to visualize the balance of heavy metal elements versus soft greenery before drilling any holes.
- Install heavy-duty masonry or wood screws into the studs/support beams, ensuring each anchor point can support at least 15-20 lbs to account for wet soil and wind resistance.
- Layer your ‘hard’ elements first, such as a central metal medallion or large mirror, which serves as the anchor for the entire composition.
- Mount the vertical planters or trellises around the anchor, ensuring there is at least 6 inches of breathing room for plants to grow without obstructing the art.
- Tuck in your greenery, prioritizing ‘spiller’ plants like Creeping Jenny for that lush, overflowing aesthetic that softens the hard edges of the wall.
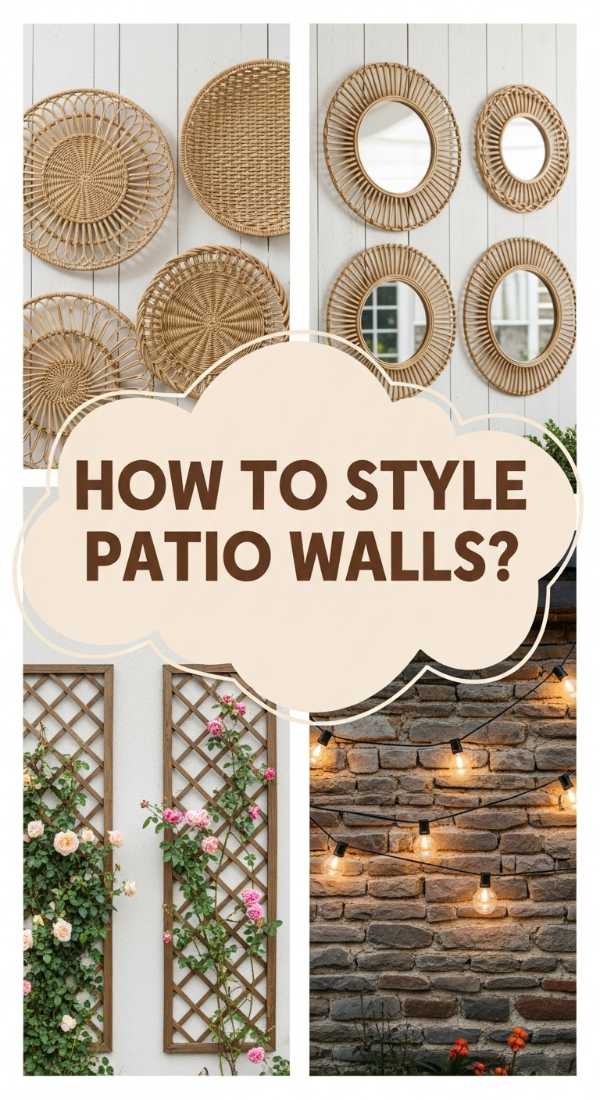
How to Style Patio Wall Decor Outdoor for the Ultimate Summer Hangout
Why we love this
This style is the heartbeat of summer, turning a functional patio into a high-energy social hub that feels like a boutique rooftop lounge. We adore the way neon signs and woven textures interact under the amber glow of string lights, creating a tactile environment that begs for ice-cold lemonade and laughter. It’s about that ‘vacation at home’ feeling where the walls pulse with personality, using sun-drenched colors and breezy materials like seagrass and rattan to keep the mood light, airy, and infinitely inviting.
Essential Elements:
- Custom LED neon word signs (UV-rated for outdoors)
- Oversized woven seagrass fans or baskets
- Weatherproof canvas prints with tropical or abstract motifs
- Wrought iron shelving for potted herbs
- Outdoor-rated string lights with Edison bulbs
How to make it
- Select a focal point on your patio wall that is shielded from direct rain but visible from the main seating area to maximize visual impact.
- Install your electrical elements first; if using a neon sign, ensure the power cord is neatly tucked behind a decorative channel or hidden along the siding of the house for a professional look.
- Create a ‘cluster’ of woven baskets by starting with the largest fan in the center and overlapping smaller baskets at varying depths to create a 3D effect.
- Use stainless steel ‘S’ hooks or outdoor Command strips rated for high temperatures to secure the baskets without damaging the siding.
- Incorporate greenery by mounting a wrought iron shelf at eye level, filling it with aromatic herbs like mint and lavender that provide both visual beauty and a natural insect repellent.
- Finalize the lighting by draping Edison bulbs in a ‘zigzag’ pattern across the wall, ensuring the lowest point of the string is at least 7 feet high to avoid head-bumps during parties.
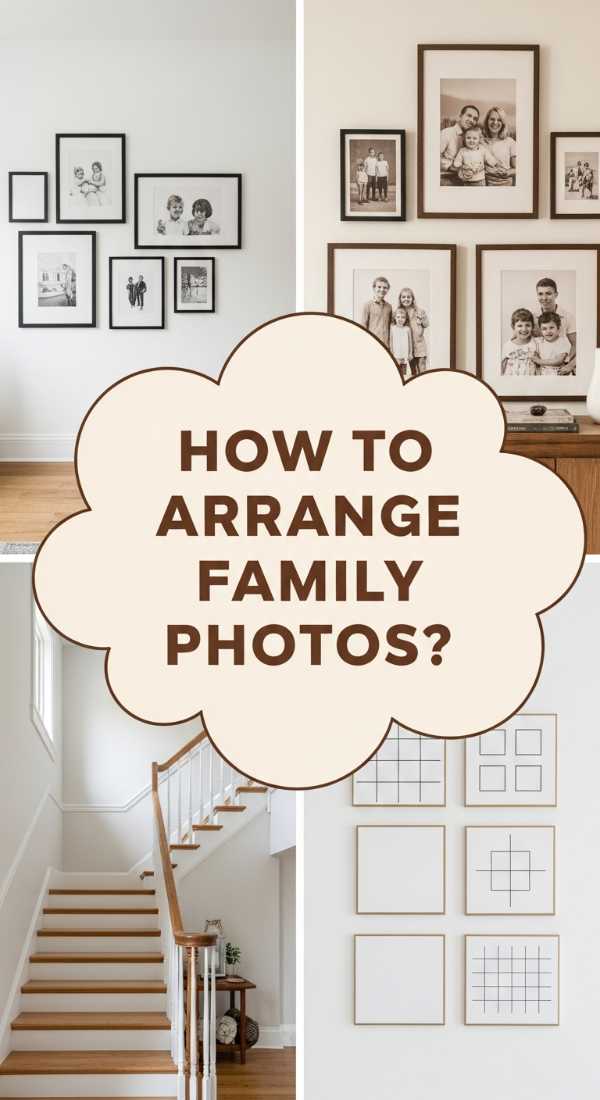
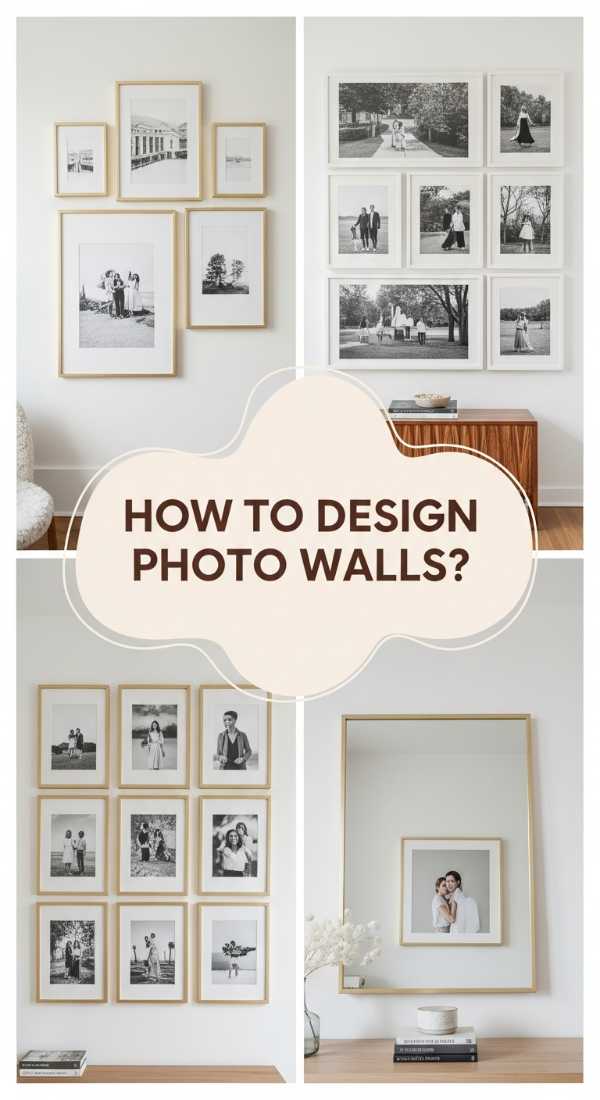
How to Arrange Family Photos Wall Decor for a Heartwarming Home Entrance

Why we love this
Walking through the front door should feel like a warm hug, and nothing achieves that quite like a curated gallery of the people you love most. This trend moves away from the rigid, museum-style grids of the past and embraces a more organic, ‘collected over time’ aesthetic that feels lived-in and deeply personal. We love the way different frame textures—sanded wood, polished gold, and matte black—intermingle to create a visual timeline of your family’s journey, capturing the soft light of childhood and the rugged edges of adventure in one beautiful sweep.
Essential Elements:
- Mismatched frames in cohesive color palettes (e.g., all warm tones)
- High-quality archival mats in off-white or cream
- A mix of candid shots and professional portraits
- Small decorative ‘filler’ items like a brass key or a small dried flower shadowbox
- Low-voltage picture lights for evening ambiance
How to make it
- Gather all your chosen photos and lay them out on the floor in front of the entrance wall to experiment with spacing without committing to nail holes.
- Start with your ‘hero’ photo—usually the largest or most vibrant—and place it slightly off-center at eye level (roughly 57-60 inches from the floor).
- Build outward, maintaining a consistent gap of 2 to 3 inches between frames to keep the arrangement looking intentional rather than cluttered.
- Intersperse your 3D ‘filler’ items, like the brass key or shadowbox, to break up the flat planes of the frames and add architectural interest.
- When hanging, use a laser level to ensure that even though the frames are mismatched, the overall ‘flow’ remains horizontal or vertically aligned with the door frame.
- Add a battery-operated picture light above the central cluster to highlight the textures of the frames and provide a soft nightlight for the entryway.
How to Curate Mexican Wall Decor for a Vibrant Cultural Vibe
Why we love this
There is an undeniable soulfulness in Mexican craftsmanship that brings an instant pulse of life to any room. We are obsessed with the explosion of cobalt blues, fiery oranges, and earthy terracottas that characterize this style. It’s a sensory feast; you can almost feel the heat of the sun on the hand-painted Talavera tiles and hear the rustle of hand-woven textiles. This trend is a celebration of heritage and hand-made imperfections, turning a blank wall into a storytelling canvas that honors tradition while feeling completely modern and energetic.
Essential Elements:
- Hand-painted Talavera ceramic plates
- Ayerza-style woven tapestries or Otomi embroidery
- Wrought iron sun-and-moon sculptures
- Traditional ‘Milagros’ (small metal charms) in a shadowbox
- Vibrant papel picado banners (for a softer, temporary look)
How to make it
- Identify a wall that receives plenty of natural light, as the pigments in Mexican decor are designed to ‘pop’ under the sun’s rays.
- Create a plate gallery by using spring-style plate hangers; start with the largest, most intricate Talavera plate in the center and radiate smaller, patterned plates outward in a circular sunburst pattern.
- Secure a heavy wooden dowel or a wrought iron rod to the top of the wall to hang your Otomi tapestry, ensuring the fabric hangs straight to showcase the intricate needlework.
- Mix textures by placing a cold, dark wrought iron sun sculpture next to the soft, colorful threads of the embroidery for a high-contrast visual.
- If using Milagros, group them in a small, deep-set shadowbox lined with dark velvet to make the silver or gold metal charms shimmer.
- Maintain balance by keeping the surrounding furniture neutral, allowing the riot of color on the wall to be the undisputed star of the room.
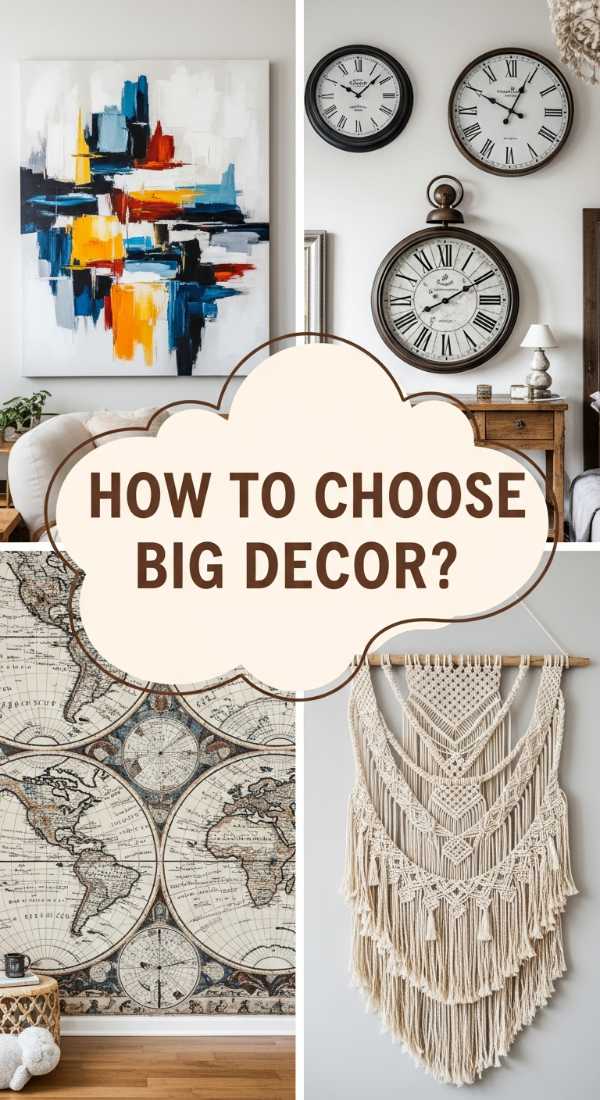
How to Choose Big Wall Decor for a Bold Statement Living Room

Why we love this
Sometimes, less really is more, and a single, massive piece of art can ground a room in a way that twenty small items never could. We love the ‘big wall’ trend because it creates an instant focal point that commands attention and sets the entire mood of the living room—from serene and moody to bold and avant-garde. There is a luxury in scale; it feels intentional and confident, like a high-end gallery. The way a large canvas catches the light at sunset, revealing the peaks and valleys of thick oil paint or the subtle weave of a linen print, is pure visual poetry.
Essential Elements:
- Oversized canvas art (at least 4 feet wide)
- Massive triptych panels (three related pieces)
- Large-scale architectural salvage (like an antique window or gate)
- Floor-to-ceiling macrame wall hangings
- Minimalist floating frames to add a ‘finished’ look without weight
How to make it
- Measure your wall and aim for a piece that covers roughly 60% to 75% of the available space above your sofa or sideboard to ensure it doesn’t look swallowed by the wall.
- Identify the wall type; for large, heavy pieces, you must use a stud finder to locate support beams, as standard drywall anchors may fail under the weight of a heavy frame.
- Use a ‘French Cleat’ hanging system for extremely large or heavy items; this provides a secure, level ‘rail’ that distributes the weight evenly across the wall.
- If using a triptych, use a spacer block (a small piece of wood or cardboard cut to exactly 2 inches) to ensure the gaps between the three panels are perfectly uniform.
- Adjust your lighting; a large piece of art requires dedicated ‘wash’ lighting from the ceiling or a tall floor lamp nearby to prevent shadows from obscuring the details.
- Step back frequently during the process to ensure the piece is centered not just on the wall, but in relation to the furniture below it.
How to Craft Tree Branch Wall Decor for a Serene Rustic Aesthetic
Why we love this
Bringing the outdoors in has a calming effect on the nervous system that is hard to replicate with manufactured goods. We love the tree branch trend because it introduces organic, asymmetrical lines into a world of hard angles and flat screens. Each knot and curve in the wood tells a story of the forest, providing a tactile, grounding presence. The subtle scent of dried wood and the way shadows dance across the wall behind the branches create a serene, rustic atmosphere that makes your home feel like a sophisticated woodland retreat.
Essential Elements:
- Sandblasted driftwood or a large, sturdy fallen branch
- Clear monofilament (fishing line) for invisible hanging
- Small air plants (Tillandsia) to nestle into the ‘V’ of the branches
- Fairy lights with a thin copper wire
- Handmade ceramic ornaments or dried citrus slices
How to make it
- Source a branch that has been properly dried and treated to ensure no pests or moisture are brought into the home; sand down any sharp or splintering edges for a smooth finish.
- Apply a thin coat of matte polyurethane to preserve the wood and give it a subtle, high-end sheen without looking ‘plastic.’
- Locate at least two points on the ceiling or high up on the wall where you can install sturdy hooks that can support the weight of the branch.
- Loop clear monofilament around the branch at its natural balance points, then suspend it from the hooks so it ‘floats’ about 2-3 inches off the wall.
- Gently nestle air plants into the natural crevices of the branch, using a tiny dab of floral glue if necessary, or simply wedging them in securely.
- Weave thin copper fairy lights around the length of the branch, hiding the battery pack behind a thick part of the wood or a nearby piece of furniture.
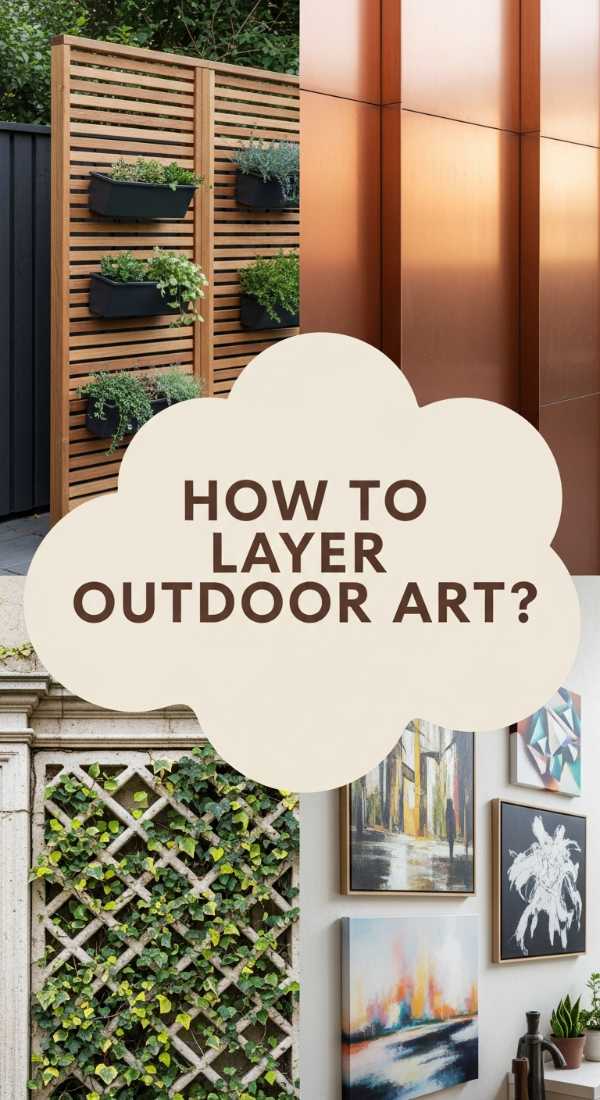
How to Layer Outdoor Wall Decor for a Sophisticated Terrace Look
Why we love this
Layering isn’t just for fashion; it’s the secret to a terrace that looks like it belongs in a Mediterranean villa. This trend is all about depth and ‘visual weight,’ combining hard metals with soft fabrics and living plants to create a rich, multi-dimensional wall. We love the sophistication of seeing a weather-beaten stone plaque partially obscured by a delicate metal screen, which is then draped in climbing jasmine. It creates a sense of history and discovery, making the terrace feel like a secret room that has been curated over decades rather than assembled in an afternoon.
Essential Elements:
- Decorative laser-cut privacy screens (metal or composite)
- Stone or resin wall fountains
- Outdoor rugs hung as ‘tapestries’
- Wrought iron candle lanterns for wall mounting
- Climbing vines like Star Jasmine or Honeysuckle
How to make it
- Start with your ‘base layer’—this should be the largest, flattest element, such as a laser-cut metal panel that covers a large section of the terrace wall.
- Secure the base layer with offset spacers so it sits 1 inch away from the wall; this allows air to circulate and prevents moisture buildup.
- Mount your ‘feature layer’ on top or slightly overlapping the base; a small wall fountain or a heavy stone plaque works beautifully here to add a different texture.
- Install wall-mounted lanterns at varying heights around the central feature, ensuring they are accessible for lighting candles or changing batteries.
- Introduce the ‘living layer’ by planting climbers at the base of the wall and training them to weave through the openings of the metal screen.
- Check the composition from your main seating area; the layering should feel ‘full’ but not so heavy that it overwhelms the space of the terrace.
How to Design Family Photos Wall Decor for a Minimalist Artistic Feel

Why we love this
Minimalism doesn’t have to be cold; it can be incredibly emotional when it focuses on the essential beauty of a moment. We love this trend for its ‘breathing room’—the use of wide white borders and thin black frames that allow the emotion in a photograph to speak for itself. It’s a quiet, sophisticated way to display family history, turning everyday snapshots into high-art masterpieces. The clean lines and monochromatic palette create a sense of order and peace, making your home feel curated and calm even on the busiest of days.
Essential Elements:
- Identical ultra-thin frames (black, white, or silver)
- Extremely wide mats (e.g., a 4×6 photo in an 11×14 frame)
- Black and white photography only
- Consistent ‘high-key’ or ‘low-key’ lighting in the photos
- A perfectly level horizontal or vertical line arrangement
How to make it
- Convert all your chosen photos to black and white using the same filter or editing style to ensure a cohesive tonal range across the entire collection.
- Order custom mats with a ‘weighted bottom’ (where the bottom margin is slightly wider than the top and sides) to give the photos a professional, gallery-style look.
- Use a laser level to project a perfectly straight horizontal line across your wall; this will be the ‘datum line’ that all your frames will align to.
- Decide on a ‘top-aligned’ or ‘center-aligned’ look; for a minimalist feel, aligning the bottom edges of the frames often feels the most modern and grounded.
- Use ‘bumper’ pads on the back corners of each frame to keep them from shifting and to ensure they sit perfectly parallel to the wall surface.
- Keep the spacing between frames wide—at least 4 to 6 inches—to emphasize the ‘minimalist’ aspect and allow each photo to stand alone as a work of art.
How to Install Big Wall Decor for a Grand Dining Room Experience
Why we love this
The dining room is the theater of the home, and big wall decor provides the perfect backdrop for dramatic dinner parties and intimate family feasts. We love the grandeur that a massive, antiqued mirror or a giant abstract painting brings to the table. It elevates the act of eating into a special occasion, reflecting the candlelight and the faces of friends in a way that feels opulent and warm. This trend is all about ‘theatre’—using scale to create a sense of importance and luxury that makes every meal feel like a celebration.
Essential Elements:
- Giant floor-to-ceiling lean-to mirrors
- Heavy, ornate gilded frames
- Large-scale scenic wallpaper murals (chinoiserie or botanical)
- Velvet-wrapped acoustic panels for sound dampening and texture
- Modern triptychs with metallic gold leaf accents
How to make it
- If installing a large mirror, choose a ‘lean-to’ style for safety and ease, but ensure you use a ‘wall strap’ or ‘anti-tip kit’ anchored into a stud to prevent it from sliding.
- For a wallpaper mural, ensure the wall is perfectly smooth; sand down any bumps and apply a ‘wall size’ primer to help the adhesive bond evenly without bubbles.
- When hanging a large painting, place it so the center of the piece is exactly 57 inches from the floor—this is the standard gallery height that feels most natural to the human eye while seated.
- Coordinate your centerpiece with the wall art; if the art is a bold abstract, keep the table decor simple and sculptural to avoid visual ‘noise.’
- Install a dimmer switch on your dining room lights; large art pieces and mirrors look their best when the light is softened, creating a moody, grand atmosphere.
- Ensure the art is wide enough to cover at least two-thirds of the width of your dining table to maintain proper scale and proportion.
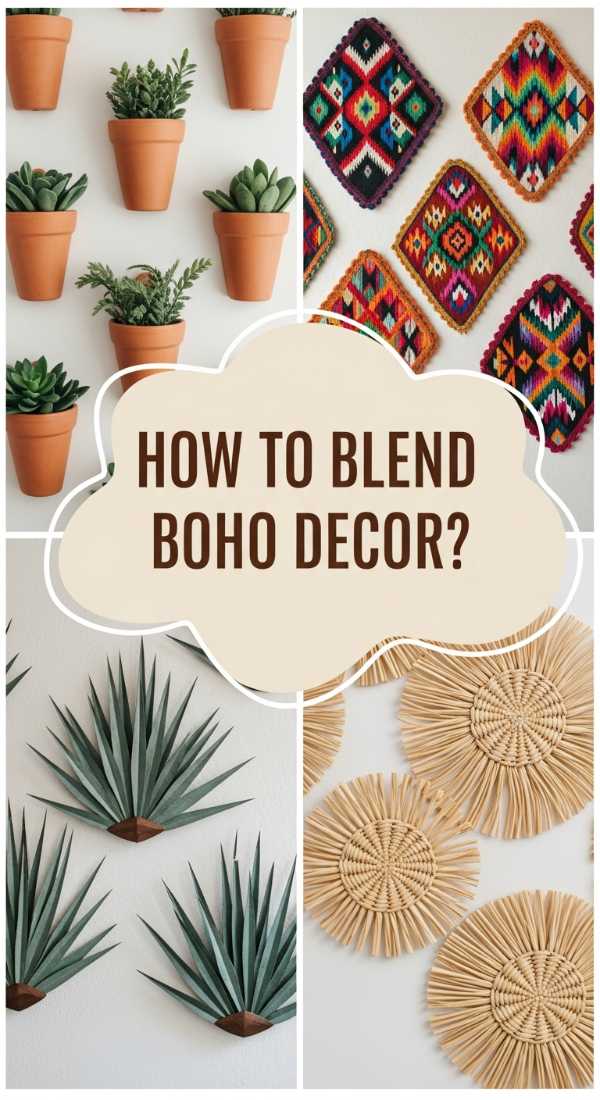
How to Blend Mexican Wall Decor for a Cozy Bohemian Sanctuary
[IMAGE_10]
Why we love this
This is the ultimate ‘warm’ aesthetic, where the vibrant energy of Mexico meets the soft, relaxed textures of Bohemian style. We love the way a hand-woven macrame piece looks when paired with a rustic, sun-baked clay mask or a brightly colored textile. It’s a sanctuary of global influences that feels both exotic and deeply cozy. The smell of sandalwood, the touch of raw cotton, and the sight of sun-faded colors create a space where you can truly kick off your shoes and let your mind wander to distant, sun-drenched horizons.
Essential Elements:
- Woven cotton macrame with wooden bead accents
- Hand-carved Oaxacan wooden animals (Alebrijes)
- Faded vintage Mexican serapes used as wall hangings
- Earthenware pots hung with leather straps
- Dried palm leaves or pampas grass in wall pockets
How to make it
- Start with a neutral, textured base, like a large cream-colored macrame hanging, to establish the ‘Bohemian’ foundation of the wall.
- Layer in the ‘Mexican’ elements by pinning a vintage serape (Mexican blanket) behind or next to the macrame, allowing the bright stripes to peek through the weave.
- Use leather cord or twine to hang small earthenware pots at different levels, filling them with low-maintenance air plants or dried wildflowers.
- Mount hand-carved wooden elements using small finishing nails that disappear into the wood, placing them in the ‘negative space’ between the larger textiles.
- Incorporate natural elements like dried palm leaves; spray them with a light coat of matte hairspray to prevent shedding and maintain their shape.
- Keep the lighting warm and low—think salt lamps or amber-colored glass sconces—to enhance the earthy tones of the clay and the soft textures of the cotton.
Conclusion: Your Home, Your Story
As we’ve explored these ten viral trends, the common thread is clear: the most beautiful homes are the ones that reflect the heart of the people living inside them. Whether you are drawn to the grand drama of a dining room mirror or the quiet rustic charm of a tree branch, remember that these trends are simply tools to help you express your own unique story. Don’t be afraid to mix and match, to break the ‘rules,’ and to create a space that makes you feel truly at home.