
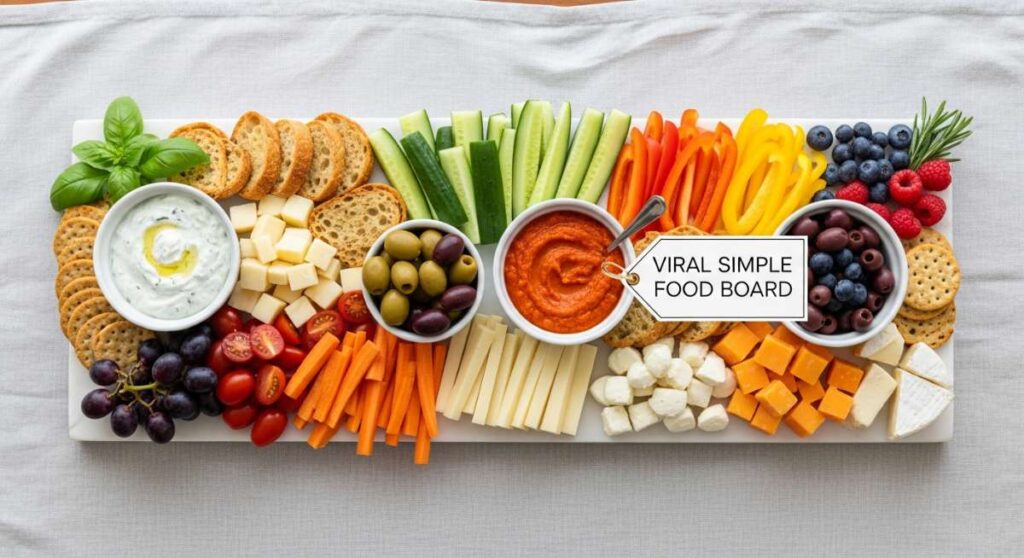
10 Minutes to Viral: Your Guide to the Ultimate Simple Food Board
There is a specific kind of magic that happens when you set a massive, overflowing food board in the center of a table. It’s more than just a meal; it’s an invitation to linger, to pick, to taste, and to share stories over the clinking of glasses. In my house, the ‘Simple Food Board’ has become our go-to for everything from chaotic Tuesday nights to sun-drenched Saturday brunches. It strips away the formality of plated meals and replaces it with a rustic, vibrant energy that is absolutely magnetic.
The secret to going viral with your own board isn’t about expensive ingredients or professional plating skills—it’s about the soul you put into the pairings. It’s that perfect balance of a charred, smoky protein sitting next to a crisp, zingy salad and a sweet, flaky dessert that looks like it was plucked from a French patisserie. Today, I’m sharing the ultimate building blocks for a board that will have your followers hitting ‘save’ and your guests asking for seconds. Let’s dive into the recipes that make the ‘Simple Food Board’ lifestyle truly unforgettable.
7 Healthy Grilling Recipes You Will Actually Love (Step-by-Step)
Why we love this
Grilling is the ultimate way to lock in deep, smoky flavors without the need for heavy oils or fats, making it the backbone of any healthy food board. Imagine the scent of charred cedar and fresh rosemary wafting through the air as succulent salmon fillets sizzle over an open flame, their skins becoming perfectly crisp while the center remains buttery and tender. There is a primal satisfaction in seeing those dark grill marks on vibrant bell peppers and asparagus, offering a crunch that feels both indulgent and incredibly nourishing. It’s the kind of cooking that feels like a celebration of summer, leaving you satisfied but light enough to go for a sunset stroll.
Ingredients
- 2 lbs Fresh Atlantic Salmon fillets
- 1 bunch thick green asparagus
- 2 large bell peppers (red and yellow), sliced
- 3 tbsp Extra virgin olive oil
- 2 Lemons (one sliced, one for juice)
- 4 cloves Garlic, minced
- 1 tbsp Fresh rosemary, finely chopped
- Sea salt and cracked black pepper to taste
How to make it
- Begin by prepping your grill; if using gas, preheat to medium-high (about 400°F), or if using charcoal, wait until the coals are covered in a light grey ash for even heat distribution.
- Prepare the marinade by whisking together the olive oil, lemon juice, minced garlic, rosemary, salt, and pepper in a small glass bowl until the oil emulsified.
- Pat the salmon fillets dry with a paper towel to ensure a proper sear, then brush both sides generously with the marinade.
- Toss the asparagus and sliced peppers in the remaining marinade, ensuring every crevice is coated for maximum flavor and to prevent sticking.
- Place the salmon skin-side down on the grates; you should hear an immediate, sharp sizzle. Close the lid and let it sear undisturbed for 5-6 minutes until the skin naturally releases from the grill.
- While the salmon cooks, arrange the vegetables around the perimeter of the heat, turning them frequently with tongs until they are tender-crisp with distinct charred edges.
- Flip the salmon gently using a wide spatula and cook for another 2-3 minutes, or until the internal temperature reaches 145°F and the flesh flakes easily with a fork.
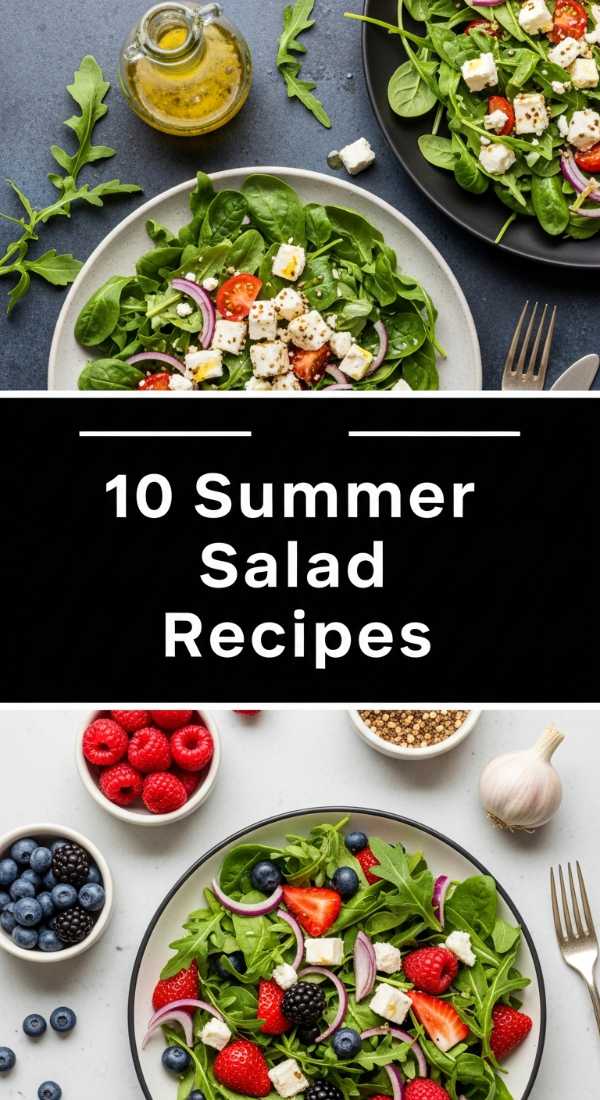
10 Fresh Summer Salad Recipes for Your Next Party

Why we love this
A great summer salad is a riot of color and texture that acts as the refreshing ‘cool-down’ component on your food board. We adore the contrast of creamy, tangy feta cheese against the icy crunch of chilled watermelon, tied together by the aromatic punch of hand-torn mint leaves. It’s a sensory experience that hits every note: sweet, salty, herbaceous, and crisp. When the sun is high and the air is thick, this salad feels like a revitalizing splash of water, bringing a sophisticated brightness to the palate that cuts through the richness of grilled meats or heavy cheeses.
Ingredients
- 1 small seedless watermelon, cubed
- 8 oz High-quality Feta cheese, crumbled
- 1/2 cup Fresh mint leaves, torn
- 1/4 cup Thinly sliced red onion
- 2 tbsp Balsamic glaze
- 1 tbsp Extra virgin olive oil
- Flaky sea salt
How to make it
- Start by chilling your watermelon in the refrigerator for at least two hours prior to assembly; a cold base is essential for that signature refreshing summer temperature.
- Using a sharp chef’s knife, remove the rind and cut the watermelon into uniform 1-inch cubes, ensuring they are bite-sized for easy grazing.
- Thinly slice the red onion into translucent half-moons; if the onion is particularly sharp, soak the slices in ice water for 10 minutes to mellow the flavor, then pat dry.
- In a large, shallow wooden bowl (perfect for the ‘food board’ look), layer the watermelon cubes and red onion slices loosely.
- Sprinkle the crumbled feta evenly over the top, allowing it to nestle into the gaps between the fruit.
- Tear the fresh mint leaves by hand just seconds before serving to prevent bruising and to release the aromatic oils directly onto the salad.
- Drizzle the olive oil and balsamic glaze in a zigzag pattern across the bowl, and finish with a generous pinch of flaky sea salt to make the sweetness of the melon pop.
5 Easy Sourdough Discard Recipes for Busy Mornings
Why we love this
Sourdough discard is the unsung hero of the kitchen, turning what would be waste into a tang-filled, fluffy masterpiece that adds a rustic, artisanal touch to your morning board. We love the way a discard pancake batter bubbles up in a hot skillet, creating those golden, lacy edges and a soft, pillowy center that carries the complex, fermented notes of the starter. It smells like a professional bakery at dawn—yeasty, warm, and inviting. Topping these with a pat of melting butter and a drizzle of amber syrup creates a comforting, soulful experience that feels much more expensive than it actually is.
Ingredients
- 1 cup Sourdough discard (unfed)
- 1 large Egg
- 2 tbsp Melted butter or coconut oil
- 1/2 cup All-purpose flour
- 1 tsp Baking soda
- 1/2 tsp Salt
- 1 tbsp Sugar or honey
- 1/2 cup Milk (adjust for desired thickness)
How to make it
- In a large mixing bowl, whisk together the sourdough discard, egg, melted butter, and honey until the mixture is smooth and the discard is fully incorporated.
- In a separate smaller bowl, sift together the flour, baking soda, and salt to ensure there are no lumps, which is key for a consistent rise.
- Gently fold the dry ingredients into the wet mixture; do not overmix, as small lumps are perfectly fine and keep the pancakes tender rather than rubbery.
- Gradually whisk in the milk until you reach a pourable but thick consistency; the batter should fall off the whisk in slow ribbons.
- Heat a non-stick skillet or cast-iron griddle over medium heat and lightly grease with a small amount of butter.
- Pour 1/4 cup portions of batter onto the hot surface, leaving space between them for even heat circulation.
- Cook until large bubbles form on the surface and the edges look set and matte—this usually takes 2-3 minutes. Flip carefully and cook the other side for an additional 1-2 minutes until golden brown.
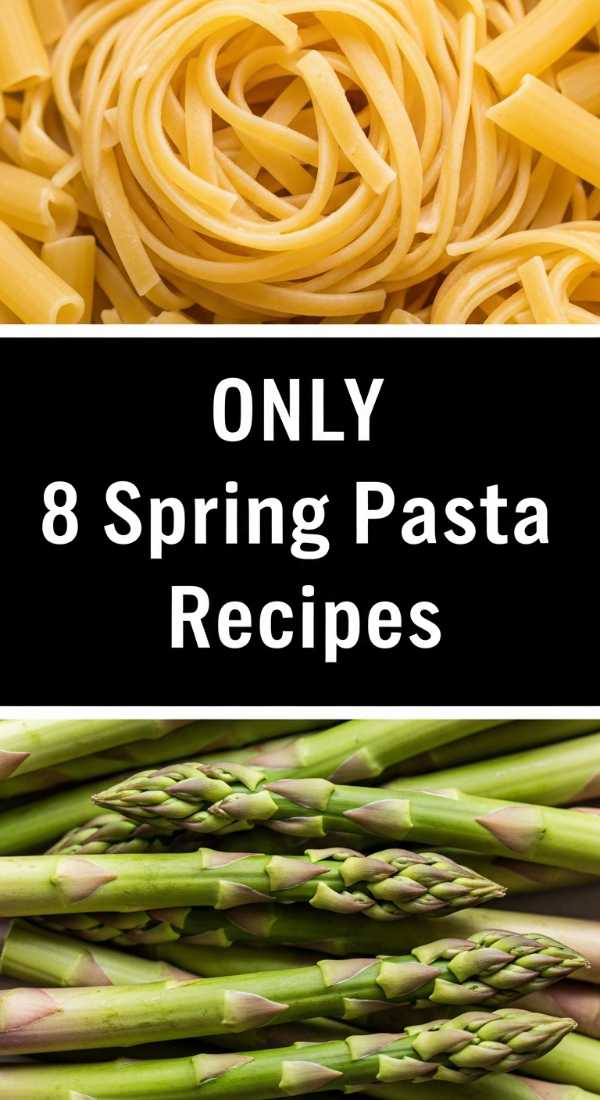
8 Tasty Spring Pasta Recipes You Need to Try Tonight
Why we love this
Spring pasta is all about the celebration of the garden, bringing a lightness to your board that feels like a breath of fresh air after a long winter. We love the vibrant pop of sweet peas and the tender snap of young asparagus, all coated in a silky, lemon-infused butter sauce that clings to every curve of the pasta. The aroma is purely botanical—fresh herbs, citrus zest, and the nuttiness of aged parmesan. It’s a dish that looks like a painting on the table, with various shades of green contrasting against the pale gold of the noodles, making it an instant viral hit for its aesthetic appeal.
Ingredients
- 1 lb Orecchiette or Penne pasta
- 1 bunch Thin asparagus, cut into 1-inch pieces
- 1 cup Fresh or frozen sweet peas
- 4 tbsp Unsalted butter
- 2 cloves Garlic, sliced paper-thin
- Zest and juice of 1 lemon
- 1/2 cup Grated Parmesan cheese
- Fresh basil and parsley, chopped
How to make it
- Bring a large pot of heavily salted water to a rolling boil; the water should taste like the sea to properly season the pasta from the inside out.
- Cook the pasta according to the package directions, but aim for ‘al dente’—usually 1-2 minutes less than the box suggests—as it will finish cooking in the sauce.
- Three minutes before the pasta is done, add the asparagus and peas directly into the boiling pasta water to blanch them until they turn bright, vibrant green.
- Before draining, reserve at least 1 cup of the starchy pasta water; this is the ‘liquid gold’ that creates a creamy sauce without heavy cream.
- In a large skillet over medium-low heat, melt the butter and add the sliced garlic, sautéing for about 1 minute until fragrant and translucent but not browned.
- Add the drained pasta and vegetables to the skillet, tossing them in the garlic butter while gradually splashing in the reserved pasta water.
- Remove from heat, stir in the lemon zest, lemon juice, and Parmesan cheese, tossing vigorously until a glossy sauce forms. Top with fresh herbs just before placing on your board.
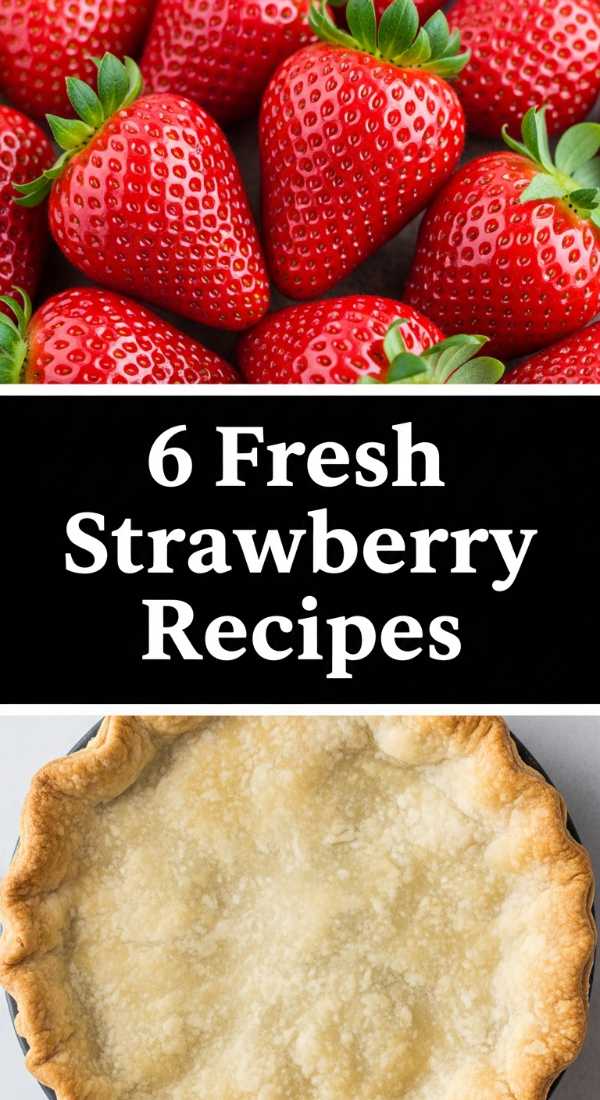
6 Best Fresh Strawberry Pie Recipes for Summer

Why we love this
Nothing says ‘summer party’ quite like a fresh strawberry pie, its bright red glaze shimmering like jewels atop a buttery, flaky crust. We love the explosion of pure, unadulterated fruit flavor—the berries are kept fresh rather than baked into a mush, preserving their natural sweetness and slight floral tartness. Every bite offers a satisfying crunch from the crust followed by the cool, silky give of the strawberry filling. It’s a nostalgic masterpiece that reminds us of country fairs and backyard picnics, providing a stunning, high-contrast focal point for any dessert-leaning food board.
Ingredients
- 1 pre-baked 9-inch pie crust
- 6 cups Fresh strawberries, hulled (divided)
- 1 cup Granulated sugar
- 3 tbsp Cornstarch
- 1 tbsp Lemon juice
- 1/2 cup Water
- Whipped cream for garnish
How to make it
- Start by selecting the most fragrant, deep red strawberries you can find; hull them and set aside the 3 cups of the prettiest, uniform-sized berries to remain whole.
- Take the remaining 3 cups of berries and crush them in a medium saucepan using a potato masher or a fork until they are pulpy.
- Stir the sugar, cornstarch, water, and lemon juice into the crushed berries, whisking until the cornstarch is completely dissolved to prevent clumps.
- Bring the mixture to a boil over medium heat, stirring constantly; the glaze will transform from cloudy to a clear, brilliant translucent red as it thickens.
- Once thickened (it should coat the back of a spoon heavily), remove from heat and let it cool for about 10 minutes so it doesn’t wilt the fresh berries.
- Arrange the whole fresh strawberries point-side up in the pre-baked pie crust, packing them tightly so there are no large gaps.
- Pour the warm glaze evenly over the whole berries, using a spatula to ensure every berry is coated. Refrigerate for at least 3-4 hours until the glaze is set firmly before slicing.
9 Refreshing Summer Mocktail Recipes for Your BBQ
Why we love this
Mocktails have evolved into sophisticated, complex beverages that prove you don’t need alcohol to have a ‘fancy’ drink on your board. We love the visual drama of a Cucumber Lime Spritz, with its pale green hue and garnishes of slapped mint and dehydrated citrus wheels. The flavor profile is sharp and invigorating—the cooling essence of cucumber meeting the zesty bite of lime and the tingle of effervescent soda water. It’s a palate cleanser that keeps you hydrated and refreshed, allowing you to enjoy the heavy hitters of the BBQ while feeling light and energized.
Ingredients
- 1 large Cucumber, thinly sliced
- 1/2 cup Fresh lime juice
- 1/4 cup Agave nectar or simple syrup
- 1 liter Club soda or sparkling mineral water
- Fresh mint sprigs
- Ice cubes
- Chili-lime salt for the rim (optional)
How to make it
- Begin by muddled 4-5 thick slices of cucumber with the agave nectar in the bottom of a large pitcher; this releases the cucumber’s water and flavor without turning it to mush.
- Add the fresh lime juice to the pitcher and stir vigorously to combine the sweet and sour elements.
- Prepare your serving glasses by rubbing a lime wedge around the rim and dipping them into the chili-lime salt for a professional, ‘viral’ aesthetic.
- Fill the glasses to the brim with large ice cubes; using large cubes helps prevent the drink from diluting too quickly in the summer heat.
- Fill the pitcher with the club soda just before serving to maintain maximum carbonation; stir gently with a long spoon to incorporate the base without losing the bubbles.
- Pour the mixture into the prepared glasses, ensuring a few cucumber slices make it into each drink.
- Take a sprig of mint, ‘slap’ it between your palms to release the aromatic oils, and tuck it into the ice as a fragrant garnish.
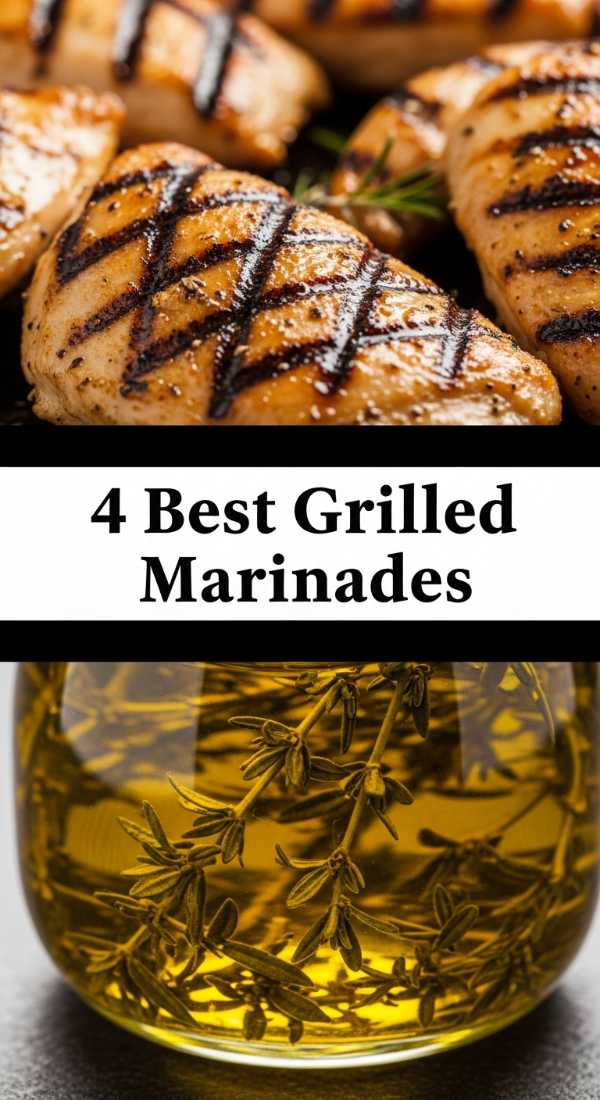
4 Best Grilled Chicken Marinades for Easy Dinners

Why we love this
A great marinade is like a secret weapon, transforming humble chicken into a succulent, flavor-packed star of the board. We particularly love a Balsamic Garlic marinade because of the way the sugars in the vinegar caramelize on the grill, creating a deep, mahogany crust that is slightly sweet and wonderfully tangy. The meat stays incredibly juicy underneath that charred exterior, infused with the savory punch of garlic and the earthy notes of dried oregano. It’s a versatile protein that pairs perfectly with everything from grilled peaches to crusty sourdough bread.
Ingredients
- 1.5 lbs Chicken thighs (boneless, skin-in for best flavor)
- 1/2 cup Balsamic vinegar
- 1/4 cup Extra virgin olive oil
- 3 cloves Garlic, smashed and minced
- 1 tbsp Dijon mustard
- 1 tsp Dried oregano
- 1/2 tsp Red pepper flakes
- Salt and pepper
How to make it
- In a large resealable bag or a shallow glass dish, whisk together the balsamic vinegar, olive oil, garlic, Dijon mustard, oregano, and red pepper flakes.
- Season the chicken thighs generously with salt and pepper on both sides before placing them into the marinade.
- Massage the bag to ensure the marinade reaches every fold of the meat, then refrigerate for at least 30 minutes, though 4 hours is ideal for deep flavor penetration.
- Preheat your grill to medium heat (350-375°F); clean the grates thoroughly and lightly oil them to prevent the balsamic sugars from sticking.
- Place the chicken skin-side down first to render out the fat and achieve that crispy, caramelized texture; cook for about 6-7 minutes.
- Flip the chicken and continue grilling for another 5-8 minutes, or until the internal temperature reaches a safe 165°F.
- Remove the chicken from the grill and let it rest for at least 5 minutes before slicing; this allows the juices to redistribute so the meat stays tender on the board.
5 Unique Dandelion Recipes You Won’t Believe are Edible

Why we love this
Foraging for your food board adds an element of whimsical storytelling that guests absolutely adore. Fried Dandelion Blossoms are a revelation—think of them as nature’s popcorn. They have a delicate, slightly nutty, and honey-like flavor that is encased in a light, crispy tempura-style batter. There is something incredibly charming about eating the yellow ‘weeds’ from the yard, transformed into a golden, crunchy snack. They add an unexpected texture and a bright pop of color that sparks conversation and makes your board feel truly unique and eco-conscious.
Ingredients
- 2 cups Fresh dandelion blossoms (bright yellow, no green sepals)
- 1 cup All-purpose flour
- 1 tsp Garlic powder
- 1/2 tsp Smoked paprika
- 1 cup Ice-cold sparkling water
- Vegetable oil for frying
- Sea salt
How to make it
- Harvest your dandelion blossoms from a clean area free of pesticides; choose fully open, bright yellow heads and soak them in cool water for 10 minutes to remove any tiny ‘hitchhikers.’
- Pat the blossoms completely dry with a paper towel; any moisture left on the flowers will cause the oil to splatter and the batter to become soggy.
- In a medium bowl, whisk the flour, garlic powder, and paprika. Slowly pour in the ice-cold sparkling water, whisking gently until just combined (a few lumps are okay). The cold carbonation is the secret to a light, airy crunch.
- Heat about 1 inch of vegetable oil in a heavy skillet to 350°F; you can test the heat by dropping a bit of batter in—it should sizzle and float immediately.
- Dip each blossom into the batter by the base, ensuring the yellow petals are well-coated.
- Drop the blossoms into the hot oil, frying in small batches to avoid crowding the pan, which lowers the oil temperature.
- Fry for 2-3 minutes until golden brown and crisp. Drain on a wire rack and sprinkle immediately with sea salt while still hot.
10 Healthy Blackstone Recipes for Summer Entertaining
[IMAGE_9]
Why we love this
The Blackstone griddle is the king of the ‘food board’ lifestyle because it allows you to cook massive quantities of varied ingredients simultaneously, all while infusing them with a distinct diner-style sear. We love Hibachi-style Zucchini and Shrimp because the high heat of the flat top creates incredible caramelization on the vegetables while keeping them snappy. The aroma of toasted sesame oil and sizzling soy sauce is intoxicating, drawing everyone toward the patio. It’s a high-energy, visual way of cooking that results in a gorgeous, piled-high spread of healthy, umami-rich goodness.
Ingredients
- 1 lb Large shrimp, peeled and deveined
- 3 medium Zucchini, sliced into half-moons
- 1 White onion, diced
- 2 tbsp Avocado oil (high smoke point)
- 2 tbsp Soy sauce (or coconut aminos)
- 1 tbsp Toasted sesame oil
- 1 tbsp Sesame seeds
- Fresh ginger, grated
How to make it
- Preheat your Blackstone griddle to medium-high heat and ensure the surface is well-seasoned and clean.
- Spread the avocado oil across the surface using a spatula; you want a thin, shimmering layer of oil.
- Toss the zucchini and onions onto the hottest part of the griddle first, spreading them out into a single layer to ensure every piece makes contact with the heat for that perfect sear.
- Sauté the vegetables for 4-5 minutes, flipping occasionally with long spatulas, until the onions are translucent and the zucchini has dark, caramelized edges.
- Create a clear space on the griddle and add the shrimp; they cook quickly, so they only need about 2 minutes per side until they turn opaque and pink.
- Drizzle the soy sauce, sesame oil, and grated ginger over the entire pile of shrimp and vegetables, tossing them together quickly so the sauce reduces and glazes the food without burning.
- Finish with a generous sprinkle of sesame seeds and immediately scoop the entire mixture onto your serving board for that ‘fresh-off-the-griddle’ appeal.
The Art of the Simple Board
Creating a viral-worthy food board isn’t about perfection; it’s about the abundance and the ease of the experience. When you combine these smoky grilled meats, vibrant salads, and whimsical touches like dandelion fritters, you create a tapestry of flavors that invites people to engage with their food in a whole new way. The ‘Simple Food Board’ is a lifestyle choice that prioritizes connection over complicated plating. So, grab your largest wooden plank, choose a few of these seasonal favorites, and start building. Your guests (and your feed) will thank you.