
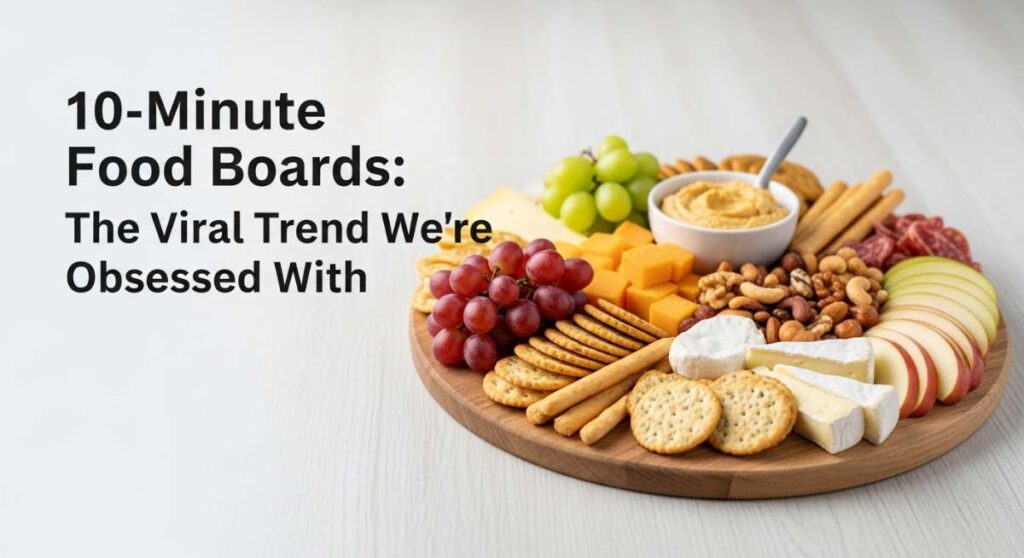
There’s something truly magical about the way food brings people together, but let’s be honest—spending hours in a hot kitchen while your guests are laughing in the living room is so last season. I remember the first time I hosted a summer gathering; I was so stressed about the individual plating that I barely tasted my own wine. That all changed when I discovered the viral ‘Food Board’ trend. It’s not just about cheese anymore; it’s about creating a visual and edible landscape that invites everyone to dig in and stay a while.
The beauty of the 10-minute food board lies in its intentional imperfection. It’s a messy-chic celebration of fresh ingredients, vibrant colors, and textures that pop. Whether you’re throwing a backyard bash or just trying to survive a Tuesday night, these boards are your secret weapon for effortless hosting. They transform simple ingredients into a centerpiece, turning a meal into an experience that feels curated, warm, and deeply personal.
7 Best Cookout Side Dishes to Make

Why we love this
This board is the ultimate crowd-pleaser because it takes those heavy, traditional cookout sides and presents them in a way that feels light, vibrant, and incredibly fresh. Imagine the sweet crunch of grilled corn kernels popping in your mouth, the creamy tang of a chilled coleslaw, and the smoky aroma of charred seasonal vegetables all mingled together on a wooden platter. The contrast between the warm, grilled elements and the crisp, cold salads creates a sensory playground that perfectly captures the essence of a sun-drenched afternoon in the backyard.
Ingredients
- Grilled corn on the cob (husked)
- Classic potato salad with chives
- Vinegar-based coleslaw
- Grilled zucchini and bell pepper strips
- Baked beans in small ramekins
- Watermelon wedges with lime zest
- Honey-butter glazed cornbread squares
How to make it
- Begin by grilling your corn and sliced vegetables over medium-high heat. You want to look for those distinct char marks and a slight softening of the texture; this usually takes about 8-10 minutes, turning frequently to prevent burning.
- Prepare your potato salad and coleslaw in advance, keeping them chilled in the refrigerator until the very last moment to ensure a crisp, refreshing temperature contrast.
- Place the small ramekins of warm baked beans at opposite corners of your board to act as anchors for the layout.
- Arrange the grilled corn in a fan shape near the center, layering the colorful zucchini and peppers alongside them for a burst of green and red.
- Fill the remaining gaps with the watermelon wedges and cornbread, ensuring that the bright pink of the fruit sits next to the golden yellow of the bread for maximum visual impact.
- Finish with a sprinkle of sea salt over the grilled veggies and a squeeze of fresh lime over the entire board to brighten the flavors before serving.
5 Easy Summer Rotel Dip Recipes
Why we love this
There is nothing quite as nostalgic or satisfying as a creamy, cheesy dip, and this Rotel-centric board brings five different flavor profiles into one glorious spread. The aroma of melted cheese infused with spicy green chilies and savory sausage fills the air, creating an instant mood of comfort and celebration. Each dip offers a unique texture—from the smooth, velvety consistency of a classic queso to the chunky, hearty feel of a loaded taco dip—making every chip-dip experience a new adventure for your taste buds.
Ingredients
- Canned Rotel (original, hot, and lime-infused)
- Velveeta or high-quality melting cheese
- Ground spicy sausage (cooked)
- Black beans and corn kernels
- Fresh cilantro and diced jalapeños
- Sour cream and taco seasoning
- Assorted tortilla chips and pita bread
How to make it
- Start by browning your spicy sausage in a skillet over medium heat, breaking it into small crumbles until it’s fully cooked and slightly crispy; drain the excess fat thoroughly to keep the dip from becoming oily.
- For the classic base, melt your cheese in a slow cooker or a heavy-bottomed pot on low heat, stirring constantly to avoid scorching the bottom until the mixture is glossy and smooth.
- Divide the base into five smaller bowls or compartments on your board, then fold in different Rotel varieties and toppings into each—one with just sausage, one with beans and corn, one with extra jalapeños, etc.
- Ensure the heat is kept very low if using a stovetop, or simply serve immediately while the cheese is at its peak ‘stretchy’ consistency.
- Surround the dip bowls with a thick border of multicolored tortilla chips and warm pita points, ensuring no dip is left without a vessel for scooping.
- Garnish the tops with fresh cilantro and a dollop of sour cream to provide a cool finish to the spicy, cheesy richness.
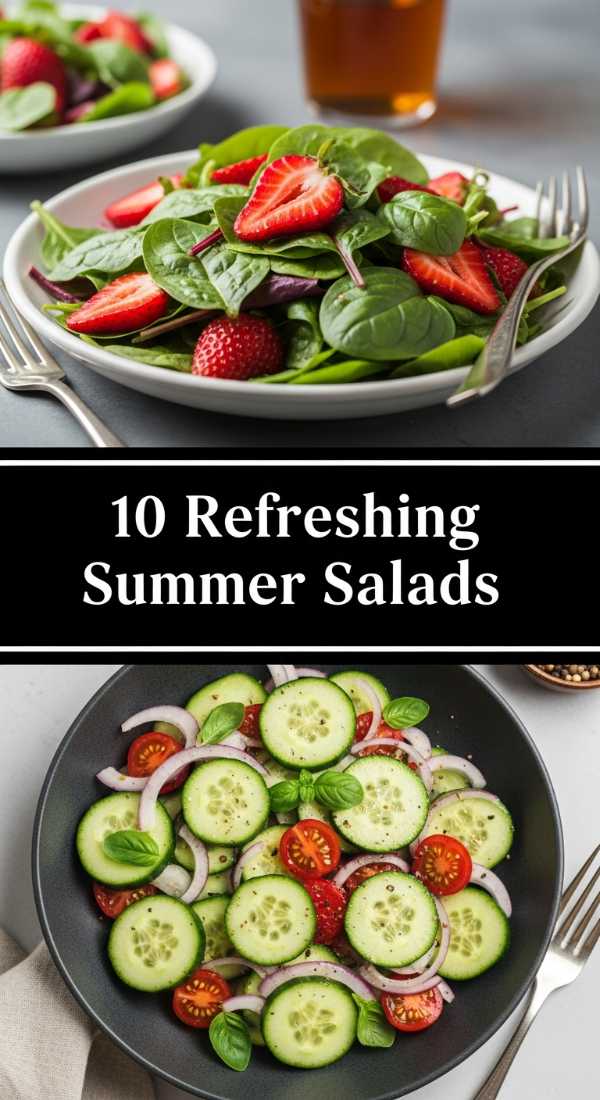
10 Refreshing Summer Salads You’ll Love

Why we love this
This salad board is a total game-changer for those who think salads are boring; it’s a vibrant tapestry of colors and crisp textures that feels like a garden on a platter. The scent of fresh basil and mint wafts up as you assemble it, mixed with the sharp, acidic notes of balsamic and citrus vinaigrettes. Every bite offers a different sensation, from the juicy burst of heirloom tomatoes to the creamy crumble of goat cheese and the crunch of toasted nuts, making it a light yet deeply satisfying meal that leaves you feeling energized.
Ingredients
- Arugula and baby spinach base
- Sliced heirloom tomatoes and cucumbers
- Strawberries and blueberries
- Feta cheese and goat cheese crumbles
- Candied pecans and toasted sunflower seeds
- Prosciutto ribbons and grilled chicken strips
- Assorted dressings (Balsamic, Lemon-Tahini, Poppyseed)
How to make it
- Lay down a lush bed of mixed greens as your canvas, making sure they are bone-dry after washing so the dressings don’t become diluted or soggy.
- Cluster your ingredients in small ‘neighborhoods’ rather than tossing them all together; this allows guests to customize their own salad portions.
- Place the heavier items, like the grilled chicken and prosciutto, in the center of the board to provide a focal point and a sense of abundance.
- Intersperse the fruits and cheeses between the vegetables to create a beautiful contrast of sweet and savory colors and flavors.
- Fill small glass jars with your various dressings and place them around the edges of the board, providing small spoons for easy drizzling.
- Just before serving, give the entire board a light misting of cold water to keep the greens looking perky and vibrant, then top with a final dusting of fresh cracked pepper.
8 Best Picnic Side Dishes Ever

Why we love this
Picnics are all about portability and joy, and this board captures that perfectly with bite-sized delights that are easy to eat with your hands while sitting on a blanket. The earthy scent of crusty baguette slices pairs beautifully with the briny aroma of olives and the sweetness of dried apricots. It feels like a sophisticated European lunch, where the textures range from the snap of a fresh snap pea to the soft, buttery spread of a camembert, creating a relaxed yet elegant dining experience under the open sky.
Ingredients
- Mini caprese skewers (tomato, basil, mozzarella)
- Hard-boiled eggs with paprika
- Assorted olives and marinated artichokes
- Salami and prosciutto rosettes
- Snap peas and baby carrots
- Baguette slices and crackers
- Hummus and spinach-artichoke dip
How to make it
- Thread your mini caprese skewers by alternating one cherry tomato, a folded basil leaf, and a mozzarella pearl; drizzle with a thick balsamic glaze for a professional finish.
- Prepare your hard-boiled eggs by placing them in boiling water for exactly 9 minutes, then immediately transferring them to an ice bath to ensure easy peeling and a perfect, non-chalky yolk.
- Roll your deli meats into ‘rosettes’ by folding them in half and rolling them tightly, then tucking them into small spaces on the board to add height and texture.
- Place your dips in the center of the board to act as the primary ‘landing zone’ for the vegetables and crackers.
- Arrange the crackers and baguette slices in a winding ‘river’ across the board, which naturally guides the eye and the hand from one side to the other.
- Tuck in the olives, nuts, and dried fruits last to fill any remaining small gaps, ensuring the board looks overflowing and bountiful.
6 Quick Spring Dinner Recipes Today

Why we love this
Spring is the season of renewal, and this dinner board reflects that with light, lean proteins and the bright, grassy flavors of early-season produce. The aroma of lemon-garlic roasted salmon and steamed asparagus is incredibly clean and inviting, signaling a shift away from heavy winter stews. The texture of flaky fish against the tender-crisp bite of spring peas and radishes creates a meal that feels both sophisticated and incredibly nourishing, making it the perfect way to celebrate the longer, brighter days.
Ingredients
- Roasted salmon fillets with lemon
- Steamed asparagus spears
- Radishes with sea salt and butter
- Quinoa or couscous pilaf
- Smashed peas with mint
- Lemon wedges and dill sprigs
- Soft dinner rolls
How to make it
- Preheat your oven to 400°F (200°C) and roast your salmon fillets for 12-15 minutes until they are just opaque in the center and flake easily with a fork; avoid overcooking to maintain the moist, buttery texture.
- Blanch your asparagus in boiling salted water for 2-3 minutes, then immediately shock them in ice water to lock in that vibrant, bright green color and snappy bite.
- Prepare your grain pilaf on the stovetop, ensuring it is fluffy and well-seasoned with herbs like parsley and chives before mounding it in a large bowl on the board.
- Place the salmon fillets prominently on one side of the board, garnishing them generously with fresh dill and lemon slices to enhance the citrus notes.
- Add the radishes and butter in a small dish, providing a traditional and crunchy spring palate cleanser.
- Fill the rest of the space with the asparagus and rolls, ensuring the board looks balanced with a mix of warm and room-temperature elements.
7 Light Summer Pasta Recipes Now

Why we love this
Pasta doesn’t have to be heavy, and this board proves it by showcasing light, oil-based, and herb-forward noodles that are perfect for a warm evening. The scent of toasted garlic, spicy chili flakes, and fresh lemon zest is absolutely intoxicating and instantly whets the appetite. From the silky strands of spaghetti aglio e olio to the chewy texture of penne with pesto, this board offers a variety of mouthfeels and flavors that are bright, zesty, and effortlessly chic.
Ingredients
- Spaghetti with garlic and olive oil
- Penne with basil pesto
- Fusilli with roasted cherry tomatoes
- Grated Parmesan cheese
- Red pepper flakes and toasted pine nuts
- Fresh arugula and basil leaves
- Garlic knots or focaccia bread
How to make it
- Cook your pasta varieties in large pots of heavily salted water until they are ‘al dente’—firm to the bite—as they will continue to soften slightly when tossed with their respective sauces.
- For the aglio e olio, sauté thinly sliced garlic in high-quality extra virgin olive oil over low heat until it is golden and fragrant, but be careful not to let it brown or it will turn bitter.
- Toss the pasta with their sauces and arrange them in distinct mounds or bowls on your board to keep the flavors from bleeding into one another.
- Scatter the roasted cherry tomatoes over the fusilli, ensuring their juices create a natural, light sauce for the pasta to soak up.
- Place bowls of Parmesan and chili flakes in the center for guests to customize their heat and salt levels.
- Surround the pasta with warm focaccia bread and fresh herbs, which can be torn and added to any of the dishes for an extra layer of freshness.
5 Best Chilled Summer Coffee Drinks

Why we love this
Forget the coffee shop line; this board is a caffeine lover’s dream, offering a customizable DIY iced coffee bar that feels incredibly indulgent. The rich, bold aroma of cold brew coffee mixes with the sweet scents of vanilla and caramel, creating an atmosphere of a cozy morning cafe. The visual of dark coffee swirling with creamy milk and the sound of ice clinking in glasses makes this an interactive experience that is as refreshing as it is delicious.
Ingredients
- Concentrated cold brew coffee
- Chilled espresso shots
- Whole milk, oat milk, and almond milk
- Vanilla and caramel syrups
- Whipped cream and cocoa powder
- Cinnamon sticks and chocolate shavings
- Plenty of ice cubes
How to make it
- Prepare your cold brew coffee at least 12 hours in advance by steeping coarse grounds in cold water; this slow process yields a smooth, low-acid flavor profile that is perfect for chilling.
- Fill several glass carafes with your different coffee bases and various milk options, labeling them clearly for your guests.
- Place a large bucket or bowl filled with fresh ice in the center of the board to ensure every drink stays frosty throughout the gathering.
- Arrange small jars of syrups and spices around the carafes, providing long-handled spoons for thorough mixing and frothing.
- Set out a bowl of whipped cream and a grater for the chocolate shavings to allow for a decadent, cafe-style topping.
- Include a stack of stylish glasses and sustainable straws, making the board a one-stop shop for the ultimate summer pick-me-up.
9 Delicious Easy Summer Dessert Ideas

Why we love this
This dessert board is a celebration of summer’s bounty, focusing on juicy fruits and light, airy treats that won’t weigh you down after a meal. The sweet, floral scent of ripe peaches and strawberries is simply irresistible, especially when paired with the rich, deep aroma of dark chocolate. The textures are a delight—from the crisp snap of a shortbread cookie to the soft, pillowy fluff of a marshmallow and the refreshing burst of a cold berry—making it a whimsical and satisfying end to any day.
Ingredients
- Fresh strawberries, raspberries, and blueberries
- Sliced peaches and plums
- Shortbread cookies and graham crackers
- Dark chocolate squares and white chocolate dip
- Mini marshmallows and meringues
- Honey or agave nectar for drizzling
- Fresh mint for garnish
How to make it
- Wash and thoroughly dry all your fruit; moisture is the enemy of a long-lasting board as it can make cookies soggy and chocolate seize.
- Place a bowl of melted chocolate or a high-quality chocolate dip in the center of the board as a focal point for dipping.
- Arrange the larger fruits, like peach slices and strawberries, in clusters, then use the smaller berries to fill in any gaps between the cookies and crackers.
- Stack the shortbread and graham crackers in neat rows or fans to create a sense of order amidst the organic shapes of the fruit.
- Scatter the meringues and marshmallows throughout the board for pops of bright white that contrast beautifully with the dark chocolate and vibrant berries.
- Drizzle the fruit lightly with honey and add a few sprigs of mint for a professional, ‘magazine-ready’ finish that enhances the natural sweetness.
10 Ideas For Comida Rica Tonight
Why we love this
This board is all about ‘Comida Rica’—rich, flavorful, and heart-warming food that feels like a hug from the inside. The air is thick with the savory scents of cumin, garlic, and slow-roasted meats, instantly making everyone feel at home. It’s a texture-rich experience where you can mix the crunch of a toasted tortilla with the creaminess of perfectly ripe avocado and the zing of a fresh salsa verde, creating a communal dining experience that is both soul-satisfying and fun.
Ingredients
- Carne asada or shredded carnitas
- Warm corn and flour tortillas
- Guacamole and pico de gallo
- Pickled red onions and jalapeños
- Queso fresco and sour cream
- Lime wedges and fresh cilantro
- Mexican street corn (Elote) off the cob
How to make it
- Marinate your meat in a mixture of citrus juice, garlic, and spices for at least 4 hours before searing it on a very hot griddle to achieve those crispy, flavorful edges.
- Keep your tortillas warm by wrapping them in a clean kitchen towel or using a tortilla warmer, placing them on the board only when you are ready to serve.
- Prepare your guacamole by mashing ripe avocados with lime and salt, leaving it slightly chunky for a more authentic and satisfying mouthfeel.
- Arrange the meat in the center of the board, surrounded by small bowls of the various toppings like pickled onions, salsa, and cheese.
- Place the Elote in a central bowl, topped with a dusting of chili powder and a crumble of cheese for a salty, sweet, and spicy side.
- Fill every remaining inch of the board with lime wedges and cilantro, encouraging guests to squeeze and sprinkle their way to the perfect taco.
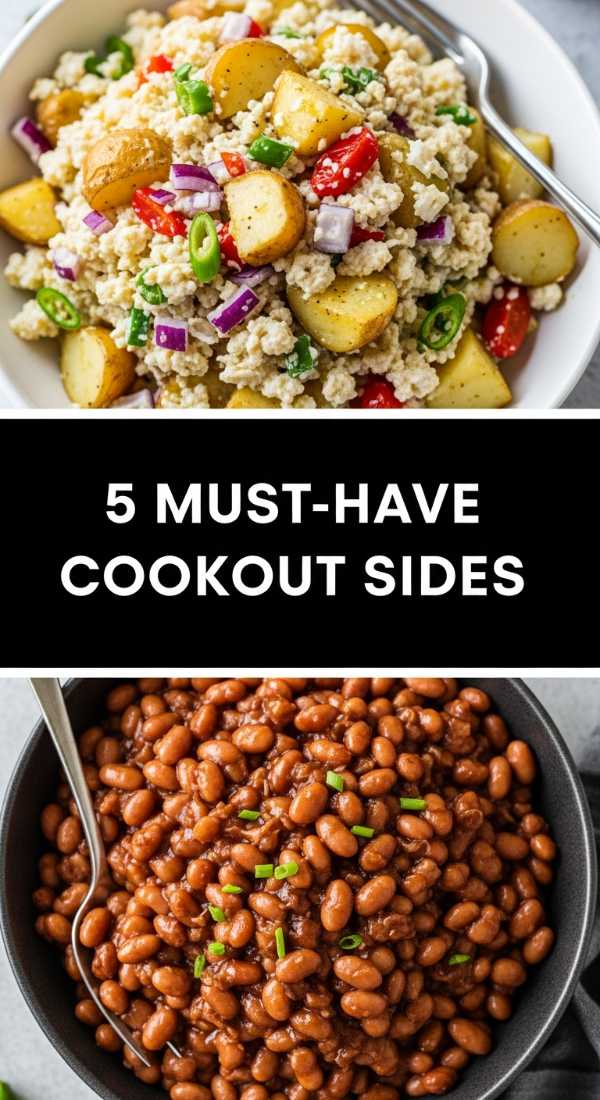
5 Must-Have Summer Cookout Sides
[IMAGE_10]
Why we love this
This board focuses on the essential, non-negotiable sides that make a cookout feel complete, but with an elevated, modern twist. The smokiness of grilled halloumi cheese meets the sweet, charred flavor of pineapple, creating a scent profile that is unmistakably ‘summer.’ You get the satisfying crunch of a gourmet pasta salad and the juicy, cooling effect of cucumber slices, making this board the perfect companion to anything coming off the grill, from burgers to briskets.
Ingredients
- Grilled halloumi cheese slices
- Charred pineapple rings
- Orzo pasta salad with feta and spinach
- Sliced cucumbers with tajin
- Corn chips with mango salsa
- Grilled avocado halves
- Pickled okra or green beans
How to make it
- Grill the halloumi over high heat for only 1-2 minutes per side; you want to see deep grill marks while the inside remains soft and squeaky.
- Prepare your orzo pasta salad by tossing the cooked grains with a lemon vinaigrette while they are still warm, allowing them to absorb the maximum amount of flavor.
- Slice your pineapple into thick rings and grill them until the natural sugars caramelize into a deep, golden brown.
- Place the orzo salad in a large bowl in one corner and the mango salsa in another, providing a balance of hearty and light elements.
- Arrange the halloumi and pineapple in an alternating pattern to create a visually striking ‘caterpillar’ effect across the board.
- Fill the gaps with the cucumber slices, avocado halves, and pickled vegetables, ensuring a mix of fresh, creamy, and acidic notes in every bite.
The Art of the Board: Why Less is More
As we wrap up our journey through the world of 10-minute food boards, remember that the most important ingredient is your own creativity. There are no strict rules here—only guidelines to help you create something that looks as good as it tastes. The trend of the food board is a reminder that we don’t need fancy plating or complicated recipes to make a meal feel special. By focusing on quality ingredients and a thoughtful layout, you can turn a simple lunch or dinner into a viral-worthy event that your friends and family will be talking about for weeks.
Frequently Asked Questions
How do I keep the food from getting cold on a board?
The trick is to use ‘anchors’ of warm food in insulated bowls or ramekins, and to assemble the board quickly right before serving. You can also focus on boards that feature room-temperature or chilled items, which are much more forgiving for long social gatherings.
What is the best way to clean a wooden food board?
Always hand-wash your wooden boards with mild soap and warm water immediately after use. Never soak them or put them in the dishwasher, as this can cause the wood to warp or crack. Regularly apply a food-grade mineral oil to keep the wood hydrated and looking new.
Can I make these boards ahead of time?
Most components can be prepped in advance, such as washing fruit, making dips, or cooking meats. However, it is best to do the final assembly about 10-15 minutes before guests arrive to ensure everything stays fresh, crisp, and visually appealing.