
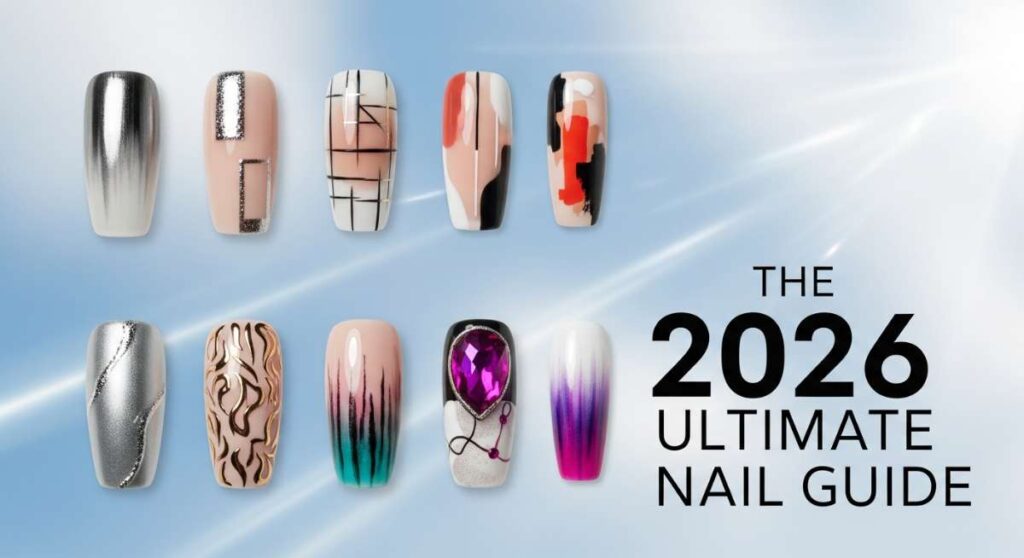
10 Mani Looks Set to Dominate: The 2026 Ultimate Nail Guide
Hi my sweet loves! As we step into the beautiful energy of 2026, I’ve been thinking so much about how our nails aren’t just an accessory—they’re a soft whisper of our soul’s story, a tiny canvas for our daily joy. There is something so healing about sitting down, taking a deep breath, and giving our hands the love they deserve. Whether you’re celebrating a massive milestone or just want to feel the glow of a sunset on your fingertips, this year is all about textures that speak and colors that sing.
I’ve spent the last few months scouting the dreamiest trends, from the high-fashion runways to the quiet corners of my favorite cozy cafes, to bring you a guide that feels like a warm hug for your aesthetic. We’re moving toward a blend of nostalgic patterns and futuristic finishes that feel both grounded and ethereal. So, grab your favorite matcha latte, curl up in your favorite nook, and let’s dive into the looks that are going to define our best selves this year.
The Graduated Glow: 5 Simple Steps for Graduation Nails

Why to love this Design:
Graduation is such a tender transition, my loves. You want a look that says ‘I did it’ while remaining timeless in those photos you’ll cherish forever. This design blends classic sophistication with a hint of 2026 holographic shimmer to represent your bright future.
Essential Elements:
- Sheer milky white base
- Micro-fine holographic glitter
- Tapered almond shape
- High-gloss top coat
How to Prepare:
- Cleanse nails thoroughly to ensure a long-lasting finish for the big day.
- Apply two thin coats of a milky nude or sheer white polish.
- Using a sponge, lightly tap holographic shimmer onto the tips for a soft gradient.
- Seal with a ‘glass-finish’ top coat to catch the stage lights.
- Massage cuticle oil into your skin for a healthy, hydrated glow in close-up diploma shots.
Budget Range
- Drugstore Luxe: Essie ‘Marshmallow’ ($10)
- Sparkle: Holo Taco ‘Cosmic Unicorn Skin’ ($13)
- Total DIY: Under $25
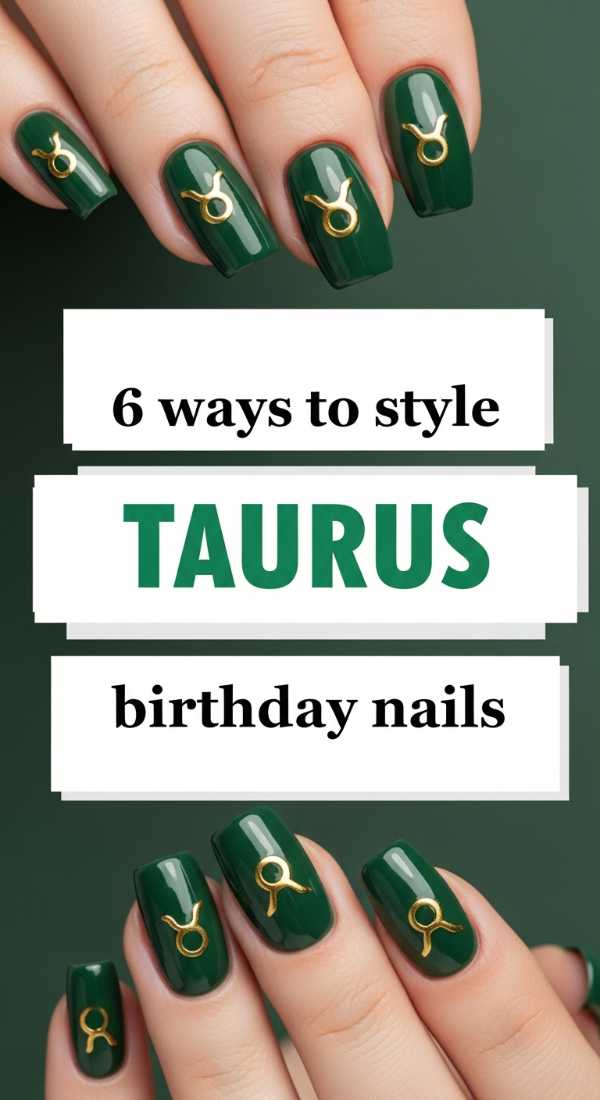
Earth Goddess Energy: 6 Ways to Style Taurus Birthday Nails
Why to love this Design:
For my Taurus queens, 2026 is all about luxury and grounding. These nails are a tribute to your steadfast heart and your love for the finer things. We’re talking rich, mossy greens and textures that feel like a walk through a sun-drenched forest.
Essential Elements:
- Deep forest green cream polish
- Gold leaf accents
- Matte and gloss contrast
- Pressed flower decals
- Short, chic square shape
- Tortoiseshell accents
How to Prepare:
- Start with a strengthening base coat to honor the Taurus ‘sturdy’ nature.
- Apply your primary green shade to three fingers.
- On the accent nails, use a tweezer to apply tiny flakes of gold leaf while the polish is tacky.
- For a modern twist, top the green nails with a matte finish.
- Add a tiny pressed daisy for that earthy, floral touch.
- Finish with a rich hand cream to keep those hands soft for birthday hugs.
Budget Range
- Main Color: OPI ‘Rated Pea-G’ ($11)
- Detail: Gold Leaf Kit from Amazon ($8)
- Total DIY: Under $20
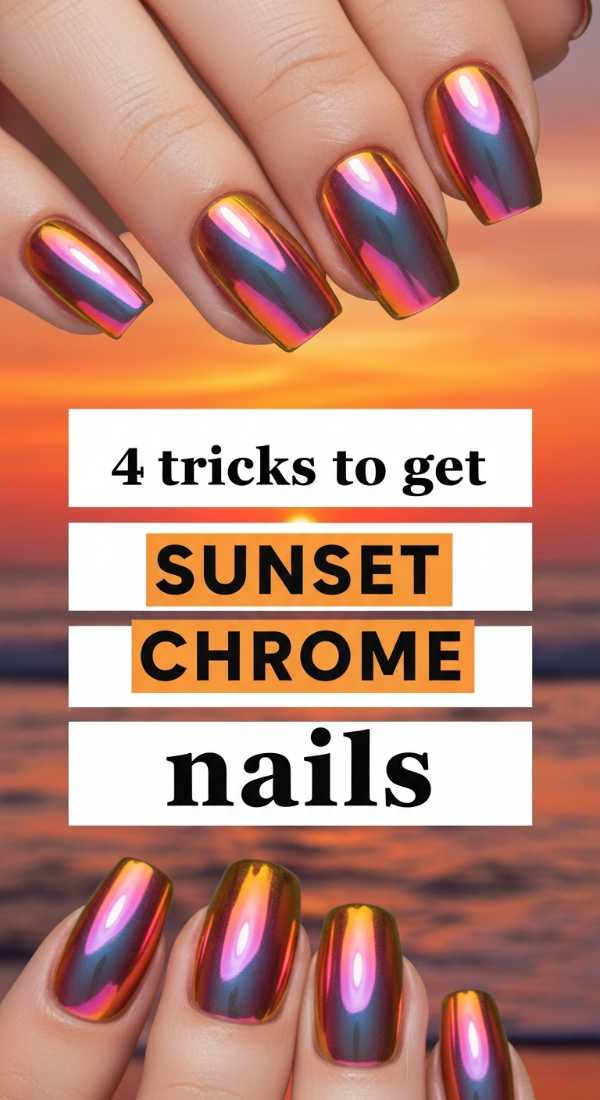
Dusk on Your Fingertips: 4 Tricks to Get Sunset Chrome Nails
Why to love this Design:
Imagine that magical moment when the sun dips below the horizon and the sky turns into a velvet painting. Sunset chrome is the ‘it’ look of 2026 because it captures movement and light so beautifully. It’s perfect for the dreamer who wants their hands to glow like a summer evening.
Essential Elements:
- Peach or coral base color
- Yellow-to-purple iridescent chrome powder
- No-wipe top coat (essential for chrome)
- Silicone applicator tool
How to Prepare:
- Apply a vibrant peach base—the brighter the base, the more the chrome will ‘pop.’
- Cure or dry your no-wipe top coat until it’s perfectly smooth but still slightly receptive to friction.
- Use a silicone tool to rub the chrome powder in circular motions until a mirror-like finish appears.
- Double-seal the edges with a second layer of top coat to prevent the chrome from chipping.
Budget Range
- Base: Orly ‘Kandy Korals’ ($12)
- Chrome: Artdone Chrome Powder Set ($15)
- Total DIY: Under $30
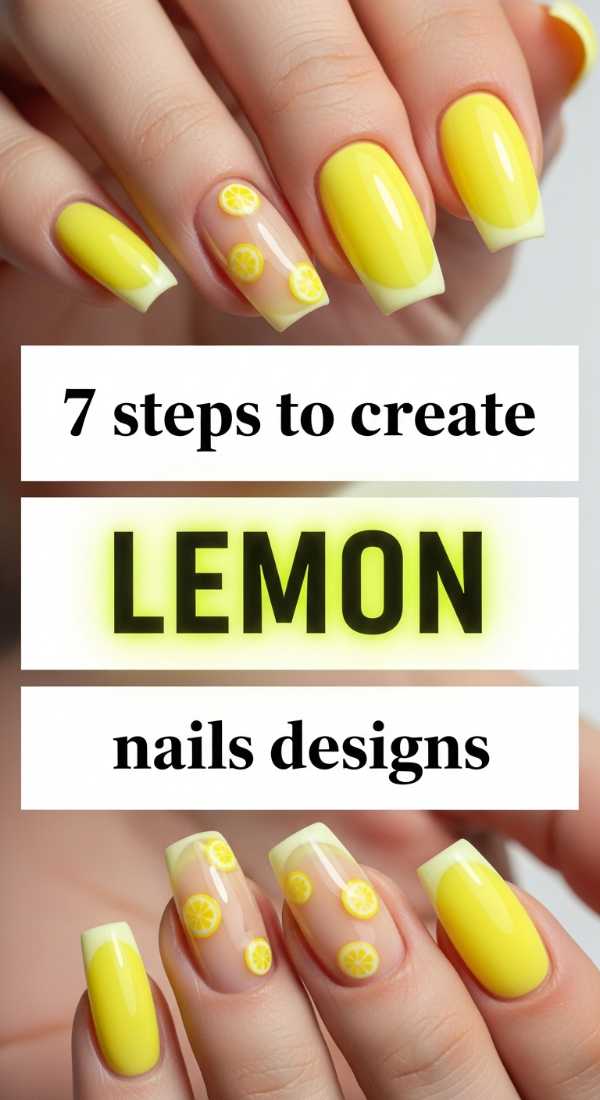
Zesty & Sweet: 7 Steps to Create Lemon Nails Designs
Why to love this Design:
There is nothing more refreshing than a cold glass of lemonade on a hot July afternoon. These lemon designs are pure sunshine and joy. They add a playful, ‘main character’ energy to your summer outfits that is absolutely infectious.
Essential Elements:
- Bright canary yellow polish
- White detail liner
- Clear 3D builder gel (for ‘dew drops’)
- Leaf green accent color
How to Prepare:
- Paint your base in a soft cream or clear to let the lemons stand out.
- Dot two small yellow circles near each other to form the lemon body.
- Use a fine brush to add a tiny white ‘rind’ detail.
- Add a single green leaf using a toothpick.
- The secret: Add tiny dots of clear builder gel on top of the lemons to look like fresh water droplets.
- Cure under a lamp or let air dry completely.
- Apply a citrus-scented cuticle oil to complete the sensory experience.
Budget Range
- Yellow: Sally Hansen ‘Sun-Kissed’ ($6)
- Detail: 3D Gelly ($12)
- Total DIY: Under $20
Shadows & Sunshine: 3 Secrets for Perfect Summer Goth Nails

Why to love this Design:
Who says dark colors are only for winter? My ‘alt’ loves, this one is for you. Summer Goth is about taking those moody vibes and making them breathable. It’s edgy, sophisticated, and surprisingly light when done with the right sheer textures.
Essential Elements:
- Sheer ‘black jelly’ polish
- Star and moon decals
- High-gloss finish
How to Prepare:
- The Secret of Sheer: Use a jelly black polish (or mix black with clear) so the nail looks like dark stained glass rather than heavy ink.
- The Secret of Minimalist Bling: Add a single silver star to only the thumb and ring finger to keep it airy.
- The Secret of Shape: Keep the nails long and stiletto-shaped to elongate the fingers and emphasize the ‘witchy’ summer aesthetic.
Budget Range
- Jelly Polish: Cirque Colors ‘Marsala Jelly’ or ‘Slate’ ($12)
- Decals: Deco Miami Stars ($8)
- Total DIY: Under $20
Ocean Meets Earth: 8 Tips to Match Teal and Coral Nails
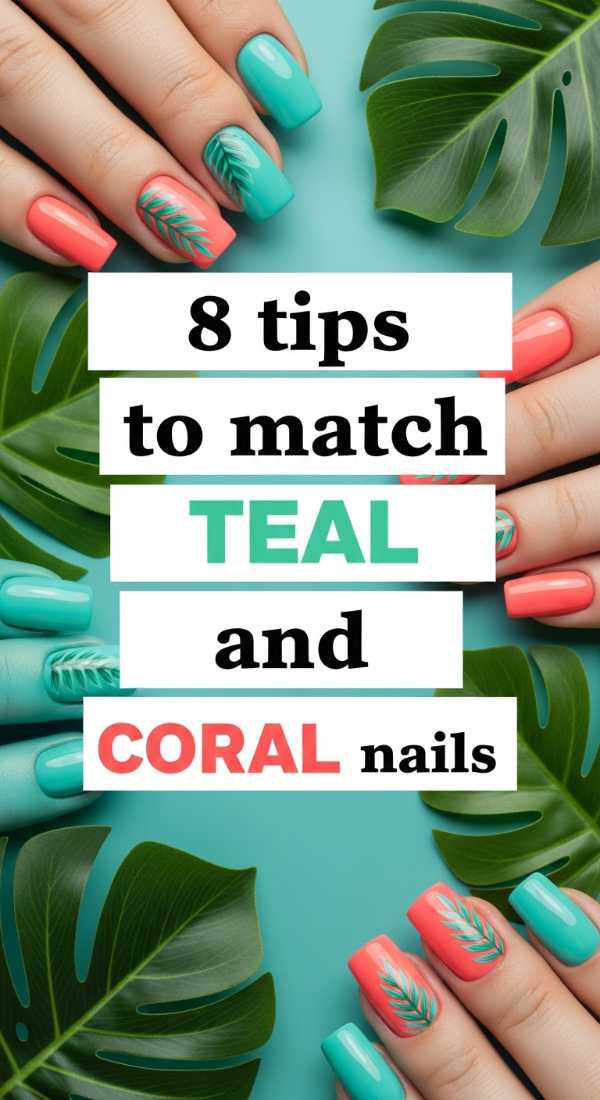
Why to love this Design:
Teal and Coral are the ultimate 2026 power couple. One represents the depth of the sea, the other the warmth of the reef. Together, they create a balanced, vibrant look that screams ‘vacation mode’ even if you’re just at your desk.
Essential Elements:
- Deep teal cream
- Electric coral neon
- Geometric divider tape
- Gold stud accents
How to Prepare:
- Alternate colors on different fingers for a ‘skittles’ mani look.
- Use striping tape to create a half-and-half nail on the middle finger.
- Apply the teal first, let dry, then tape and apply the coral.
- Keep the coral near the tips to brighten the overall look of the hand.
- Use a matte top coat on the teal and a glossy one on the coral for a 2026 texture play.
- Add a gold stud at the base of the teal nails for a Mediterranean feel.
- Keep nail length medium—too long and the colors become overwhelming.
- Finish with a cooling aloe-based hand gel.
Budget Range
- Teal: Lights Lacquer ‘Paper Snow’ ($13)
- Coral: Zoya ‘Elodie’ ($12)
- Total DIY: Under $25
Retro Revival: 5 Steps for Trendy Pucci Nails
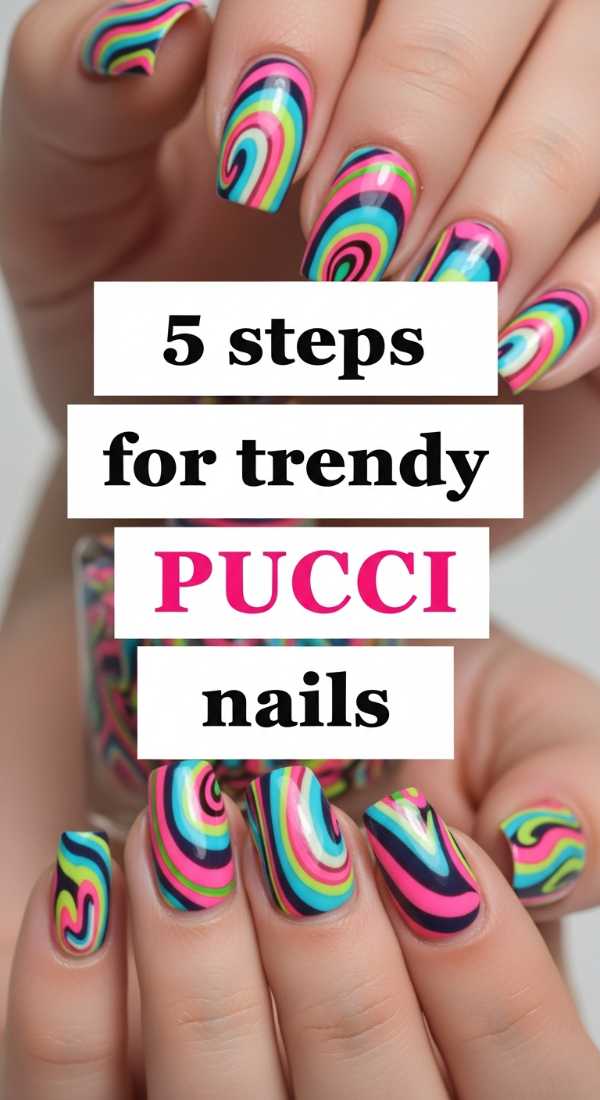
Why to love this Design:
Retro prints are making a massive comeback, and the Pucci-inspired swirl is the queen of them all. It feels like 1970s Italian glamour met a 2026 tech-color palette. It’s artistic, bold, and surprisingly easy to customize to your favorite colors.
Essential Elements:
- 3-4 Contrasting colors (Pink, Orange, Blue, White)
- Long-haired detailing brush
- Steady hand or a ‘swirl’ stencil
How to Prepare:
- Apply a clean white base to make the colors pop.
- Using your thinnest brush, draw elongated ‘S’ shapes in your first color.
- Nestle the second color right against the first, following the curve.
- Fill in the remaining gaps with your third and fourth colors, ensuring no white is showing.
- Outline a few of the shapes in black or gold if you want that true vintage scarf look.
Budget Range
- Brush Set: Winstonia Detail Brushes ($10)
- Polish Set: Beetles Pastel Collection ($20)
- Total DIY: Under $30
Electric Jungle: 4 Ways to Rock Neon Cheetah Print Nails
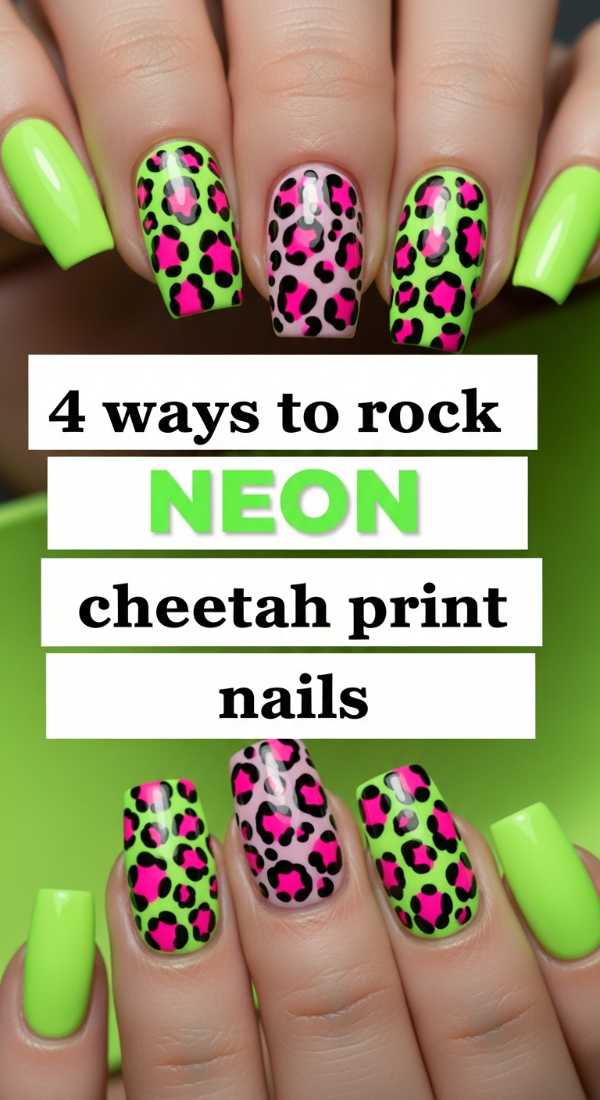
Why to love this Design:
Animal print is a neutral in my book, but for 2026, we’re giving it an electric heartbeat. Neon Cheetah is for my loves who aren’t afraid to be seen. It’s fierce, fun, and looks incredible under the summer sun or club lights.
Essential Elements:
- Neon pink or lime green base
- Chocolate brown or black for the spots
- Iridescent center dot
- Short round nail shape
How to Prepare:
- Apply two coats of your brightest neon.
- Use a dotting tool to make irregular, ‘C’ shaped blobs in black.
- Inside each ‘C’, place a tiny dot of a different neon color or a bit of glitter.
- Don’t aim for perfection—animal print looks better when it’s a bit organic and ‘messy.’
Budget Range
- Neon: Color Club Neon Collection ($10)
- Dotting Tool: DIY (use a bobby pin!) ($0)
- Total DIY: Under $15
Heavenly Hues: 6 Steps to Achieve Sunset Aura Nails
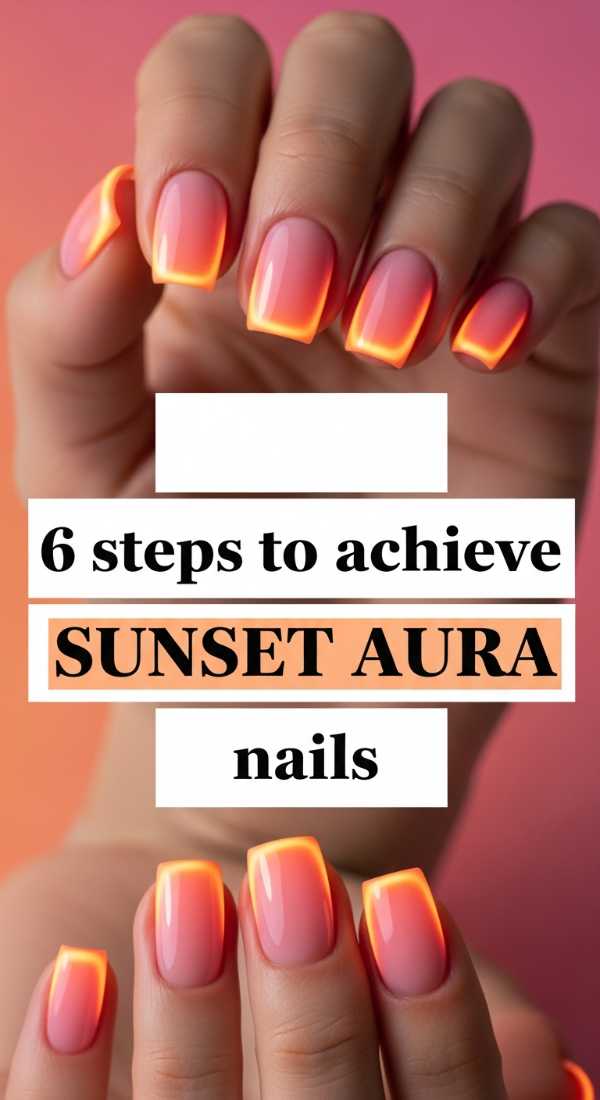
Why to love this Design:
Aura nails are all about capturing your inner vibration. By using sunset colors—soft pinks, oranges, and deep purples—you create a ‘glow from within’ effect on your nails. It’s incredibly soothing to look at and feels very ‘spiritual chic.’
Essential Elements:
- Makeup sponge
- Pale pink base
- Orange and Purple eyeshadow or pigment
- Buffer block
How to Prepare:
- Apply your pale pink base and let it dry completely.
- Lightly buff the center of the nail to create a ‘grip’ for the pigment.
- Using a small eyeshadow brush, dab orange pigment in the very center.
- Blend a ring of purple around the orange, fading it out toward the edges.
- Gently wipe away excess dust with a fan brush.
- Apply a thick layer of top coat—be careful not to ‘drag’ the brush, or you’ll smear the aura!
Budget Range
- Base: OPI ‘Bubble Bath’ ($11)
- Pigment: Old eyeshadow palette ($0)
- Total DIY: Under $15
The Perfect Pair: 2 Easy Rules for Hands and Toes Matching
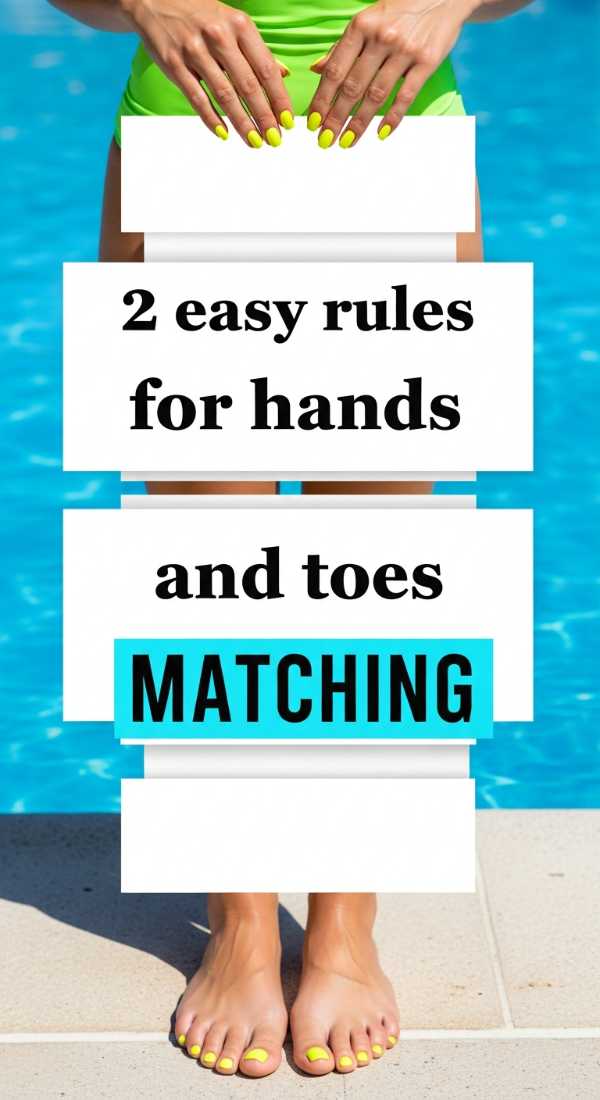
Why to love this Design:
There is a quiet confidence that comes from a perfectly coordinated mani-pedi. In 2026, we are moving away from ‘identical’ and moving toward ‘complementary.’ It makes you look polished without looking like you tried too hard.
Essential Elements:
- A ‘Primary’ color for hands
- A ‘Coordinating’ texture or tone for toes
How to Prepare:
- Rule 1: The ‘Tone Shift.’ If your hands are a vibrant teal, choose a softer mint or a deeper navy for your toes. It stays in the family but adds depth.
- Rule 2: The ‘Texture Flip.’ If your fingernails are a busy Pucci print, pick one single solid color from that print for your toes. It ties the whole look together with a clean finish.
Budget Range
- Standard Polish Duo: $15 – $25
Embrace Your Inner Glow
As we navigate this beautiful year together, I hope these designs remind you to take a moment for yourself. Your nails are a celebration of your unique journey, a way to paint your moods onto the world. Whether you choose the grounding energy of the Taurus earth or the vibrant shout of the Neon Cheetah, do it with love and a soft heart. You deserve to feel beautiful, right down to your fingertips. I can’t wait to see which look you choose, my loves!